audio NISSAN VERSA HATCHBACK 2012 1.G Quick Reference Guide
[x] Cancel search | Manufacturer: NISSAN, Model Year: 2012, Model line: VERSA HATCHBACK, Model: NISSAN VERSA HATCHBACK 2012 1.GPages: 16, PDF Size: 1.55 MB
Page 2 of 16
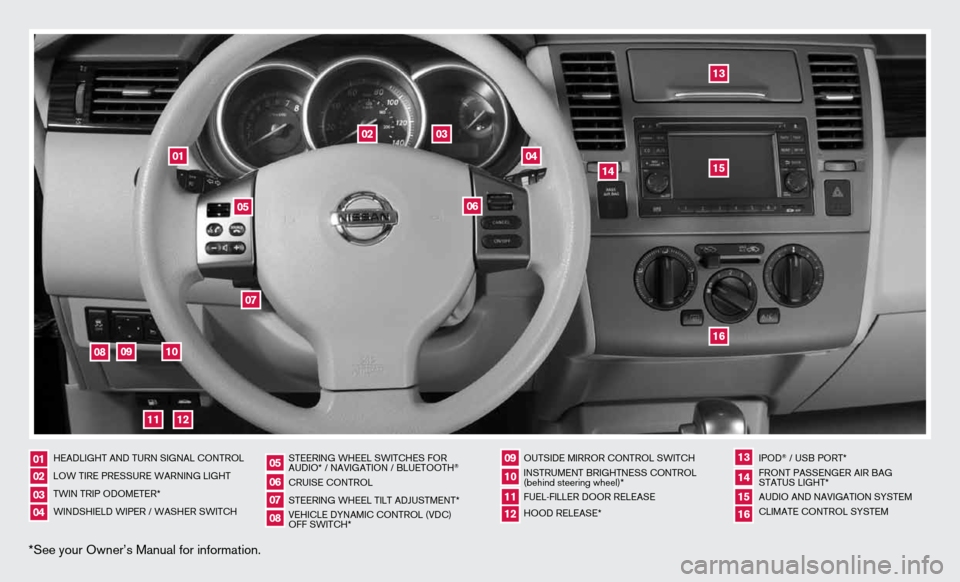
*See your Owner’s Manual for information.
heAdLiGht And tuRn SiGnAL cOntROL
LOW tiRe PReSSuRe WARninG LiGht
tWin tRiP OdOMeteR*
WindShieLd WiPeR / WASheR SWitch SteeRinG WheeL SWitcheS fOR
AudiO* / nAViGAtiOn / bLuetOOth
®
cRuiSe cOntROL
SteeRinG WheeL tiLt AdJuStMent*
VehicLe dYnAMic cOntROL (Vdc)
Off SWitch* OutSide MiRROR cOntROL SWitch
inStRuMent bRiGhtneSS cOntROL
(behind steering wheel)*
fueL-fiLLeR dOOR ReLeASe
hOOd ReLeASe*
iPOd
® / uSb PORt*
fROnt PASSenGeR AiR bAG
StAtuS LiGht*
AudiO And nAViGAtiOn SYSteM
cLiMAte cOntROL SYSteM
01020304
05
09
13
06
10
141516
07
11
08
12
02
03
01
04
05
09
15
06
12
16
07
13
08
14
11
10
Page 3 of 16
tAbLe Of cOntentS
• A cellular telephone should not be used for any purpose while
driving so full attention may be given to vehicle operation.
• Always wear your seat belt.
• Supplemental air bags do not replace proper seat belt usage.
• Children 12 and under should always ride in the rear seat
properly secured in child restraints or seat belts according to
their age and weight.
• Do not drink and drive.
for more information, refer to the “Safety — Seats, seat belts and
supplemental restraint system (section 1)”,
“Display screen, heater,
air conditioner, audio and phone systems (section 4)” and “Starting
and driving (section 5)” of your Owner’s Manual.
Additional information about your vehicle is also
available in your Owner’s Manual, navigation System Owner’s Manual and at www.nissanusa.com.
to view detailed
instructional videos, go to
www.nissanownersinfo.mobi/2012/versahatchback or snap this barcode with an appropriate barcode reader.
E SSE ntial i nformation
Loose Fuel Cap . . . . . . . . . . . . . . . . . . . . . . . . . . . . . . . . . . . .\
. . . . . . . . . . . . 2
tire Pressure Monitoring System (tPMS) ...........................2
fir St DrivE fEatur ES
niSSAn intelligent key
® System (if so equipped) .................... 3
Rear Hatch Release (NISSAN Intelligent Key® models only) ........... 3
Seat Adjustments .............................................. 4
Outside Mirror Control Switch .................................... 4
Starting/Stopping the Engine ..................................... 4
headlight control .............................................. 5
Windshield Wiper/Washer Switch ................................ 6
Climate Control (if so equipped) .................................. 6
fM/AM/XM
® Satellite Radio with CD Player (if so equipped) ...........8
Cruise Control (if so equipped) ................................... 9
fuel-filler door ................................................. 9
Sy StEm GuiDE
bluetooth
® Hands-free Phone System (if so equipped) ...............10
Navigation System (if so equipped) ............................... 12
Page 9 of 16
To view detailed instructional videos regarding these and other features, please go to www.nissanownersinfo.mobi.7
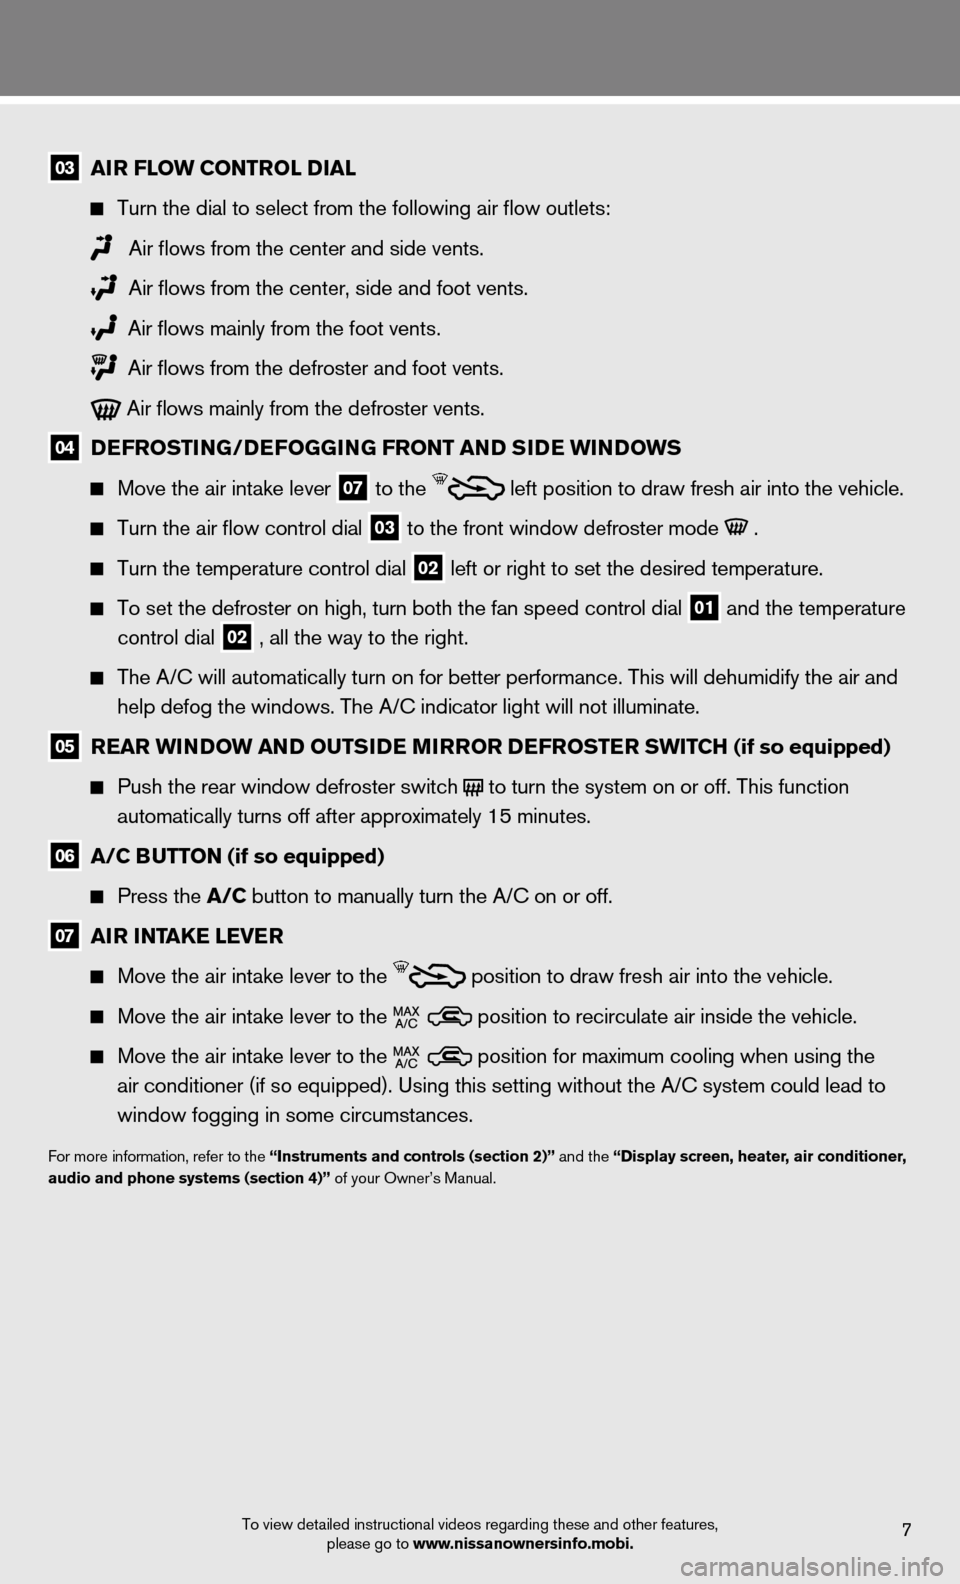
03 air floW Control D ial
Turn the dial to select from the following air flow outlets:
Air flows from the center and side vents.
Air flows from the center, side and foot vents.
Air flows mainly from the foot vents.
Air flows from the defroster and foot vents.
Air flows mainly from the defroster vents.
04 DE
froStin G/DEfoGG inG front an D SiDE Win Do WS
Move the air intake lever
07 to the
left position to draw fresh air into the vehicle.
Turn the air flow control dial
03 to the front window defroster mode .
Turn the temperature control dial
02 left or right to set the desired temperature.
To set the defroster on high, turn both the fan speed control dial
01 and the temperature
control dial
02 , all the way to the right.
The A/C will automatically turn on for better performance. this will dehumidify the air and
help defog the windows. The A/C indicator light will not illuminate.
05 rEar Win Do W an D outS iDE mirror DE froStEr SWitCH (if so equipped)
Push the rear window defroster switch
to turn the system on or off. This function
automatically turns off after approximately 15 minutes.
06 a/C Button (if so equipped)
Press the a/C button to manually turn the A/c on or off.
07 air intaKE lEvE r
Move the air intake lever to the
position to draw fresh air into the vehicle.
Move the air intake lever to the position to recirculate air inside the vehicle.
Move the air intake lever to the position for maximum cooling when using the
air conditioner (if so equipped). Using this setting without the A/C system could lead to
window fogging in some circumstances.
for more information, refer to the “instruments and controls (section 2)” and the “Display screen, heater, air conditioner,
audio and phone systems (section 4)” of your Owner’s Manual.
Page 10 of 16
To view detailed instructional videos regarding these and other features, please go to www.nissanownersinfo.mobi.8
first drive features
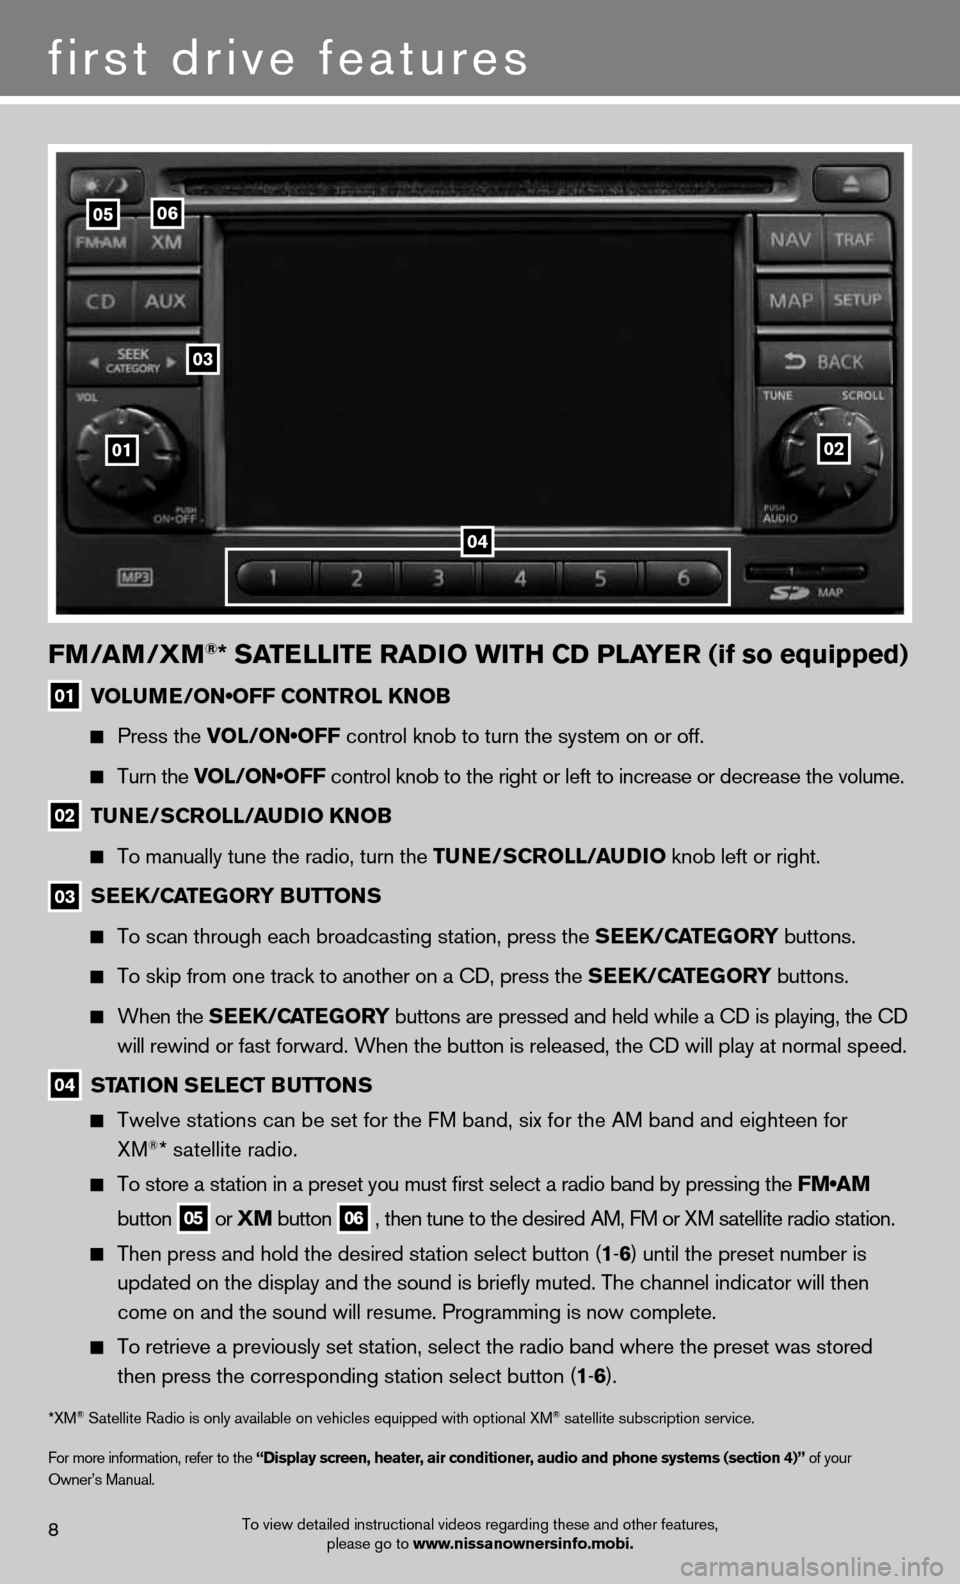
fm/am /Xm®* SatE llitE raD io WitH CD PlayE r (if so equipped)
01 VOLUME/ON•OFF CONTROL KNOB
Press the VOL/ON•OFF control knob to turn the system on or off.
turn the VOL/ON•OFF control knob to the right or left to increase or decrease the volume.
02 tun
E/SCroll/ auDio K noB
to manually tune the radio, turn the tun E/SCroll/auDio knob left or right.
03
SEEK/C
atEGory B utton S
To scan through each broadcasting station, press the SEEK/C atEGory buttons.
To skip from one track to another on a CD, press the SEEK/C atEGory buttons.
When the SEEK/C atEGory buttons are pressed and held while a CD is playing, the CD
will rewind or fast forward. When the button is released, the CD will play at normal speed.
04 Station SE
lECt Button S
Twelve stations can be set for the FM band, six for the AM band and eighteen for
XM®* satellite radio.
To store a station in a preset you must first select a radio band by pressing the FM•AM
button
05 or
Xm
button
06 , then tune to the desired AM, fM or XM satellite radio station.
Then press and hold the desired station select button (1 -6 ) until the preset number is
updated on the display and the sound is briefly muted. The channel indicator will then
come on and the sound will resume. Programming is now complete.
To retrieve a previously set station, select the radio band where the preset was stored
then press the corresponding station select button (1 -6 ).
*XM® Satellite Radio is only available on vehicles equipped with optional XM® satellite subscription service.
for more information, refer to the “Display screen, heater, air conditioner, audio and phone systems (section 4)” of your
Owner’s Manual.
01
03
0506
02
04
Page 12 of 16
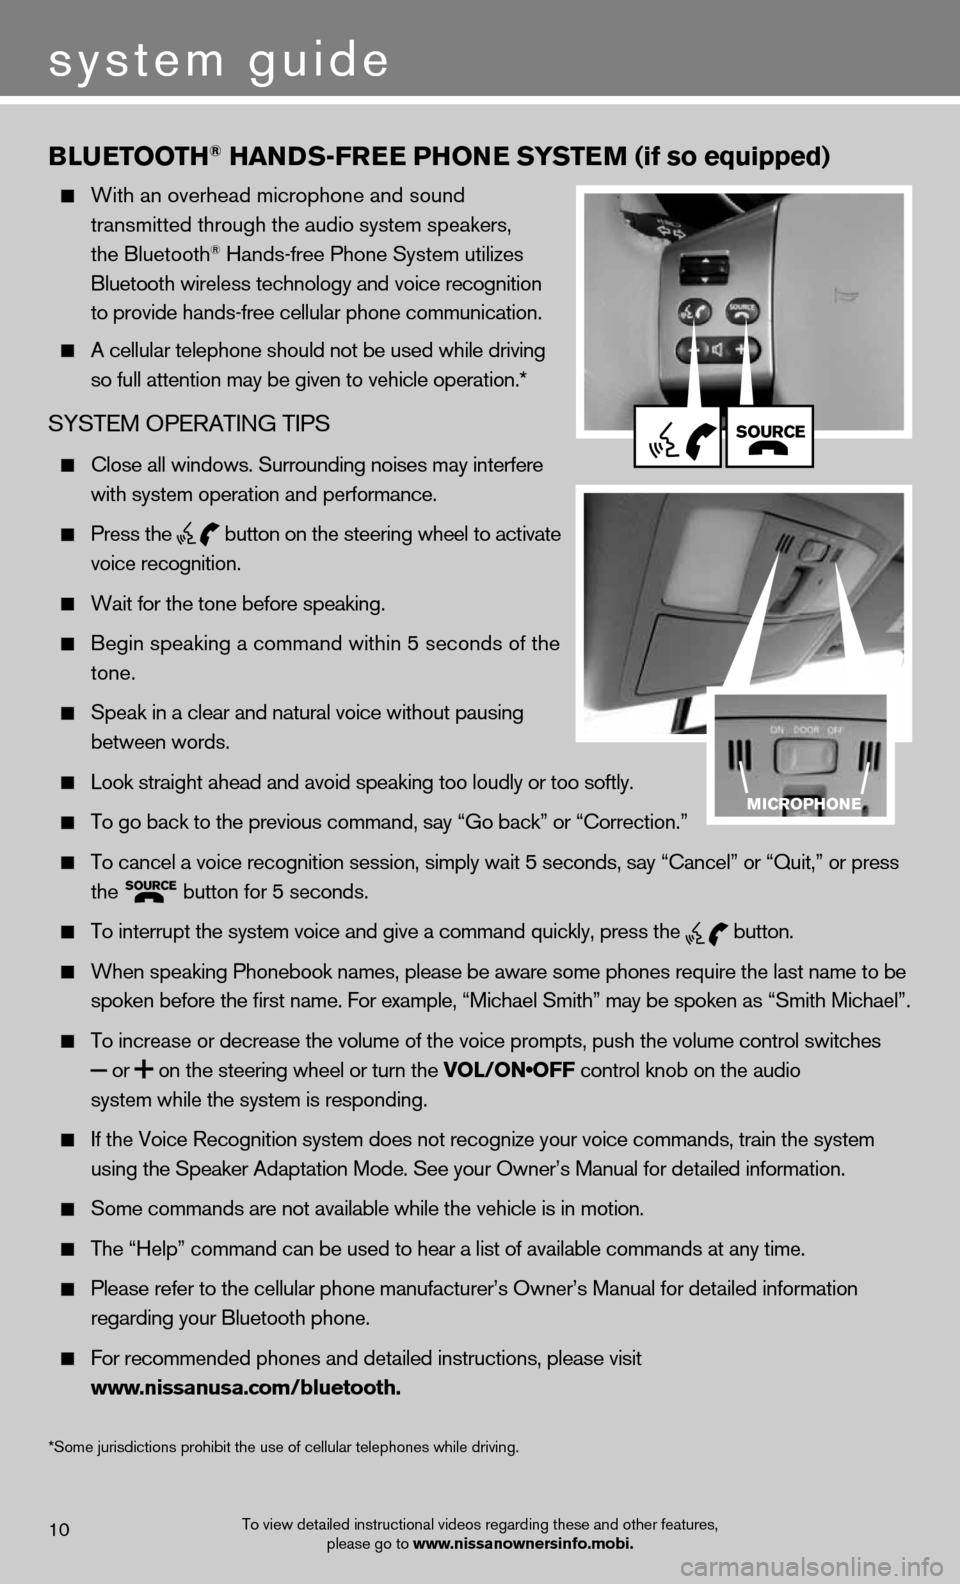
Blu EtootH® Han DS-fr EE PHonE S yStE m (if so equipped)
With an overhead microphone and sound
transmitted through the audio system speakers,
the bluetooth
® hands-free Phone System utilizes
Bluetooth wireless technology and voice recognition
to provide hands-free cellular phone communication.
A cellular telephone should not be used while driving
so full attention may be given to vehicle operation.*
SYSteM OPeRAtinG tiPS
close all windows. Surrounding noises may interfere
with system operation and performance.
Press the
button on the steering wheel to activate
voice recognition.
Wait for the tone before speaking.
Begin speaking a command within 5 seconds of the
tone.
Speak in a clear and natural voice without pausing
between words.
Look straight ahead and avoid speaking too loudly or too softly.
To go back to the previous command, say “Go back” or “Correction.”
To cancel a voice recognition session, simply wait 5 seconds, say “Cancel” or “Quit,” or press
the
button for 5 seconds.
To interrupt the system voice and give a command quickly, press the
button.
When speaking Phonebook names, please be aware some phones require the last name to be
spoken before the first name. For example, “Michael Smith” may be spoken as “Smith Michael”.
To increase or decrease the volume of the voice prompts, push the volume control switches
or
on the steering wheel or turn the VOL/ON•OFF control knob on the audio
system while the system is responding.
If the Voice Recognition system does not recognize your voice commands, train the system
using the Speaker Adaptation Mode. See your Owner’s Manual for detailed information.
Some commands are not available while the vehicle is in motion.
The “Help” command can be used to hear a list of available commands at any time.
Please refer to the cellular phone manufacturer’s Owner’s Manual for detailed information
regarding your Bluetooth phone.
For recommended phones and detailed instructions, please visit
www.nissanusa.com/bluetooth.
To view detailed instructional videos regarding these and other features,
please go to www.nissanownersinfo.mobi.10
system guide
*Some jurisdictions prohibit the use of cellular telephones while driving.
Page 14 of 16
MAkinG A cALL bY PhOne nuMbeR
1. Press the
button. A tone will sound.
2. Say: “Call”. The system acknowledges the command and announces the next set of
available commands.
3. Say: “Phone Number”. The system acknowledges the command and announces the next
set of available commands.
4. Say the number you wish to call starting with the area code in single digit format.
5. When you have finished speaking the phone number, the system repeats it back and
announces the available commands.
6. Say: “Dial”. The system acknowledges the command and makes the call.
ReceiVinG/endinG A cALL
When you receive a phone call, a ring tone sounds through the audio system.
To accept the call, press the
button. To reject the call, press the
button.
To hang up the phone at the end of a call or to disconnect during call placement, press
the
button.for more information, refer to the “Display screen, heater, air conditioner, audio and phone systems (section 4)” of your
Owner’s Manual.
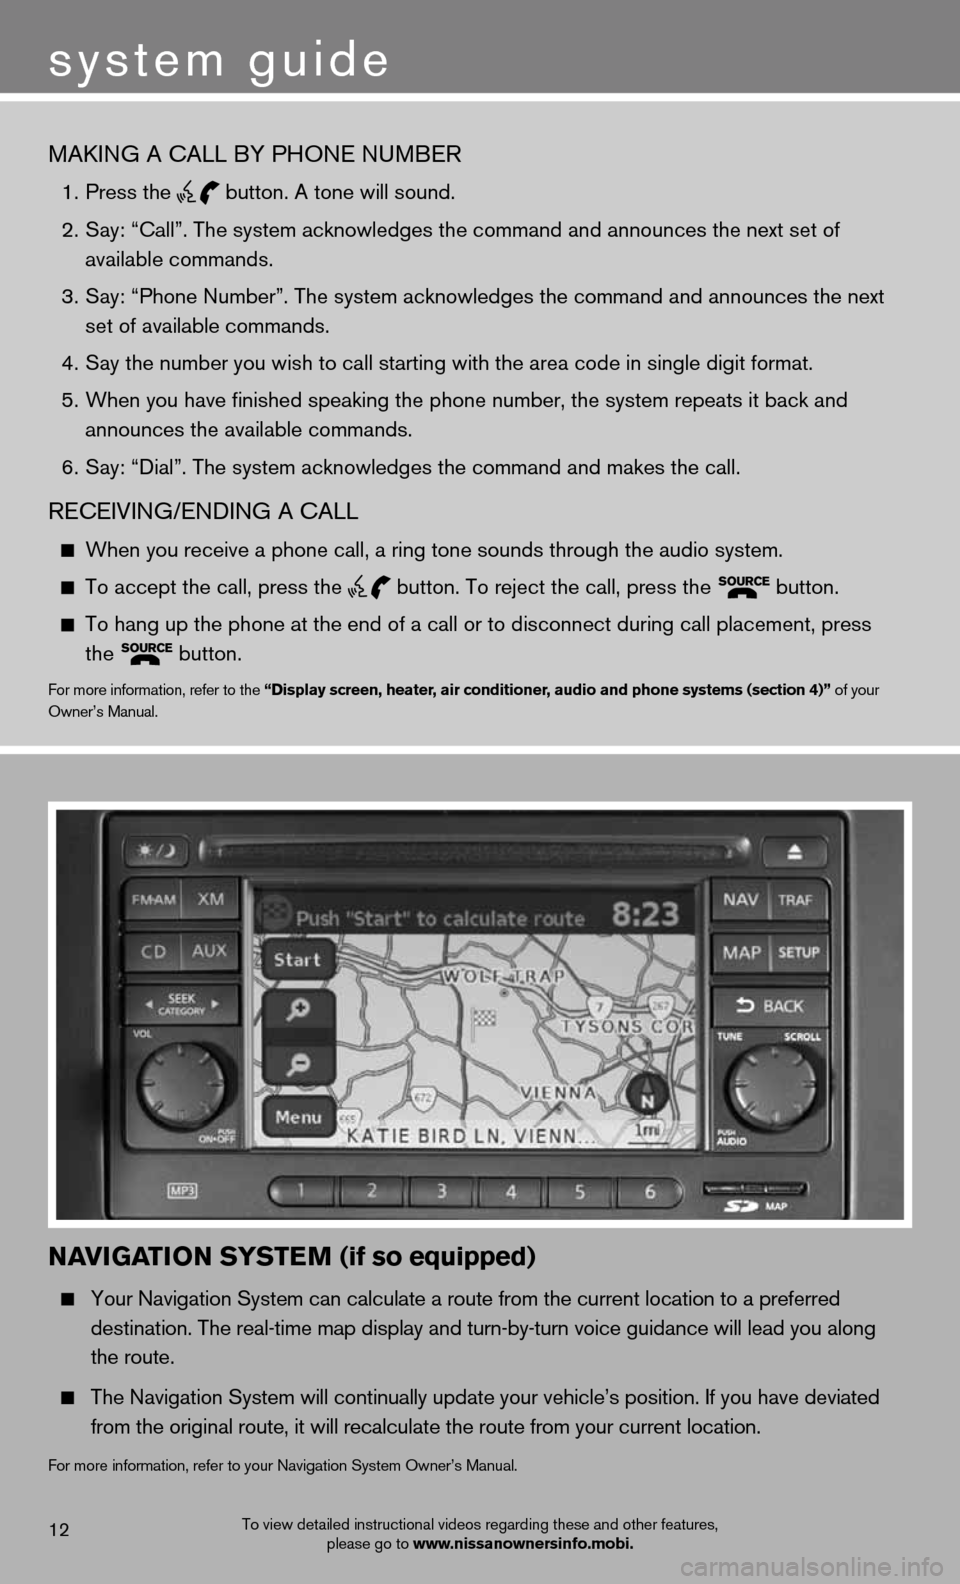
navi
Gation SyStE m (if so equipped)
Your Navigation System can calculate a route from the current location to a preferred
destination. The real-time map display and turn-by-turn voice guidance will lead you along
the route.
The Navigation System will continually update your vehicle’s position. If you have deviated
from the original route, it will recalculate the route from your current location.
for more information, refer to your navigation System Owner’s Manual.
To view detailed instructional videos regarding these and other features,
please go to www.nissanownersinfo.mobi.12
system guide