ESP NISSAN VERSA NOTE 2014 2.G Quick Reference Guide
[x] Cancel search | Manufacturer: NISSAN, Model Year: 2014, Model line: VERSA NOTE, Model: NISSAN VERSA NOTE 2014 2.GPages: 24, PDF Size: 1.8 MB
Page 10 of 24

8To view detailed instructional videos regarding these and other features, please go\
to www.nissanownersinfo.mobi
first drive features
NiSSaN iNTelli GeNT KeY® SYST eM
(if so equipped)
The NISSAN Intelligent k ey® System allows you to lock or unlock your
vehicle and activate the panic alarm. It is important to make sure the
Intelligent k ey is with you (that is, in your pocket or purse).
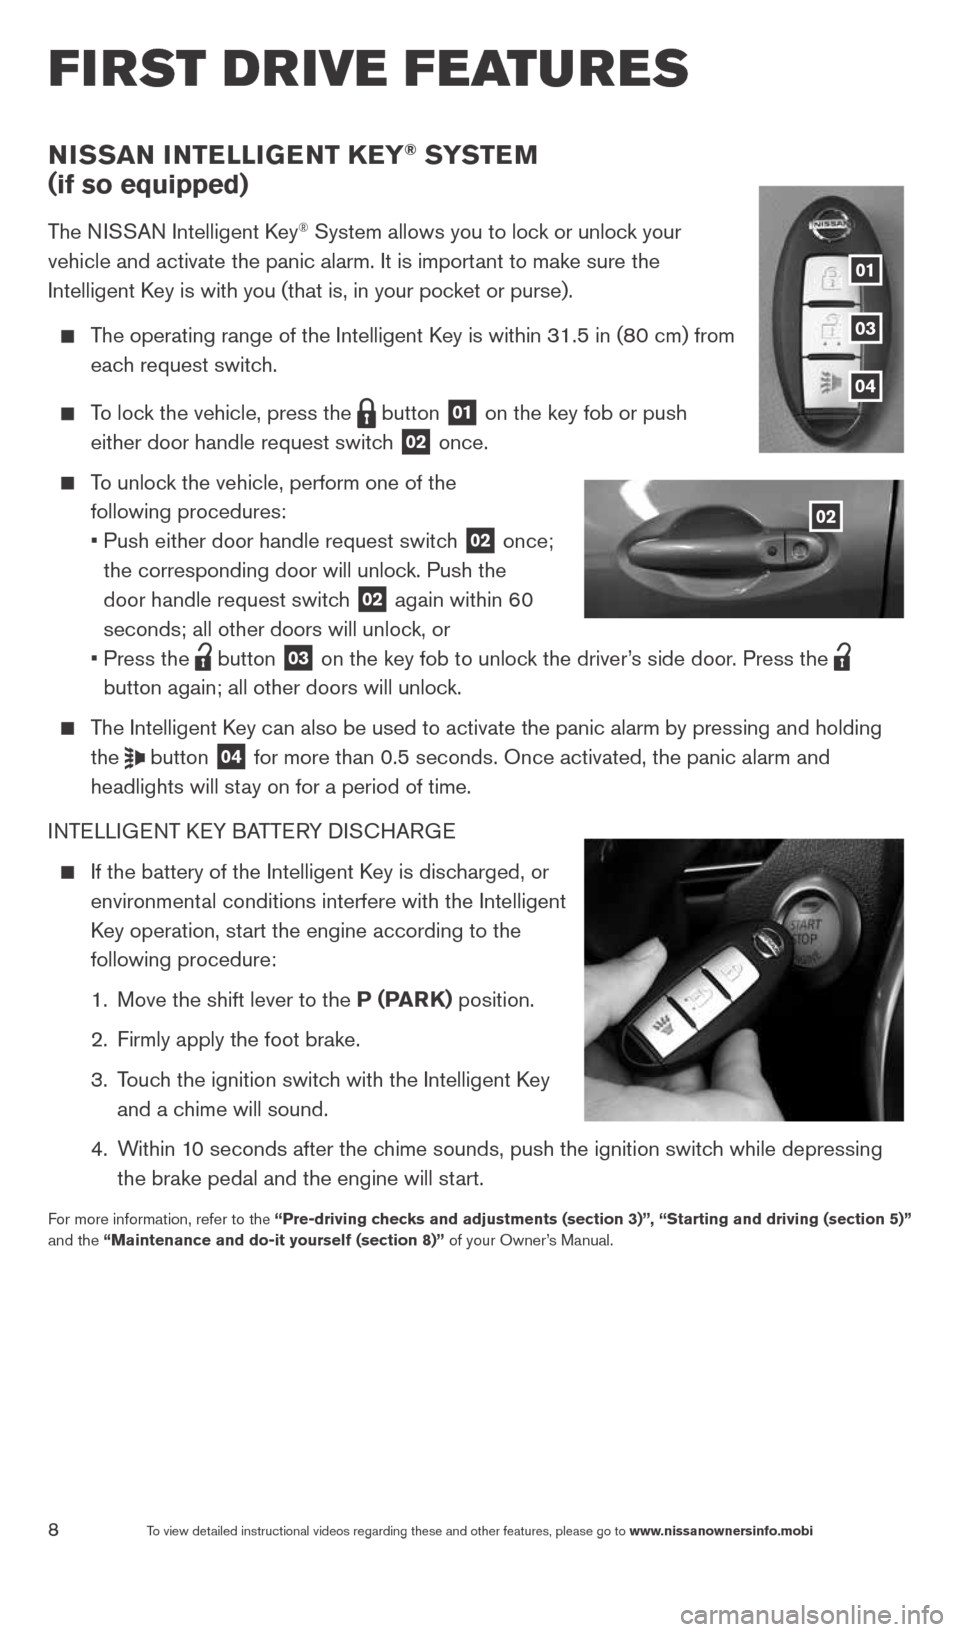
The operating range of the Intelligent k ey is within 31.5 in (80 cm) from
each request switch.
To lock the vehicle, press the
button
01 on the key fob or push
either door handle request switch 02 once.
To unlock the vehicle, perform one of the
following procedures:
• Push either door handle request switch
02 once;
the corresponding door will unlock. Push the
door handle request switch
02 again within 60
seconds; all other doors will unlock, or
• Press the
button
03 on the key fob to unlock the driver’s side door. Press the
button again; all other doors will unlock.
The Intelligent k ey can also be used to activate the panic alarm by pressing and holding \
the
button
04 for more than 0.5 seconds. Once activated, the panic alarm and
headlights will stay on for a period of time.
INTELLIGENT k EY BATTERY DIS cHARGE
If the battery of the Intelligent k ey is discharged, or
environmental conditions interfere with the Intelligent
k ey operation, start the engine according to the
following procedure:
1. Move the shift lever to the P (ParK) position.
2. Firmly apply the foot brake.
3. Touch the ignition switch with the Intelligent k ey
and a chime will sound.
4. Within 10 seconds after the chime sounds, push the ignition switch while depressing
the brake pedal and the engine will start.
For more information, refer to the “Pre-driving checks and adjustments (section 3)”, “Starting and driving (section\
5)”
and the “Maintenance and do-it yourself (section 8)” of your Owner’s Manual.
02
01
03
04
1598304_14b_VersaHatchback_QRG_090613.indd 89/6/13 1:44 PM
Page 15 of 24

13To view detailed instructional videos regarding these and other features, please go\
to www.nissanownersinfo.mobi
FM/aM/SiriusXM* Sa TelliTe raDio wiTH CD Pla Yer
(if so equipped)
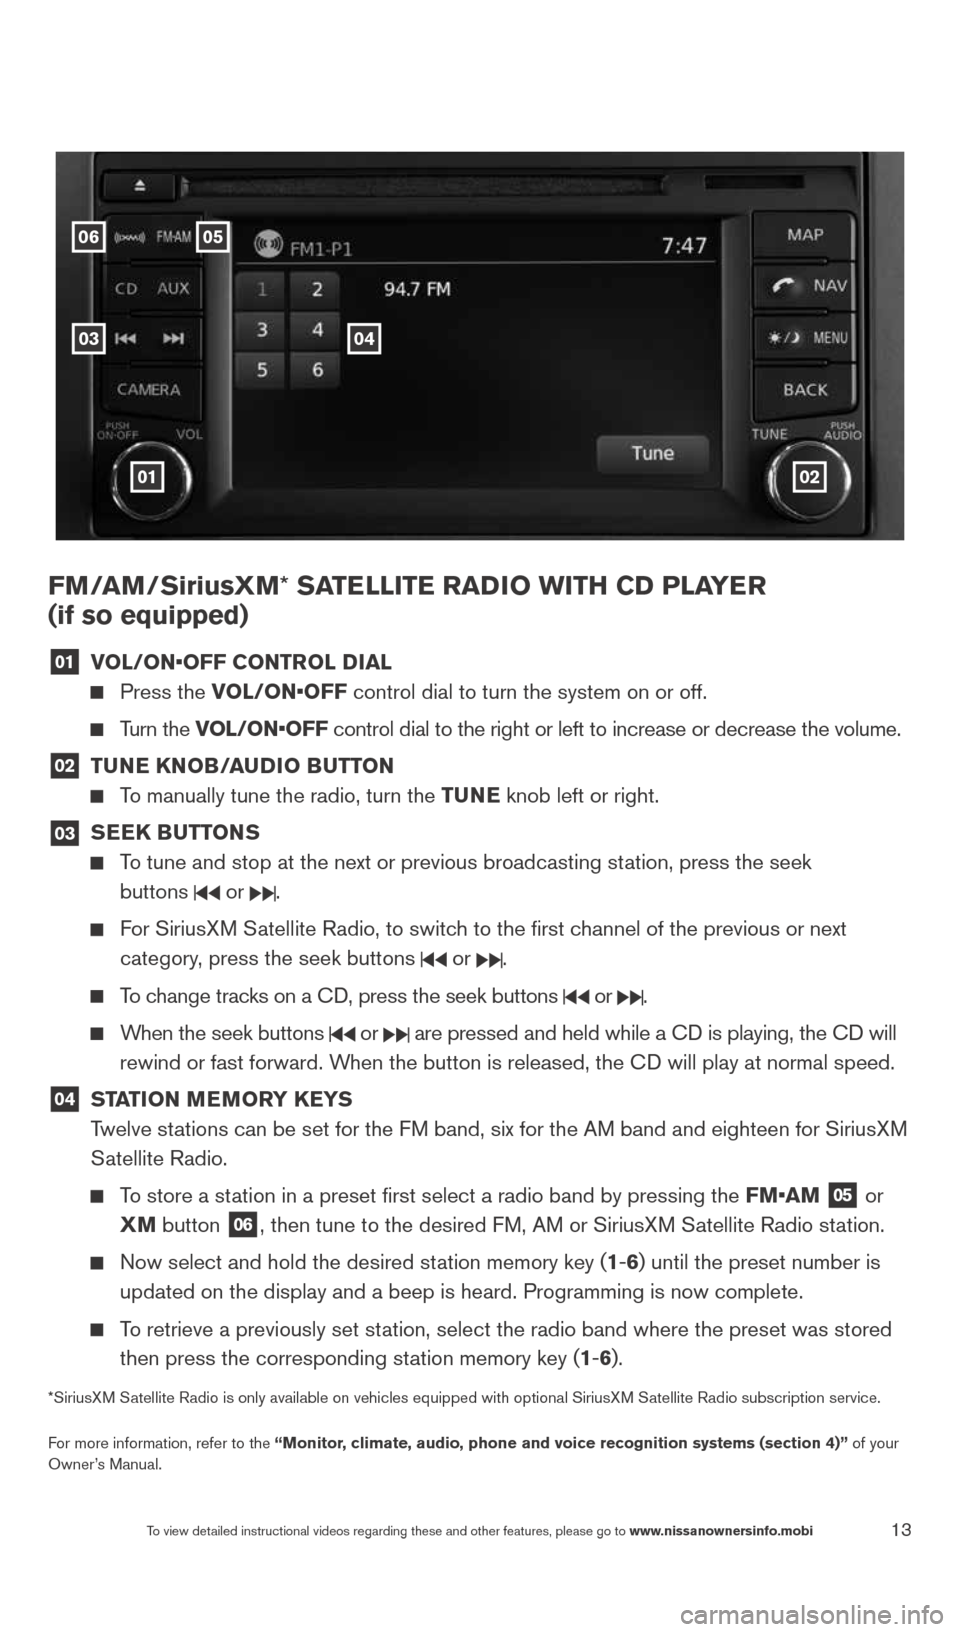
01 vol/oN•oFF CoNTrol D
ial
Press the vol/oN•oFF control dial to turn the system on or off.
Turn the vol/oN•oFF control dial to the right or left to increase or decrease the volume.
02 Tu
Ne KN oB/auDio B uTToN
To manually tune the radio, turn the Tu Ne knob left or right.
03
SeeK Bu
TToNS
To tune and stop at the next or previous broadcasting station, press the seek
buttons
or .
For SiriusXM Satellite Radio, to switch to the first channel of the previous or next
category, press the seek buttons
or .
To change tracks on a c D, press the seek buttons or .
When the seek buttons or are pressed and held while a c D is playing, the cD will
rewind or fast forward. When the button is released, the c D will play at normal speed.
04 ST
aTioN M eM or Y K eYS
Twelve stations can be set for the FM band, six for the AM band and eighteen for SiriusXM
Satellite Radio.
To store a station in a preset first select a radio band by pressing the FM•aM
05 or
XM button
06, then tune to the desired FM, AM or SiriusXM Satellite Radio station.
Now select and hold the desired station memory key (1-6) until the preset number is
updated on the display and a beep is heard. Programming is now complete.\
To retrieve a previously set station, select the radio band where the preset was stored
then press the corresponding station memory key (1-6).
*SiriusXM Satellite Radio is only available on vehicles equipped with optional Siri\
usXM Satellite Radio subscription service.
For more information, refer to the “Monitor, climate, audio, phone and voice recognition systems (section 4)” of your
Owner’s Manual.
01
05
03
06
02
04
1598304_14b_VersaHatchback_QRG_090613.indd 139/6/13 1:44 PM
Page 17 of 24

15
system guide
To view detailed instructional videos regarding these and other features, please go\
to www.nissanownersinfo.mobi
BlueT ooTH® HaNDS-Free PH oNe SYSTe M (if so equipped)
A cellular telephone should not be used while driving
so full attention may be given to vehicle operation.*
SYSTEM OPERATING TIPS
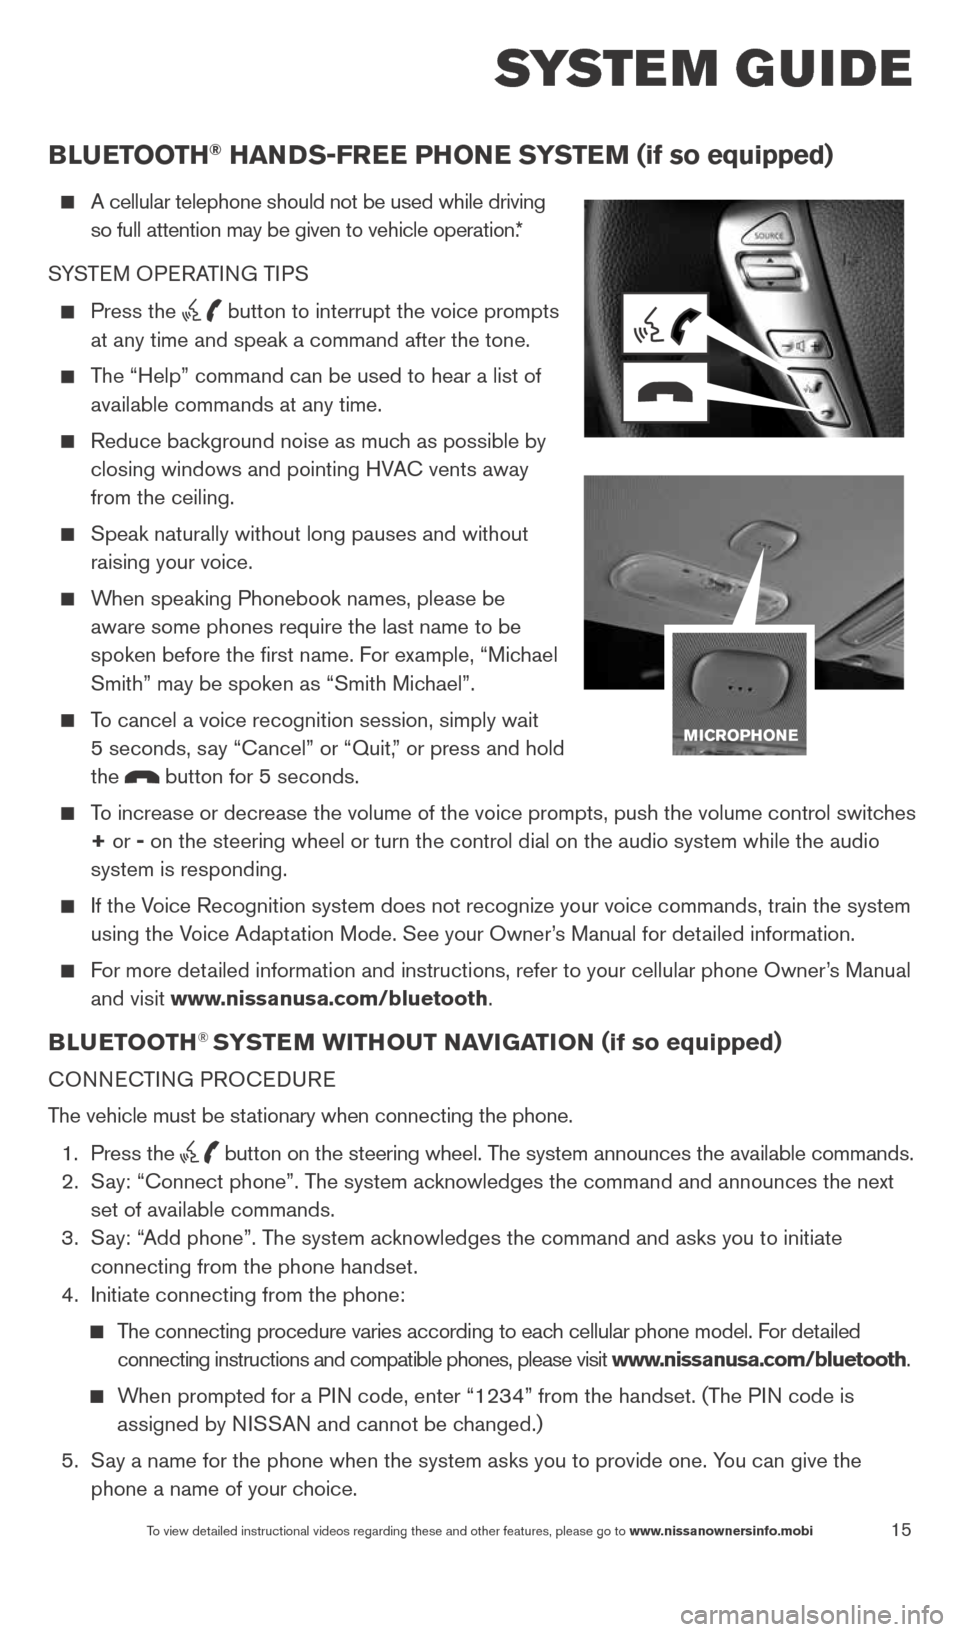
Press the button to interrupt the voice prompts
at any time and speak a command after the tone.
The “Help” command can be used to hear a list of
available commands at any time.
Reduce background noise as much as possible by
closing windows and pointing HVA c vents away
from the ceiling.
Speak naturally without long pauses and without
raising your voice.
When speaking Phonebook names, please be
aware some phones require the last name to be
spoken before the first name. For example, “Michael
Smith” may be spoken as “Smith Michael”.
To cancel a voice recognition session, simply wait
5 seconds, say “cancel” or “Quit,” or press and hold
the
button for 5 seconds.
To increase or decrease the volume of the voice prompts, push the volume \
control switches
+ or - on the steering wheel or turn the control dial on the audio system while\
the audio
system is responding.
If the Voice Recognition system does not recognize your voice commands, train th\
e system
using the Voice Adaptation Mode. See your Owner’s Manual for detailed information.
For more detailed information and instructions, refer to your cellular phone Owner’s Manual
and visit www.nissanusa.com/bluetooth.
BlueT ooTH® SYSTe M wiTH ouT Navi GaTioN (if so equipped)
cONNEc TING PROcEDURE
The vehicle must be stationary when connecting the phone.
1. Press the
button on the steering wheel. The system announces the available commands.
2. Say: “connect phone”. The system acknowledges the command and announces the next
set of available commands.
3. Say: “Add phone”. The system acknowledges the command and asks you to initiate
connecting from the phone handset.
4. Initiate connecting from the phone:
The connecting procedure varies according to each cellular phone model. For detailed
connecting instructions and compatible phones, please visit www.nissanusa.com/bluetooth.
When prompted for a PIN code, enter “1234” from the handset. (The PIN code is
assigned by NISSAN and cannot be changed.)
5. Say a name for the phone when the system asks you to provide one. You can give the
phone a name of your choice.
1598304_14b_VersaHatchback_QRG_090613.indd 159/6/13 1:44 PM