lock NISSAN VERSA NOTE 2014 2.G Quick Reference Guide
[x] Cancel search | Manufacturer: NISSAN, Model Year: 2014, Model line: VERSA NOTE, Model: NISSAN VERSA NOTE 2014 2.GPages: 24, PDF Size: 1.8 MB
Page 3 of 24
TABLE OF cONTENTS
New SYSTe M FeaTureS
Around View® Monitor (if so equipped) ............................. 2
Trip computer ................................................. 3
USB/AUX Jack and iPod
® Interface (if so equipped) ................. 3
Divide-N-Hide® Adjustable Floor .................................. 4
eSS eNTial iNF orMa TioN
Tire Pressure Monitoring System (TPMS) with
Easy Fill Tire Alert (if so equipped) ................................. 5
Loose Fuel cap ................................................ 6
Fuel-Filler Door ................................................ 6
clock Set/Adjustment ........................................... 7
Fir ST Drive Fea TureS
NISSAN Intelligent k ey
® System (if so equipped) ....................8
Rear Hatch Release (NISSAN Intelligent k ey® models only -
if so equipped) ................................................. 9
Seat Adjustments .............................................. 9
Outside Mirror control Switch .................................... 9
Starting/Stopping the Engine .................................... 10
Headlight control Switch ....................................... 11
Windshield Wiper and Washer Switch ............................11
Manual climate controls ........................................ 12
FM/AM/SiriusXM Satellite Radio with c D Player (if so equipped)......13
cruise control (if so equipped) .................................. 14
S YST eM GuiDe
Bluetooth
® Hands-free Phone System (if so equipped) .............. 15
System Operating Tips ....................................... 15
Bluetooth
® System without Navigation (if so equipped) .............. 15
Bluetooth® System with Navigation (if so equipped) .................17
Navigation System (if so equipped) ............................... 19
Please see your Owner’s Manual for important safety
information and system operation limitations.
• A cellular telephone should not be used for any purpose while
driving so full attention may be given to vehicle operation.
• Always wear your seat belt.
• Supplemental air bags do not replace proper seat belt usage.
• children 12 and under should always ride in the rear seat
properly secured in child restraints or seat belts according
to their age and weight.
• Do not drink and drive.
For more information, refer to the “Safety –– Seats, seat belts and
supplemental restraint system (section 1)”, “Monitor, climate,
audio, phone and voice recognition systems (section 4)” and
“Starting and driving (section 5)” of your Owner’s Manual.
Additional information about your vehicle is also available in your Owner’s Manual, Navigation System Owner’s Manual and at www.nissanusa.com.
To view detailed instructional videos, go to www.nissanownersinfo.mobi/
2014/versa
or snap this barcode with an appropriate barcode reader.
1598304_14b_VersaHatchback_QRG_090613.indd 49/6/13 1:43 PM
Page 6 of 24
4
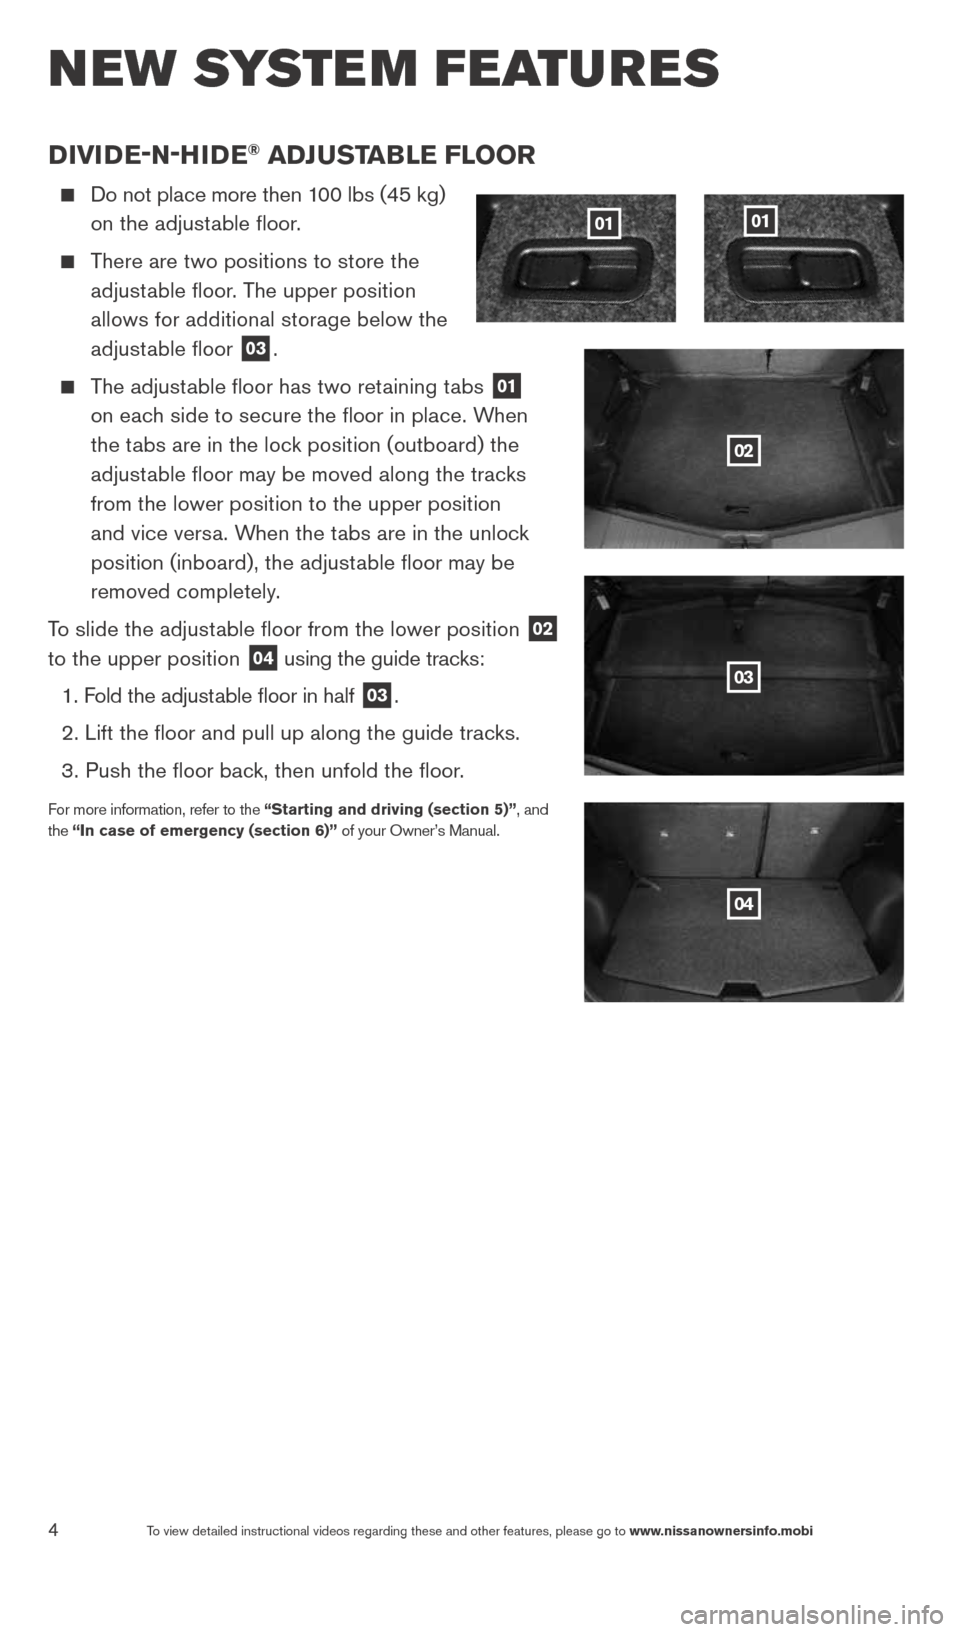
DiviDe-N-HiDe® aDJuST aB le Floor
Do not place more then 100 lbs (45 kg)
on the adjustable floor.
There are two positions to store the
adjustable floor. The upper position
allows for additional storage below the
adjustable floor
03.
The adjustable floor has two retaining tabs
01
on each side to secure the floor in place. When
the tabs are in the lock position (outboard) the
adjustable floor may be moved along the tracks
from the lower position to the upper position
and vice versa. When the tabs are in the unlock
position (inboard), the adjustable floor may be
removed completely.
To slide the adjustable floor from the lower position
02
to the upper position 04 using the guide tracks:
1. Fold the adjustable floor in half
03.
2. Lift the floor and pull up along the guide tracks.
3. Push the floor back, then unfold the floor.
For more information, refer to the “ Starting and driving (section 5)” , and
the “in case of emergency (section 6)” of your Owner’s Manual.
To view detailed instructional videos regarding these and other features, please go\
to www.nissanownersinfo.mobi
new system features
0101
02
03
04
1598304_14b_VersaHatchback_QRG_090613.indd 49/6/13 1:44 PM
Page 8 of 24
6To view detailed instructional videos regarding these and other features, please go\
to www.nissanownersinfo.mobi
esse ntial i n for mation
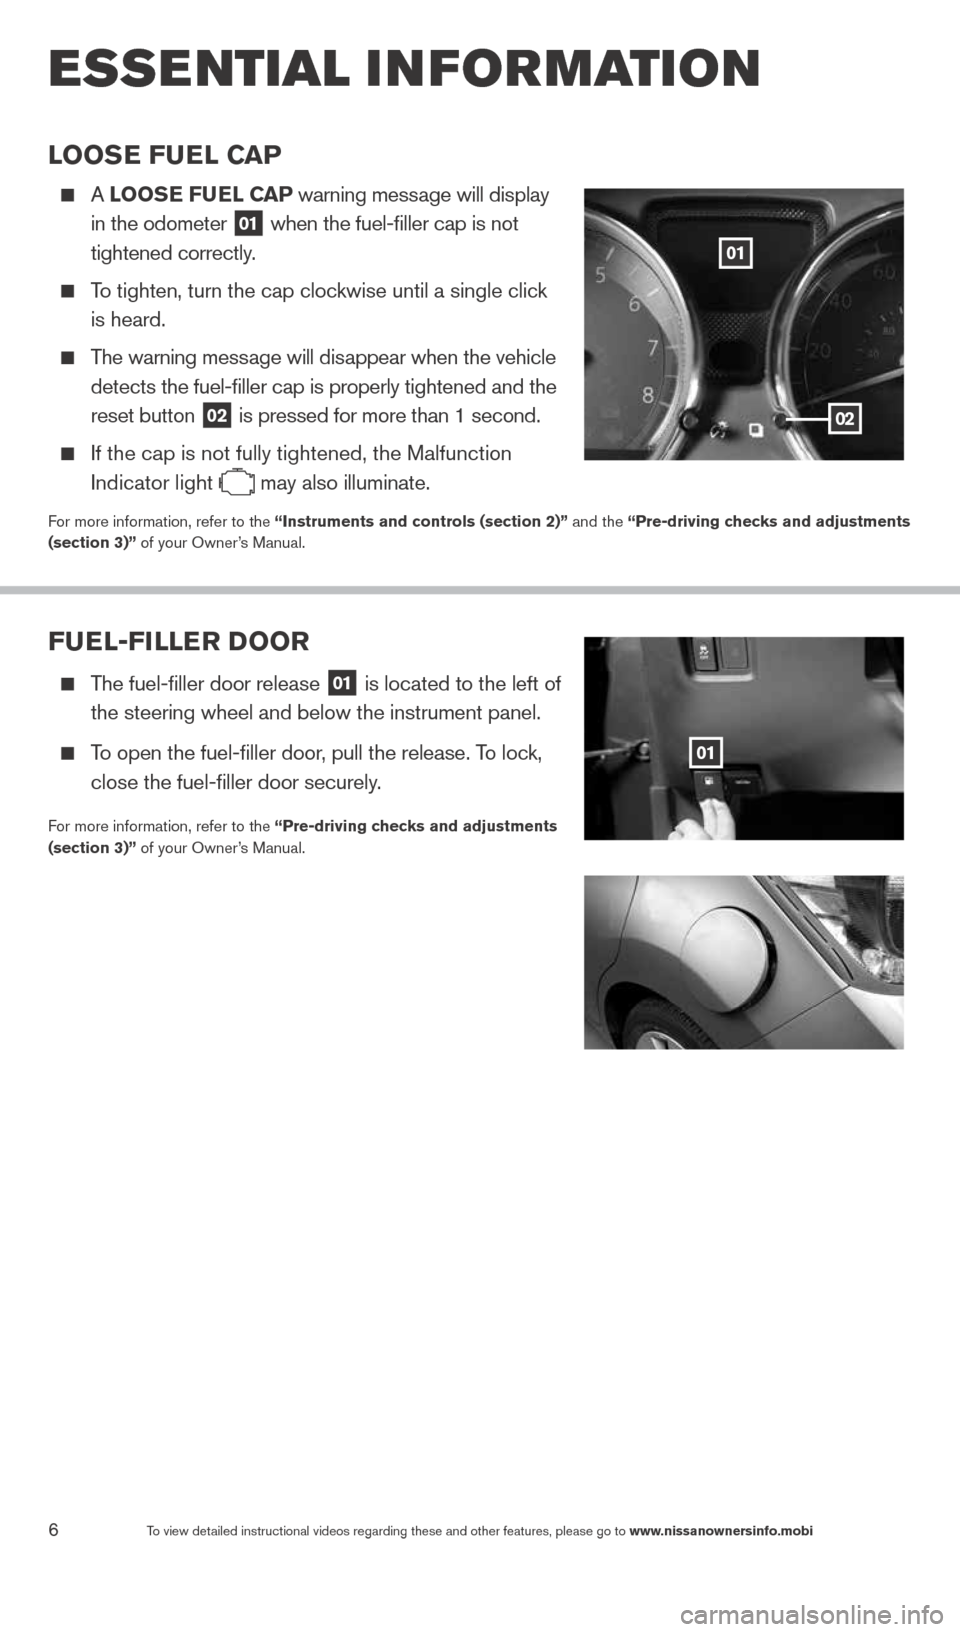
Fuel-Filler Door
The fuel-filler door release
01 is located to the left of
the steering wheel and below the instrument panel.
To open the fuel-filler door, pull the release. To lock,
close the fuel-filler door securely.
For more information, refer to the “Pre-driving checks and adjustments
(section 3)” of your Owner’s Manual.
01
looSe Fuel C aP
A looS e Fuel CaP warning message will display
in the odometer
01 when the fuel-filler cap is not
tightened correctly.
To tighten, turn the cap clockwise until a single click
is heard.
The warning message will disappear when the vehicle
detects the fuel-filler cap is properly tightened and the
reset button
02 is pressed for more than 1 second.
If the cap is not fully tightened, the Malfunction
Indicator light
may also illuminate.
For more information, refer to the “instruments and controls (section 2)” and the “Pre-driving checks and adjustments
(section 3)” of your Owner’s Manual.
02
01
1598304_14b_VersaHatchback_QRG_090613.indd 69/6/13 1:44 PM
Page 9 of 24
7To view detailed instructional videos regarding these and other features, please go\
to www.nissanownersinfo.mobi
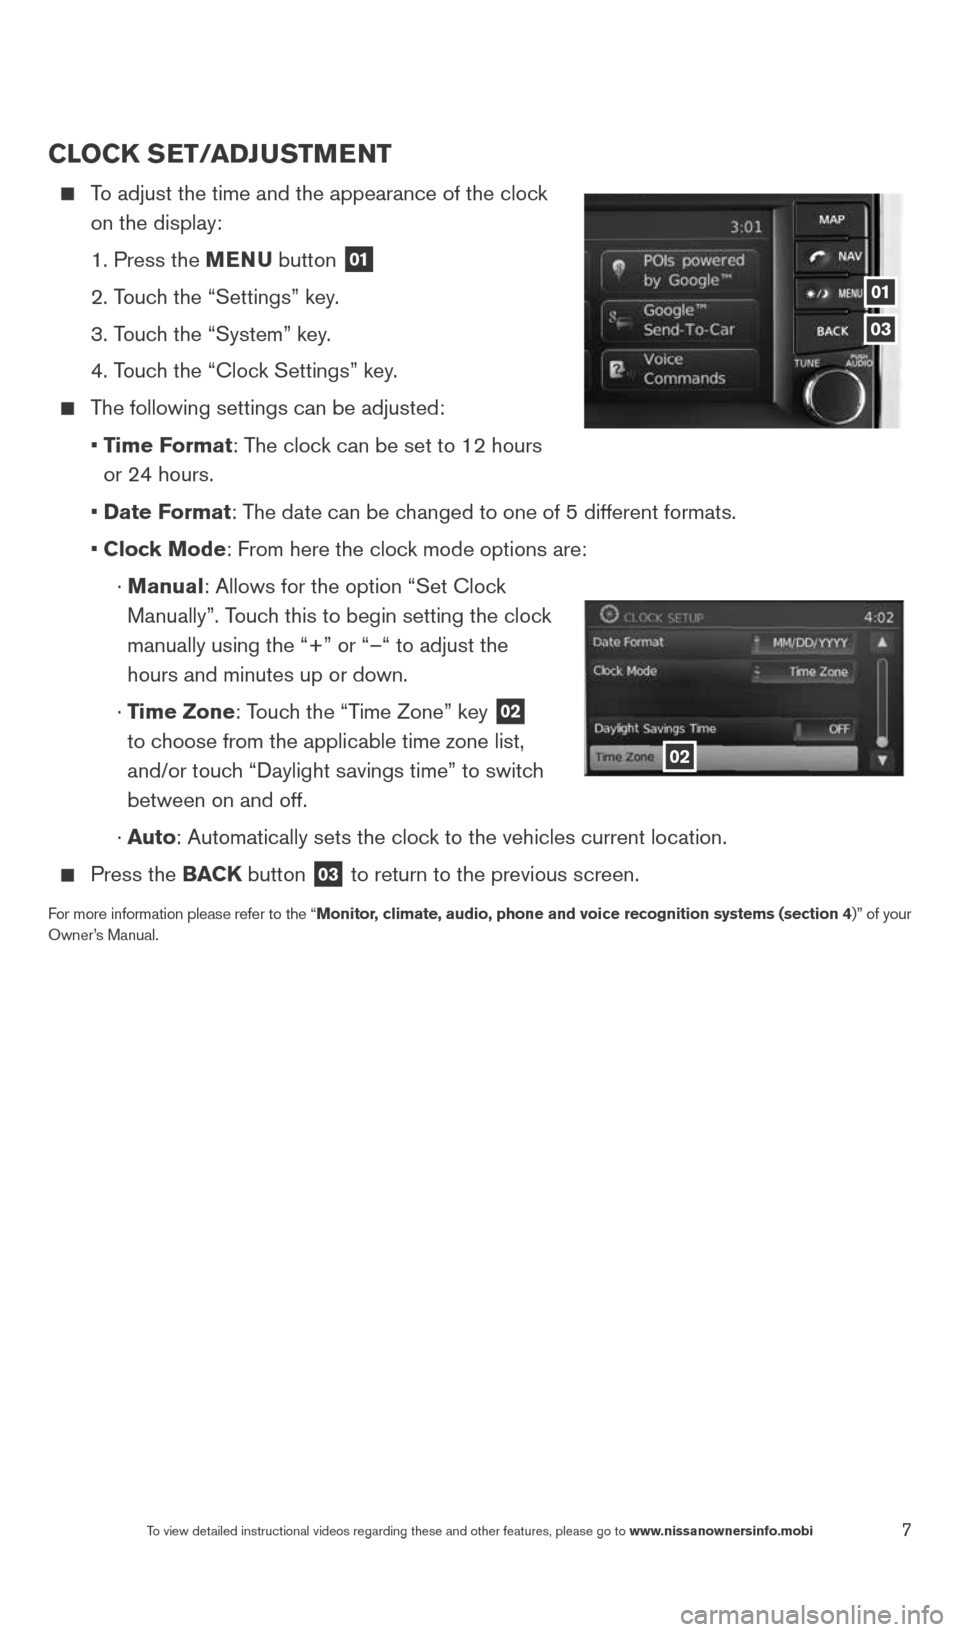
CloCK SeT/aDJ uSTM eNT
To adjust the time and the appearance of the clock
on the display:
1. Press the MeNu button
01
2. Touch the “Settings” key.
3. Touch the “System” key.
4. Touch the “clock Settings” key.
The following settings can be adjusted:
• Time Format: The clock can be set to 12 hours
or 24 hours.
• Date Format: The date can be changed to one of 5 different formats.
• Clock Mode: From here the clock mode options are:
· Manual: Allows for the option “Set clock
Manually”. Touch this to begin setting the clock
manually using the “+” or “–“ to adjust the
hours and minutes up or down.
· Time Zone: Touch the “Time Zone” key
02
to choose from the applicable time zone list,
and/or touch “Daylight savings time” to switch
between on and off.
· a uto: Automatically sets the clock to the vehicles current location.
Press the BaCK button
03 to return to the previous screen.
For more information please refer to the “Monitor, climate, audio, phone and voice recognition systems (section 4)” of your
Owner’s Manual.
03
01
02
1598304_14b_VersaHatchback_QRG_090613.indd 79/6/13 1:44 PM
Page 10 of 24
8To view detailed instructional videos regarding these and other features, please go\
to www.nissanownersinfo.mobi
first drive features
NiSSaN iNTelli GeNT KeY® SYST eM
(if so equipped)
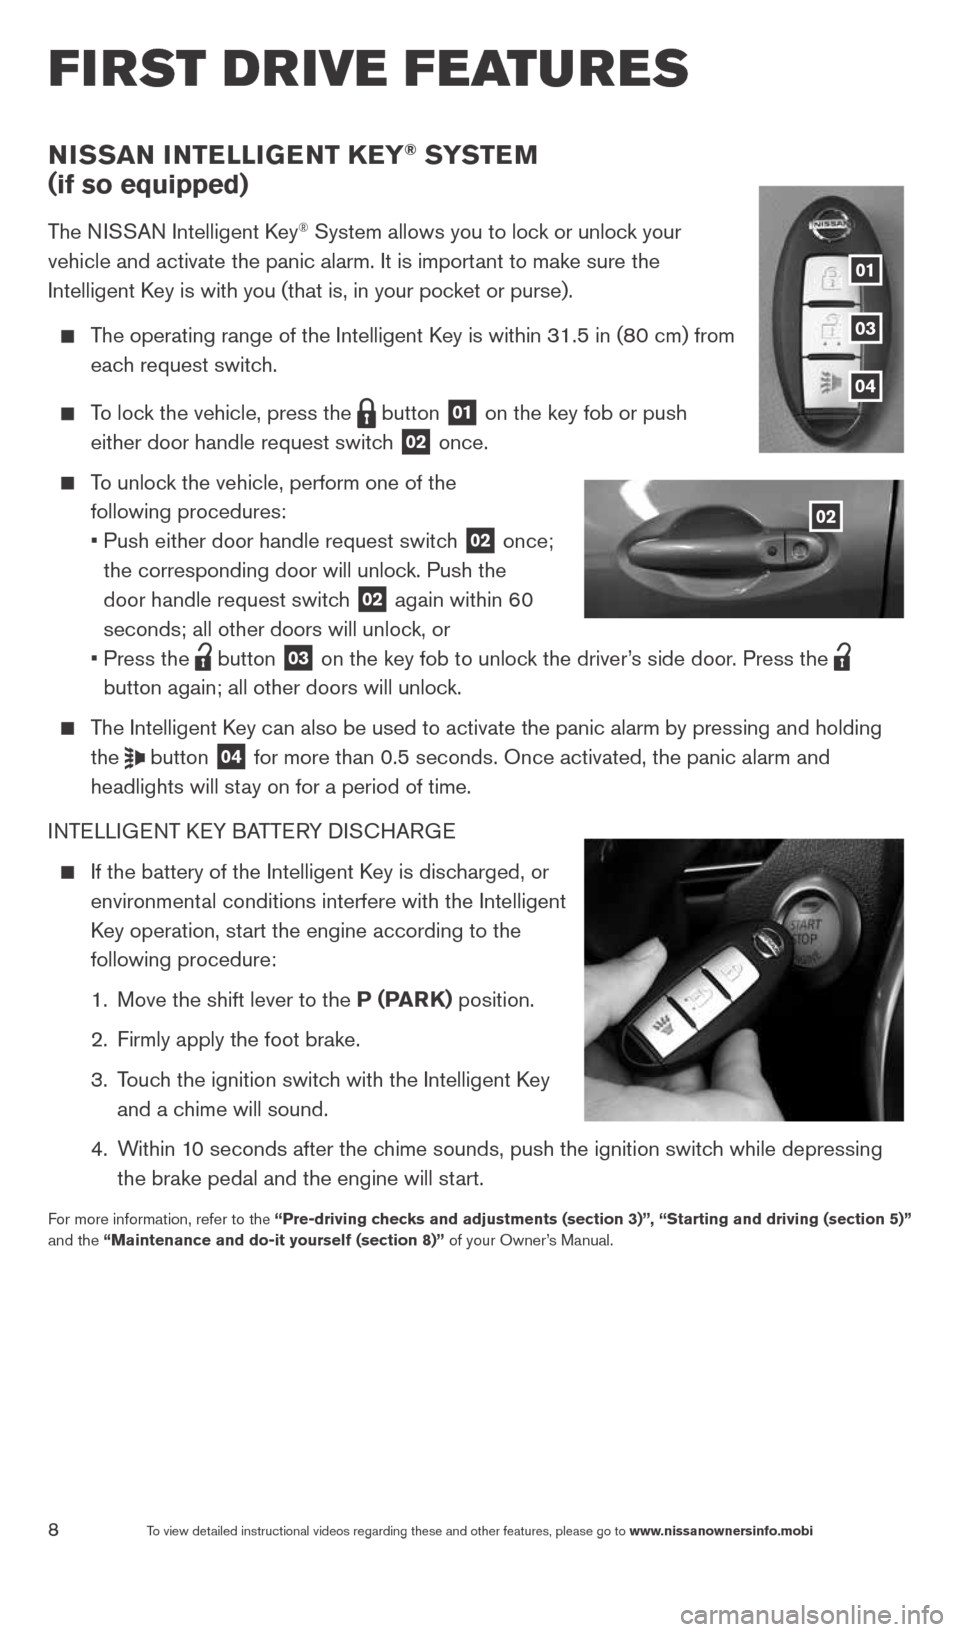
The NISSAN Intelligent k ey® System allows you to lock or unlock your
vehicle and activate the panic alarm. It is important to make sure the
Intelligent k ey is with you (that is, in your pocket or purse).
The operating range of the Intelligent k ey is within 31.5 in (80 cm) from
each request switch.
To lock the vehicle, press the
button
01 on the key fob or push
either door handle request switch 02 once.
To unlock the vehicle, perform one of the
following procedures:
• Push either door handle request switch
02 once;
the corresponding door will unlock. Push the
door handle request switch
02 again within 60
seconds; all other doors will unlock, or
• Press the
button
03 on the key fob to unlock the driver’s side door. Press the
button again; all other doors will unlock.
The Intelligent k ey can also be used to activate the panic alarm by pressing and holding \
the
button
04 for more than 0.5 seconds. Once activated, the panic alarm and
headlights will stay on for a period of time.
INTELLIGENT k EY BATTERY DIS cHARGE
If the battery of the Intelligent k ey is discharged, or
environmental conditions interfere with the Intelligent
k ey operation, start the engine according to the
following procedure:
1. Move the shift lever to the P (ParK) position.
2. Firmly apply the foot brake.
3. Touch the ignition switch with the Intelligent k ey
and a chime will sound.
4. Within 10 seconds after the chime sounds, push the ignition switch while depressing
the brake pedal and the engine will start.
For more information, refer to the “Pre-driving checks and adjustments (section 3)”, “Starting and driving (section\
5)”
and the “Maintenance and do-it yourself (section 8)” of your Owner’s Manual.
02
01
03
04
1598304_14b_VersaHatchback_QRG_090613.indd 89/6/13 1:44 PM
Page 11 of 24
9To view detailed instructional videos regarding these and other features, please go\
to www.nissanownersinfo.mobi
rear HaTCH releaS e
(N iSSaN intelligent Key® models only)
(if so equipped)
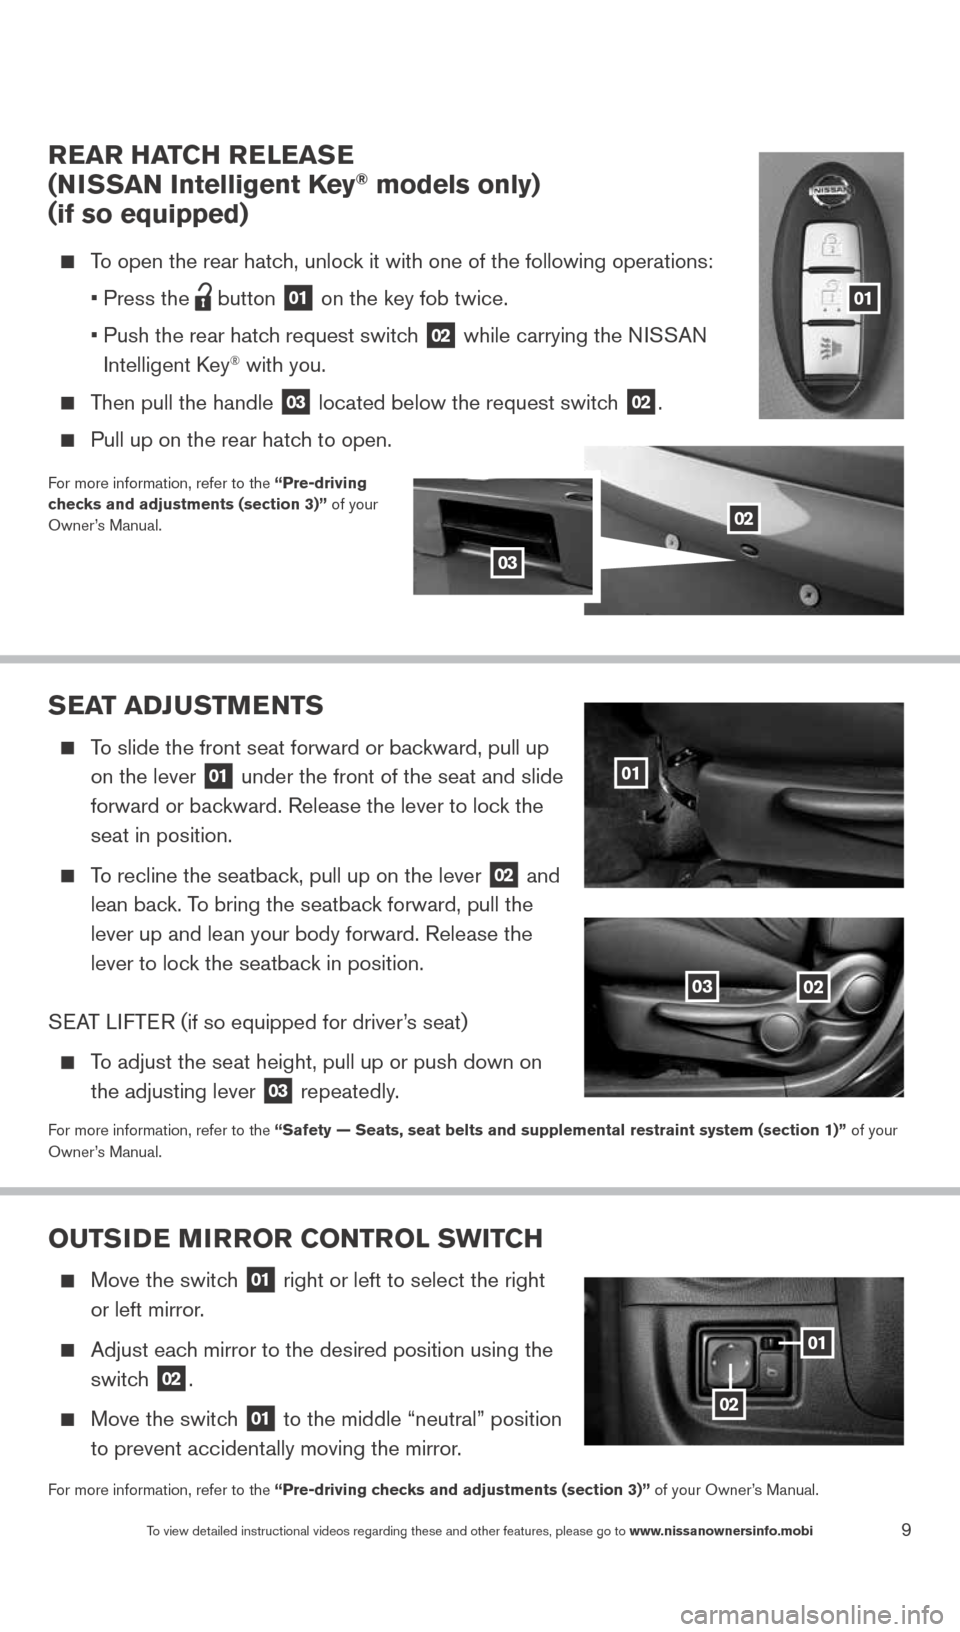
To open the rear hatch, unlock it with one of the following operations:
• Press the
button
01 on the key fob twice.
• Push the rear hatch request switch
02 while carrying the NISSAN
Intelligent k ey® with you.
Then pull the handle
03 located below the request switch 02.
Pull up on the rear hatch to open.
For more information, refer to the “Pre-driving
checks and adjustments (section 3)” of your
Owner’s Manual.
Sea T aDJ uSTM eNTS
To slide the front seat forward or backward, pull up
on the lever
01 under the front of the seat and slide
forward or backward. Release the lever to lock the
seat in position.
To recline the seatback, pull up on the lever
02 and
lean back. To bring the seatback forward, pull the
lever up and lean your body forward. Release the
lever to lock the seatback in position.
S EAT LIFTER (if so equipped for driver’s seat)
To adjust the seat height, pull up or push down on
the adjusting lever
03 repeatedly.
For more information, refer to the “Safety — Seats, seat belts and supplemental restraint system (se\
ction 1)”
of your
Owner’s Manual.
01
0203
ouTS iD e M irror CoNTrol SwiTCH
Move the switch
01 right or left to select the right
or left mirror.
Adjust each mirror to the desired position using the
switch
02.
Move the switch
01 to the middle “neutral” position
to prevent accidentally moving the mirror.
For more information, refer to the “Pre-driving checks and adjustments (section 3)” of your Owner’s Manual.
0201
02
02
01
03
1598304_14b_VersaHatchback_QRG_090613.indd 99/6/13 1:44 PM
Page 12 of 24
10To view detailed instructional videos regarding these and other features, please go\
to www.nissanownersinfo.mobi
first drive features
STarTi NG/ST oPPiNG TH e eNGiN e
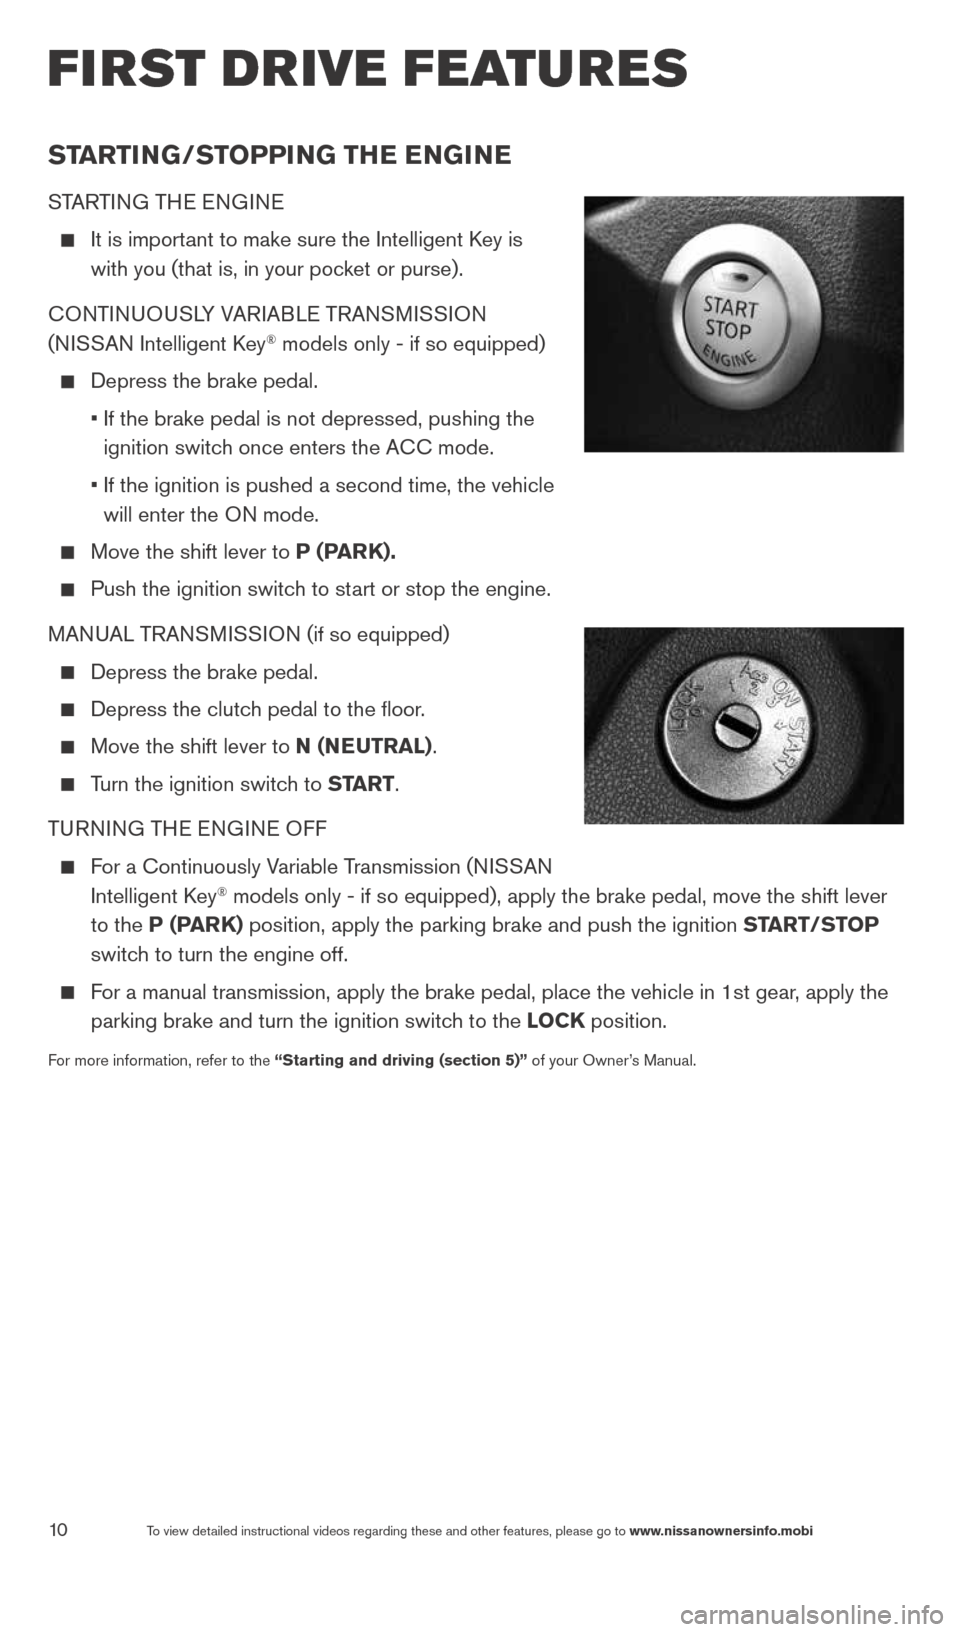
STARTING THE ENGINE
It is important to make sure the Intelligent k ey is
with you (that is, in your pocket or purse).
cONTINUOUSLY VARIABLE TRANSMISSION
(NISSAN Intelligent k ey
® models only - if so equipped)
Depress the brake pedal.
• If the brake pedal is not depressed, pushing the
ignition switch once enters the A cc mode.
• If the ignition is pushed a second time, the vehicle
will enter the ON mode.
Move the shift lever to P (P arK).
Push the ignition switch to start or stop the engine.
MANUAL TRANSMISSION (if so equipped)
Depress the brake pedal.
Depress the clutch pedal to the floor.
Move the shift lever to N (N euTral).
Turn the ignition switch to ST arT.
TURNING THE ENGINE OFF
For a continuously Variable Transmission (NISSAN
Intelligent k ey® models only - if so equipped), apply the brake pedal, move the shift l\
ever
to the P (P arK) position, apply the parking brake and push the ignition ST arT/SToP
switch to turn the engine off.
For a manual transmission, apply the brake pedal, place the vehicle in 1s\
t gear, apply the
parking brake and turn the ignition switch to the loCK position.
For more information, refer to the “Starting and driving (section 5)” of your Owner’s Manual.
1598304_14b_VersaHatchback_QRG_090613.indd 109/6/13 1:44 PM
Page 21 of 24
19
NaviGaTioN SYSTe M (if so equipped)
Your Navigation System can calculate a route from the current location to\
a preferred
destination. The real-time map display and turn-by-turn voice guidance will lead you a\
long
the route.
The Navigation System will continually update your vehicle’s position. If you have deviated
from the original route, it will recalculate the route from your current\
location.
Nissanconnect™ Google™ services require an active subscription. Please co\
ntact a
NISSAN dealer for more information.
Your Navigation System, along with POIs (Point Of Interest) powered by Google™*
(if so equipped), allows you to enter a destination using Google searc\
h results.
Using Google™ Send-to-car* (if so equipped) you can send a destination from Google
Maps to your vehicle’s Navigation System.
Hands-free Text Messaging – The system allows for the sending and receiving of text
messages through the vehicle interface.
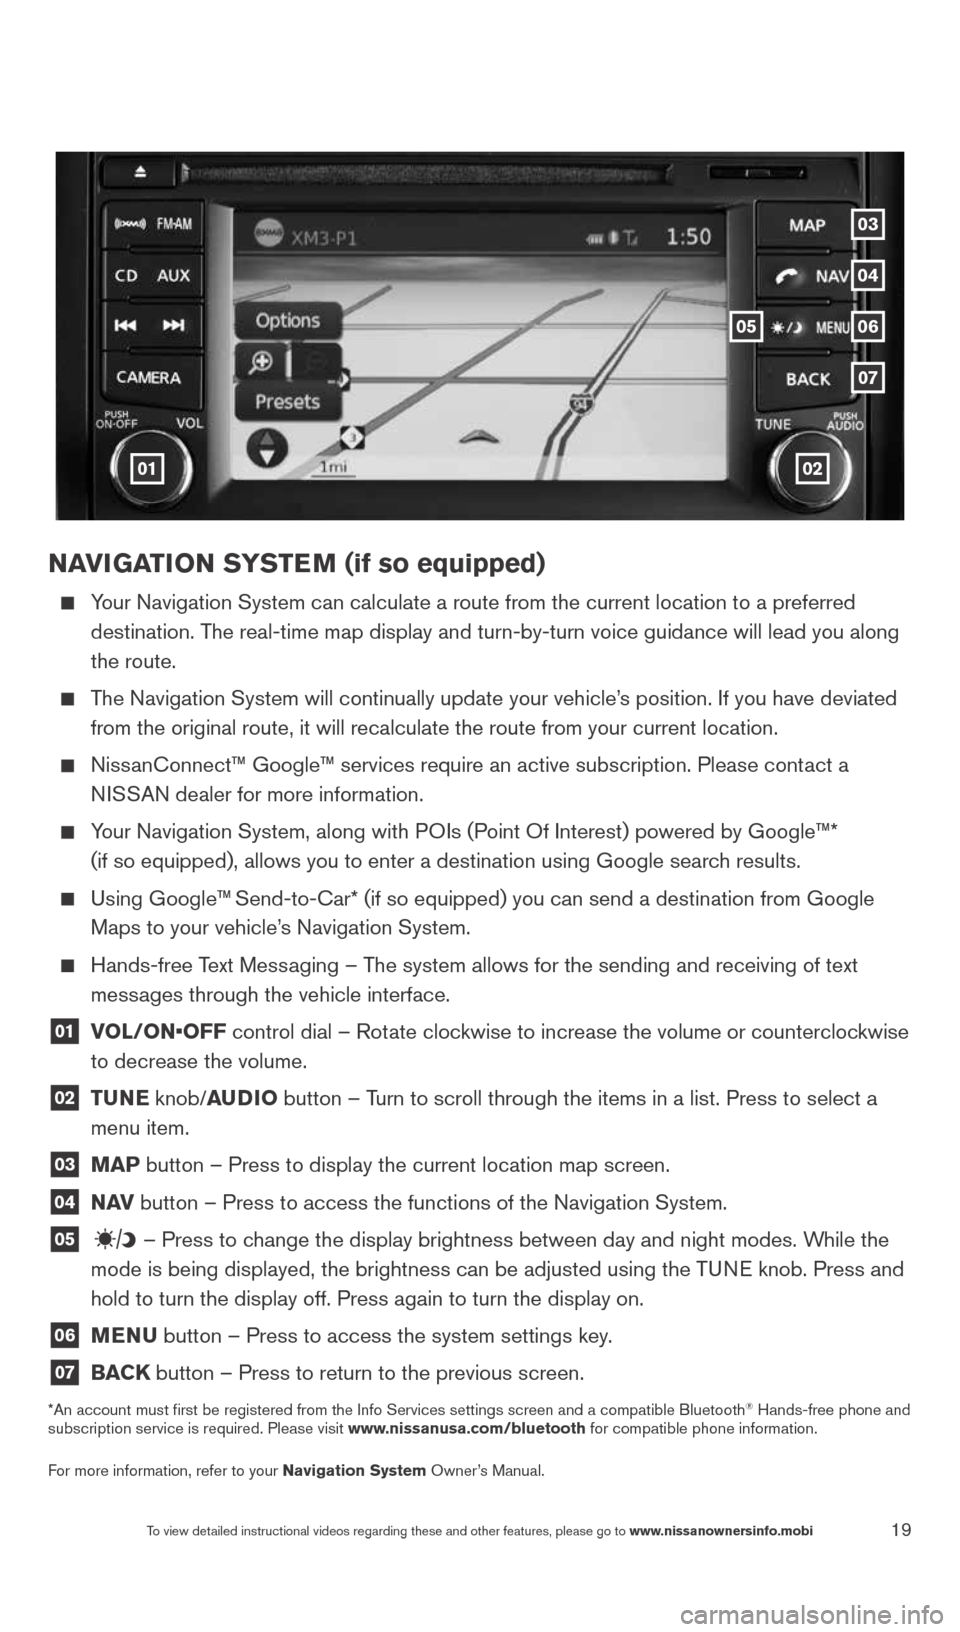
01 vol/oN•oFF control dial – Rotate clockwise to increase the volume or counterclockwise
to decrease the volume.
02 T
uNe knob/auDio button – Turn to scroll through the items in a list. Press to select a
menu item.
03 MaP button – Press to display the current location map screen.
04 N
av button – Press to access the functions of the Navigation System.
05 – Press to change the display brightness between day and night modes. While the
mode is being displayed, the brightness can be adjusted using the TUNE knob. Press and
hold to turn the display off. Press again to turn the display on.
06 MeNu
button – Press to access the system settings key.
07 BaCK
button – Press to return to the previous screen.
*An account must first be registered from the Info Services settings s\
creen and a compatible Bluetooth® Hands-free phone and
subscription service is required. Please visit www.nissanusa.com/bluetooth for compatible phone information.
For more information, refer to your Navigation System Owner’s Manual.
01
05
04
07
03
06
02
To view detailed instructional videos regarding these and other features, please go\
to www.nissanownersinfo.mobi
1598304_14b_VersaHatchback_QRG_090613.indd 199/6/13 1:44 PM