bluetooth NISSAN VERSA NOTE 2015 2.G Owners Manual
[x] Cancel search | Manufacturer: NISSAN, Model Year: 2015, Model line: VERSA NOTE, Model: NISSAN VERSA NOTE 2015 2.GPages: 384, PDF Size: 3.82 MB
Page 4 of 384
If you see this symbol, it means“Do not do this”
or “Do not let this happen.”
If you see a symbol similar to these in an illustra-
tion, it means the arrow points to the front of the
vehicle.
Arrows in an illustration that are similar to these
indicate movement or action.
Arrows in an illustration that are similar to these
call attention to an item in the illustration.
CALIFORNIA PROPOSITION 65
WARNING
WARNING
Engine exhaust, some of its constituents,
and certain vehicle components contain or
emit chemicals known to the State of Cali-
fornia to cause cancer and birth defects or
other reproductive harm. In addition, cer-
tain fluids contained in vehicles and cer-
tain products of component wear contain
or emit chemicals known to the State of
California to cause cancer and birth de-
fects or other reproductive harm.
CALIFORNIA PERCHLORATE
ADVISORY
Some vehicle parts, such as lithium batter-
ies, may contain perchlorate material. The
following advisory is provided: “Perchlorate
Material – special handling may apply, See
www.dtsc.ca.gov/hazardouswaste/perchlorate/”.
BLUETOOTH® is a
trademark owned by
Bluetooth SIG, Inc.
and licensed to
Visteon and Bosch.
SiriusXM® services
require a subscription
after trial period and
are sold separately or
as a package. The
satellite service is
available only in the
48 contiguous USA
and DC. SiriusXM
satellite service is
also available in
Canada; see
www.siriusxm.ca.
© Nissan Mexicana, S. A. de C. V.
All rights reserved. No part of this Owner’s
Manual may be reproduced or stored in a retrieval
system, or transmitted in any form, or by any
means, electronic, mechanical, photocopying,
recording or otherwise, without the prior written
permission of Nissan Mexicana, S. A. de C. V.
APD1005
Page 151 of 384
USB (Universal Serial Bus) connection port
(models without Navigation System)
(if so equipped)............................... 4-61
USB (Universal Serial Bus) connection port
(models with Navigation System)
(if so equipped) ............................... 4-63
iPod®* player operation without Navigation
System (if so equipped) ........................ 4-65
iPod®* player operation with Navigation
System (if so equipped) ........................ 4-67
Bluetooth® streaming audio without
Navigation System (if so equipped) ..............4-70
Bluetooth® streaming audio with Navigation
System ....................................... 4-71
CD care and cleaning .......................... 4-72
Steering wheel switch for audio control ..........4-72
Antenna ...................................... 4-74
NissanConnect
SMMobile Apps (if so equipped) .....4-75
Registering with NissanConnectSMApp.......... 4-75
Connect Phone ............................... 4-75
Application Download .......................... 4-75
Car phone or CB radio ............................ 4-76
Bluetooth® Hands-Free Phone System without
Navigation System (if so equipped) .................4-76Regulatory Information
......................... 4-78
Using the system .............................. 4-78
Control buttons ............................... 4-81
Getting started ................................ 4-82
List of voice commands ........................ 4-83
Voice Adaptation (VA) mode ....................4-88
Manual control . . .............................. 4-89
Troubleshooting guide ......................... 4-90
Bluetooth® Hands-Free Phone System with
Navigation System (if so equipped) .................4-91
Regulatory Information ......................... 4-92
Voice commands .............................. 4-93
Connecting Procedure ......................... 4-93
Vehicle phonebook ............................ 4-94
Making a call . ................................. 4-94
Receiving a call ............................... 4-94
During a call .................................. 4-94
Ending a call .................................. 4-94
Text messaging. . .............................. 4-95
Bluetooth® settings ........................... 4-96
Phone settings ................................ 4-97
NISSAN Voice Recognition System
(if so equipped) .................................. 4-98
Page 152 of 384
Using the system.............................. 4-98
System features ............................... 4-99
Bluetooth® Hands-Free Phone System
voice commands ............................. 4-100
Navigation System voice commands ............4-101 Audio system voice commands
.................4-101
Information voice commands ...................4-101
My Apps Voice Commands ....................4-101
Help voice commands ........................ 4-102
Troubleshooting guide ........................ 4-102
Page 154 of 384
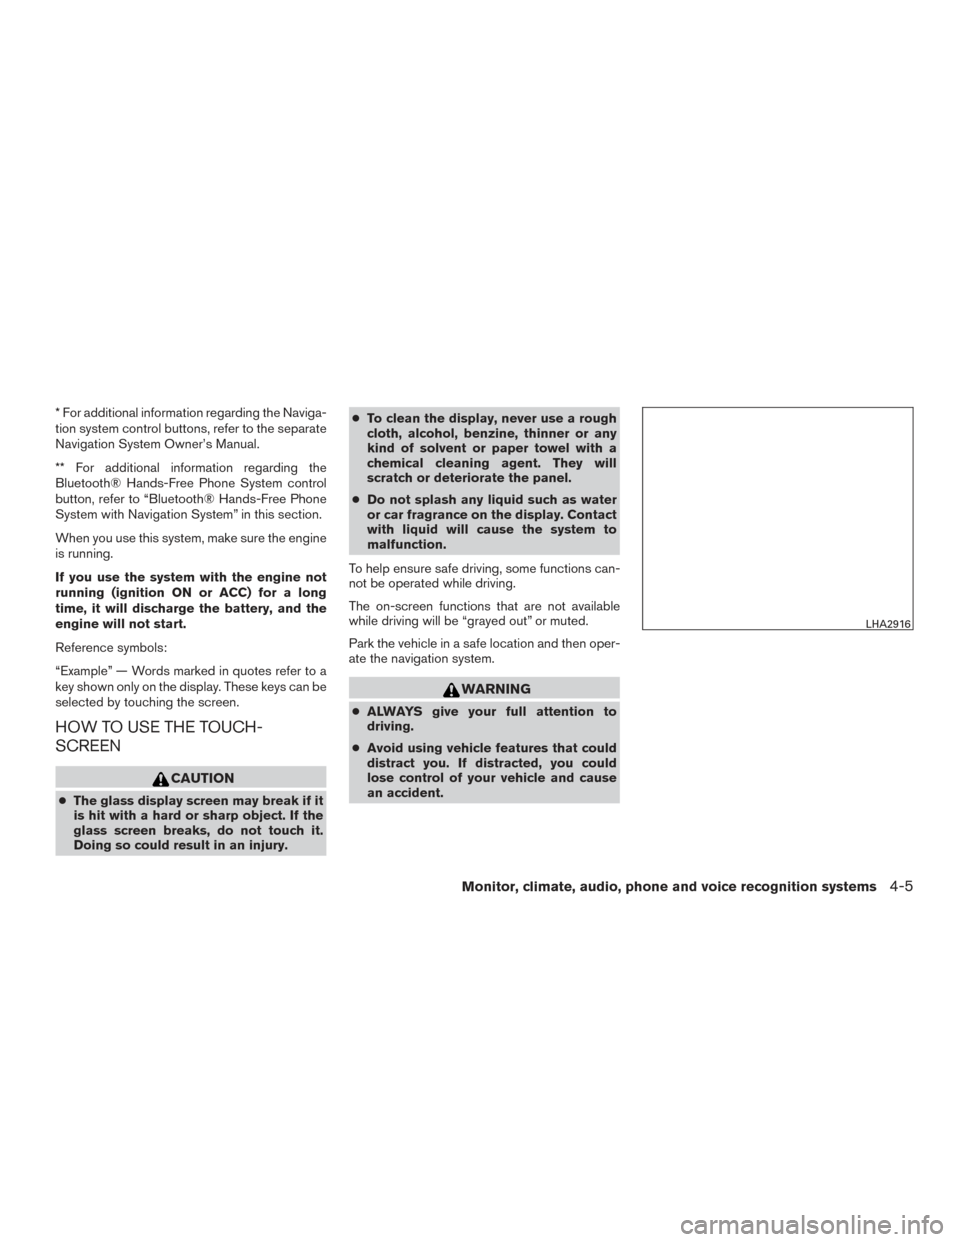
* For additional information regarding the Naviga-
tion system control buttons, refer to the separate
Navigation System Owner’s Manual.
** For additional information regarding the
Bluetooth® Hands-Free Phone System control
button, refer to “Bluetooth® Hands-Free Phone
System with Navigation System” in this section.
When you use this system, make sure the engine
is running.
If you use the system with the engine not
running (ignition ON or ACC) for a long
time, it will discharge the battery, and the
engine will not start.
Reference symbols:
“Example” — Words marked in quotes refer to a
key shown only on the display. These keys can be
selected by touching the screen.
HOW TO USE THE TOUCH-
SCREEN
CAUTION
●The glass display screen may break if it
is hit with a hard or sharp object. If the
glass screen breaks, do not touch it.
Doing so could result in an injury. ●
To clean the display, never use a rough
cloth, alcohol, benzine, thinner or any
kind of solvent or paper towel with a
chemical cleaning agent. They will
scratch or deteriorate the panel.
● Do not splash any liquid such as water
or car fragrance on the display. Contact
with liquid will cause the system to
malfunction.
To help ensure safe driving, some functions can-
not be operated while driving.
The on-screen functions that are not available
while driving will be “grayed out” or muted.
Park the vehicle in a safe location and then oper-
ate the navigation system.
WARNING
● ALWAYS give your full attention to
driving.
● Avoid using vehicle features that could
distract you. If distracted, you could
lose control of your vehicle and cause
an accident.
LHA2916
Monitor, climate, audio, phone and voice recognition systems4-5
Page 157 of 384
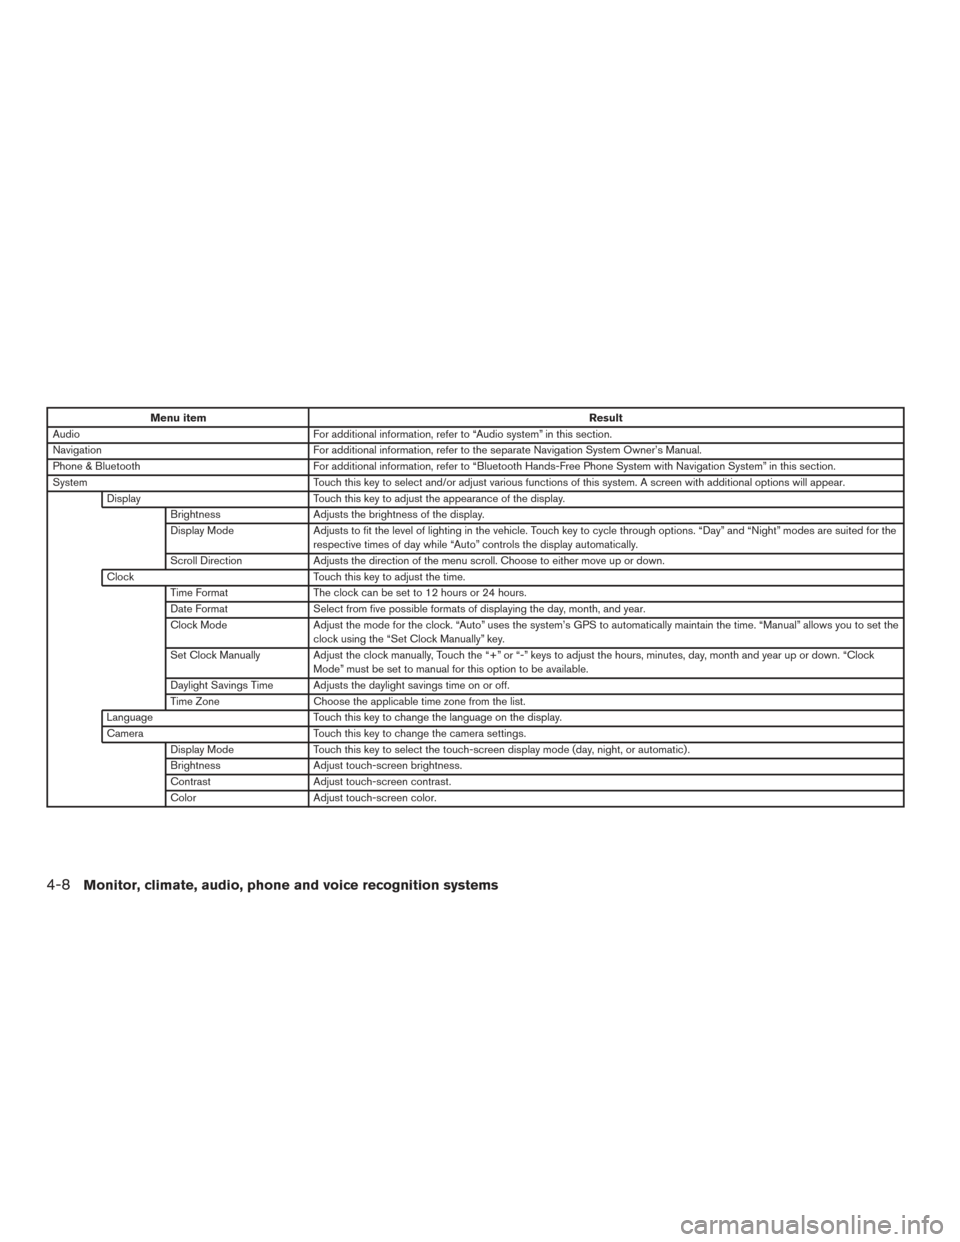
Menu itemResult
Audio For additional information, refer to “Audio system” in this section.
Navigation For additional information, refer to the separate Navigation System Owner’s Manual.
Phone & Bluetooth For additional information, refer to “Bluetooth Hands-Free Phone System with Navigation System” in this section.
System Touch this key to select and/or adjust various functions of this system. A screen with additional options will appear.
Display Touch this key to adjust the appearance of the display.
Brightness Adjusts the brightness of the display.
Display Mode Adjusts to fit the level of lighting in the vehicle. Touch key to cycle through options. “Day” and “Night” modes are suited for the
respective times of day while “Auto” controls the display automatically.
Scroll Direction Adjusts the direction of the menu scroll. Choose to either move up or down.
Clock Touch this key to adjust the time.
Time Format The clock can be set to 12 hours or 24 hours.
Date Format Select from five possible formats of displaying the day, month, and year.
Clock Mode Adjust the mode for the clock. “Auto” uses the system’s GPS to automatically maintain the time. “Manual” allows you to set the
clock using the “Set Clock Manually” key.
Set Clock Manually Adjust the clock manually, Touch the “+” or “-” keys to adjust the hours, minutes, day, month and year up or down. “Clock Mode” must be set to manual for this option to be available.
Daylight Savings Time Adjusts the daylight savings time on or off.
Time Zone Choose the applicable time zone from the list.
Language Touch this key to change the language on the display.
Camera Touch this key to change the camera settings.
Display Mode Touch this key to select the touch-screen display mode (day, night, or automatic) .
Brightness Adjust touch-screen brightness.
Contrast Adjust touch-screen contrast.
Color Adjust touch-screen color.
4-8Monitor, climate, audio, phone and voice recognition systems
Page 188 of 384
Bluetooth® streaming audio (if so
equipped)
●Some Bluetooth® audio devices may not be
recognized by the in-vehicle audio system.
● It is necessary to set up the wireless con-
nection between a compatible Bluetooth®
audio device and the in-vehicle Bluetooth®
module before using the Bluetooth® audio.
● Operating procedure of the Bluetooth® au-
dio will vary depending on the devices. Make
sure how to operate your audio device be-
fore using it with this system.
● The Bluetooth® audio may be stopped un-
der the following conditions:
● Receiving a call on the Hands-Free
Phone System.
● Checking the connection to the hands-
free phone.
● Do not place the Bluetooth® audio device in
an area surrounded by metal or far away from
the in-vehicle Bluetooth® module to prevent
tone quality degradation and wireless con-
nection disruption. ●
While an audio device is connected through
the Bluetooth® wireless connection, the
battery power of the device may discharge
quicker than usual.
● This system supports the Bluetooth® Audio
Distribution Profile (A2DP, AVRCP) .
BLUETOOTH® is a
trademark owned by
Bluetooth SIG, Inc.
and licensed to
Visteon and Bosch.
Monitor, climate, audio, phone and voice recognition systems4-39
Page 192 of 384
(When the last track on the compact disc is
skipped, the first track is played.)
When the TRACK
button is pressed, the
track being played returns to the beginning.
Press the TRACK
button several times to
skip back several tracks. Each time the button is
pressed the CD moves back one track.
RPT (repeat)/RDM (random) button
Press the RPT/RDM button while a compact disc
is playing to change the play pattern as follows:
CD:
TRACK REPEAT →DISC RANDOM →DISC
REPEAT
MP3/WMA CD:
FOLDER REPEAT →TRACK REPEAT →DISC
RANDOM →FOLDER RANDOM →DISC RE-
PEAT
TRACK REPEAT: The track that is currently play-
ing will be repeated.
DISC RANDOM: The order of the tracks on the
disc will be mixed during play.
DISC REPEAT: The disc currently playing will be
repeated.
FOLDER REPEAT: The tracks in the current
folder will be repeated. FOLDER RANDOM: The order of the tracks in
the folder will be mixed during play.
SCAN (CDs) button
Press the SCAN button for less than 1.5 seconds
to scan all tracks of the current disc for 10 sec-
onds per track. The SCAN icon is flashed during
scan mode.
The scan mode is canceled once it scans through
all tracks on the disc, or if the SCAN button is
pressed during scan mode.
CD EJECT
When the
button is pressed with a com-
pact disc loaded, the compact disc will be
ejected.
When the
button is pressed while the
compact disc is playing, the compact disc will
eject and the system will turn off.
AUX (Auxiliary) button
The AUX IN jack is located on the CD player. The
AUX IN audio input jack accepts any standard
analog audio input such as from a portable cas-
sette tape/CD player, MP3 player or laptop com-
puters.
Press the AUX button to play a compatible device
when it is plugged into the AUX IN jack. Press the MENU button repeatedly until “AUX IN
Volume” appears on the screen to control the
incoming volume level of the auxiliary input de-
vice. Turn the TUNE/FOLDER knob to adjust the
level between 0 and +3.
Additional features
For additional information about the Bluetooth®
audio interface available with this system, refer to
“Bluetooth® streaming audio without Navigation
System” in this section.
Monitor, climate, audio, phone and voice recognition systems4-43
Page 195 of 384
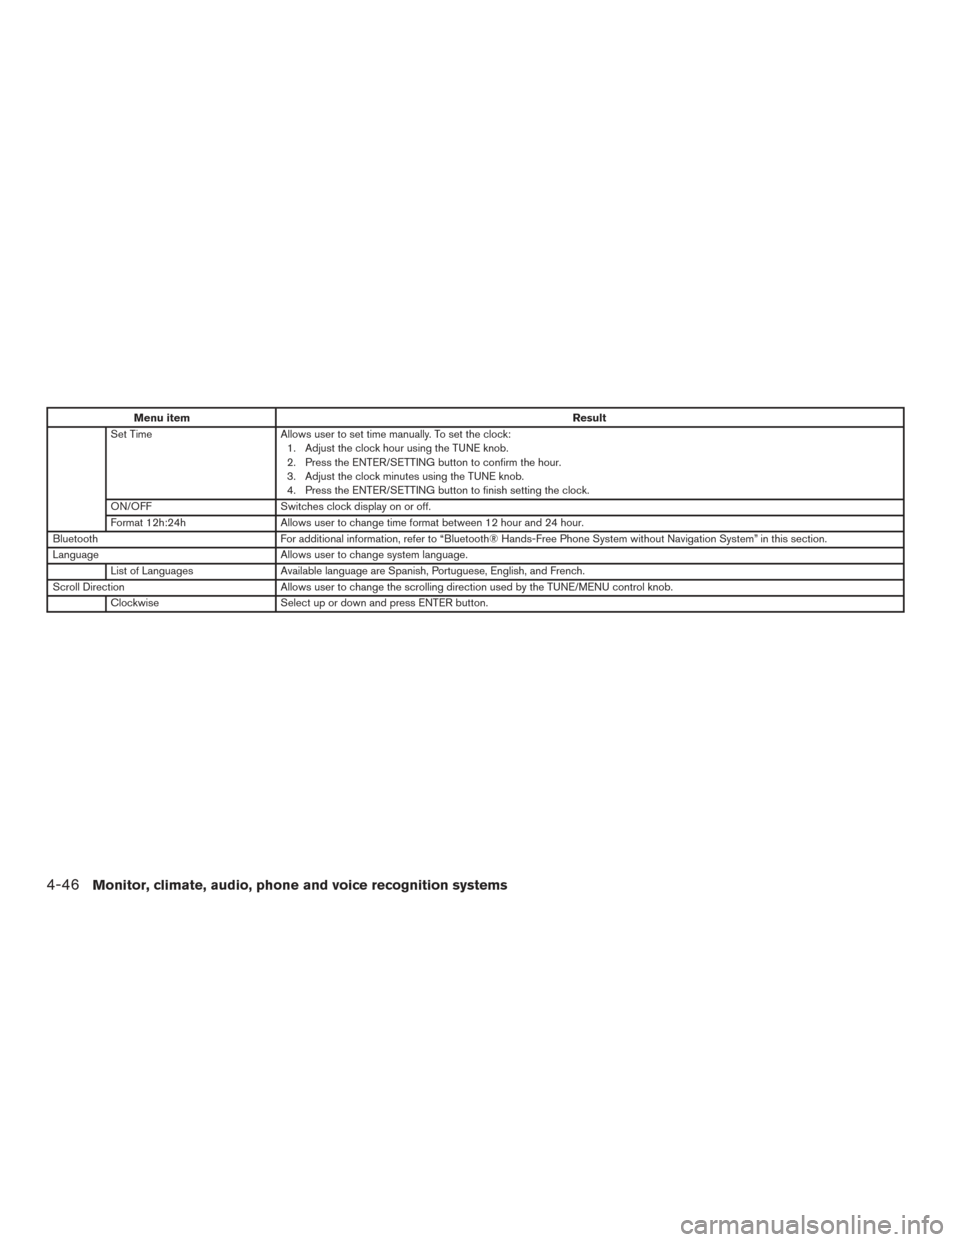
Menu itemResult
Set Time Allows user to set time manually. To set the clock:
1. Adjust the clock hour using the TUNE knob.
2. Press the ENTER/SETTING button to confirm the hour.
3. Adjust the clock minutes using the TUNE knob.
4. Press the ENTER/SETTING button to finish setting the clock.
ON/OFF Switches clock display on or off.
Format 12h:24h Allows user to change time format between 12 hour and 24 hour.
Bluetooth For additional information, refer to “Bluetooth® Hands-Free Phone System without Navigation System” in this section.
Language Allows user to change system language.
List of Languages Available language are Spanish, Portuguese, English, and French.
Scroll Direction Allows user to change the scrolling direction used by the TUNE/MENU control knob.
Clockwise Select up or down and press ENTER button.
4-46Monitor, climate, audio, phone and voice recognition systems
Page 197 of 384
DISP button:
When the DISP button is pressed while a CD is
playing, the display will change as follows:
CD:
Track Time→Album →Artist →Track Time
CD with MP3 or WMA:
Track time→ Folder title→Artist →Song title →
Track number
SEEK/TRACK (Reverse or
Fast Forward) button:
Press and hold the SEEK/TRACK button
orfor 1.5 seconds while the compact disc
is playing to reverse or fast forward the track
being played. The compact disc plays at an in-
creased speed while reversing or fast forwarding.
When the button is released, the compact disc
returns to normal play speed.
SEEK/TRACK button
Press the SEEK/TRACK button
while a
CD or MP3/WMA CD is playing to return to the
beginning of the current track. Press the
SEEK/TRACK button
several times to skip
backward several tracks. Press the SEEK/TRACK button
while a
CD or MP3/WMA CD is playing to advance one
track. Press the SEEK/TRACK button
sev-
eral times to skip forward several tracks. If the last
track on a CD is skipped, the first track on the
disc is played. If the last track in a folder of an
MP3/WMA CD is skipped, the first track of the
next folder is played.
button (MP3/WMA CD only):
If an MP3/WMA CD with multiple folders is play-
ing, press the
button once to view the
track list and again to view the folder list. To select
a folder or track, turn the TUNE/MENU knob to
scroll through the folders/songs and press the
ENTER button to make a selection.
RPT button:
When the RPT button (Preset station number 1)
is pressed while a compact disc is playing, the
Repeat mode is toggled.
RDM button:
When the RDM button (Preset station number 2)
is pressed while a compact disc is playing, the
Random mode is toggled.
CD EJECT button
When the
button is pressed with a com-
pact disc loaded, the compact disc will eject and
the last source will be played.
Additional features
For additional information about the iPod® player
available with this system, refer to “iPod® player
operation without Navigation System” in this sec-
tion.
For additional information about the USB inter-
face available with this system, refer to “USB
(Universal Serial Bus) connection port (models
without Navigation System)” in this section.
For additional information about the Bluetooth®
audio interface available with this system, refer to
“Bluetooth® streaming audio without Navigation
System” in this section.
4-48Monitor, climate, audio, phone and voice recognition systems
Page 199 of 384
Audio main operation
(power) button / VOL (volume) con-trol knob
Place the ignition switch in the ACC or ON
position and press the
(power) button
while the system is off to call up the mode (radio,
CD, AUX, Bluetooth® audio USB or iPod®) that
was playing immediately before the system was
turned off. To turn the system off, press the
(power)
button.
Turn the VOL (volume) control knob to adjust the
volume.
This vehicle may be equipped with Speed Sen-
sitive Volume. When this feature is active, the
audio volume changes as the driving speed
changes. ENTER/SETTING button:
Press the ENTER/SETTING button to show the
Settings screen on the display. Turn the
TUNE/SCROLL knob to navigate the options
and then press the ENTER/SETTING button to
make a selection.
Audio
Bass Adjusts the bass to the desired level.
Treble Adjusts the treble to the desired level.
Balance Adjusts the balance to the desired level. Balance adjusts the sound level between the left and right speakers.
Fade Adjusts the fade to the desired level. Fade adjusts the sound level between the front and rear speakers.
Speed Sens Vol. (Speed Sensitive Volume) Adjusts the speed sensitive volume function, which increases the volume of the audio system as the speed of
the vehicle increases. Set to “OFF” to disable the feature. The higher the setting, the more the volume in-
creases in relation to vehicle speed.
AUX Vol. Choose a setting from 0 to +3 to control the boost of incoming auxiliary device volume. A setting of 0 provides
no additional boost in volume. A setting of +3 provides the greatest boost in volume.
Brightness and Contrast Adjust the brightness or contrast to adjust the appearance of the display screen.
Clock adjust Press the ENTER/SETTING button to highlight the hours or minutes and then use the TUNE/SCROLL knob to
adjust the value. Press the ENTER/SETTING button again to set the value.
On-Screen Clock Toggles ON or OFF the clock display on the upper right corner of the display screen.
RDS Display Toggles ON or OFF the RDS information displayed on the screen while the radio is playing.
Language Select the desired language for the system from the available options.
Bass, treble, balance and fade can also be adjusted by pressing the ENTER/SETTING button and turning the TUNE/SCROLL control knob to select the item
to adjust. When the desired item is shown on the display, turn the tuning to adjust and then press the ENTER/SETTING button until the display returns to
the main audio screen. If the button is not pressed for approximately 10 seconds, the radio or CD display will automatically reappear.
4-50Monitor, climate, audio, phone and voice recognition systems