cruise control NISSAN XTERRA 2000 WD22 / 1.G Owners Manual
[x] Cancel search | Manufacturer: NISSAN, Model Year: 2000, Model line: XTERRA, Model: NISSAN XTERRA 2000 WD22 / 1.GPages: 263, PDF Size: 2.16 MB
Page 50 of 263

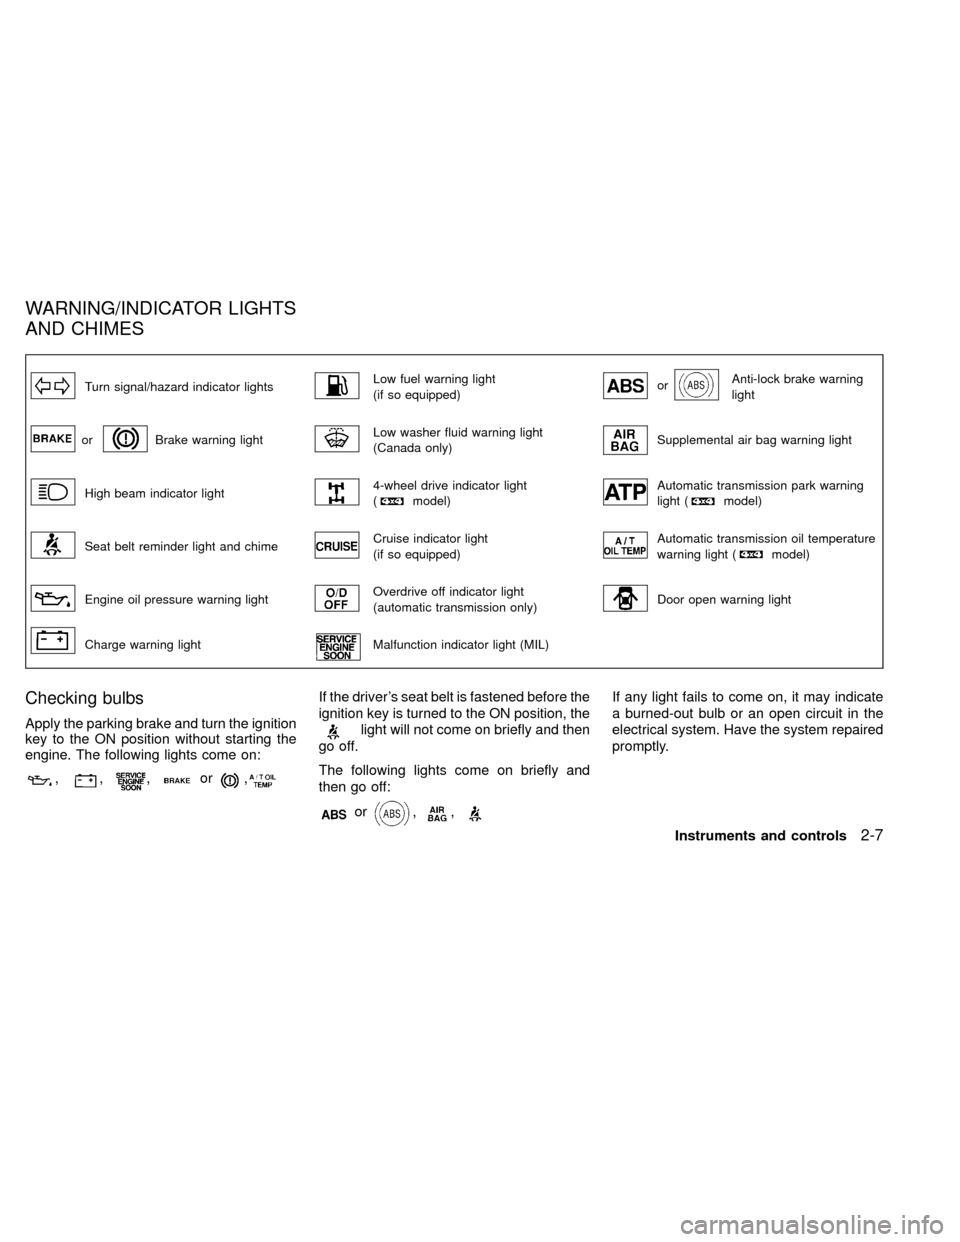
Turn signal/hazard indicator lightsLow fuel warning light
(if so equipped)orAnti-lock brake warning
light
orBrake warning lightLow washer fluid warning light
(Canada only)Supplemental air bag warning light
High beam indicator light4-wheel drive indicator light
(model)Automatic transmission park warning
light (model)
Seat belt reminder light and chimeCruise indicator light
(if so equipped)Automatic transmission oil temperature
warning light (model)
Engine oil pressure warning lightOverdrive off indicator light
(automatic transmission only)Door open warning light
Charge warning lightMalfunction indicator light (MIL)
Checking bulbs
Apply the parking brake and turn the ignition
key to the ON position without starting the
engine. The following lights come on:
,,,or,
If the driver's seat belt is fastened before the
ignition key is turned to the ON position, the
light will not come on briefly and then
go off.
The following lights come on briefly and
then go off:
or,,
If any light fails to come on, it may indicate
a burned-out bulb or an open circuit in the
electrical system. Have the system repaired
promptly.
WARNING/INDICATOR LIGHTS
AND CHIMES
Instruments and controls2-7
ZX
Page 53 of 263

WARNING
OWhen parking always make sure the
transfer control lever is in the 2H, 4H
or 4L position and the parking brake
is applied.
OFailure to engage the transfer con-
trol lever in 2H, 4H or 4L could result
in the vehicle moving unexpectedly,
which could cause serious personal
injury or property damage.
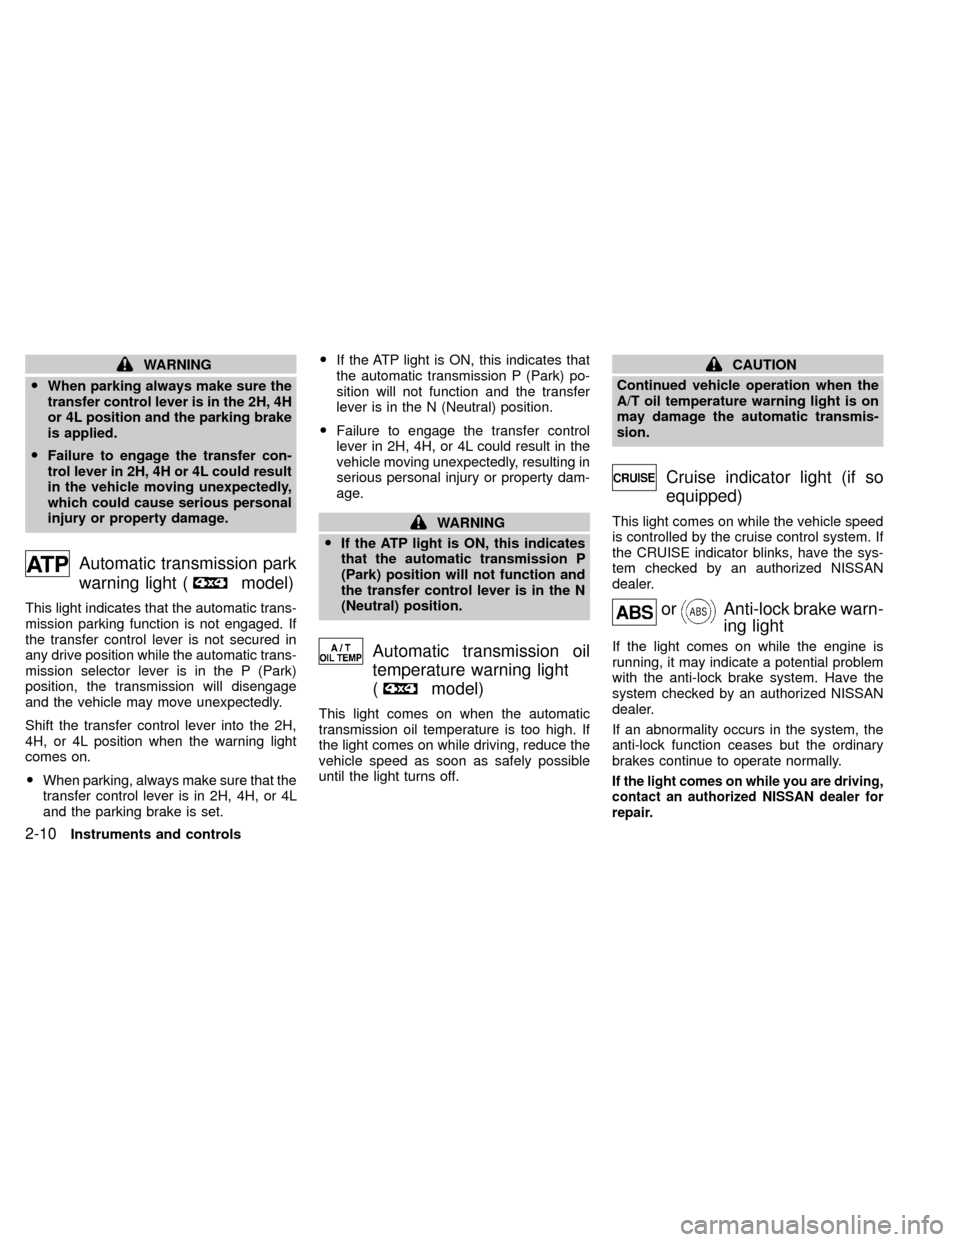
Automatic transmission park
warning light (
model)
This light indicates that the automatic trans-
mission parking function is not engaged. If
the transfer control lever is not secured in
any drive position while the automatic trans-
mission selector lever is in the P (Park)
position, the transmission will disengage
and the vehicle may move unexpectedly.
Shift the transfer control lever into the 2H,
4H, or 4L position when the warning light
comes on.
OWhen parking, always make sure that the
transfer control lever is in 2H, 4H, or 4L
and the parking brake is set.OIf the ATP light is ON, this indicates that
the automatic transmission P (Park) po-
sition will not function and the transfer
lever is in the N (Neutral) position.
OFailure to engage the transfer control
lever in 2H, 4H, or 4L could result in the
vehicle moving unexpectedly, resulting in
serious personal injury or property dam-
age.
WARNING
OIf the ATP light is ON, this indicates
that the automatic transmission P
(Park) position will not function and
the transfer control lever is in the N
(Neutral) position.
Automatic transmission oil
temperature warning light
(
model)
This light comes on when the automatic
transmission oil temperature is too high. If
the light comes on while driving, reduce the
vehicle speed as soon as safely possible
until the light turns off.
CAUTION
Continued vehicle operation when the
A/T oil temperature warning light is on
may damage the automatic transmis-
sion.
Cruise indicator light (if so
equipped)
This light comes on while the vehicle speed
is controlled by the cruise control system. If
the CRUISE indicator blinks, have the sys-
tem checked by an authorized NISSAN
dealer.
orAnti-lock brake warn-
ing light
If the light comes on while the engine is
running, it may indicate a potential problem
with the anti-lock brake system. Have the
system checked by an authorized NISSAN
dealer.
If an abnormality occurs in the system, the
anti-lock function ceases but the ordinary
brakes continue to operate normally.
If the light comes on while you are driving,
contact an authorized NISSAN dealer for
repair.
2-10Instruments and controls
ZX
Page 126 of 263

5 Starting and driving
Precautions when starting and driving ...................5-2
Exhaust gas (carbon monoxide) ............................5-2
Three-way catalyst .................................................5-3
On-pavement and off-road driving precautions .....5-3
Avoiding collision and rollover................................5-3
Drinking alcohol/drugs and driving .........................5-4
Driving safety precautions ......................................5-4
Ignition switch .........................................................5-6
Manual transmission ..............................................5-6
Automatic transmission ..........................................5-7
Before starting the engine ......................................5-8
Driving with automatic transmission
(if so equipped) ......................................................5-8
Driving with manual transmission ........................5-13Starting the engine ...............................................5-14
Parking brake operation .......................................5-15
Cruise control (if so equipped) .............................5-16
Break-in schedule ................................................5-18
Increasing fuel economy ......................................5-18
Transfer case shifting procedures for 4-wheel
drive vehicles........................................................5-19
Auto-lock free-running hubs .................................5-20
Tires of four-wheel drive ......................................5-22
Parking/parking on hills ........................................5-23
Power steering system .........................................5-24
Brake system........................................................5-24
Anti-lock brake system (ABS) ..............................5-25
Cold weather driving ............................................5-26
ZX
Page 141 of 263

Precautions
OThe cruise indicator light in the instru-
ment panel may blink when the cruise
control main switch is turned ON while
pushing the RES/ACCEL, COAST/SET,
or CANCEL switch. To properly set the
cruise control system, perform the follow-
ing steps in the order indicated.
OIf the cruise control system malfunctions,
it cancels automatically. The CRUISE
light in the instrument panel then blinks to
warn the driver.
OIf the cruise light blinks, turn the cruisecontrol main switch off and have the
system checked by an authorized NIS-
SAN dealer.
WARNING
Do not use the cruise control when
driving under the following conditions:
OWhen it is not possible to keep the
vehicle at a set speed.
OIn heavy traffic or in traffic that var-
ies in speed.
OOn winding or hilly roads.OOn slippery roads (rain, snow, ice,
etc.).
OIn very windy areas.
Doing so could cause a loss of vehicle
control and result in an accident.
CAUTION
On manual transmission models, do
not shift into N (Neutral) without de-
pressing the clutch pedal when the
cruise control is set. Should this occur,
depress the clutch pedal and turn the
main switch off immediately. Failure to
do so may cause engine damage.
The cruise control allows driving at a fixed
speed between 30 and 90 MPH (48 and 145
km/h) without keeping your foot on the
accelerator pedal.
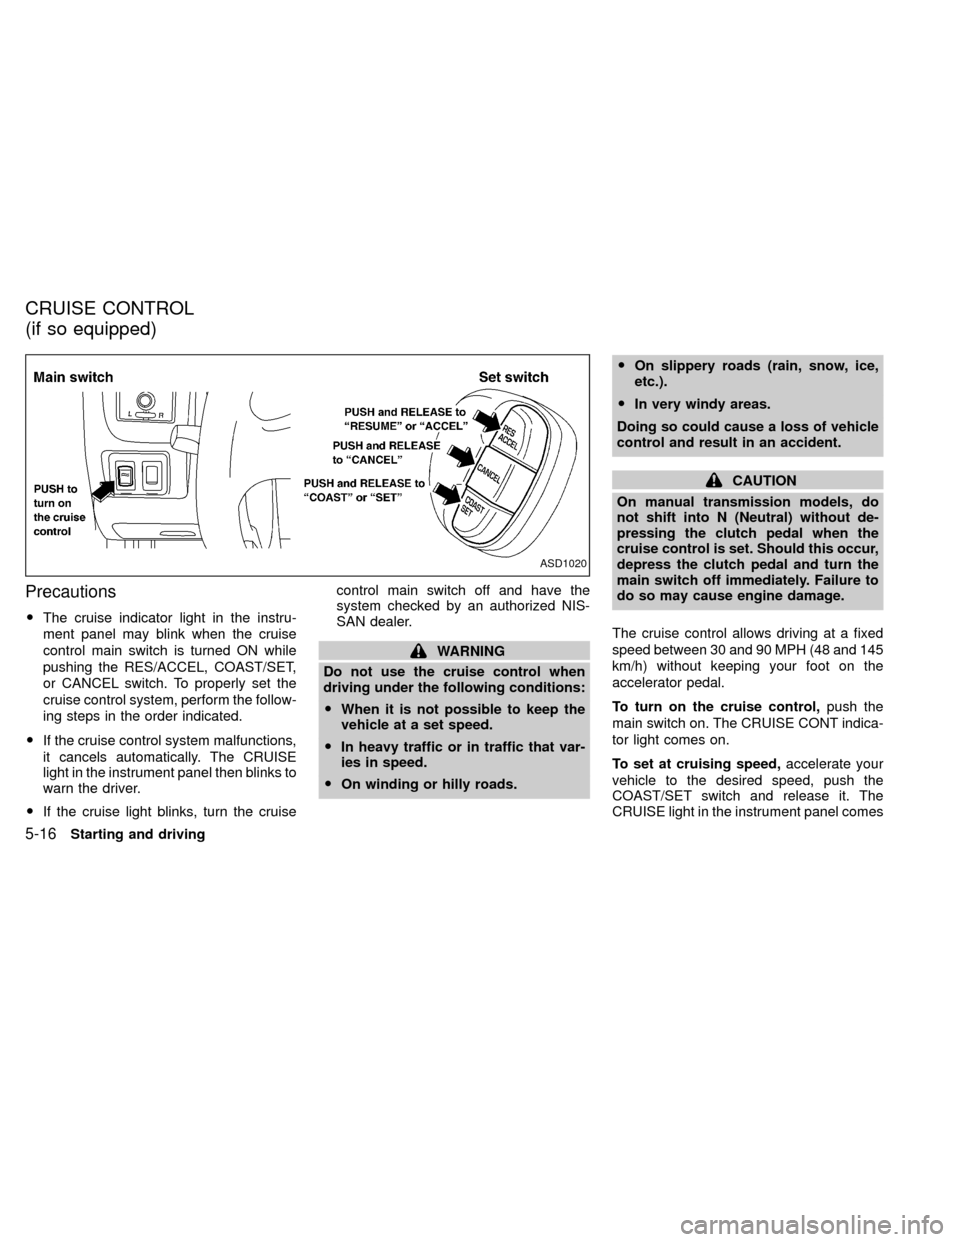
To turn on the cruise control,push the
main switch on. The CRUISE CONT indica-
tor light comes on.
To set at cruising speed,accelerate your
vehicle to the desired speed, push the
COAST/SET switch and release it. The
CRUISE light in the instrument panel comes
ASD1020
CRUISE CONTROL
(if so equipped)
5-16Starting and driving
ZX
Page 142 of 263

on. Take your foot off the accelerator pedal.
Your vehicle maintains the set speed.
To pass another vehicle,depress the ac-
celerator pedal. When you release the
pedal, the vehicle returns to the previously
set speed.
OThe vehicle may not maintain the set
speed when going up or down steep
hills. If this happens, drive without the
cruise control.
To cancel the preset speed,use one of the
following three methods:
a) Push the CANCEL button; the CRUISE
light in the instrument panel goes out.
b) Tap the brake pedal; the CRUISE light
goes out.
c)
Turn the main switch off. Both the CRUISE
CONT and CRUISE lights go out.
The cruise control is automatically can-
celled and the CRUISE light goes out if:
Oyou depress the brake pedal while push-
ing the RES/ACCEL set switch.
Othe vehicle slows down more than 8 MPH
(13 km/h) below the set speed.Oyou depress the clutch pedal (manual
transmission), or move the shift lever to
the N (Neutral) position (automatic trans-
mission).
To reset at a faster cruising speed,use
one of the following three methods:
a) Depress the accelerator pedal. When the
vehicle attains the desired speed, push
and release the COAST/SET switch.
b) Push and hold the RES/ACCEL set
switch. When the vehicle attains the
speed you desire, release the switch.
c)
Push, and release the RES/ACCEL set
switch. Each time you do this, the set
speed increases by about 1 MPH (1.6
km/h).
To reset at a slower cruising speed,use
one of the following three methods:
a) Lightly tap the brake pedal. When the
vehicle attains the desired speed, push
the COAST/SET switch and release it.
b) Push and hold the COAST/SET switch.
Release the switch when the vehicle
slows down to the desired speed.
c) Push, and release the COAST/SETswitch. Each time you do this, the set
speed decreases by about 1 MPH (1.6
km/h).
To resume the preset speed,push and
release the RES/ACCEL switch. The ve-
hicle returns to the last set cruising speed
when the vehicle speed is over 30 MPH (48
km/h).
Starting and driving
5-17
ZX
Page 152 of 263

installing tire chains. When installing tire
chains, make sure they are of proper size
for the tires on your vehicle and are
installed according to the chain manufac-
turer's suggestions.Use only SAE
Class ``S'' chains.Other types may
damage your vehicle. Use chain tension-
ers when recommended by the tire chain
manufacturer to ensure a tight fit. Loose
end links of the tire chain must be se-
cured or removed to prevent the possi-
bility of whipping action damage to the
fenders or undercarriage. If possible,
avoid fully loading your vehicle when
using tire chains. In addition, drive at a
reduced speed, otherwise, your vehicle
may be damaged and/or vehicle handling
and performance may be adversely af-
fected. Never install tire chains on a
TEMPORARY USE ONLY spare tire. Do
not use tire chains on dry roads.
Special winter equipment
It is recommended that the following items
be carried in the vehicle during winter:
1. A scraper and stiff-bristled brush to re-
move ice and snow from the windows
and wiper blades.2. A sturdy, flat board to be placed under
the jack to give it firm support.
3. A shovel to dig the vehicle out of snow-
drifts.
4. Extra window washer fluid to refill the
reservoir tank.
Driving on snow or ice
WARNING
OWet ice (32ÉF, 0ÉC and freezing rain),
very cold snow, or ice can be slick
and very hard to drive on. The ve-
hicle will have much less traction or
``grip'' under these conditions. Try to
avoid driving on wet ice until the
road is salted or sanded.
OWhatever the condition, drive with
caution. Accelerate and slow down
with care. If accelerating or down-
shifting too fast, the drive wheels
will lose even more traction.
O
Allow more stopping distance under
these conditions. Braking should be
started sooner than on dry pavement.
OAllow greater following distances on
slippery roads.OWatch for slippery spots (glare ice).
These may appear on an otherwise
clear road in shaded areas. If a patch
of ice is seen ahead, brake before
reaching it. Try not to brake while on
the ice, and avoid any sudden steer-
ing maneuvers.
ODo not use the cruise control on
slippery roads.
OSnow can trap dangerous exhaust
gases under your vehicle. Keep
snow clear of the exhaust pipe and
from around your vehicle.
Engine block heater (if so equipped)
An engine block heater to assist extreme
cold temperature starting is available
through an authorized NISSAN dealer.
WARNING
Do not use your heater with an un-
grounded electrical system or two-
pronged (cheater) adapters. You can be
injured by an electrical shock if you use
an ungrounded connection.
Starting and driving
5-27
ZX
Page 257 of 263

Changing engine coolant........................ 8-6
Checking engine coolant level ............... 8-5
Engine coolant temperature gauge ........ 2-5
Corrosion protection .................................... 7-4
Cover
Tonneau cover ...................................... 2-22
Cruise control............................................. 5-16
Cup holders ............................................... 2-22
D
Daytime running light system
(Canada only) ............................................ 2-14
Defogger switch
Rear window defogger switch .............. 2-18
Dimensions and weights .......................... 10-11
Door locks .................................................... 3-2
Drive belts .................................................. 8-18
Driving
Auto-lock free-running hubs ................. 5-20
Cold weather driving............................. 5-26
Driving with automatic transmission ....... 5-8
Driving with manual transmission ......... 5-13
Precautions when starting and driving ... 5-2
E
Economy - fuel........................................... 5-18
Emission control information label........... 10-14
Emission control system warranty ........... 10-26Engine
Before starting the engine ...................... 5-8
Capacities and recommended fuel/
lubricants .............................................. 10-2
Changing engine coolant........................ 8-6
Changing engine oil.............................. 8-10
Changing engine oil filter...................... 8-12
Checking engine coolant level ............... 8-5
Checking engine oil level ....................... 8-9
Engine compartment check locations .... 8-3
Engine coolant temperature gauge ........ 2-5
Engine cooling system ........................... 8-5
Engine oil ................................................ 8-9
Engine oil and oil filter
recommendation ................................... 10-6
Engine oil pressure warning light ........... 2-9
Engine oil viscosity ............................... 10-7
Engine serial number ......................... 10-13
Engine specifications ............................ 10-9
Starting the engine ............................... 5-14
Exhaust gas (Carbon monoxide) ................. 5-2
F
First aid kit
First aid kit .............................................. 6-2
Flashers (See hazard warning flasher
switch) ........................................................ 2-18
Floor mat positioning aid ............................. 7-4
Fluid
Automatic transmission fluid (ATF)....... 8-13
Brake fluid ................................... 10-3, 8-15Capacities and recommended fuel/
lubricants .............................................. 10-2
Clutch fluid ............................................ 8-15
Engine coolant ........................................ 8-5
Engine oil ................................................ 8-9
Power steering fluid .............................. 8-14
Window washer fluid ............................ 8-16
F.M.V.S.S. certification label .................... 10-13
Front seats
Separate ................................................. 1-2
Fuel
Capacities and recommended fuel/
lubricants .............................................. 10-2
Fuel economy ....................................... 5-18
Fuel filler cap ........................................ 3-14
Fuel gauge.............................................. 2-6
Fuel octane rating................................. 10-4
Fuel recommendation ........................... 10-4
Fuses ......................................................... 8-27
G
Gauge
Engine coolant temperature gauge ........ 2-5
Fuel gauge.............................................. 2-6
Odometer ................................................ 2-3
Speedometer .......................................... 2-3
Tachometer ............................................. 2-5
Gear Basket (see roof rack with gear
basket) ....................................................... 3-11
General maintenance .................................. 9-2
11-2
ZX