remove seats NISSAN XTERRA 2000 WD22 / 1.G Owners Manual
[x] Cancel search | Manufacturer: NISSAN, Model Year: 2000, Model line: XTERRA, Model: NISSAN XTERRA 2000 WD22 / 1.GPages: 263, PDF Size: 2.16 MB
Page 10 of 263
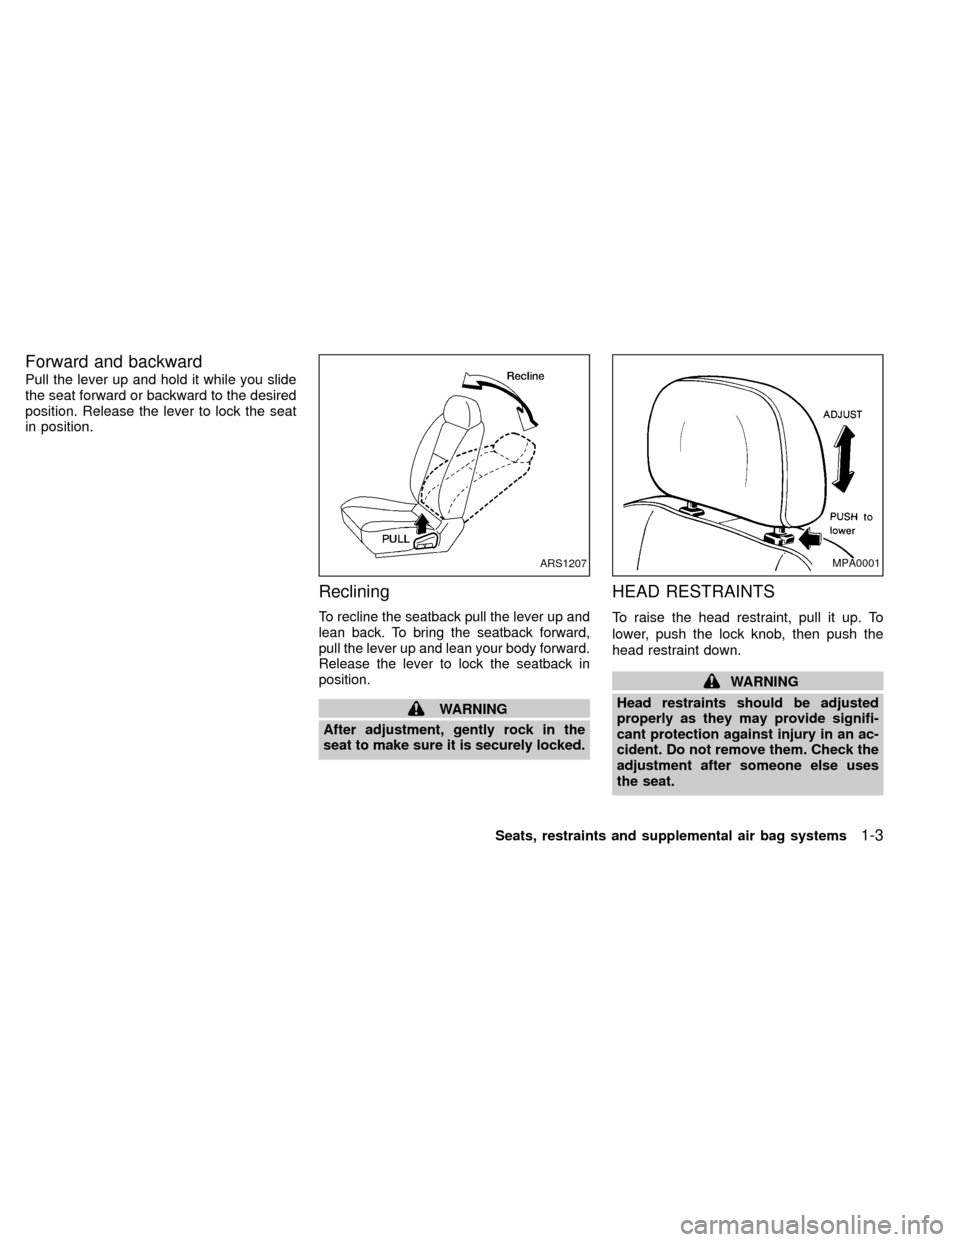
Forward and backward
Pull the lever up and hold it while you slide
the seat forward or backward to the desired
position. Release the lever to lock the seat
in position.
Reclining
To recline the seatback pull the lever up and
lean back. To bring the seatback forward,
pull the lever up and lean your body forward.
Release the lever to lock the seatback in
position.
WARNING
After adjustment, gently rock in the
seat to make sure it is securely locked.
HEAD RESTRAINTS
To raise the head restraint, pull it up. To
lower, push the lock knob, then push the
head restraint down.
WARNING
Head restraints should be adjusted
properly as they may provide signifi-
cant protection against injury in an ac-
cident. Do not remove them. Check the
adjustment after someone else uses
the seat.
ARS1207MPA0001
Seats, restraints and supplemental air bag systems1-3
ZX
Page 11 of 263
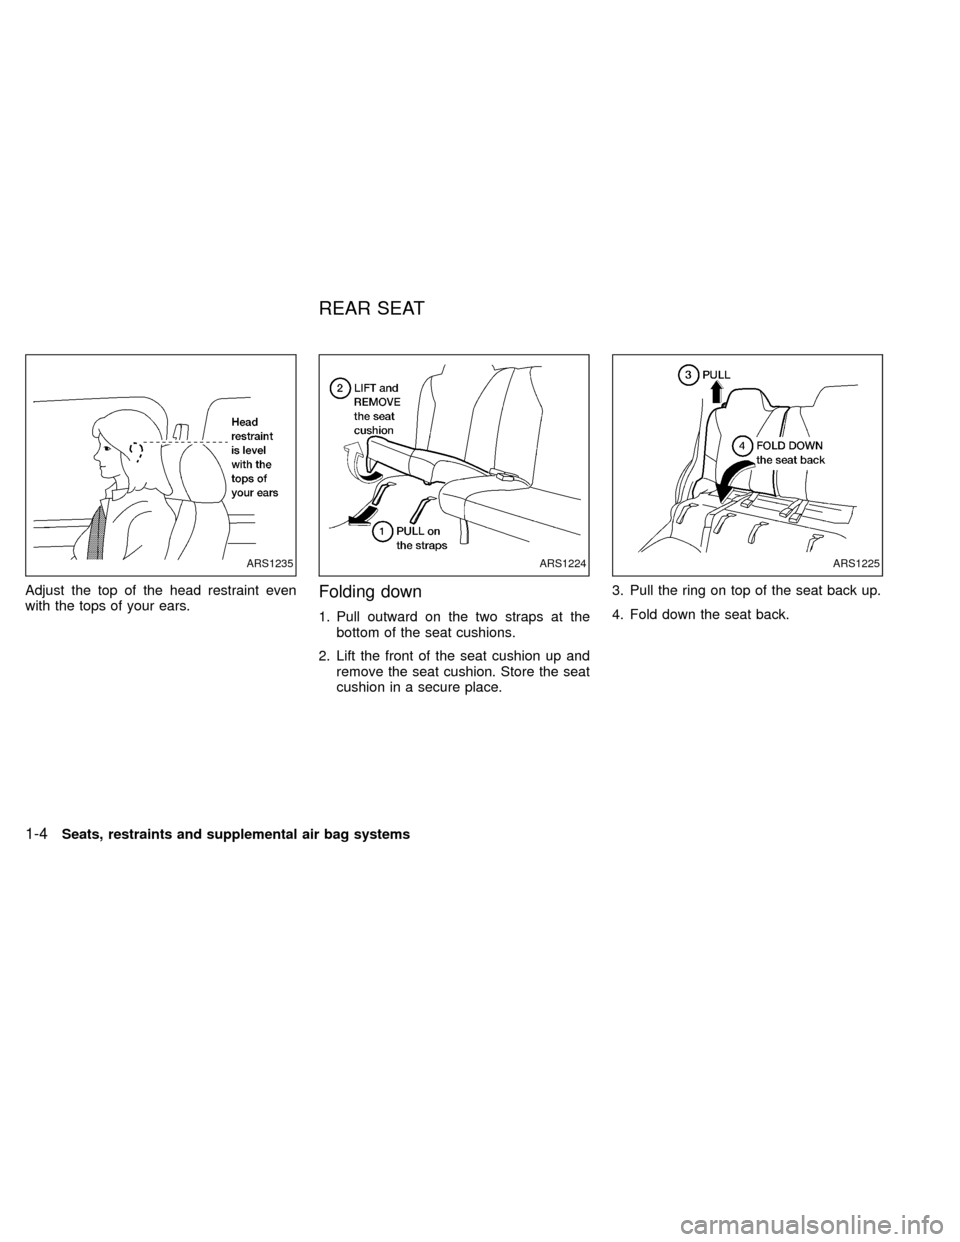
Adjust the top of the head restraint even
with the tops of your ears.Folding down
1. Pull outward on the two straps at the
bottom of the seat cushions.
2. Lift the front of the seat cushion up and
remove the seat cushion. Store the seat
cushion in a secure place.3. Pull the ring on top of the seat back up.
4. Fold down the seat back.
ARS1235ARS1224ARS1225
REAR SEAT
1-4Seats, restraints and supplemental air bag systems
ZX
Page 31 of 263
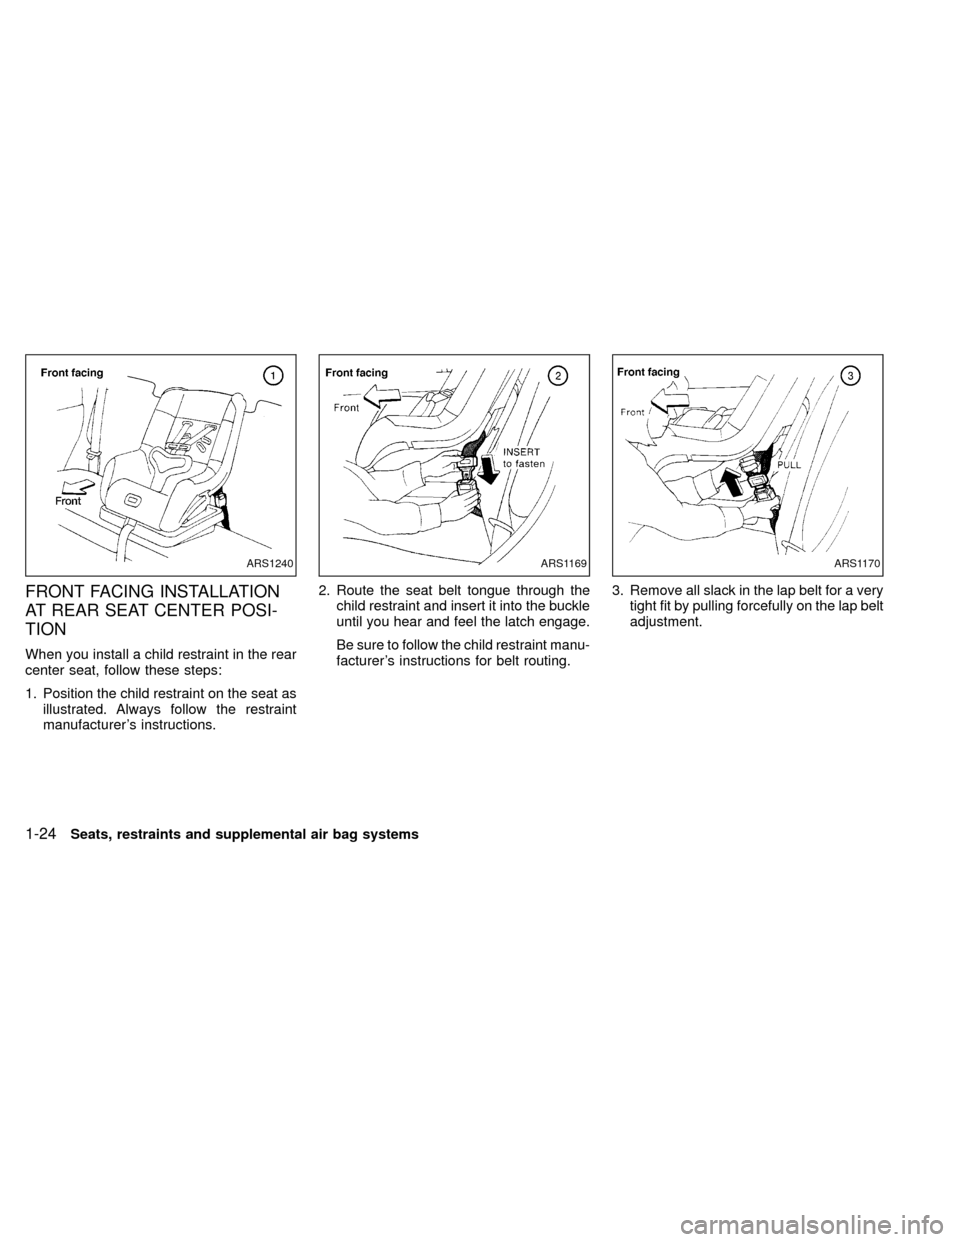
FRONT FACING INSTALLATION
AT REAR SEAT CENTER POSI-
TION
When you install a child restraint in the rear
center seat, follow these steps:
1. Position the child restraint on the seat as
illustrated. Always follow the restraint
manufacturer's instructions.2. Route the seat belt tongue through the
child restraint and insert it into the buckle
until you hear and feel the latch engage.
Be sure to follow the child restraint manu-
facturer's instructions for belt routing.3. Remove all slack in the lap belt for a very
tight fit by pulling forcefully on the lap belt
adjustment.
ARS1240ARS1169ARS1170
1-24Seats, restraints and supplemental air bag systems
ZX
Page 33 of 263
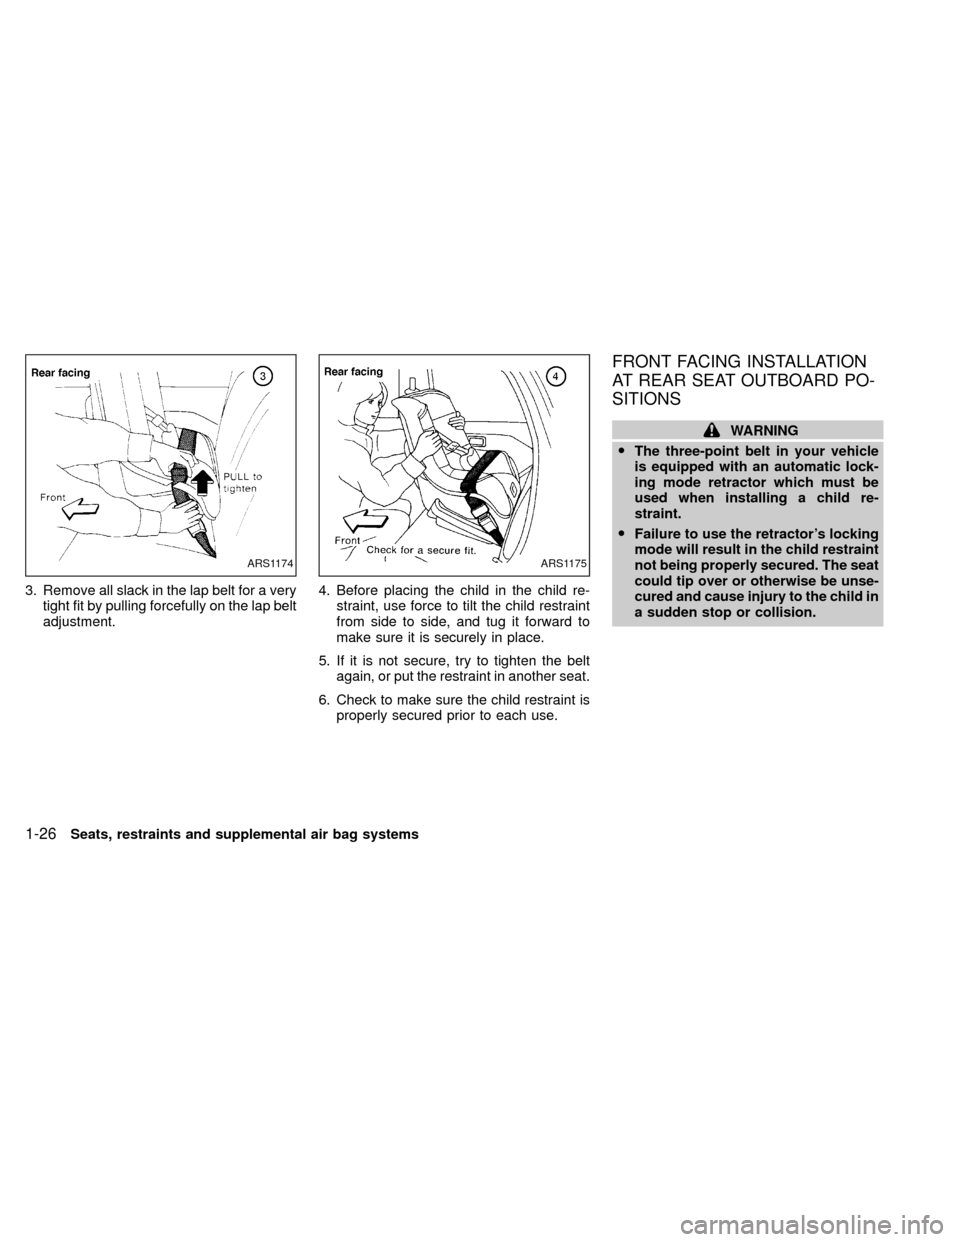
3. Remove all slack in the lap belt for a very
tight fit by pulling forcefully on the lap belt
adjustment.4. Before placing the child in the child re-
straint, use force to tilt the child restraint
from side to side, and tug it forward to
make sure it is securely in place.
5. If it is not secure, try to tighten the belt
again, or put the restraint in another seat.
6. Check to make sure the child restraint is
properly secured prior to each use.
FRONT FACING INSTALLATION
AT REAR SEAT OUTBOARD PO-
SITIONS
WARNING
OThe three-point belt in your vehicle
is equipped with an automatic lock-
ing mode retractor which must be
used when installing a child re-
straint.
OFailure to use the retractor's locking
mode will result in the child restraint
not being properly secured. The seat
could tip over or otherwise be unse-
cured and cause injury to the child in
a sudden stop or collision.
ARS1174ARS1175
1-26Seats, restraints and supplemental air bag systems
ZX
Page 35 of 263
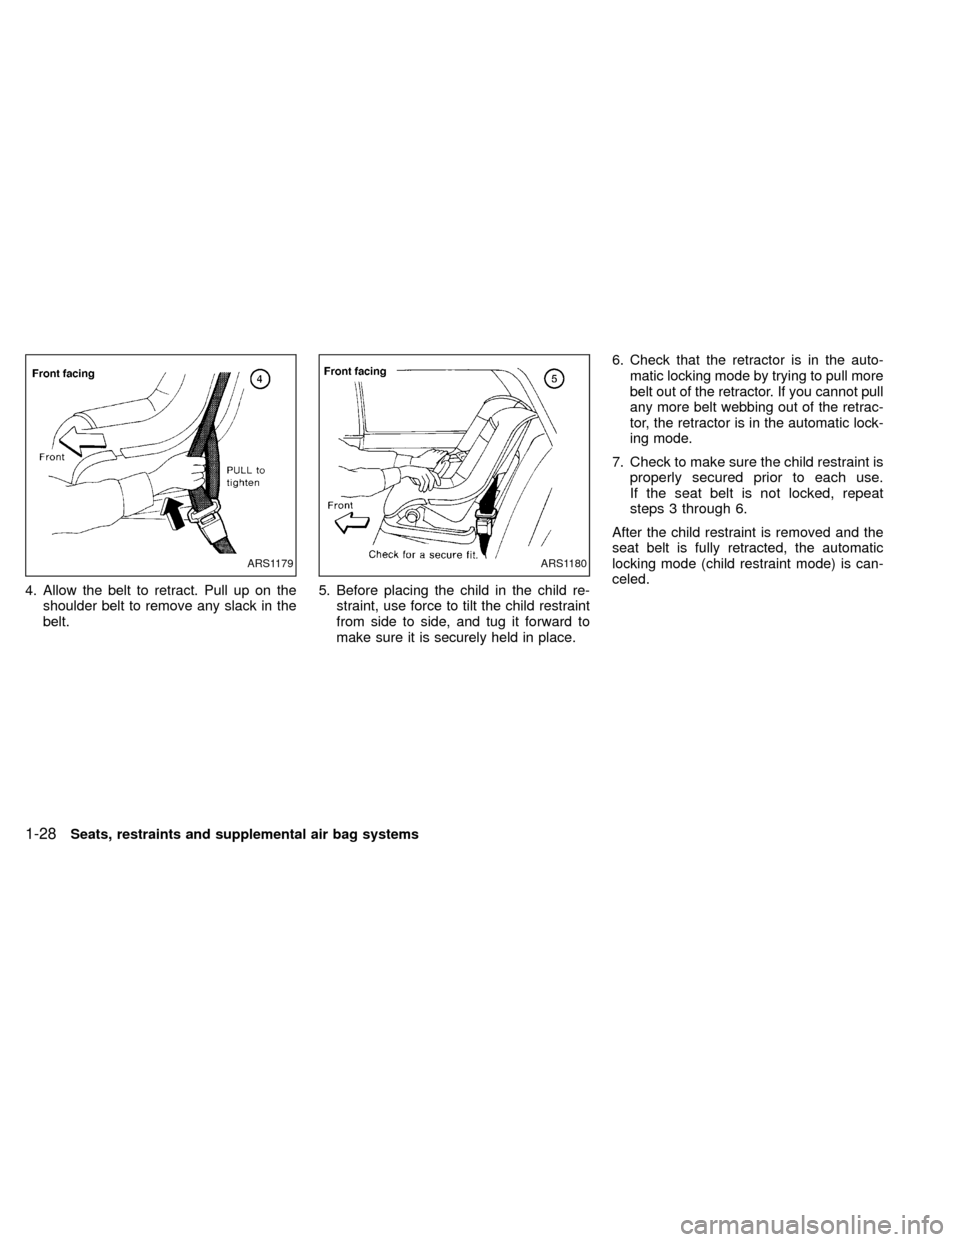
4. Allow the belt to retract. Pull up on the
shoulder belt to remove any slack in the
belt.5. Before placing the child in the child re-
straint, use force to tilt the child restraint
from side to side, and tug it forward to
make sure it is securely held in place.6. Check that the retractor is in the auto-
matic locking mode by trying to pull more
belt out of the retractor. If you cannot pull
any more belt webbing out of the retrac-
tor, the retractor is in the automatic lock-
ing mode.
7.
Check to make sure the child restraint is
properly secured prior to each use.
If the seat belt is not locked, repeat
steps 3 through 6.
After the child restraint is removed and the
seat belt is fully retracted, the automatic
locking mode (child restraint mode) is can-
celed.
ARS1179ARS1180
1-28Seats, restraints and supplemental air bag systems
ZX
Page 37 of 263
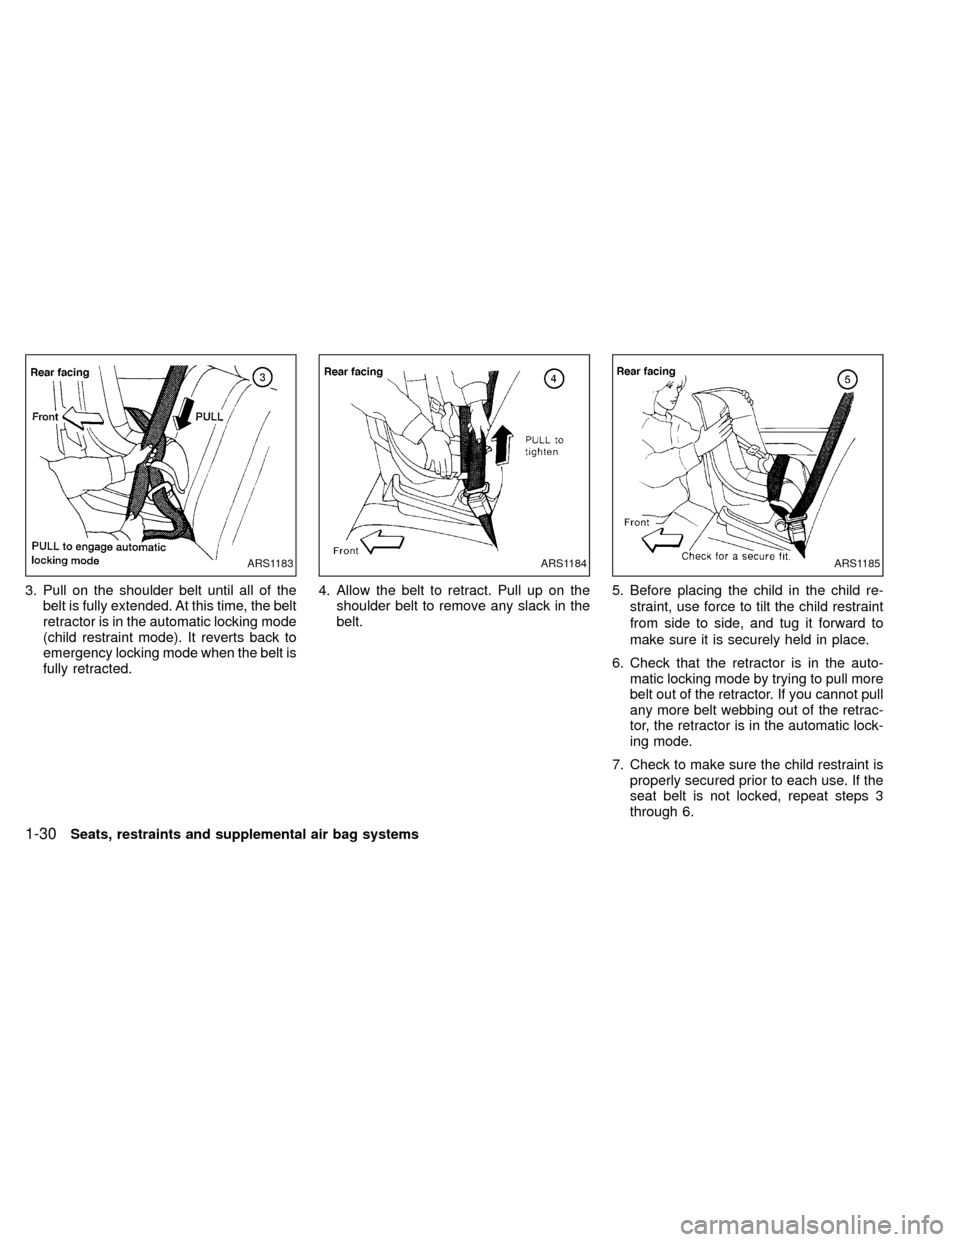
3. Pull on the shoulder belt until all of the
belt is fully extended. At this time, the belt
retractor is in the automatic locking mode
(child restraint mode). It reverts back to
emergency locking mode when the belt is
fully retracted.4. Allow the belt to retract. Pull up on the
shoulder belt to remove any slack in the
belt.5. Before placing the child in the child re-
straint, use force to tilt the child restraint
from side to side, and tug it forward to
make sure it is securely held in place.
6. Check that the retractor is in the auto-
matic locking mode by trying to pull more
belt out of the retractor. If you cannot pull
any more belt webbing out of the retrac-
tor, the retractor is in the automatic lock-
ing mode.
7. Check to make sure the child restraint is
properly secured prior to each use. If the
seat belt is not locked, repeat steps 3
through 6.
ARS1183ARS1184ARS1185
1-30Seats, restraints and supplemental air bag systems
ZX
Page 38 of 263
After the child restraint is removed and the
seat belt is fully retracted, the automatic
locking mode (child restraint mode) is can-
celed.
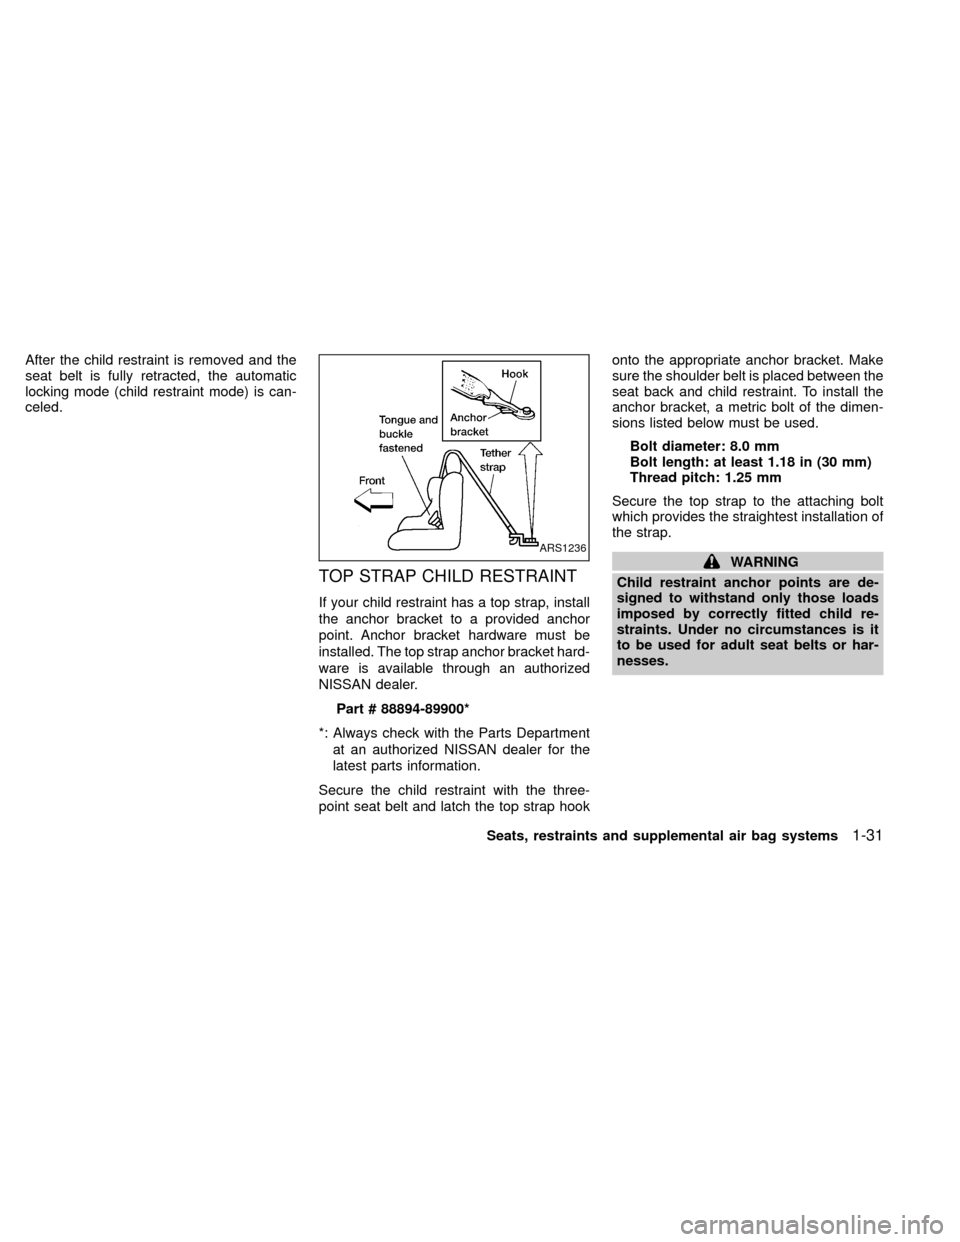
TOP STRAP CHILD RESTRAINT
If your child restraint has a top strap, install
the anchor bracket to a provided anchor
point. Anchor bracket hardware must be
installed. The top strap anchor bracket hard-
ware is available through an authorized
NISSAN dealer.
Part # 88894-89900*
*: Always check with the Parts Department
at an authorized NISSAN dealer for the
latest parts information.
Secure the child restraint with the three-
point seat belt and latch the top strap hookonto the appropriate anchor bracket. Make
sure the shoulder belt is placed between the
seat back and child restraint. To install the
anchor bracket, a metric bolt of the dimen-
sions listed below must be used.
Bolt diameter: 8.0 mm
Bolt length: at least 1.18 in (30 mm)
Thread pitch: 1.25 mm
Secure the top strap to the attaching bolt
which provides the straightest installation of
the strap.
WARNING
Child restraint anchor points are de-
signed to withstand only those loads
imposed by correctly fitted child re-
straints. Under no circumstances is it
to be used for adult seat belts or har-
nesses.ARS1236
Seats, restraints and supplemental air bag systems1-31
ZX
Page 41 of 263
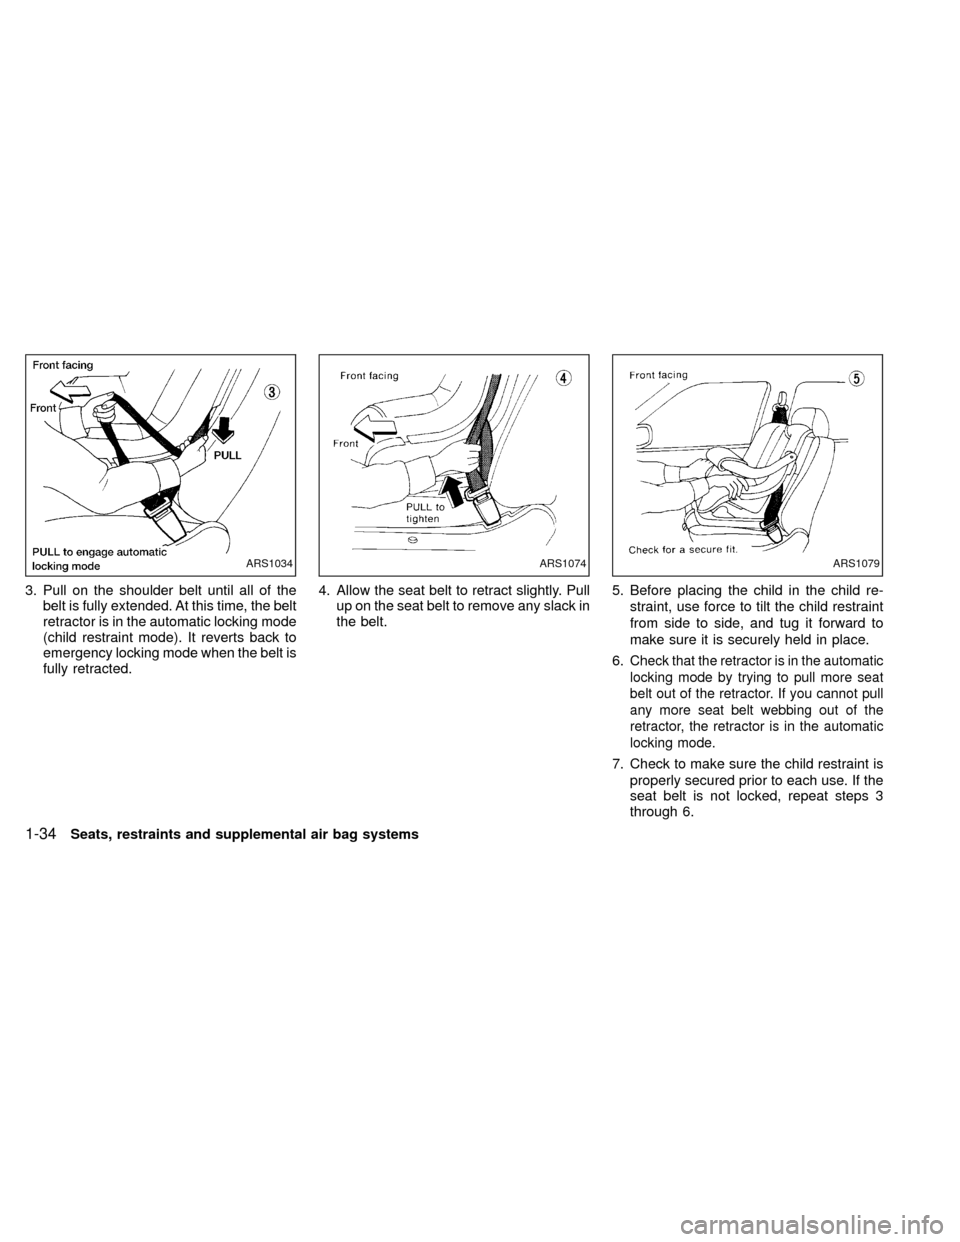
3. Pull on the shoulder belt until all of the
belt is fully extended. At this time, the belt
retractor is in the automatic locking mode
(child restraint mode). It reverts back to
emergency locking mode when the belt is
fully retracted.4. Allow the seat belt to retract slightly. Pull
up on the seat belt to remove any slack in
the belt.5. Before placing the child in the child re-
straint, use force to tilt the child restraint
from side to side, and tug it forward to
make sure it is securely held in place.
6.
Check that the retractor is in the automatic
locking mode by trying to pull more seat
belt out of the retractor. If you cannot pull
any more seat belt webbing out of the
retractor, the retractor is in the automatic
locking mode.
7. Check to make sure the child restraint is
properly secured prior to each use. If the
seat belt is not locked, repeat steps 3
through 6.
ARS1034ARS1074ARS1079
1-34Seats, restraints and supplemental air bag systems
ZX
Page 42 of 263

After the child restraint is removed and the
seat belt is fully retracted, the automatic
locking mode (child restraint mode) is can-
celed.
Seats, restraints and supplemental air bag systems
1-35
ZX
Page 170 of 263
you in choosing the proper product.
OWax your vehicle only after a thorough
washing. Follow the instructions supplied
with the wax.
ODo not use a wax containing any abra-
sives, cutting compounds or cleaners
that may damage the vehicle finish.
OIf the surface does not polish easily, use
a ``road tar'' remover and wax again.
Machine compounding or aggressive pol-
ishing on a base coat/clear coat paint finish
may dull the finish or leave swirl marks.
Removing spots
Remove tar and oil spots, industrial dust,
insects and tree sap as quickly as possible
from the surface of the paint to avoid per-
manent damage or staining. Special clean-
ing products are available at an authorized
NISSAN dealer or any automotive accesso-
ries store.
Underbody
In areas where road salt is used in winter, it
is necessary to clean the underbody regu-
larly in order to prevent dirt and salt from
building up and causing corrosion on theunderbody and suspension. Before the win-
ter period and again in the spring, the
underseal must be checked and, if neces-
sary, retreated.
Cleaning glass
Use glass cleaner to remove smoke and
dust film from the glass surfaces. It is nor-
mal for glass to be coated with a film after
the vehicle is parked in the hot sun. Glass
cleaner and a soft cloth easily remove this
film.
CAUTION
When cleaning the inside of the win-
dow, do not use sharp-edged tools or
abrasive cleaners or chlorine-based
disinfectant cleaners. They could dam-
age the electrical conductors, radio an-
tenna elements or rear window defog-
ger elements.
Cleaning aluminum alloy wheels
Wash regularly, especially during winter
months in areas where road salt is used.
Salt could discolor the wheel if not removed.
Chrome parts
Clean all chrome parts regularly with a
non-abrasive chrome polish to maintain the
finish.
Cleaning interior
Occasionally remove loose dust from the
interior trim, plastic parts and seats using a
vacuum cleaner or soft brush. Wipe the
vinyl and leather surfaces with a clean, soft
cloth dampened in mild soap solution, then
wipe clean with a dry soft cloth. Before
using any fabric protector, read the manu-
facturer's recommendations. Some fabric
protectors contain chemicals that stain or
bleach the seat material. Use a cloth damp-
ened only with water, to clean the meter and
gauge lens.
CAUTION
ONever use benzine, thinner or any
similar material.
ONever use fabric protectors unless
recommended by the manufacturer.
ODo not use glass or plastic cleaner
on meter or gauge lens covers. It
may damage the lens cover.
Appearance and care
7-3
ZX