warning light NISSAN XTERRA 2002 WD22 / 1.G Owners Manual
[x] Cancel search | Manufacturer: NISSAN, Model Year: 2002, Model line: XTERRA, Model: NISSAN XTERRA 2002 WD22 / 1.GPages: 263, PDF Size: 2.22 MB
Page 8 of 263

1 Seats, restraints and supplemental air
bag systems
Seats ......................................................................1-2
Front manual seat adjustment...........................1-2
Rear seat adjustment (type a)...........................1-3
Rear seat adjustment (type b)...........................1-5
Head restraint adjustment .................................1-7
Supplemental restraint system ...............................1-7
Precautions on supplemental restraint
system ...............................................................1-7
Supplemental air bag warning labels ..............1-14
Supplemental air bag warning light .................1-14
Seat belts .............................................................1-16
Precautions on seat belt usage ......................1-16
Child safety ......................................................1-17
Pregnant women .............................................1-18
Injured persons ................................................1-18Three-point type seat belt with retractor .........1-19
Two-point type seat belt without
retractor (center of rear seat) ..........................1-21
Seat belt extenders .........................................1-23
Seat belt maintenance ....................................1-24
Child restraints .....................................................1-24
Precautions on child restraints ........................1-24
Installation on rear seat center position ..........1-26
Installation on rear seat outboard
positions ..........................................................1-29
Latch (lower anchors and tether for children)
system ..................................................................1-33
Top tether strap child restraint.........................1-35
Installation on front passenger seat ................1-36
ZX
Page 14 of 263
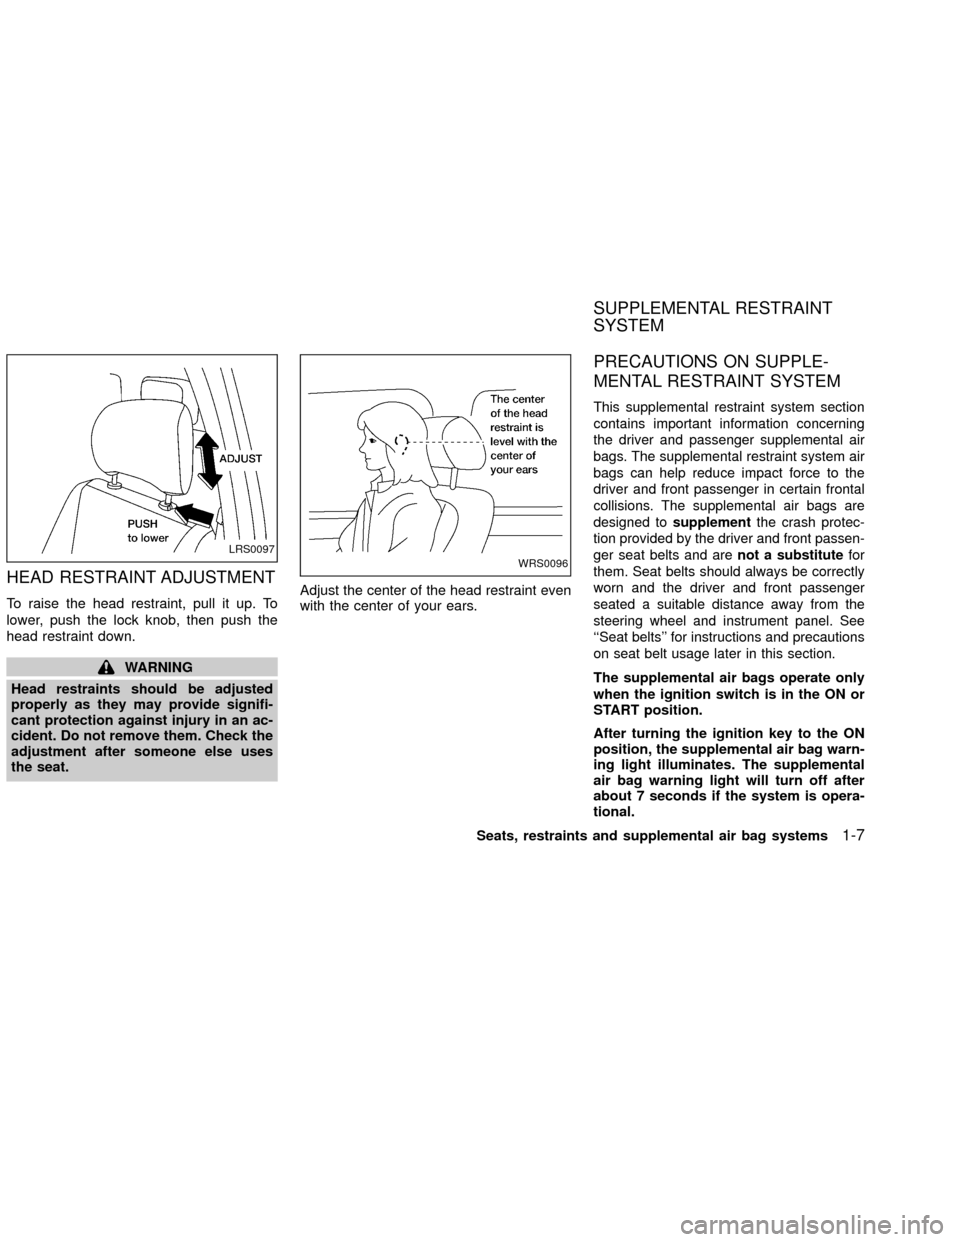
HEAD RESTRAINT ADJUSTMENT
To raise the head restraint, pull it up. To
lower, push the lock knob, then push the
head restraint down.
WARNING
Head restraints should be adjusted
properly as they may provide signifi-
cant protection against injury in an ac-
cident. Do not remove them. Check the
adjustment after someone else uses
the seat.Adjust the center of the head restraint even
with the center of your ears.
PRECAUTIONS ON SUPPLE-
MENTAL RESTRAINT SYSTEM
This supplemental restraint system section
contains important information concerning
the driver and passenger supplemental air
bags. The supplemental restraint system air
bags can help reduce impact force to the
driver and front passenger in certain frontal
collisions. The supplemental air bags are
designed tosupplementthe crash protec-
tion provided by the driver and front passen-
ger seat belts and arenot a substitutefor
them. Seat belts should always be correctly
worn and the driver and front passenger
seated a suitable distance away from the
steering wheel and instrument panel. See
``Seat belts'' for instructions and precautions
on seat belt usage later in this section.
The supplemental air bags operate only
when the ignition switch is in the ON or
START position.
After turning the ignition key to the ON
position, the supplemental air bag warn-
ing light illuminates. The supplemental
air bag warning light will turn off after
about 7 seconds if the system is opera-
tional.
LRS0097WRS0096
SUPPLEMENTAL RESTRAINT
SYSTEM
Seats, restraints and supplemental air bag systems1-7
ZX
Page 20 of 263
you inform the buyer about the supplemental
air bag system and guide the buyer to the
appropriate sections in this owner's manual.
Pre-tensioner seat belt system
(For front seats)
WARNING
OThe pre-tensioner seat belt cannot
be reused after activation. It must
bereplaced together with the retrac-
tor and buckle as a unit.
OIf the vehicle becomes involved in a
frontal collision but the pre-
tensioner is not activated, be sure to
have the pre-tensioner system
checked and, if necessary, replaced
by your NISSAN dealer.
ONo unauthorized changes should be
made to any components or wiring
of the pre-tensioner seat belt sys-
tem. This is to prevent accidental
activation of the pre-tensioner seat
belt or damage to the pre-tensioner
seat belt operation. Tampering with
the pre-tensioner seat belt system
may result in serious personal in-
jury.OWork around and on the pre-
tensioner system should be done by
an authorized NISSAN dealer.
Installation of electrical equipment
should also be done by an autho-
rized NISSAN dealer. Unauthorized
electrical test equipment and prob-
ing devices should not be used
onthe pre-tensioner seat belt sys-
tem.
OIf you need to dispose of the pre-
tensioner or scrap the vehicle, con-
tact an authorized NISSAN dealer.
Correct pre-tensioner disposal pro-
cedures are set forth in the appropri-
ate NISSAN Service Manual. Incor-
rect disposal procedures could
cause personal injury.
The front seat pre-tensioner seat belt sys-
tem activates in conjuction with the supple-
mental air bag. Working with the seat belt
retractor, it helps tighten the seat belt the
instant the vehicle becomes involved in
certain types of collisions.
The pre-tensioner is encased with the seat
belt's retractor. These seat belts are used
the same as conventional seat belts.When the pre-tensioner seat belt activates,
smoke is released and a loud noise may be
heard. The smoke is not harmful. Care
should be taken not to intentionally inhale it
as it may cause irritation and choking.
Those with a history of a breathing condition
should get fresh air promptly.
If any abnormality occurs in the pre-
tensioner system, the supplemental air bag
warning light
will flash intermit-
tently after the ignition key is turned to the
ON or START position. In this case, the
pre-tensioner seat belt will not function
properly.
When selling your vehicle, we request that
you inform the buyer about the pre-
tensioner seat belt system and guide the
buyer to the appropriate sections in this
Owner's Manual.
Seats, restraints and supplemental air bag systems
1-13
ZX
Page 21 of 263

SUPPLEMENTAL AIR BAG
WARNING LABELS
Warning labels about the supplemental air
bag system are placed in the vehicle as
shown in the illustration.
SUPPLEMENTAL AIR BAG
WARNING LIGHT
The supplemental air bag warning light,
displaying
in the instrument panel,
monitors the circuits of the supplemental air
bag and pre-tensioner seat belt systems.
The circuits monitored by the supplemental
air bag warning light are the diagnosis sen-
sor unit, the supplemental air bag modules,
pre-tensioner seat belts and all related wir-
ing.
When the ignition key is in the ON or START
position, the supplemental air bag warning
WRS0099
LRS0100
1-14Seats, restraints and supplemental air bag systems
ZX
Page 22 of 263
light illuminates for about 7 seconds and
then turns off. This means the system is
operational.
If any of the following system conditions
occur, the supplemental air bag and pre-
tensioner seat belt systems need servicing
and should be taken to an authorized NIS-
SAN dealer:
O
The supplemental air bag warning light
remains on after approximately 7 seconds.
OThe supplemental air bag warning light
flashes intermittently.
OThe supplemental air bag warning light
does not come on at all.
Under these conditions, the Supplemental
Restraint System (supplemental air bag or
pre-tensioner seat belt systems may not
function properly. It must be checked and
repaired.
WARNING
If the supplemental air bag warning
light is on, it could mean that the
supplemental air bag or pre-tensioner
seat belt systems will not operate in an
accident.
Repair and replacement procedure
The supplemental air bag modules are de-
signed to inflate on a one-time-only basis.
As a reminder, unless it is damaged, the
supplemental air bag warning light remains
illuminated after inflation has occurred.
Repair and replacement of the supplemen-
tal air bag system should be done only by
an authorized NISSAN dealer.
When maintenance work is required on the
vehicle, the supplemental front air bags,
pre-tensioner seat belts and related parts
should be pointed out to the person conduct-
ing the maintenance. The ignition key must
always be in the LOCK position when work-
ing under the hood or inside the vehicle.
WARNING
O
Once the supplemental front air bag
has inflated, the air bag module will
not function and must be replaced.
Additionally, if any of the supplemen-
tal air bags inflate, the pre-tensioner
seat belts must also be replaced. The
air bag module and pre-tensioner
seat belt system should be replaced
by an authorized NISSAN dealer. The
air bag module and pre-tensioner
seat belt system cannot be repaired.
OThe supplemental air bag system
should be inspected by an autho-
rized NISSAN dealer if there is any
damage to the front end portion of
the vehicle, or replaced if the supple-
mental air bag has inflated.
OIf you need to dispose of the supple-
mental air bag, pre-tensioner seat
belt system or scrap the vehicle,
contact an authorized NISSAN and
pre-tensioner seat belt system
dealer. Correct supplemental air bag
disposal procedures are set forth in
the appropriate NISSAN Service
Manual. Incorrect disposal proce-
dures could cause personal injury.
Seats, restraints and supplemental air bag systems
1-15
ZX
Page 24 of 263
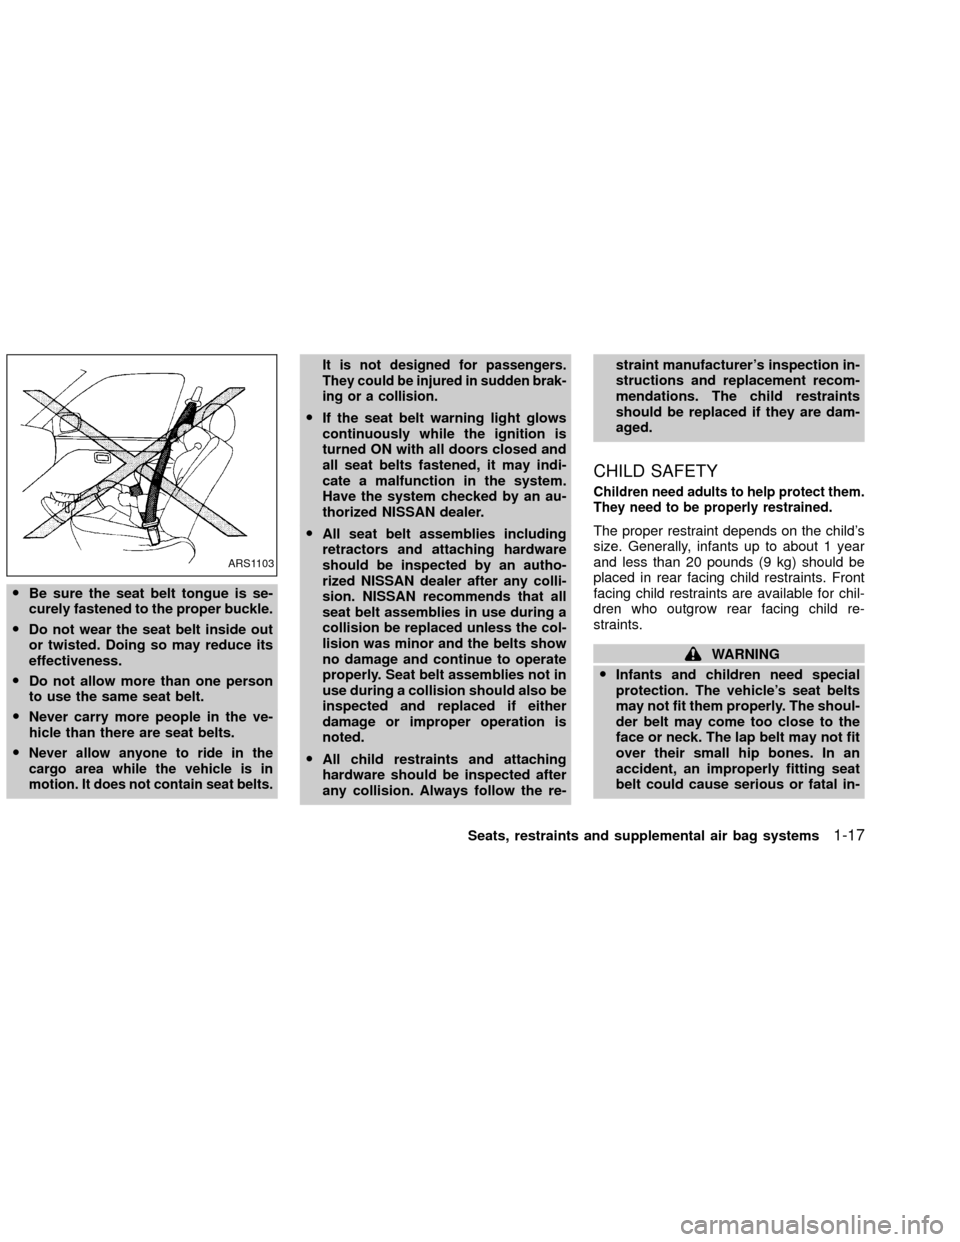
OBe sure the seat belt tongue is se-
curely fastened to the proper buckle.
ODo not wear the seat belt inside out
or twisted. Doing so may reduce its
effectiveness.
ODo not allow more than one person
to use the same seat belt.
ONever carry more people in the ve-
hicle than there are seat belts.
O
Never allow anyone to ride in the
cargo area while the vehicle is in
motion. It does not contain seat belts.It is not designed for passengers.
They could be injured in sudden brak-
ing or a collision.
OIf the seat belt warning light glows
continuously while the ignition is
turned ON with all doors closed and
all seat belts fastened, it may indi-
cate a malfunction in the system.
Have the system checked by an au-
thorized NISSAN dealer.
OAll seat belt assemblies including
retractors and attaching hardware
should be inspected by an autho-
rized NISSAN dealer after any colli-
sion. NISSAN recommends that all
seat belt assemblies in use during a
collision be replaced unless the col-
lision was minor and the belts show
no damage and continue to operate
properly. Seat belt assemblies not in
use during a collision should also be
inspected and replaced if either
damage or improper operation is
noted.
OAll child restraints and attaching
hardware should be inspected after
any collision. Always follow the re-straint manufacturer's inspection in-
structions and replacement recom-
mendations. The child restraints
should be replaced if they are dam-
aged.
CHILD SAFETY
Children need adults to help protect them.
They need to be properly restrained.
The proper restraint depends on the child's
size. Generally, infants up to about 1 year
and less than 20 pounds (9 kg) should be
placed in rear facing child restraints. Front
facing child restraints are available for chil-
dren who outgrow rear facing child re-
straints.
WARNING
OInfants and children need special
protection. The vehicle's seat belts
may not fit them properly. The shoul-
der belt may come too close to the
face or neck. The lap belt may not fit
over their small hip bones. In an
accident, an improperly fitting seat
belt could cause serious or fatal in-
ARS1103
Seats, restraints and supplemental air bag systems1-17
ZX
Page 47 of 263

2 Instruments and controls
Instrument panel ....................................................2-2
Meters and gauges ................................................2-3
Speedometer and odometer .............................2-3
Tachometer ........................................................2-5
Engine coolant temperature gauge ...................2-5
Fuel gauge ........................................................2-6
Compass and outside temperature display
(if so equipped) ......................................................2-6
Outside temperature display .............................2-6
Compass display ...............................................2-7
Warning/indicator lights and audible
reminders..............................................................2-10
Checking bulbs ................................................2-10
Warning lights .................................................. 2-11
Indicator lights .................................................2-13
Audible reminders............................................2-14
Security system ....................................................2-15
Vehicle security system (if so equipped).........2-15
Windshield wiper and washer switch ...................2-18
Switch operation ..............................................2-18
Rear window wiper and washer switch................2-19
Rear window defogger switch ..............................2-20Headlight and turn signal switch ..........................2-20
Headlight switch ..............................................2-20
Turn signal switch............................................2-21
Front fog light switch (if so equipped)..................2-22
Hazard warning flasher switch .............................2-22
Horn ......................................................................2-23
Cigarette lighter and ash tray (accessories) ........2-23
Power point (if so equipped) ................................2-24
Storage .................................................................2-25
Map pocket ......................................................2-25
Cup holders .....................................................2-26
Glove box ........................................................2-27
Console box (if so equipped) ..........................2-27
Luggage hooks (if so equipped) .....................2-28
Tonneau cover (if so equipped).......................2-29
Windows .............................................................2-30
Power windows (if so equipped) .....................2-30
Manual windows ..............................................2-31
Sunroof (if so equipped).......................................2-32
Tilting the sunroof ............................................2-32
Removing/installing..........................................2-33
Interior light...........................................................2-33
ZX
Page 49 of 263

1. Headlight/turn signal switch
2. Meters and gauges
3. Windshield wiper/washer switch
4. Power point
5. Heater and air conditioner
6. Front passenger supplemental air bag
7. Glove box
8. Audio system
9. Hazard warning flasher switch
10. Automatic/manual selector lever
11. Transfer cased shift lever
12. Parking brake release lever
13. Cruise control main/set switch
14. Driver supplemental air bag
15. Steering wheel switch for audio controls
WIC0150
INSTRUMENT PANEL
2-2Instruments and controls
ZX
Page 57 of 263
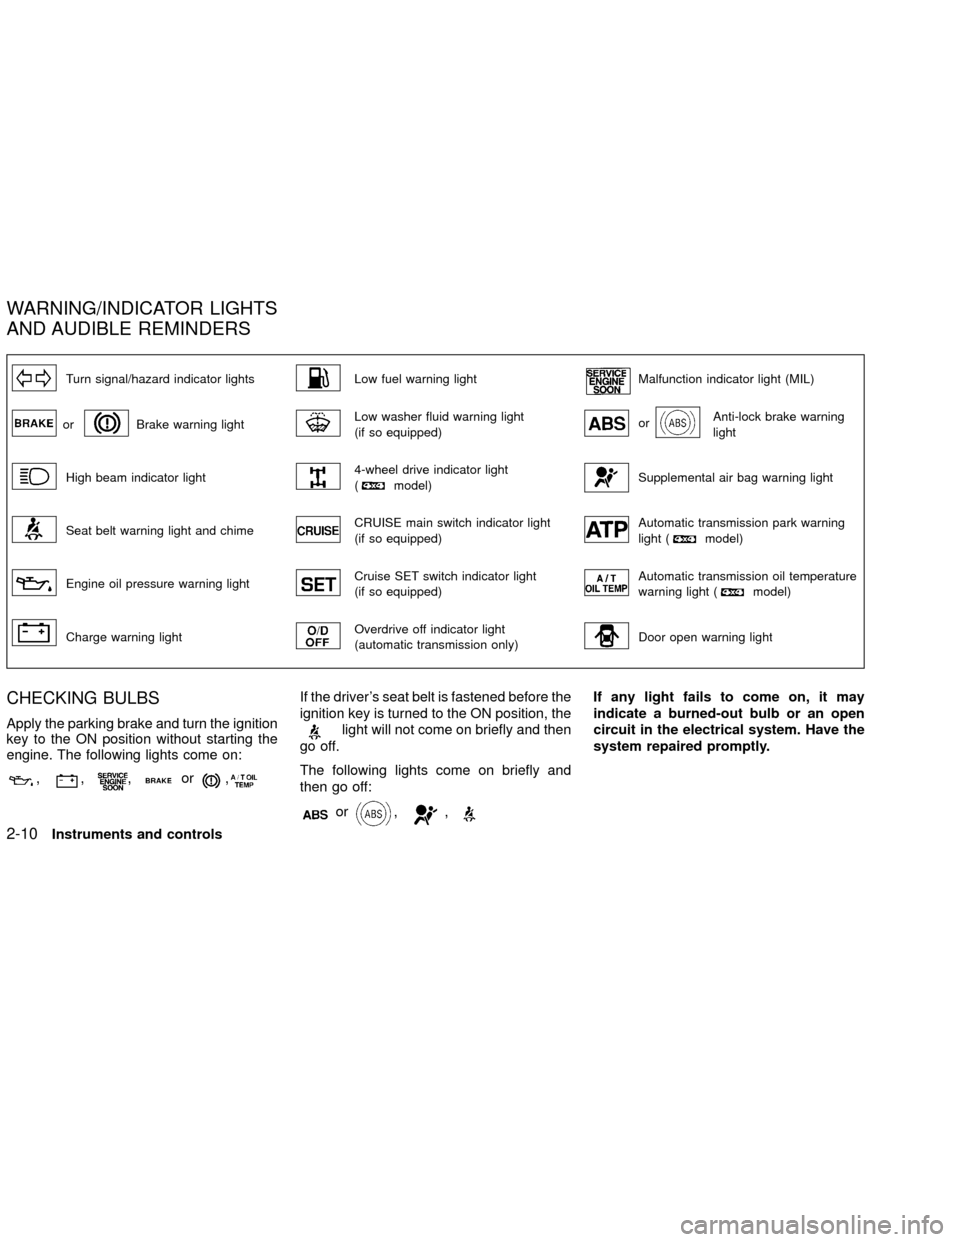
Turn signal/hazard indicator lightsLow fuel warning lightMalfunction indicator light (MIL)
orBrake warning lightLow washer fluid warning light
(if so equipped)orAnti-lock brake warning
light
High beam indicator light4-wheel drive indicator light
(model)Supplemental air bag warning light
Seat belt warning light and chimeCRUISE main switch indicator light
(if so equipped)Automatic transmission park warning
light (model)
Engine oil pressure warning lightCruise SET switch indicator light
(if so equipped)Automatic transmission oil temperature
warning light (model)
Charge warning lightOverdrive off indicator light
(automatic transmission only)Door open warning light
CHECKING BULBS
Apply the parking brake and turn the ignition
key to the ON position without starting the
engine. The following lights come on:
,,,or,
If the driver's seat belt is fastened before the
ignition key is turned to the ON position, the
light will not come on briefly and then
go off.
The following lights come on briefly and
then go off:
or,,
If any light fails to come on, it may
indicate a burned-out bulb or an open
circuit in the electrical system. Have the
system repaired promptly.
WARNING/INDICATOR LIGHTS
AND AUDIBLE REMINDERS
2-10Instruments and controls
ZX
Page 58 of 263
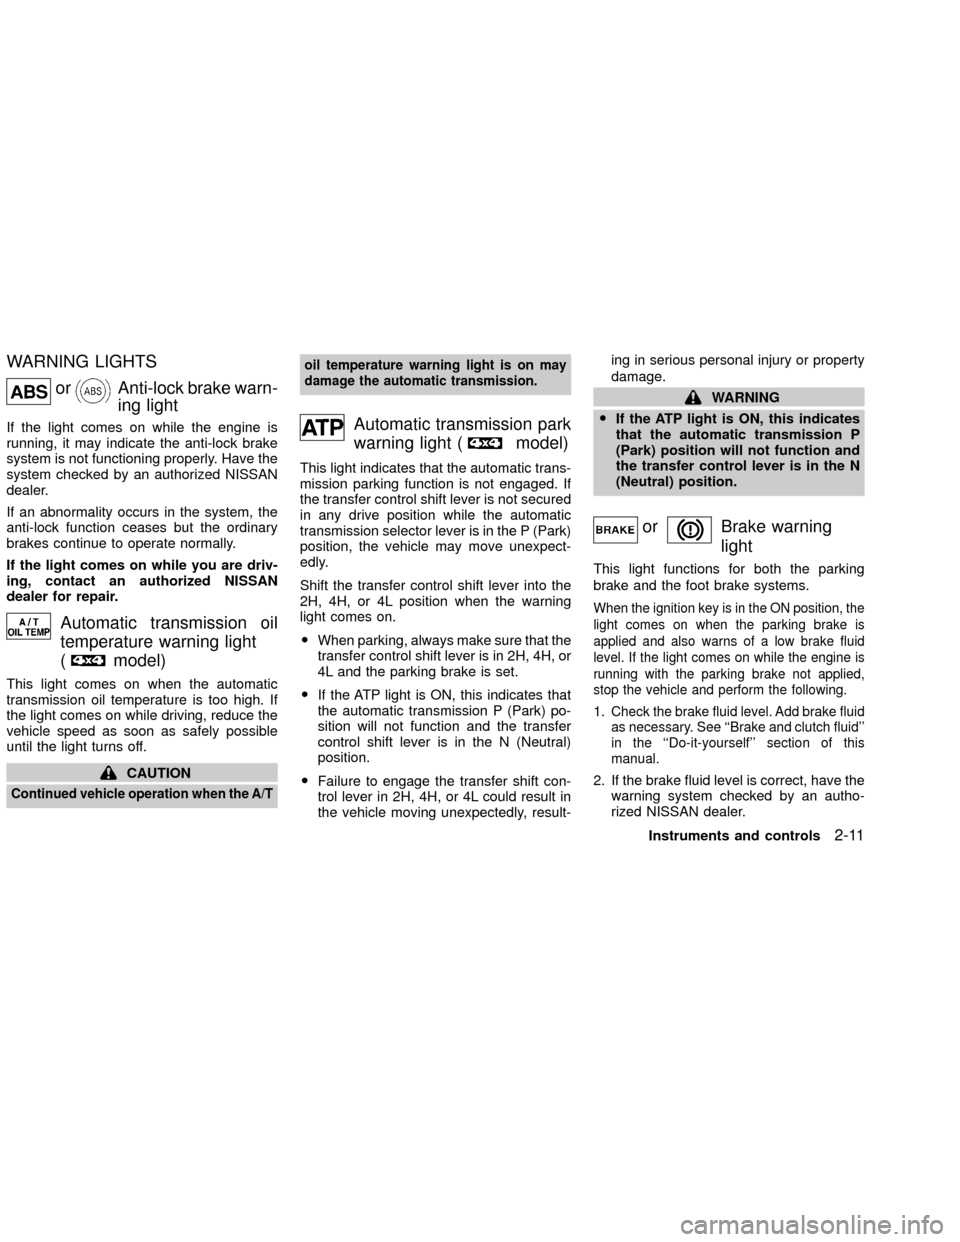
WARNING LIGHTS
orAnti-lock brake warn-
ing light
If the light comes on while the engine is
running, it may indicate the anti-lock brake
system is not functioning properly. Have the
system checked by an authorized NISSAN
dealer.
If an abnormality occurs in the system, the
anti-lock function ceases but the ordinary
brakes continue to operate normally.
If the light comes on while you are driv-
ing, contact an authorized NISSAN
dealer for repair.
Automatic transmission oil
temperature warning light
(
model)
This light comes on when the automatic
transmission oil temperature is too high. If
the light comes on while driving, reduce the
vehicle speed as soon as safely possible
until the light turns off.
CAUTION
Continued vehicle operation when the A/Toil temperature warning light is on may
damage the automatic transmission.
Automatic transmission park
warning light (
model)
This light indicates that the automatic trans-
mission parking function is not engaged. If
the transfer control shift lever is not secured
in any drive position while the automatic
transmission selector lever is in the P (Park)
position, the vehicle may move unexpect-
edly.
Shift the transfer control shift lever into the
2H, 4H, or 4L position when the warning
light comes on.
OWhen parking, always make sure that the
transfer control shift lever is in 2H, 4H, or
4L and the parking brake is set.
OIf the ATP light is ON, this indicates that
the automatic transmission P (Park) po-
sition will not function and the transfer
control shift lever is in the N (Neutral)
position.
OFailure to engage the transfer shift con-
trol lever in 2H, 4H, or 4L could result in
the vehicle moving unexpectedly, result-ing in serious personal injury or property
damage.
WARNING
OIf the ATP light is ON, this indicates
that the automatic transmission P
(Park) position will not function and
the transfer control lever is in the N
(Neutral) position.
orBrake warning
light
This light functions for both the parking
brake and the foot brake systems.
When the ignition key is in the ON position, the
light comes on when the parking brake is
applied and also warns of a low brake fluid
level. If the light comes on while the engine is
running with the parking brake not applied,
stop the vehicle and perform the following.
1.Check the brake fluid level. Add brake fluid
as necessary. See ``Brake and clutch fluid''
in the ``Do-it-yourself'' section of this
manual.
2. If the brake fluid level is correct, have the
warning system checked by an autho-
rized NISSAN dealer.
Instruments and controls
2-11
ZX