ECO mode NISSAN XTERRA 2003 WD22 / 1.G User Guide
[x] Cancel search | Manufacturer: NISSAN, Model Year: 2003, Model line: XTERRA, Model: NISSAN XTERRA 2003 WD22 / 1.GPages: 272, PDF Size: 3.86 MB
Page 128 of 272

All preset scan
Pressing the PRESET SCAN button (>1.5 sec-
onds) scans all the permanent preset memory
banks (A, B or C) from 1–6 for 5 seconds. If the
Travel Preset is ON, all the travel preset memory
banks (A, B or C) from 1–6 are scanned for 5
seconds.
Canceling preset scan mode
Pressing any button except CLOCK, EJECT and
PTY cancels the Preset Scan mode.
RDS (radio data system)
RDS stands for Radio Data System, and is a data
information service transmitted by some radiostations on the FM band (not AM band) encoded
within a regular radio broadcast. Currently, most
RDS stations are in large cities, but many stations
are now considering broadcasting RDS data.
RDS can display:
cStation call sign, such as “WHFR 98.3”.
cStation name, such as “The Groove”.
cMusic or programming type, such as “Clas-
sical”, “Country”, or “Rock”.
cTraffic reports about delays or construction.
If the station broadcasts RDS information the
RDS icon is displayed. The RDS information will
be displayed according to the option chosen in
the RDS setup mode. (FM & RDS is the default.)
Press the RDS button again to display the fre-
quency for 3 seconds. The radio will then return
to the normal display. If the station does not
broadcast RDS information, the RDS icon will not
be displayed.
Setting RDS mode
Press and RDS button (>3 seconds) until the
display shows“RDS SET MODE”. This display
will last 2 seconds and then change to
“TRAFFIC-OFF”. Press TUNE/FF-REV (or) to toggle the RDS traffic mode from
“OFF” to “ON”. Press the RDS button again to
set your RDS traffic mode selection.The display changes to“SHOW”for the second
part of the RDS mode selection. Press TUNE/FF-
REV (
or) to switch between the
following RDS display modes:
c“FM & RDS”: the radio display will show the
station’s broadcast frequency and the sta-
tion’s name.
c“RDS ONLY”: the radio display will show the
station’s name only.
c
“RDS TEMP”: the radio display will show the
station’s name for 5 seconds and then display
only the radio station’s broadcast frequency.
PTY (program type)
PTY can be used to search for a certain program
type. Certain areas have a limited number of
stations that transmit RDS. Many stations trans-
mit call letters and frequencies only. Searching or
scanning by program type may yield a limited
number of selections.
1. Press the PTY button. The display changes
from“RDS PTY SEARCH”to“SELECT
BY TUNE”.
2. Press TUNE/FF-REV (
or)
up/down button to choose a specific pro-
gram type:
ROCK, CLASSIC ROCK, SOFT ROCK,
TOP 40, COUNTRY, JAZZ, CLASSICAL,
OLDIES, NEWS, SPORTS, TALK, ANY
LHA0086
4-22Heater, air conditioner and audio systems
ZREVIEW COPY:Ð2003 Xterra(xtr)
Owners Manual(owners)ÐUSA English(nna)
02/24/03Ðtbrooks
X
Page 129 of 272
3. Press the SEEK or SCAN button to search
for the next station with the selected PTY.
The SCAN icon flashes when the SCAN
button is pressed. The radio continues to
seek or scan until a radio station is found
matching the selected PTY
4. Press the PTY button again to cancel the
PTY SEEK mode.
Compact disc (CD) player operation
Turn the ignition key to the ACC or ON position.
CAUTION
cDo not force a compact disc into the CD
insert slot. This could damage the CD
and/or CD changer/player.
cTrying to load a CD with the CD door
closed could damage the CD and/or CD
changer.
CD button
When the CD button is pressed with a compact
disc loaded and the radio playing, the radio turns
off and the last used compact disc starts to play.
CD loading
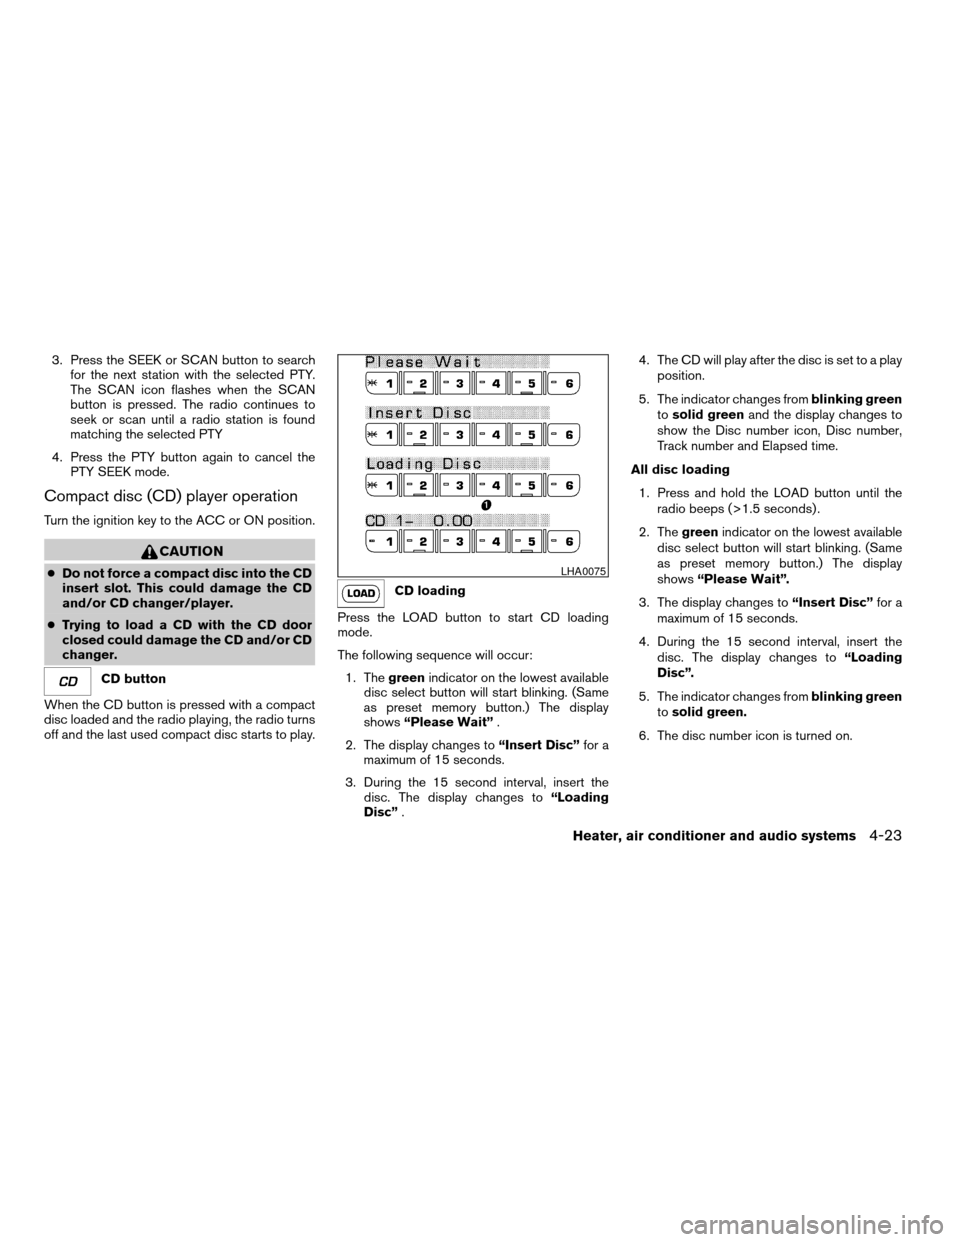
Press the LOAD button to start CD loading
mode.
The following sequence will occur:
1. Thegreenindicator on the lowest available
disc select button will start blinking. (Same
as preset memory button.) The display
shows“Please Wait”.
2. The display changes to“Insert Disc”for a
maximum of 15 seconds.
3. During the 15 second interval, insert the
disc. The display changes to“Loading
Disc”.4. The CD will play after the disc is set to a play
position.
5. The indicator changes fromblinking green
tosolid greenand the display changes to
show the Disc number icon, Disc number,
Track number and Elapsed time.
All disc loading
1. Press and hold the LOAD button until the
radio beeps (>1.5 seconds) .
2. Thegreenindicator on the lowest available
disc select button will start blinking. (Same
as preset memory button.) The display
shows“Please Wait”.
3. The display changes to“Insert Disc”for a
maximum of 15 seconds.
4. During the 15 second interval, insert the
disc. The display changes to“Loading
Disc”.
5. The indicator changes fromblinking green
tosolid green.
6. The disc number icon is turned on.
LHA0075
Heater, air conditioner and audio systems4-23
ZREVIEW COPY:Ð2003 Xterra(xtr)
Owners Manual(owners)ÐUSA English(nna)
02/24/03Ðtbrooks
X
Page 130 of 272

7. Repeat steps 2–5 until all discs are loaded,
then the last loaded disc will begin to play.
The display shows the Disc number, Track
number and Elapsed Time.
Selected disc loading
1. Press a disc select button whose indicator is
off. The display shows“Please Wait”.
2. Thegreenindicator starts blinking and the
display shows“Insert Disc”for 15 sec-
onds.
3. Insert the CD. The display shows“Loading
Disc”.
4. The CD will play after the disc is set to a play
position.
5. The indicator color changes fromblinking
greentosolid greenand the display
shows the Disc icon, Disc number, Track
number and Elapsed Time.
If a disc is not inserted within 15 seconds or if the
load button is pressed during load sequence, the
entire disc load sequence will be canceled.
Disc play
Press the CD button. If a CD is loaded and the
radio is playing, the radio turns off and the last
loaded disc starts to play.Selected disc play
1. Press the disc select button whose disc icon
is displayed.
2. The indicator blinksgreenduring the
change and the display shows“Changing
Disc”.
3. The CD plays after the disc is set to a play
position.4.The indicator changes fromblinking green
tosolid greenand the display shows the Disc
number, Track number and Elapsed Time.
FF (fast forward) REW
(rewind) buttons
When the TUNE/FF-REV (
or) but-
ton is pressed while the compact disc is playing,
the compact disc plays at an increased speed
while fast forwarding or rewinding. When the
button is released, the CD returns to normal play
speed.
SEEK/TRACK buttons
Whenis pressed while the compact disc is
playing, the selection following the present one
starts to play from the beginning. Press
several
times to skip several selections. Each time the
button is pressed, the CD advances 1 additional
selection. The track number appears in the display
window. (When the last selection on the compact
disc is skipped, the first selection is played.)
Whenis pressed, the selection being played
returns to the beginning. Pressseveral times
to skip back several selections. Each time the
button is pressed, the CD moves back 1 selec-
tion. If the play pattern is in MIX mode when the
button is pressed the next random selection will
be played.
LHA0076
4-24Heater, air conditioner and audio systems
ZREVIEW COPY:Ð2003 Xterra(xtr)
Owners Manual(owners)ÐUSA English(nna)
02/24/03Ðtbrooks
X
Page 131 of 272

Repeat/Mix
Press the RPT MIX button to change CD play
patterns:
Repeat!Mix!All Mix!Normal Play
Repeat
Press the RPT MIX button (<1.5 seconds) once
to repeat the current track. The “1” icon is turned
on, and the display shows“Repeat Track”for 2
seconds. The display then shows the Track num-
ber and Elapsed time as normal.Mix
Press the RPT MIX button (<1.5 seconds) again
to start shuffle play of the current disc. The “MIX”
icon is turned on and the display shows“Mix
Tracks”for 2 seconds. The display then shows
the Track number and Elapsed time as normal.
All mix
Press the RPT MIX button (<1.5 seconds) again
to start shuffle play of all discs. The “MIX” icon is
turned on, and the display shows“Mix All
Tracks”for 2 seconds. The display then shows
the Track number and Elapsed time as normal.
Also, the indicators of the loaded discs are turned
on with amber color. (Green for current disc.)
Normal play
Press the RPT MIX button (<1.5 seconds) again
to return to normal play mode. The “MIX” icon and
the amber LEDs are turned off. The display
shows“Normal Play”for 2 seconds. The dis-
play then shows the Track number and Elapsed
time as normal.CD scan
1 Disc All Tracks
Press the SCAN button (<1.5 seconds) to scan
all tracks of the current disc for 7 seconds per
track. The display shows“Disc Scan”for 2
seconds, and then shows the track number and
elapsed time as normal. The SCAN icon is
flashed during Scan mode.
The Scan mode is canceled once it scans
through all tracks on the disc, or if the SCAN
button is pressed during Scan mode.
LHA0077LHA0078
Heater, air conditioner and audio systems4-25
ZREVIEW COPY:Ð2003 Xterra(xtr)
Owners Manual(owners)ÐUSA English(nna)
02/24/03Ðtbrooks
X
Page 132 of 272

All Discs, 1 Track
Press and hold the SCAN button (>1.5 seconds)
to scan the first track of all the loaded discs for 7
seconds per track. The display shows“All Disc
Scan”for 2 seconds, and then shows the track
number and elapsed time as normal. The SCAN
icon is flashed during Scan mode.
The Scan mode is canceled once it scans
through all the loaded discs, or if the SCAN
button is pressed during Scan mode.
Eject CD
Current disc
1. Press the
button.
2. Thegreenindicator starts to blink and the
display shows“Disc Eject”for 2 seconds.
The display then changes to“Ejecting
Disc”.
3. The disc ejects. Remove the disc. (If the disc
is not removed within 15 seconds, the disc
will reload.)
4. The indicator and symbol for the disc are
turned off.Select a disc
1. Press the desired disc, then press
the
button.
2. Thegreenindicator starts blinking and the
display shows“Disc Eject”for 2 seconds.
The display then changes to“Ejecting
Disc”.
3. The disc ejects. Remove the disc. (If the disc
is not removed within 15 seconds, the disc
will reload.)
4. The indicator and symbol for the disc are
turned off.
LHA0079
4-26Heater, air conditioner and audio systems
ZREVIEW COPY:Ð2003 Xterra(xtr)
Owners Manual(owners)ÐUSA English(nna)
02/24/03Ðtbrooks
X
Page 134 of 272
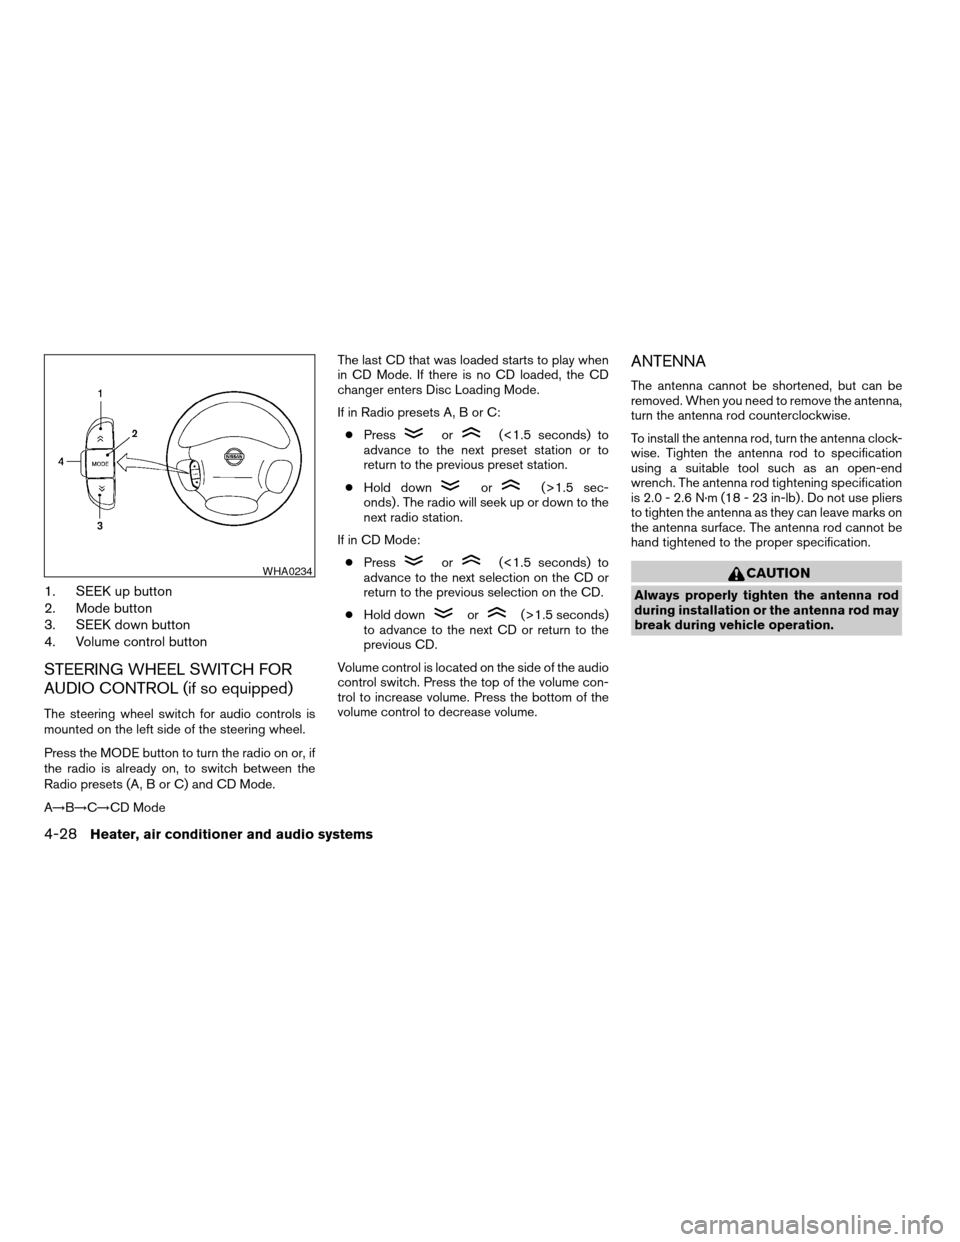
1. SEEK up button
2. Mode button
3. SEEK down button
4. Volume control button
STEERING WHEEL SWITCH FOR
AUDIO CONTROL (if so equipped)
The steering wheel switch for audio controls is
mounted on the left side of the steering wheel.
Press the MODE button to turn the radio on or, if
the radio is already on, to switch between the
Radio presets (A, B or C) and CD Mode.
A!B!C!CD ModeThe last CD that was loaded starts to play when
in CD Mode. If there is no CD loaded, the CD
changer enters Disc Loading Mode.
If in Radio presets A, B or C:
cPress
or(<1.5 seconds) to
advance to the next preset station or to
return to the previous preset station.
cHold down
or(>1.5 sec-
onds) . The radio will seek up or down to the
next radio station.
If in CD Mode:
cPress
or(<1.5 seconds) to
advance to the next selection on the CD or
return to the previous selection on the CD.
cHold down
or(>1.5 seconds)
to advance to the next CD or return to the
previous CD.
Volume control is located on the side of the audio
control switch. Press the top of the volume con-
trol to increase volume. Press the bottom of the
volume control to decrease volume.
ANTENNA
The antenna cannot be shortened, but can be
removed. When you need to remove the antenna,
turn the antenna rod counterclockwise.
To install the antenna rod, turn the antenna clock-
wise. Tighten the antenna rod to specification
using a suitable tool such as an open-end
wrench. The antenna rod tightening specification
is 2.0 - 2.6 N·m (18 - 23 in-lb) . Do not use pliers
to tighten the antenna as they can leave marks on
the antenna surface. The antenna rod cannot be
hand tightened to the proper specification.
CAUTION
Always properly tighten the antenna rod
during installation or the antenna rod may
break during vehicle operation.
WHA0234
4-28Heater, air conditioner and audio systems
ZREVIEW COPY:Ð2003 Xterra(xtr)
Owners Manual(owners)ÐUSA English(nna)
02/24/03Ðtbrooks
X
Page 135 of 272
When installing a CB, ham radio or car phone in
your NISSAN, be sure to observe the following
cautions, otherwise the new equipment may ad-
versely affect the MFI (Multiport Fuel Injection)
system and other electronic parts.
WARNING
cA cellular telephone should not be used
while driving so full attention may be
given to vehicle operation. Some juris-
dictions prohibit the use of cellular tele-
phones while driving.
cIf you must make a call while your ve-
hicle is in motion, the hands free cellu-
lar phone operational mode (if so
equipped) is highly recommended. Ex-
ercise extreme caution at all times so
full attention may be given to vehicle
operation.
cIf a conversation in a moving vehicle
requires you to take notes, pull off the
road to a safe location and stop your
vehicle before doing so.
CAUTION
cKeep the antenna as far away as pos-
sible from the Engine Control Module
(ECM) .cKeep the antenna wire more than 8 in
(20 cm) away from the Multiport Fuel
Injection harness. Do not route the an-
tenna wire next to any harness.
cAdjust the antenna standing-wave ratio
as recommended by the manufacturer.
cConnect the ground wire from the CB
radio chassis to the body.
cFor details, consult a NISSAN dealer.
CAR PHONE OR CB RADIO
Heater, air conditioner and audio systems4-29
ZREVIEW COPY:Ð2003 Xterra(xtr)
Owners Manual(owners)ÐUSA English(nna)
02/24/03Ðtbrooks
X
Page 145 of 272
cMake sure the area around the vehicle is
clear.
cCheck fluid levels such as engine oil, cool-
ant, brake and clutch fluid, and window
washer fluid as frequently as possible, or at
least whenever you refuel.
cCheck that all windows and lights are clean.
cVisually inspect tires for their appearance
and condition. Also check tires for proper
inflation.
cLock all doors.
cPosition seat and adjust head restraints.
cAdjust inside and outside mirrors.
cFasten seat belts and ask all passengers to
do likewise.
cCheck the operation of warning lights when
the key is turned to the ON (3) position. See
“Warning/indicator lights and audible re-
minders” in the “Instruments and controls”
section of this manual.1. Apply the parking brake.
2.Automatic transmission:
Move the shift selector lever to P (Park) or N
(Neutral) . P (Park) is recommended.
The shift selector lever cannot be
moved out of P (Park) and into any of
the other gear positions if the ignition
key is turned to the OFF position or if
the key is removed from the ignition
switch.
The starter is designed not to operate if
the shift selector lever is in any of the
driving positions.
Manual transmission:
Move the shift lever to N (Neutral) . Depress
the clutch pedal to the floor while cranking
the engine.
The starter is designed not to operate
unless the clutch pedal is fully de-
pressed.
3. Crank the enginewith your foot off the
accelerator pedalby turning the ignition
key to START. Release the key when the
engine starts. If the engine starts, but fails to
run, repeat the above procedure.cWhen the engine is very hard to start in
extremely cold weather or when restart-
ing, depress the accelerator pedal a little
(approximately 1/5 to the floor) and hold it
and then crank the engine. Release the
key and the accelerator pedal when the
engine starts.
cWhen the engine is very hard to start
because it is flooded, depress the accel-
erator pedal all the way to the floor and
hold it. Crank the engine for 5-6 seconds.
After cranking the engine, release the ac-
celerator pedal. Crank the enginewith
your foot off the accelerator pedalby
turning the ignition key to START. Release
the key when the engine starts. If the
engine starts, but fails to run, repeat the
above procedure.
CAUTION
Do not operate the starter for more than
15 seconds at a time. If the engine does
not start, turn the key off and wait 10
seconds before cranking again, otherwise
the starter could be damaged.
4. Allow the engine to idle for at least 30 sec-
onds after starting. Drive at moderate speed
for a short distance first, especially in cold
weather.
BEFORE STARTING THE ENGINE STARTING THE ENGINE
Starting and driving5-9
ZREVIEW COPY:Ð2003 Xterra(xtr)
Owners Manual(owners)ÐUSA English(nna)
03/05/03Ðtmchalpi
X
Page 150 of 272
CAUTION
cDo not rest your foot on the clutch pedal
while driving. This may cause clutch
damage.
cFully depress the clutch pedal before
shifting to help prevent transmission
damage.
cStop your vehicle completely before
shifting into R (Reverse) .
cWhen the vehicle is stopped with the
engine running (for example, at a stop
light) , shift to N (Neutral) and release
the clutch pedal with the foot brake
applied.
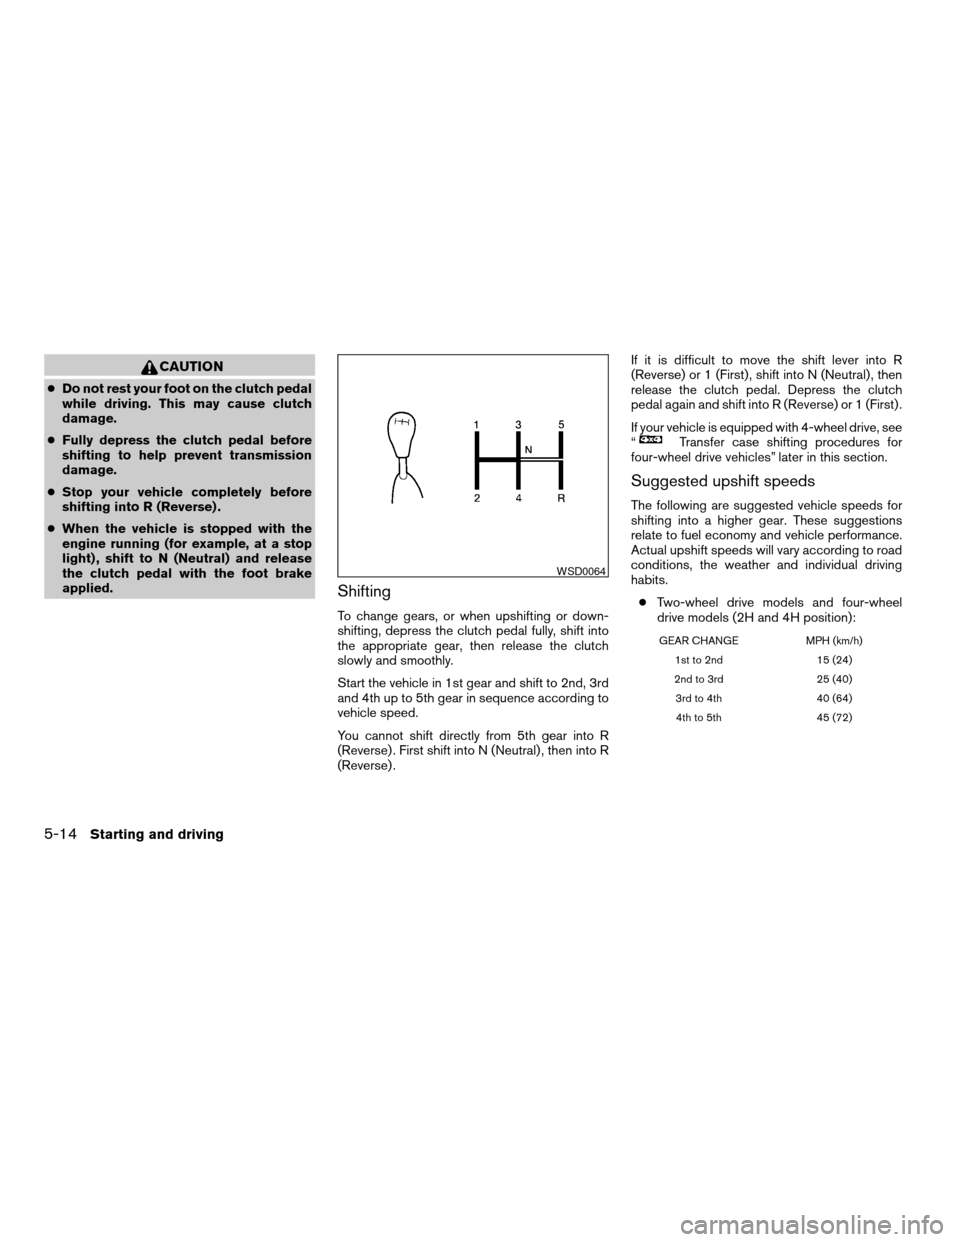
Shifting
To change gears, or when upshifting or down-
shifting, depress the clutch pedal fully, shift into
the appropriate gear, then release the clutch
slowly and smoothly.
Start the vehicle in 1st gear and shift to 2nd, 3rd
and 4th up to 5th gear in sequence according to
vehicle speed.
You cannot shift directly from 5th gear into R
(Reverse) . First shift into N (Neutral) , then into R
(Reverse) .If it is difficult to move the shift lever into R
(Reverse) or 1 (First) , shift into N (Neutral) , then
release the clutch pedal. Depress the clutch
pedal again and shift into R (Reverse) or 1 (First) .
If your vehicle is equipped with 4-wheel drive, see
“
Transfer case shifting procedures for
four-wheel drive vehicles” later in this section.
Suggested upshift speeds
The following are suggested vehicle speeds for
shifting into a higher gear. These suggestions
relate to fuel economy and vehicle performance.
Actual upshift speeds will vary according to road
conditions, the weather and individual driving
habits.
cTwo-wheel drive models and four-wheel
drive models (2H and 4H position):
GEAR CHANGE MPH (km/h)
1st to 2nd 15 (24)
2nd to 3rd 25 (40)
3rd to 4th 40 (64)
4th to 5th 45 (72)
WSD0064
5-14Starting and driving
ZREVIEW COPY:Ð2003 Xterra(xtr)
Owners Manual(owners)ÐUSA English(nna)
02/24/03Ðtbrooks
X
Page 154 of 272

During the first 1,200 miles (2,000 km) , follow
these recommendations to obtain maximum en-
gine performance and ensure the future reliability
and economy of your new vehicle. Failure to
follow these recommendations may result in
shortened engine life and reduced engine perfor-
mance.
cAvoid driving for long periods at constant
speed, either fast or slow, and do not run the
engine over 4,000 rpm.
cDo not accelerate at full throttle in any gear.
cAvoid quick starts.
cAvoid hard braking as much as possible.
cDo not tow a trailer for the first 500 miles
(800 km) .cAccelerate slowly and smoothly. Maintain
cruising speeds with a constant accelerator
position.
cDrive at moderate speeds on the highway.
Driving at high speed lowers fuel economy.
cAvoid unnecessary stopping and braking.
Maintain a safe distance behind other ve-
hicles.
cUse a proper gear range which suits road
conditions. On level roads, shift into high
gear as soon as possible.
cAvoid unnecessary engine idling.
cKeep your engine tuned up.
cFollow the recommended periodic mainte-
nance schedule.
cKeep the tires inflated to the correct pres-
sure. Low tire pressure increases tire wear
and lowers fuel economy.
cKeep the front wheels in correct alignment.
Improper alignment increases tire wear and
lowers fuel economy.
c
Air conditioner operation lowers fuel economy.
Use the air conditioner only when necessary.
cWhen cruising at highway speeds, it is more
economical to use the air conditioner and
leave the windows closed to reduce drag.c
Use 4H or 4L position only when
necessary. Four-wheel drive operation low-
ers fuel economy.
BREAK-IN SCHEDULE INCREASING FUEL ECONOMY
5-18Starting and driving
ZREVIEW COPY:Ð2003 Xterra(xtr)
Owners Manual(owners)ÐUSA English(nna)
02/24/03Ðtbrooks
X