engine coolant NISSAN XTERRA 2003 WD22 / 1.G User Guide
[x] Cancel search | Manufacturer: NISSAN, Model Year: 2003, Model line: XTERRA, Model: NISSAN XTERRA 2003 WD22 / 1.GPages: 272, PDF Size: 3.86 MB
Page 193 of 272

VG33E engine
1. Fuse/fusible link holder
2. Power steering fluid reservoir
3. Automatic transmission fluid dipstick
(A/T model)
4. Brake fluid reservoir
5. Clutch fluid reservoir (M/T model)
6. Air cleaner
7. Windshield washer fluid reservoir
8. Engine oil dipstick
9. Radiator cap
10. Engine oil filler cap
11. Coolant reservoir
12. Battery
WDI0269
Maintenance and do-it-yourself8-7
ZREVIEW COPY:Ð2003 Xterra(xtr)
Owners Manual(owners)ÐUSA English(nna)
02/24/03Ðtbrooks
X
Page 194 of 272

VG33ER engine
1. Fuse/fusible link holder
2. Power steering fluid reservoir
3. Automatic transmission fluid dipstick
(A/T model)
4. Supercharger
5. Brake fluid reservoir
6. Air cleaner
7. Windshield washer fluid reservoir
8. Engine oil dipstick
9. Radiator cap
10. Engine oil filler cap
11. Coolant reservoir
12. Battery
WDI0270
8-8Maintenance and do-it-yourself
ZREVIEW COPY:Ð2003 Xterra(xtr)
Owners Manual(owners)ÐUSA English(nna)
02/24/03Ðtbrooks
X
Page 195 of 272
The engine cooling system is filled at the factory
with a high-quality, year-round, anti-freeze cool-
ant solution. The anti-freeze solution contains
rust and corrosion inhibitors; therefore, additional
engine cooling system additives are not neces-
sary.
WARNING
cNever remove the radiator cap when the
engine is hot. Wait until the engine and
radiator cool down. Serious burns
could be caused by high pressure fluid
escaping from the radiator. See precau-
tions in “If your vehicle overheats”
found in the “In case of emergency”
section of this manual.
cThe radiator is equipped with a pres-
sure type radiator cap. To prevent en-
gine damage, use only a genuine
NISSAN radiator cap.
Outside temperature
down toGenuine
NISSAN
Long Life
Anti-freeze
coolant or
equivalentDemineral-
ized or dis-
tilled water
°C °F
-35 -30 50% 50%
CAUTION
When adding or replacing coolant, be sure
to use only a Genuine Nissan Long Life
Anti-Freeze Coolant (green) or equivalent
with the proper mixture ratio of 50% anti-
freeze and 50% demineralized or distilled
water. The use of other types of coolant
solutions or coolant colors, such as or-
ange, may damage the engine cooling
system.
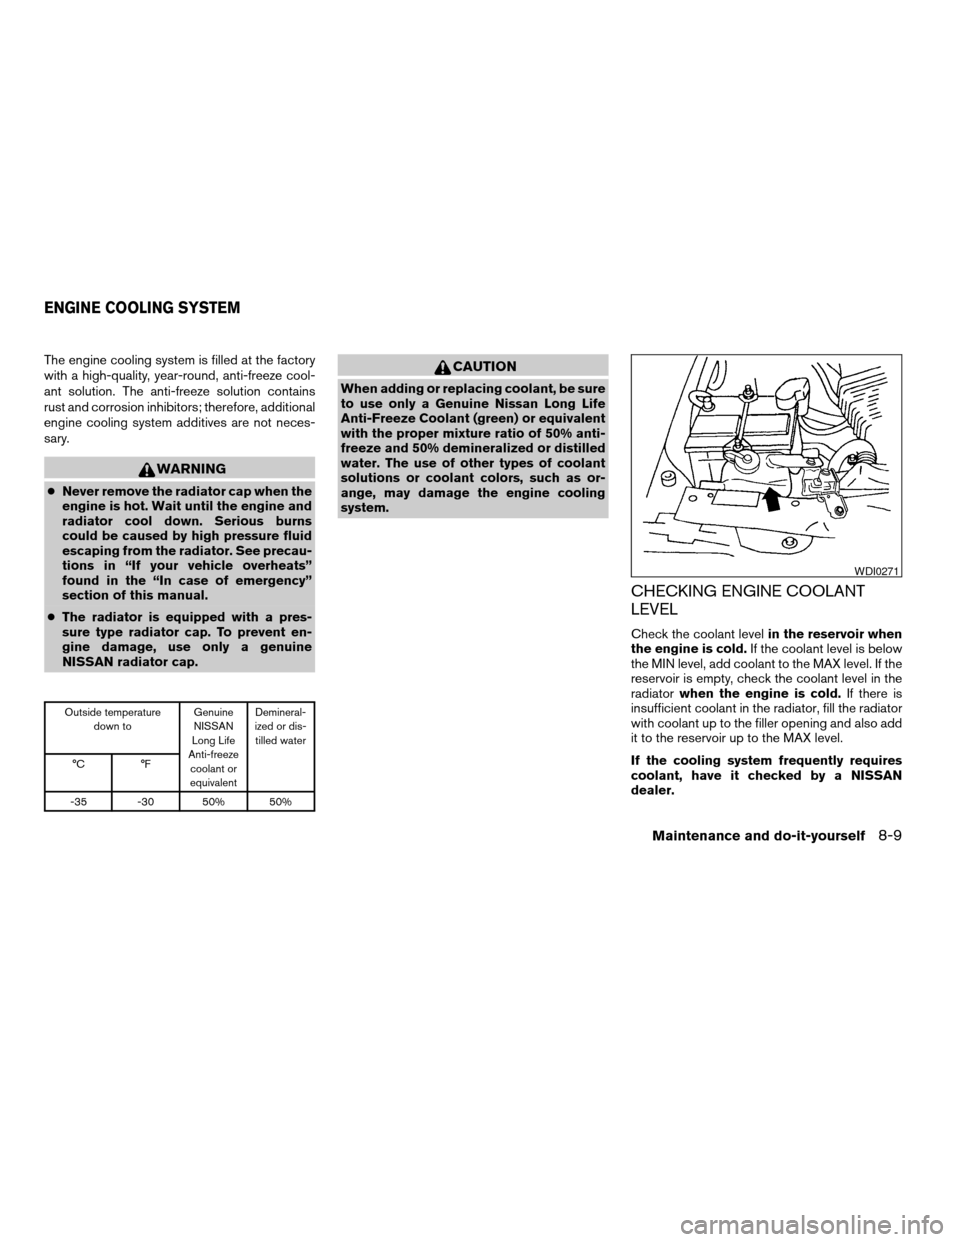
CHECKING ENGINE COOLANT
LEVEL
Check the coolant levelin the reservoir when
the engine is cold.If the coolant level is below
the MIN level, add coolant to the MAX level. If the
reservoir is empty, check the coolant level in the
radiatorwhen the engine is cold.If there is
insufficient coolant in the radiator, fill the radiator
with coolant up to the filler opening and also add
it to the reservoir up to the MAX level.
If the cooling system frequently requires
coolant, have it checked by a NISSAN
dealer.
WDI0271
ENGINE COOLING SYSTEM
Maintenance and do-it-yourself8-9
ZREVIEW COPY:Ð2003 Xterra(xtr)
Owners Manual(owners)ÐUSA English(nna)
02/24/03Ðtbrooks
X
Page 196 of 272
CHANGING ENGINE COOLANT
A NISSAN dealer can change the engine coolant.
The service procedure can be found in the
NISSAN Service Manual.
Improper servicing can result in reduced
heater performance and engine overheat-
ing.
WARNING
cTo avoid the danger of being scalded,
never change the coolant when the en-
gine is hot.
cNever remove the radiator cap when the
engine is hot. Serious burns could be
caused by high pressure fluid escaping
from the radiator.
cAvoid direct skin contact with used
coolant. If skin contact is made, wash
thoroughly with soap or hand cleaner
as soon as possible.
cKeep coolant out of the reach of chil-
dren and pets.
Engine coolant must be disposed of properly.
Check your local regulations.
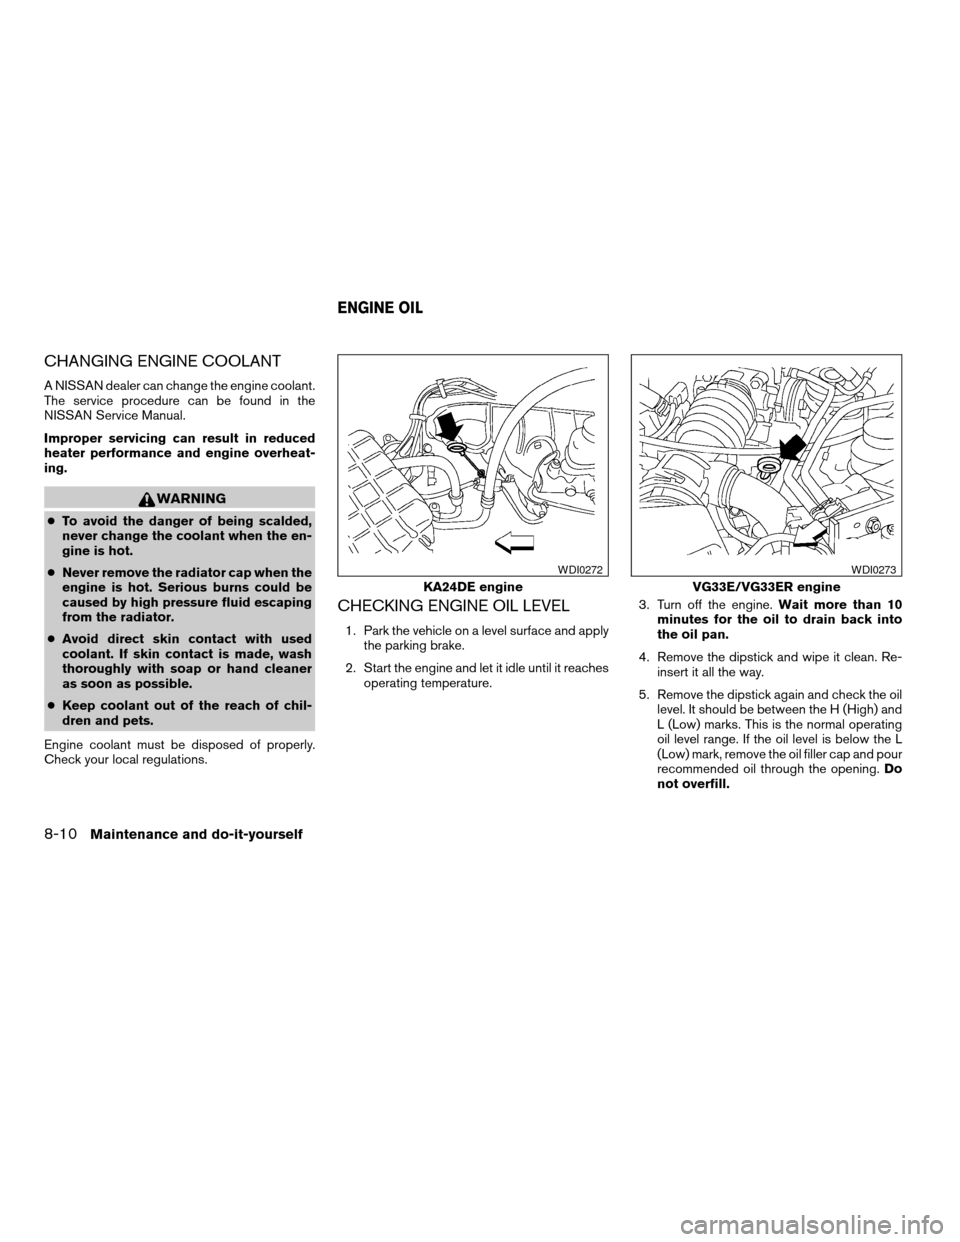
CHECKING ENGINE OIL LEVEL
1. Park the vehicle on a level surface and apply
the parking brake.
2. Start the engine and let it idle until it reaches
operating temperature.3. Turn off the engine.Wait more than 10
minutes for the oil to drain back into
the oil pan.
4. Remove the dipstick and wipe it clean. Re-
insert it all the way.
5. Remove the dipstick again and check the oil
level. It should be between the H (High) and
L (Low) marks. This is the normal operating
oil level range. If the oil level is below the L
(Low) mark, remove the oil filler cap and pour
recommended oil through the opening.Do
not overfill.
KA24DE engine
WDI0272
VG33E/VG33ER engine
WDI0273
ENGINE OIL
8-10Maintenance and do-it-yourself
ZREVIEW COPY:Ð2003 Xterra(xtr)
Owners Manual(owners)ÐUSA English(nna)
02/24/03Ðtbrooks
X
Page 203 of 272
WARNING
Use only new fluid from a sealed con-
tainer. Old, inferior or contaminated fluid
may damage the brake and clutch sys-
tems. The use of improper fluids can dam-
age the brake system and affect the vehi-
cle’s stopping ability.
CAUTION
Do not spill the fluid on any painted sur-
faces. This will damage the paint. If fluid is
spilled, immediately wash the surface
with water.
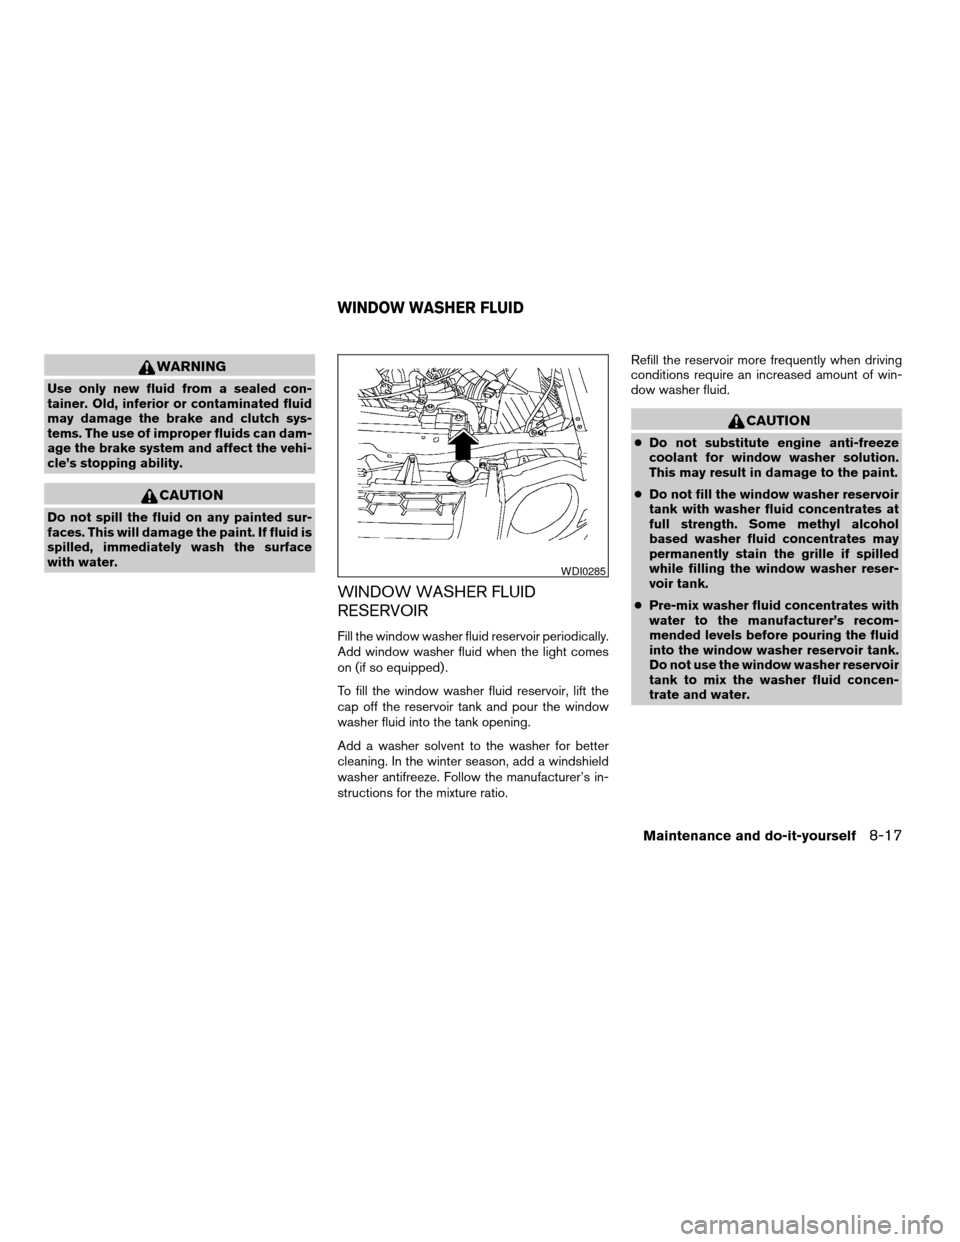
WINDOW WASHER FLUID
RESERVOIR
Fill the window washer fluid reservoir periodically.
Add window washer fluid when the light comes
on (if so equipped) .
To fill the window washer fluid reservoir, lift the
cap off the reservoir tank and pour the window
washer fluid into the tank opening.
Add a washer solvent to the washer for better
cleaning. In the winter season, add a windshield
washer antifreeze. Follow the manufacturer’s in-
structions for the mixture ratio.Refill the reservoir more frequently when driving
conditions require an increased amount of win-
dow washer fluid.
CAUTION
cDo not substitute engine anti-freeze
coolant for window washer solution.
This may result in damage to the paint.
cDo not fill the window washer reservoir
tank with washer fluid concentrates at
full strength. Some methyl alcohol
based washer fluid concentrates may
permanently stain the grille if spilled
while filling the window washer reser-
voir tank.
cPre-mix washer fluid concentrates with
water to the manufacturer’s recom-
mended levels before pouring the fluid
into the window washer reservoir tank.
Do not use the window washer reservoir
tank to mix the washer fluid concen-
trate and water.
WDI0285
WINDOW WASHER FLUID
Maintenance and do-it-yourself8-17
ZREVIEW COPY:Ð2003 Xterra(xtr)
Owners Manual(owners)ÐUSA English(nna)
02/24/03Ðtbrooks
X
Page 232 of 272
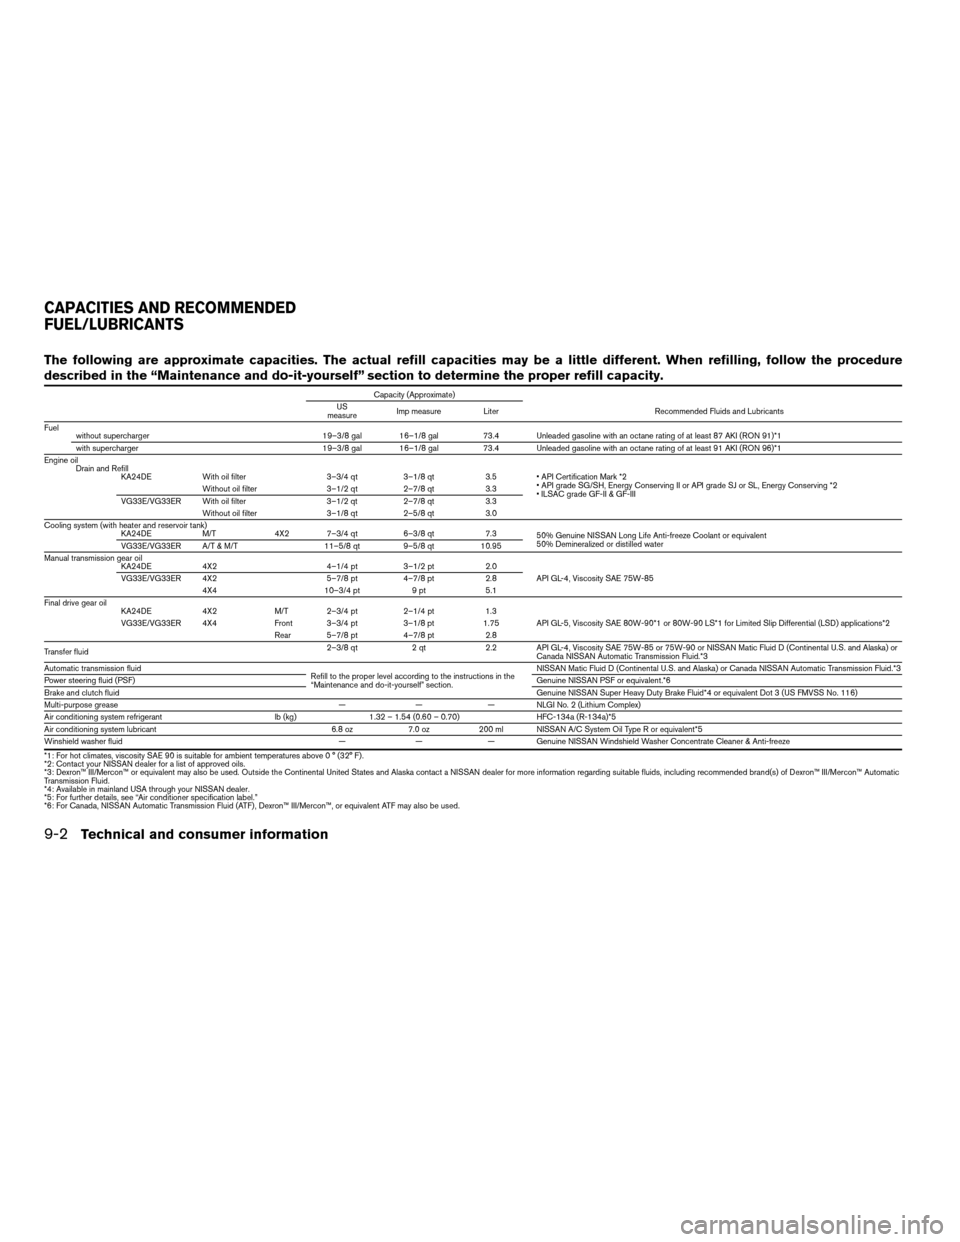
The following are approximate capacities. The actual refill capacities may be a little different. When refilling, follow the procedure
described in the “Maintenance and do-it-yourself” section to determine the proper refill capacity.
Capacity (Approximate)
US
measureImp measure Liter Recommended Fluids and Lubricants
Fuel
without supercharger 19–3/8 gal 16–1/8 gal 73.4 Unleaded gasoline with an octane rating of at least 87 AKI (RON 91)*1
with supercharger 19–3/8 gal 16–1/8 gal 73.4 Unleaded gasoline with an octane rating of at least 91 AKI (RON 96)*1
Engine oil
Drain and Refill
KA24DE With oil filter 3–3/4 qt 3–1/8 qt 3.5 • API Certification Mark *2
• API grade SG/SH, Energy Conserving II or API grade SJ or SL, Energy Conserving *2
• ILSAC grade GF-II & GF-III Without oil filter 3–1/2 qt 2–7/8 qt 3.3
VG33E/VG33ER With oil filter 3–1/2 qt 2–7/8 qt 3.3
Without oil filter 3–1/8 qt 2–5/8 qt 3.0
Cooling system (with heater and reservoir tank)
KA24DE M/T 4X2 7–3/4 qt 6–3/8 qt 7.3
50% Genuine NISSAN Long Life Anti-freeze Coolant or equivalent
50% Demineralized or distilled water
VG33E/VG33ER A/T & M/T 11–5/8 qt 9–5/8 qt 10.95
Manual transmission gear oil
KA24DE 4X2 4–1/4 pt 3–1/2 pt 2.0
API GL-4, Viscosity SAE 75W-85 VG33E/VG33ER 4X2 5–7/8 pt 4–7/8 pt 2.8
4X4 10–3/4 pt 9 pt 5.1
Final drive gear oil
KA24DE 4X2 M/T 2–3/4 pt 2–1/4 pt 1.3
API GL-5, Viscosity SAE 80W-90*1 or 80W-90 LS*1 for Limited Slip Differential (LSD) applications*2 VG33E/VG33ER 4X4 Front 3–3/4 pt 3–1/8 pt 1.75
Rear 5–7/8 pt 4–7/8 pt 2.8
Transfer fluid2–3/8 qt 2 qt 2.2 API GL-4, Viscosity SAE 75W-85 or 75W-90 or NISSAN Matic Fluid D (Continental U.S. and Alaska) or
Canada NISSAN Automatic Transmission Fluid.*3
Automatic transmission fluid
Refill to the proper level according to the instructions in the
“Maintenance and do-it-yourself” section.NISSAN Matic Fluid D (Continental U.S. and Alaska) or Canada NISSAN Automatic Transmission Fluid.*3
Power steering fluid (PSF)Genuine NISSAN PSF or equivalent.*6
Brake and clutch fluidGenuine NISSAN Super Heavy Duty Brake Fluid*4 or equivalent Dot 3 (US FMVSS No. 116)
Multi-purpose grease — — — NLGI No. 2 (Lithium Complex)
Air conditioning system refrigerant lb (kg) 1.32 – 1.54 (0.60 – 0.70) HFC-134a (R-134a)*5
Air conditioning system lubricant 6.8 oz 7.0 oz 200 ml NISSAN A/C System Oil Type R or equivalent*5
Winshield washer fluid — — — Genuine NISSAN Windshield Washer Concentrate Cleaner & Anti-freeze
*1: For hot climates, viscosity SAE 90 is suitable for ambient temperatures above 0 ° (32° F) .
*2: Contact your NISSAN dealer for a list of approved oils.
*3: Dexron™ III/Mercon™ or equivalent may also be used. Outside the Continental United States and Alaska contact a NISSAN dealer for more informationregarding suitable fluids, including recommended brand(s) of Dexron™ III/Mercon™ Automatic
Transmission Fluid.
*4: Available in mainland USA through your NISSAN dealer.
*5: For further details, see “Air conditioner specification label.”
*6: For Canada, NISSAN Automatic Transmission Fluid (ATF) , Dexron™ III/Mercon™, or equivalent ATF may also be used.
CAPACITIES AND RECOMMENDED
FUEL/LUBRICANTS
9-2Technical and consumer information
ZREVIEW COPY:Ð2003 Xterra(xtr)
Owners Manual(owners)ÐUSA English(nna)
02/24/03Ðtbrooks
X
Page 252 of 272
3. Route the trailer tow harness so that it does
not block access to the spare tire winch
socket.
4. Connect the tow harness connector (SAE
J1239) to your trailer.
5. Confirm proper vehicle and trailer stop/turn
lamp operation.
6.
When towing is completed, disconnect the
tow harness from the trailer and the vehicle.
Store the tow harness in the glove box. Rein-
stall the connector cap to the vehicle harness.
If you need further assistance in wiring a trailer to
your NISSAN, contact a NISSAN dealer.
Always confirm proper vehicle and trailer
stop/turn lamp operation every time the
trailer light circuits are connected for use.
Trailer brakes
If your trailer is equipped with a braking system,
make sure it conforms to federal and/or local
regulations and that it is properly installed.
WARNING
Never connect a trailer brake system di-
rectly to the vehicle brake system.
Pre-towing tips
cBe certain your vehicle maintains a level
position when a loaded and/or unloaded
trailer is hitched. Do not drive the vehicle if it
has an abnormal nose-up or nose-down
condition; check for improper tongue load,
overload, worn suspension or other possible
causes of either condition.
cAlways secure items in the trailer to prevent
load shift while driving.
cBe certain your rear view mirrors conform to
all federal, state or local regulations. If not,
install any mirrors required for towing before
driving the vehicle.
Trailer towing tips
In order to gain skill and an understanding of the
vehicle’s behavior, you should practice turning,
stopping and backing up in an area which is free
from traffic. Steering stability and braking perfor-
mance will be somewhat different than under
normal driving conditions.
cAlways secure items in the trailer to prevent
load shift while driving.
cAvoid abrupt starts, acceleration or stops.
cAvoid sharp turns or lane changes.
c
Always drive your vehicle at a moderate speed.
cAlways block the wheels on both vehicle and
trailer when parking. Parking on a slope is
not recommended; however, if you must do
so, and if your vehicle is equipped with an
automatic transmission, first block the
wheels and apply the parking brake, and
then move the transmission shift selector
lever into the P (Park) position. If you move
the shift selector lever to the P (Park) posi-
tion before blocking the wheels and applying
the parking brake, transmission damage
could occur.
cWhen going down a hill, shift into a lower
gear and use the engine braking effect.
When going up a long grade, downshift the
transmission to a lower gear and reduce
speed to reduce chances of engine over-
loading and/or overheating. However, for
long steep grades, do not stay in 1st or 2nd
gear when driving above 35 MPH (56 km/h) .
cIf the engine coolant rises to an extremely
high temperature when the air conditioner
system is on, turn off the air conditioner.
Coolant heat can be additionally vented by
opening the windows, switching the fan
control to high and setting the temperature
control to the HOT position.
cTrailer towing requires more fuel than normal
circumstances.
9-22Technical and consumer information
ZREVIEW COPY:Ð2003 Xterra(xtr)
Owners Manual(owners)ÐUSA English(nna)
02/24/03Ðtbrooks
X
Page 255 of 272
If you believe that your vehicle has a defect which
could cause a crash or could cause injury or
death, you should immediately inform the Na-
tional Highway Traffic Safety Administration
(NHTSA) in addition to notifying NISSAN.
If NHTSA receives similar complaints, it may
open an investigation, and if it finds that a safety
defect exists in a group of vehicles, it may order a
recall and remedy campaign. However, NHTSA
cannot become involved in individual problems
between you, your dealer, or NISSAN.
To contact NHTSA, you may call the Auto Safety
Hotline toll-free at 1-888-327-4236. You may
also write to: NHTSA, U.S. Department of Trans-
portation, Washington, D.C. 20590. You can also
obtain other information about motor vehicle
safety from the Hotline.
You may notify NISSAN by contacting our Con-
sumer Affairs Department, toll-free, at 1-800-
NISSAN-1.
In Hawaii call 1-808-836-0888.Due to legal requirements in some states and
Canadian Provinces, your vehicle may be re-
quired to be in what is called the “ready condi-
tion” for an Inspection/Maintenance (I/M) test of
the emission control system.
The vehicle is set to the “ready condition”’ when it
is driven through certain driving patterns. Usually,
the ready condition can be obtained by ordinary
usage of the vehicle.
If a powertrain system component is repaired or
the battery is disconnected, the vehicle may be
reset to a “not ready” condition. Before taking the
I/M test, drive the vehicle through the following
pattern to set the vehicle to the ready condition. If
you cannot or do not want to perform the driving
pattern, a NISSAN dealer can conduct it for you.
WARNING
Always drive the vehicle in a safe and
prudent manner according to traffic con-
ditions and obey all traffic laws.
1. Start the engine when the engine coolant
temperature gauge needle points to C. Al-
low the engine to idle until the gauge needle
points between the C and H (normal oper-
ating temperature) .2. Accelerate the vehicle to 55 mph (88 km/h) ,
then quickly release the accelerator pedal
completely and keep it released for at least 6
seconds.
3. Quickly depress the accelerator pedal for a
moment, then drive the vehicle at a speed of
53 - 60 mph (85 - 97 km/h) for at least 5
minutes.
4. Stop the vehicle.
5. Accelerate the vehicle to 35 mph (55 km/h)
and maintain the speed for 20 seconds.
6. Repeat steps 4 through 5 at least three
times.
7. Accelerate the vehicle to 55 mph (88 km/h)
and maintain the speed for at least 3 min-
utes.
8. Stop the vehicle and turn the engine off.
9. Repeat steps 1 through 8 at least one more
time.
If steps 1 through 7 are interrupted, repeat the
preceding step. Any safe driving mode is accept-
able between steps. Do not stop the engine until
step 7 is completed. If you cannot or do not want
to perform the driving pattern, a NISSAN dealer
can conduct it for you.
REPORTING SAFETY DEFECTS (US
only)READINESS FOR INSPECTION/
MAINTENANCE (I/M) TEST
Technical and consumer information9-25
ZREVIEW COPY:Ð2003 Xterra(xtr)
Owners Manual(owners)ÐUSA English(nna)
02/24/03Ðtbrooks
X
Page 259 of 272

10 Index
A
Air bag (See supplemental restraint
system)......................1-8
Air bag warning light...........1-19, 2-12
Air cleaner housing filter............8-22
Air conditioner
Air conditioner operation...........4-5
Air conditioner service............4-9
Air conditioner specification label.....9-12
Air conditioner system refrigerant and
lubrication recommendations........9-6
Heater and air conditioner controls.....4-2
Servicing air conditioner...........4-9
Air flow charts..................4-6
Alarm system
(See vehicle security system).........2-15
Anchor point locations.............1-42
Antenna.....................4-28
Anti-lock brake system (ABS).........5-24
Anti-lock brake warning light..........2-10
Audible reminders................2-15
Audio system..................4-10
Compact disc (CD) player.........4-15
FM-AM radio with compact disc (CD)
changer...................4-16
FM-AM radio with compact disc (CD)
player....................4-12
Radio....................4-10
Steering wheel audio control switch. . . .4-28
Auto-lock free-running hubs..........5-20Automatic
Automatic power window switch.....2-32
Automatic transmission fluid (ATF). . . .8-14
Driving with automatic transmission. . . .5-10
Transmission selector lever lock release .5-12
B
Battery......................8-18
Charge warning light............2-11
Battery replacement
(See remote keyless entry system).......3-7
Before starting the engine............5-9
Belts (See drive belts).............8-19
Brake
Anti-lock brake system (ABS).......5-24
Brake booster................8-30
Brake fluid..................8-16
Brake light (See stop light).........8-36
Brake pedal.................8-29
Brake system................5-23
Brake warning light.............2-10
Brake wear indicators........2-15, 8-29
Parking brake check............8-29
Parking brake operation..........5-15
Self-adjusting brakes............8-29
Break-in schedule................5-18
Brightness control
Instrument panel..............2-21
Bulb check/instrument panel..........2-9
Bulb replacement................8-36C
Capacities and recommended
fuel/lubricants...................9-2
Car phone or CB radio.............4-29
Cargo (See vehicle loading information) . . .9-13
CD player (See audio system).........4-15
Check engine indicator light
(See malfunction indicator light)........2-13
Child restraint with top tether strap......1-41
Child restraints.......1-23, 1-24, 1-30, 1-39
Precautions on child restraints.......1-30
Top tether strap anchor point locations . .1-42
Child safety rear door lock............3-4
Chimes, audible reminders...........2-15
Cleaning exterior and interior..........7-2
Clock...................4-13, 4-18
Clutch
Clutch fluid.................8-16
Cold weather driving..............5-27
Compact disc (CD) player...........4-15
Controls
Audio controls (steering wheel)......4-28
Heater and air conditioner controls.....4-2
Coolant
Capacities and recommended
fuel/lubricants.................9-2
Changing engine coolant..........8-10
Checking engine coolant level........8-9
Engine coolant temperature gauge.....2-5
Corrosion protection...............7-5
ZREVIEW COPY:Ð2003 Xterra(xtr)
Owners Manual(owners)ÐUSA English(nna)
03/17/03Ðcathy
X
Page 260 of 272

Cover
Tonneau cover................2-30
Cruise control..................5-16
Cup holders...................2-27
D
Daytime running light system
(Canada only)..................2-21
Defogger switch
Rear window defogger switch.......2-20
Dimensions and weights.............9-9
Door locks....................3-2
Door open warning light............2-11
Drive belts....................8-19
Driving
Auto-lock free-running hubs........5-20
Cold weather driving............5-27
Driving with automatic transmission. . . .5-10
Driving with manual transmission.....5-13
Precautions when starting and driving . . .5-2
E
Economy - fuel.................5-18
Emission control information label.......9-12
Emission control system warranty.......9-24
Engine
Before starting the engine..........5-9
Capacities and recommended
fuel/lubricants.................9-2
Changing engine coolant..........8-10
Changing engine oil............8-11
Changing engine oil filter..........8-13Checking engine coolant level........8-9
Checking engine oil level..........8-10
Engine compartment check locations. . . .8-9
Engine coolant temperature gauge.....2-5
Engine cooling system............8-9
Engine oil..................8-10
Engine oil and oil filter recommendation . .9-5
Engine oil pressure warning light.....2-11
Engine oil viscosity..............9-5
Engine serial number............9-11
Engine specifications.............9-7
Starting the engine..............5-9
Exhaust gas (Carbon monoxide)........5-2
F
First aid kit....................6-2
Flashers (See hazard warning flasher switch)
..........................2-22
Flat tire......................6-2
Floor mat positioning aid.............7-4
Fluid
Automatic transmission fluid (ATF). . . .8-14
Brake fluid..................8-16
Capacities and recommended fuel/lubricants
.........................9-2
Clutch fluid.................8-16
Engine coolant................8-9
Engine oil..................8-10
Power steering fluid.............8-15
Window washer fluid............8-17
F.M.V.S.S. certification label..........9-11
Fog light switch.................2-22
Front seats....................1-2Fuel
Capacities and recommended
fuel/lubricants.................9-2
Fuel economy................5-18
Fuel filler cap................3-13
Fuel filler lid.................3-13
Fuel gauge..................2-6
Fuel octane rating..............9-4
Fuel recommendation............9-3
Fuses......................8-31
G
Gascap.....................3-13
Gauge
Engine coolant temperature gauge.....2-5
Fuel gauge..................2-6
Odometer...................2-3
Speedometer.................2-3
Tachometer..................2-5
Gear Basket
(see roof rack with gear basket)........3-10
General maintenance..............8-2
Glove box....................2-27
Glove box lock.................2-27
H
Hazard warning flasher switch.........2-22
Head restraints..................1-7
Headlight and turn signal switch........2-20
Headlights....................8-33
Heater
Heater and air conditioner controls.....4-2
Heater operation...............4-4
10-2
ZREVIEW COPY:Ð2003 Xterra(xtr)
Owners Manual(owners)ÐUSA English(nna)
03/17/03Ðcathy
X