stop start NISSAN XTERRA 2004 WD22 / 1.G Owner's Manual
[x] Cancel search | Manufacturer: NISSAN, Model Year: 2004, Model line: XTERRA, Model: NISSAN XTERRA 2004 WD22 / 1.GPages: 296, PDF Size: 4.64 MB
Page 179 of 296
WARNING
cThe anti-lock brake system is a sophis-
ticated device, but it cannot prevent ac-
cidents resulting from careless or dan-
gerous driving techniques. It can help
maintain vehicle control during braking
on slippery surfaces, but remember that
the stopping distance on slippery sur-
faces will be longer than on normal
surfaces even with the anti-lock brake
system. Stopping distances may also
be longer on rough, gravel or snow cov-
ered roads, or if you are using tire
chains. Tire type and condition may also
affect braking effectiveness. Always
maintain a safe distance from the ve-
hicle in front of you. Ultimately, the re-
sponsibility for safety of self and others
rests in the hands of the driver.
cTire type and condition of tires may also
affect braking effectiveness.
cWhen replacing tires, install the speci-
fied size of tires on all four wheels.cWhen installing a spare tire, make sure
it is the proper size and type as speci-
fied on the tire placard. For tire placard
location information, refer to “Tire plac-
ard” in the “Technical and consumer
information” section of this manual.
cRefer to “Wheels and tires” in the
“Maintenance and do-it-yourself” sec-
tion of this manual.When accelerating or driving on slippery sur-
faces, the tires may spin or slide. With the Vehicle
Dynamic Control (VDC) system, sensors detect
these movements and control the braking and
engine output to help improve vehicle stability.
cWhen the vehicle dynamic control (VDC)
system is operating, the slip indicator in the
instrument panel blinks.
cWhen only the traction control system (TCS)
portion of the vehicle dynamic control sys-
tem is operating, the slip indicator will also
blink.
cIf the slip indicator blinks, the road condi-
tions are slippery. Be sure to adjust your
speed and driving to these conditions. See
“Slip indicator light”, and “Vehicle dynamic
control off indicator light” in the “Instruments
and controls” section.
cIndicator light
If malfunction occurs in the system,
the
andindicator lights come
on in the instrument panel.
As long as these warning lights are on, the
traction control function is canceled.
The VDC system uses an Active Brake Limited
Slip (ABLS) system to improve vehicle traction.
The ABLS system works when one of the driving
wheels is spinning on a slippery surface. The
VEHICLE DYNAMIC CONTROL (VDC)
SYSTEM (if so equipped)
Starting and driving5-25
ZREVIEW COPY:Ð2004 Xterra(xtr)
Owners Manual(owners)ÐUSA English(nna)
10/23/03Ðdebbie
X
Page 182 of 296
SPECIAL WINTER EQUIPMENT
It is recommended that the following items be
carried in the vehicle during winter:
cA scraper and stiff-bristled brush to remove
ice and snow from the windows and wiper
blades.
cA sturdy, flat board to be placed under the
jack to give it firm support.
cA shovel to dig the vehicle out of snowdrifts.
cExtra window washer fluid to refill the reser-
voir tank.
DRIVING ON SNOW OR ICE
WARNING
cWet ice (32°F, 0°C and freezing rain) ,
very cold snow or ice can be slick and
very hard to drive on. The vehicle will
have much less traction or “grip” under
these conditions. Try to avoid driving on
wet ice until the road is salted or
sanded.
cWhatever the condition, drive with cau-
tion. Accelerate and slow down with
care. If accelerating or downshifting too
fast, the drive wheels will lose even
more traction.cAllow more stopping distance under
these conditions. Braking should be
started sooner than on dry pavement.
cAllow greater following distances on
slippery roads.
cWatch for slippery spots (glare ice) .
These may appear on an otherwise
clear road in shaded areas. If a patch of
ice is seen ahead, brake before reach-
ing it. Try not to brake while on the ice,
and avoid any sudden steering
maneuvers.
cDo not use the cruise control on slip-
pery roads.
cSnow can trap dangerous exhaust
gases under your vehicle. Keep snow
clear of the exhaust pipe and from
around your vehicle.
ENGINE BLOCK HEATER (if so
equipped)
An engine block heater to assist in extreme cold
temperature starting is available through a
NISSAN dealer.
WARNING
Do not use your heater with an un-
grounded electrical system or two-
pronged (cheater) adapters. You can be
injured by an electrical shock if you use an
ungrounded connection.
5-28Starting and driving
ZREVIEW COPY:Ð2004 Xterra(xtr)
Owners Manual(owners)ÐUSA English(nna)
10/23/03Ðdebbie
X
Page 191 of 296
4. Lower the vehicle slowly until the tire
touches the ground. Then, with the wheel
nut wrench, tighten the wheel nuts securely
in the sequence illustrated. Lower the ve-
hicle completely.
WARNING
cIncorrect wheel nuts or improperly
tightened wheel nuts can cause the
wheel to become loose or come off.
This could cause an accident.
cDo not use oil or grease on the wheel
studs or nuts. This could cause the nuts
to become loose.
Retighten the wheel nuts after the vehicle
has been driven for 600 miles (1,000 km)
(also in cases of a flat tire, etc.) . As soon as
possible, tighten the wheel nuts to the
specified torque with a torque wrench.
Wheel nut tightening torque:
98 ft-lb (133 N·m)
The wheel nuts must be kept tightened to
specification at all times. It is recom-
mended that wheel nuts be tightened to
specifications at each lubrication interval.
Adjust tire pressure to the COLD pressure.COLD pressure: After vehicle has been
parked for three hours or more or driven
less than 1 mile (1.6 km) .
COLD tire pressures are shown on the tire
placard affixed to the inside of the glove
box lid.
5. Securely store the flat tire and jacking equip-
ment in the vehicle.
WARNING
cAlways make sure that the spare tire
and jacking equipment are properly se-
cured after use. Such items can become
dangerous projectiles in an accident or
sudden stop.
cThe spare tire is designed for emer-
gency use. See specific instructions un-
der the heading “Wheels and tires” in
the “Maintenance and do-it-yourself”
section of this manual.To start your engine with a booster battery, the
instructions and precautions below must be fol-
lowed.
WARNING
cIf done incorrectly, jump starting can
lead to a battery explosion, resulting in
severe injury or death. It could also
damage your vehicle.
cExplosive hydrogen gas is always
present in the vicinity of the battery.
Keep all sparks and flames away from
the battery.
cDo not allow battery fluid to come into
contact with eyes, skin, clothing or
painted surfaces. Battery fluid is a cor-
rosive sulfuric acid solution which can
cause severe burns. If the fluid should
come into contact with anything, imme-
diately flush the contacted area with
water.
cKeep battery out of the reach of
children.
cThe booster battery must be rated at 12
volts. Use of an improperly rated battery
can damage your vehicle.
JUMP STARTING
In case of emergency6-9
ZREVIEW COPY:Ð2004 Xterra(xtr)
Owners Manual(owners)ÐUSA English(nna)
10/23/03Ðdebbie
X
Page 193 of 296
CAUTION
cAlways connect positive (1) to positive
(1) and negative (2) to body ground (for
example, strut mounting bolt, engine
lift bracket, etc.) — not to the battery.
cMake sure the jumper cables do not
touch moving parts in the engine com-
partment and that the cable clamps do
not contact any other metal.
5. Start the engine of the booster vehicle and
let it run for a few minutes.
6. Keep the engine speed of the booster ve-
hicle at about 2,000 rpm, and start the en-
gine of the vehicle being jump started.
CAUTION
Do not keep the starter motor engaged for
more than 10 seconds. If the engine does
not start right away, turn the key off and
wait 3 to 4 seconds before trying again.
7. After starting the engine, carefully discon-
nect the negative cable and then the positive
cable.
8. Replace the vent caps (if so equipped) . Be
sure to dispose of the cloth used to cover
the vent holes as it may be contaminated
with corrosive acid.
WARNING
cAutomatic transmission models cannot
be push-started or tow-started. This
may cause transmission or other ve-
hicle damage.
cThree-way catalyst equipped models
should not be started by pushing. The
three-way catalyst may be damaged.
cNever try to start the vehicle by towing
it. When the engine starts, the forward
surge could cause the vehicle to collide
with the tow vehicle.If your vehicle is overheating (indicated by an
extremely high temperature gauge reading) , or if
you feel a lack of engine power, detect abnormal
noise, etc. take the following steps.
WARNING
cDo not continue to drive if your vehicle
overheats. Doing so could cause engine
damage or a vehicle fire.
cTo avoid the danger of being scalded,
never remove the radiator cap while the
engine is still hot. When the radiator
cap is removed, pressurized hot water
will spurt out, possibly causing serious
injury.
cDo not open the hood if steam is com-
ing out.
1. Move the vehicle safely off the road, apply
the parking brake and move the shift lever to
N (Neutral) (manual transmission) or to P
(Park) (automatic transmission) .
Do not stop the engine.
2. Turn off the air conditioner (if so equipped) .
Open all the windows, move the heater or air
conditioner temperature control to maximum
hot and fan control to high speed.
PUSH STARTING IF YOUR VEHICLE OVERHEATS
In case of emergency6-11
ZREVIEW COPY:Ð2004 Xterra(xtr)
Owners Manual(owners)ÐUSA English(nna)
10/23/03Ðdebbie
X
Page 194 of 296
3. If engine overheating is caused by climbing a
long hill on a hot day, run the engine at a fast
idle (approximately 1,500 r/min) until the
temperature gauge indicator returns to nor-
mal.
4. Get out of the vehicle. Look and listen for
steam or coolant escaping from the radiator
before opening the hood. Do not open the
hood further until no steam or coolant can be
seen.
5. Open the engine hood.
WARNING
If steam or water is coming from the en-
gine, stand clear to prevent getting
burned.
6. Visually check drive belts for damage or
looseness. Also check if the cooling fan is
running. The radiator hoses and radiator
should not leak water. If coolant is leaking,
the water pump belt is missing or loose, or
the cooling fan does not run, stop the en-
gine.
WARNING
Be careful not to allow your hands, hair,
jewelry or clothing to come into contact
with, or get caught in, engine belts or the
engine cooling fan. The engine cooling
fan can start at any time when the coolant
temperature is high.
7. After the engine cools down, check the cool-
ant level in the engine coolant reservoir tank
with the engine running. Add coolant to the
engine coolant reservoir tank if necessary.
Have your vehicle repaired at a NISSAN
dealer.When towing your vehicle, all State (Provincial in
Canada) and local regulations for towing must be
followed. Incorrect towing equipment could dam-
age your vehicle. Towing instructions are avail-
able from a NISSAN dealer. Local service opera-
tors are generally familiar with the applicable laws
and procedures for towing. To assure proper
towing and to prevent accidental damage to your
vehicle, NISSAN recommends having a service
operator tow your vehicle. It is advisable to have
the service operator carefully read the following
precautions:
WARNING
cNever ride in a vehicle that is being
towed.
cNever get under your vehicle after it has
been lifted by a tow truck.
TOWING YOUR VEHICLE
6-12In case of emergency
ZREVIEW COPY:Ð2004 Xterra(xtr)
Owners Manual(owners)ÐUSA English(nna)
10/23/03Ðdebbie
X
Page 227 of 296
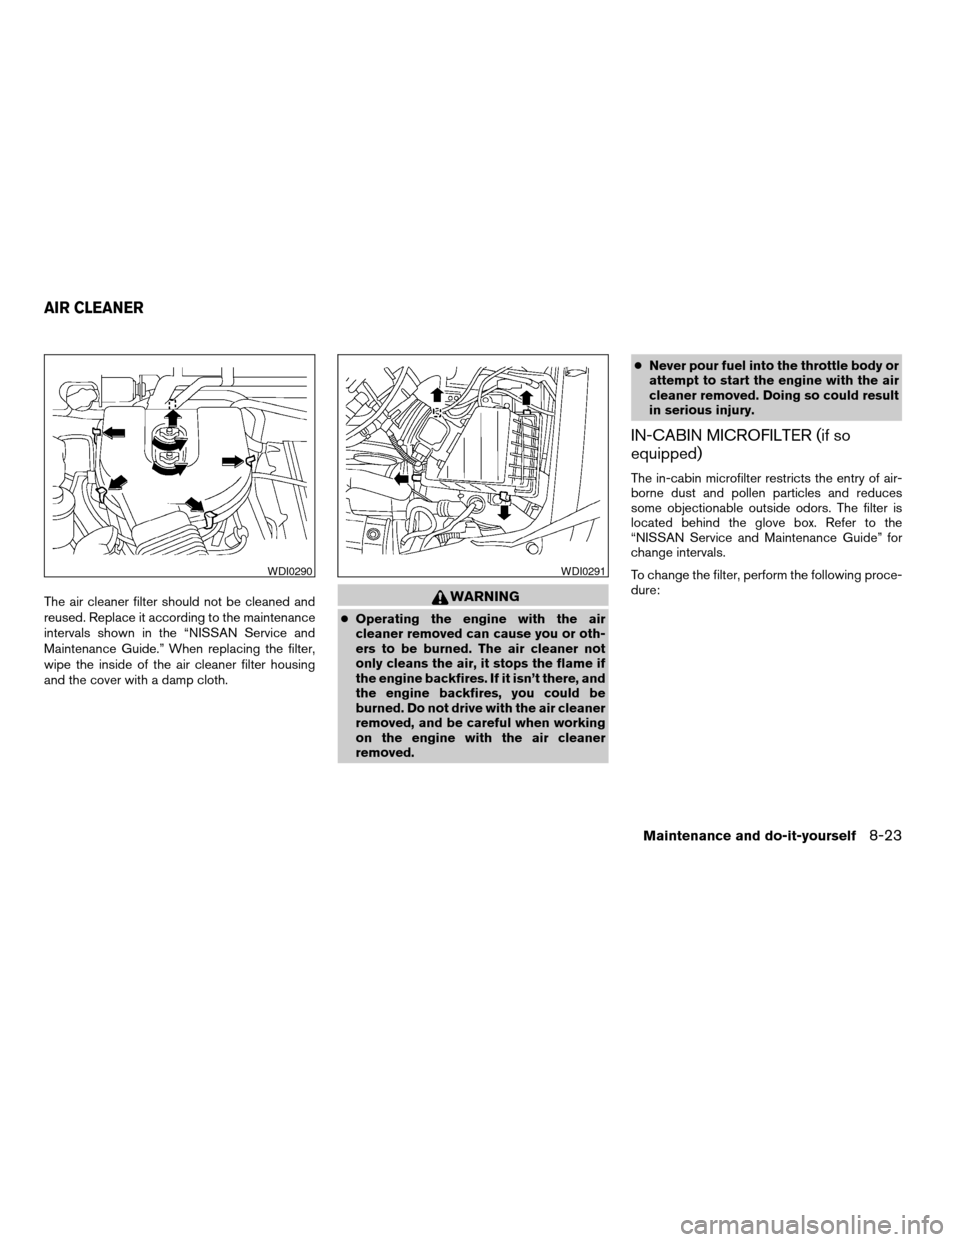
The air cleaner filter should not be cleaned and
reused. Replace it according to the maintenance
intervals shown in the “NISSAN Service and
Maintenance Guide.” When replacing the filter,
wipe the inside of the air cleaner filter housing
and the cover with a damp cloth.WARNING
cOperating the engine with the air
cleaner removed can cause you or oth-
ers to be burned. The air cleaner not
only cleans the air, it stops the flame if
the engine backfires. If it isn’t there, and
the engine backfires, you could be
burned. Do not drive with the air cleaner
removed, and be careful when working
on the engine with the air cleaner
removed.cNever pour fuel into the throttle body or
attempt to start the engine with the air
cleaner removed. Doing so could result
in serious injury.
IN-CABIN MICROFILTER (if so
equipped)
The in-cabin microfilter restricts the entry of air-
borne dust and pollen particles and reduces
some objectionable outside odors. The filter is
located behind the glove box. Refer to the
“NISSAN Service and Maintenance Guide” for
change intervals.
To change the filter, perform the following proce-
dure:
WDI0290WDI0291
AIR CLEANER
Maintenance and do-it-yourself8-23
ZREVIEW COPY:Ð2004 Xterra(xtr)
Owners Manual(owners)ÐUSA English(nna)
10/23/03Ðdebbie
X
Page 234 of 296

Under some driving or climate conditions, occa-
sional brake squeak, squeal or other noise may
be heard. Occasional brake noise during light to
moderate stops is normal and does not affect the
function or performance of the brake system.
The rear drum brakes (if so equipped) do not
have audible wear indicators. Should you ever
hear an unusually loud noise from the rear drum
brakes, have them inspected as soon as possible
by a NISSAN dealer.
Proper brake inspection intervals should
be followed.For more information regarding
brake inspections, see the appropriate mainte-
nance schedule information in the “NISSAN Ser-
vice and Maintenance Guide”.
BRAKE BOOSTER
Check the brake booster function as follows:
1. With the engine off, press and release the
brake pedal several times. When brake
pedal movement (distance of travel) remains
the same from one pedal application to the
next, continue on to the next step.
2. While depressing the brake pedal, start the
engine. The pedal height should drop a little.3. With the brake pedal depressed, stop the
engine. Keep the pedal depressed for about
30 seconds. The pedal height should not
change.
4. Run the engine for one minute without de-
pressing the brake pedal, then turn it off.
Depress the brake pedal several times. The
pedal travel distance will decrease gradually
with each depression as the vacuum is re-
leased from the booster.
If the brakes do not operate properly, have the
brakes checked by a NISSAN dealer.
8-30Maintenance and do-it-yourself
ZREVIEW COPY:Ð2004 Xterra(xtr)
Owners Manual(owners)ÐUSA English(nna)
10/23/03Ðdebbie
X
Page 275 of 296
3. Route the trailer tow harness so that it does
not block access to the spare tire winch
socket.
4. Connect the tow harness connector (SAE
J1239) to your trailer.
5. Confirm proper vehicle and trailer stop/turn
lamp operation.
6. When towing is completed, disconnect the
tow harness from the trailer and the vehicle.
Store the tow harness in the glove box.
Reinstall the connector cap to the vehicle
harness.
If you need further assistance in wiring a trailer to
your NISSAN, contact a NISSAN dealer.
Always confirm proper vehicle and trailer
stop/turn lamp operation every time the
trailer light circuits are connected for use.
Trailer brakes
If your trailer is equipped with a braking system,
make sure it conforms to federal and/or local
regulations and that it is properly installed.
WARNING
Never connect a trailer brake system di-
rectly to the vehicle brake system.
Pre-towing tips
cBe certain your vehicle maintains a level
position when a loaded and/or unloaded
trailer is hitched. Do not drive the vehicle if it
has an abnormal nose-up or nose-down
condition; check for improper tongue load,
overload, worn suspension or other possible
causes of either condition.
cAlways secure items in the trailer to prevent
load shift while driving.
cBe certain your rearview mirrors conform to
all federal, state or local regulations. If not,
install any mirrors required for towing before
driving the vehicle.
Trailer towing tips
In order to gain skill and an understanding of the
vehicle’s behavior, you should practice turning,
stopping and backing up in an area which is free
from traffic. Steering stability and braking perfor-
mance will be somewhat different than under
normal driving conditions.
cAlways secure items in the trailer to prevent
load shift while driving.
cAvoid abrupt starts, acceleration or stops.
cAvoid sharp turns or lane changes.cAlways drive your vehicle at a moderate
speed.
cAlways block the wheels on both vehicle and
trailer when parking. Parking on a slope is
not recommended; however, if you must do
so, and if your vehicle is equipped with an
automatic transmission, first block the
wheels and apply the parking brake, and
then move the transmission shift selector
lever into the P (Park) position. If you move
the shift selector lever to the P (Park) posi-
tion before blocking the wheels and applying
the parking brake, transmission damage
could occur.
cWhen going down a hill, shift into a lower
gear and use the engine braking effect.
When going up a long grade, downshift the
transmission to a lower gear and reduce
speed to reduce chances of engine over-
loading and/or overheating. However, for
long steep grades, do not stay in 1st or 2nd
gear when driving above 35 MPH (56 km/h) .
cIf the engine coolant rises to an extremely
high temperature when the air conditioner
system is on, turn off the air conditioner.
Coolant heat can be additionally vented by
opening the windows, switching the fan
control to high and setting the temperature
control to the HOT position.
Technical and consumer information9-21
ZREVIEW COPY:Ð2004 Xterra(xtr)
Owners Manual(owners)ÐUSA English(nna)
10/23/03Ðdebbie
X
Page 283 of 296

10 Index
A
Air bag (See supplemental restraint
system)......................1-8
Air bag warning light...........1-19, 2-13
Air cleaner housing filter............8-23
Air conditioner
Air conditioner operation...........4-5
Air conditioner service............4-9
Air conditioner specification label.....9-11
Air conditioner system refrigerant and
lubrication recommendations........9-6
Heater and air conditioner controls.....4-2
Servicing air conditioner...........4-9
Air flow charts..................4-6
Alarm system (See vehicle security system) .2-15
Anchor point locations.............1-42
Antenna.....................4-28
Anti-lock brake system (ABS).........5-24
Anti-lock brake warning light..........2-10
Audible reminders................2-15
Audio system..................4-10
Compact disc (CD) player.........4-14
FM-AM radio with compact disc (CD)
changer...................4-16
FM-AM radio with compact disc (CD)
player....................4-12
Radio....................4-10
Steering wheel audio control switch. . . .4-28
Auto-lock free-running hubs..........5-20Automatic
Automatic power window switch.....2-38
Automatic transmission fluid (ATF). . . .8-14
Driving with automatic transmission. . . .5-10
Transmission selector lever lock release .5-13
B
Battery......................8-18
Charge warning light............2-11
Battery replacement
(See remote keyless entry system). . . .3-8, 8-32
Before starting the engine............5-9
Belts (See drive belts).............8-20
Brake
Anti-lock brake system (ABS).......5-24
Brake booster................8-30
Brake fluid..................8-16
Brake light (See stop light).........8-36
Brake pedal.................8-29
Brake system................5-23
Brake warning light.............2-10
Brake wear indicators........2-15, 8-29
Parking brake check............8-29
Parking brake operation..........5-16
Self-adjusting brakes............8-29
Break-in schedule................5-18
Brightness control
Instrument panel..............2-22
Bulb check/instrument panel..........2-9
Bulb replacement................8-36C
Capacities and recommended
fuel/lubricants...................9-2
Car phone or CB radio.............4-29
Cargo (See vehicle loading information) . . .9-12
CD care and cleaning.............4-27
CD player (See audio system).........4-14
Check engine indicator light
(See malfunction indicator lamp).......2-14
Child restraint with top tether strap......1-41
Child restraints.......1-23, 1-24, 1-30, 1-39
Precautions on child restraints.......1-30
Top tether strap anchor point locations . .1-42
Child safety rear door lock............3-4
Chimes, audible reminders...........2-15
Cleaning exterior and interior..........7-2
Clock...................4-13, 4-18
Clutch
Clutch fluid.................8-17
Cold weather driving..............5-27
Compact disc (CD) player...........4-14
Controls
Audio controls (steering wheel)......4-28
Heater and air conditioner controls.....4-2
Coolant
Capacities and recommended
fuel/lubricants.................9-2
Changing engine coolant..........8-10
Checking engine coolant level........8-9
Engine coolant temperature gauge.....2-5
ZREVIEW COPY:Ð2004 Xterra(xtr)
Owners Manual(owners)ÐUSA English(nna)
10/23/03Ðdebbie
X
Page 285 of 296

Headlights....................8-33
Heater
Heater and air conditioner controls.....4-2
Heater operation...............4-4
Hood release...................3-9
Horn.......................2-23
Hubs
Auto-lock free-running hubs........5-20
I
Ignition switch..................5-7
Important vehicle information label.......9-10
In-cabin microfilter...............8-23
Increasing fuel economy............5-18
Indicator lights and audible reminders
(See warning/indicator lights and
audible reminders)................2-9
Inside mirror...................3-13
Instrument brightness control.........2-22
Instrument panel.................2-2
Interior light...................2-40
ISOFIX child restraints.............1-39
J
Jump starting...................6-9
K
Key ........................3-2
Keyless entry system
(See remote keyless entry system).......3-4L
Labels
Air conditioner specification label.....9-11
Emission control information label.....9-11
Engine serial number............9-10
F.M.V.S.S. certification label........9-10
Vehicle identification number (VIN) plate . .9-9
Warning labels (for SRS)..........1-19
LATCH (Lower Anchors and Tethers for
CHildren) System................1-39
License plate
Installing the license plate.........9-12
Light
Air bag warning light.........1-19, 2-13
Brake light (See stop light).........8-36
Bulb check/instrument panel........2-9
Bulb replacement..............8-36
Charge warning light............2-11
Fog light switch...............2-22
Headlight and turn signal switch......2-20
Headlights..................8-33
Interior light.................2-40
Light bulbs..................8-33
Low tire pressure warning light......2-11
Low washer fluid warning light.......2-12
Spotlights (See map light).........2-41
Warning/indicator lights and audible
reminders...................2-9
Lights
Map lights..................2-41
Lock
Child safety rear door lock..........3-4
Door locks..................3-2
Glove box lock...............2-30Power door locks...............3-3
Rear door lock...............3-10
Low fuel warning light.............2-11
Low tire pressure warning light........2-11
Low tire pressure warning system........5-3
Low washer fluid warning light.........2-12
Luggage rack..................2-33
Luggage rack (see roof rack).........2-33
Luggage rack
(see roof rack with gear basket)........2-33
Luggage (See vehicle loading information) . .9-12
M
Maintenance
General maintenance............8-2
Inside the vehicle...............8-3
Maintenance precautions..........8-5
Outside the vehicle..............8-2
Seat belt maintenance...........1-30
Under the hood and vehicle.........8-4
Malfunction indicator lamp (MIL)........2-14
Manual front seat adjustment..........1-2
Manual windows................2-38
Map lights....................2-41
Meters and gauges................2-3
Instrument brightness control.......2-22
Mirror
Inside mirror.................3-13
Outside mirror control........3-14, 3-15
Outside mirrors...............3-14
Vanity mirror.................3-13
Multi-remote control system
(See remote keyless entry system).......3-4
10-3
ZREVIEW COPY:Ð2004 Xterra(xtr)
Owners Manual(owners)ÐUSA English(nna)
10/23/03Ðdebbie
X