ECU NISSAN XTERRA 2004 WD22 / 1.G Workshop Manual
[x] Cancel search | Manufacturer: NISSAN, Model Year: 2004, Model line: XTERRA, Model: NISSAN XTERRA 2004 WD22 / 1.GPages: 296, PDF Size: 4.64 MB
Page 236 of 296

4. If the fuse is open, replace it with a known
good fuse.
5. Push the fuse box cover to install.
6. If a new fuse also opens, have the electrical
system checked and repaired by a NISSAN
dealer.
Replace the battery in the keyfob as follows:
s1Open the lid using a coin.
s2Remove the battery.
s3Install a new battery with the “+” facing
down.
Recommended battery: Toshiba CR2025 or
equivalent.
s4Close the lid securely.
WDI0200
WPD0160
KEYFOB BATTERY REPLACEMENT
8-32Maintenance and do-it-yourself
ZREVIEW COPY:Ð2004 Xterra(xtr)
Owners Manual(owners)ÐUSA English(nna)
10/23/03Ðdebbie
X
Page 250 of 296
TYPES OF TIRES
WARNING
cWhen changing or replacing tires, be
sure all four tires are of the same type
(i.e., Summer, All Season or Snow) and
construction. A NISSAN dealer may be
able to help you with information about
tire type, size, speed rating and avail-
ability. Replacement tires may have a
lower speed rating than the factory
equipped tires, and may not match the
potential maximum vehicle speed.
Never exceed the maximum speed rat-
ing of the tire.
cFor additional information regarding
tires, refer to “Important Tire Safety In-
formation” (US) or “Tire Safety Informa-
tion” (Canada) in the Warranty Informa-
tion Booklet.
All season tires
NISSAN specifies All Season tires on some mod-
els to provide good performance all year, includ-
ing snowy and icy road conditions. All Season
tires are identified by ALL SEASON and/or M&S
on the tire sidewall. Snow tires have better snow
traction than All Season tires and may be more
appropriate in some areas.
Summer tires
NISSAN specifies summer tires on some models
to provide superior performance on dry roads.
Summer tire performance is substantially re-
duced in snow and ice. Summer tires do not have
the tire traction rating “M&S” on the tire sidewall.
If you plan to operate your vehicle in snowy or icy
conditions, NISSAN recommends the use of
SNOW tires or ALL SEASON tires on all four
wheels.
Snow tires
If snow tires are needed, it is necessary to select
tires equivalent in size and load rating to the
original equipment tires. If you do not, it can
adversely affect the safety and handling of your
vehicle.
Generally, snow tires have lower speed ratings
than factory equipped tires and may not match
the potential maximum vehicle speed. Never ex-
ceed the maximum speed rating of the tire.
If you install snow tires, they must be the same
size, brand, construction and tread pattern on all
four wheels.
For additional traction on icy roads, studded tires
may be used. However, some U.S. states and
Canadian provinces prohibit their use. Check
local, state and provincial laws before installingstudded tires. Skid and traction capabilities of
studded snow tires on wet or dry surfaces may be
poorer than that of non-studded snow tires.
TIRE CHAINS
Use of tire chains may be prohibited according to
location. Check the local laws before installing
tire chains. When installing tire chains, make sure
they are the proper size for the tires on your
vehicle and are installed according to the chain
manufacturer’s suggestions.Use only SAE
class “S” chains.Class9S9chains are used on
vehicles with restricted tire to vehicle clearance.
Vehicles that can use Class “S” chains are de-
signed to meet the minimum clearances between
the tire and the closest vehicle suspension or
body component required to accommodate the
use of a winter traction device (tire chains or
cables) . The minimum clearances are determined
using the factory equipped tire size. Other types
may damage your vehicle. Use chain tensioners
when recommended by the tire chain manufac-
turer to ensure a tight fit. Loose end links of the
tire chain must be secured or removed to prevent
the possibility of whipping action damage to the
fenders or underbody. If possible, avoid fully load-
ing your vehicle when using tire chains. In addi-
tion, drive at a reduced speed. Otherwise, your
vehicle may be damaged and/or vehicle handling
and performance may be adversely affected.
8-46Maintenance and do-it-yourself
ZREVIEW COPY:Ð2004 Xterra(xtr)
Owners Manual(owners)ÐUSA English(nna)
10/23/03Ðdebbie
X
Page 255 of 296

9 Technical and consumer information
Capacities and recommended fuel/lubricants.........9-2
Fuel recommendation...........................9-3
Engine oil and oil filter recommendation...........9-5
Recommended SAE viscosity number............9-6
Air conditioner system refrigerant and
lubricant recommendations......................9-6
Specifications.....................................9-7
Engine........................................9-7
Wheels and tires...............................9-8
Dimensions and weights........................9-8
When traveling or registering your vehicle in
another country...................................9-9
Vehicle identification...............................9-9
Vehicle identification number (VIN) plate..........9-9
Vehicle identification number
(chassis number)...............................9-9
Engine serial number...........................9-10
F.M.V.S.S. certification label....................9-10
Emission control information label...............9-11
Tire placard...................................9-11
Air conditioner specification label................9-11Installing front license plate........................9-12
Vehicle loading information........................9-12
Terms........................................9-12
Determining vehicle load capacity...............9-13
Securing the load..............................9-13
Loading tips..................................9-14
Vehicle load weight capacity....................9-14
Measurement of weights.......................9-15
Towing a trailer...................................9-16
Maximum load limits...........................9-16
Towing load/specification chart.................9-18
Towing safety.................................9-19
Flat towing....................................9-22
Uniform tire quality grading........................9-23
Emission control system warranty..................9-24
Reporting safety defects (US only).................9-24
Readiness for inspection/maintenance (I/M) test.....9-24
Dynamometer testing for Inspection/
Maintenance (I/M) test (US only)................9-25
Owner’s Manual/Service Manual order information . . . 9-26
In the event of a collision.......................9-27
ZREVIEW COPY:Ð2004 Xterra(xtr)
Owners Manual(owners)ÐUSA English(nna)
10/23/03Ðdebbie
X
Page 267 of 296

cGAWR (Gross Axle Weight Rating) - maxi-
mum weight (load) limit specified for the
front or rear axle.
DETERMINING VEHICLE LOAD
CAPACITY
The load capacity of this vehicle is determined by
weight, not by available cargo space. For ex-
ample, a roof rack, bike carrier, or similar equip-
ment does not increase load carrying capacity of
your vehicle.
To determine vehicle load capacity:
Vehicle weight can be determined by using a
commercial-grade scale, found at places such as
a truck stop, gravel quarry, grain elevator, or a
scrap metal recycling facility.
1. Determine the curb weight of your vehicle.
2. Compare the curb weight amount to the
GVWR specified for your vehicle to deter-
mine how much more weight your vehicle
can carry.
3. After loading (cargo and passengers) , re-
weigh your vehicle to determine if either
GVWR or GAWR for your vehicle is ex-
ceeded. If GVWR is exceeded, remove
cargo as necessary. If either the front or rear
GAWR is exceeded, shift the load or remove
cargo as necessary.
1. Plastic hook
2. Metal hook
SECURING THE LOAD
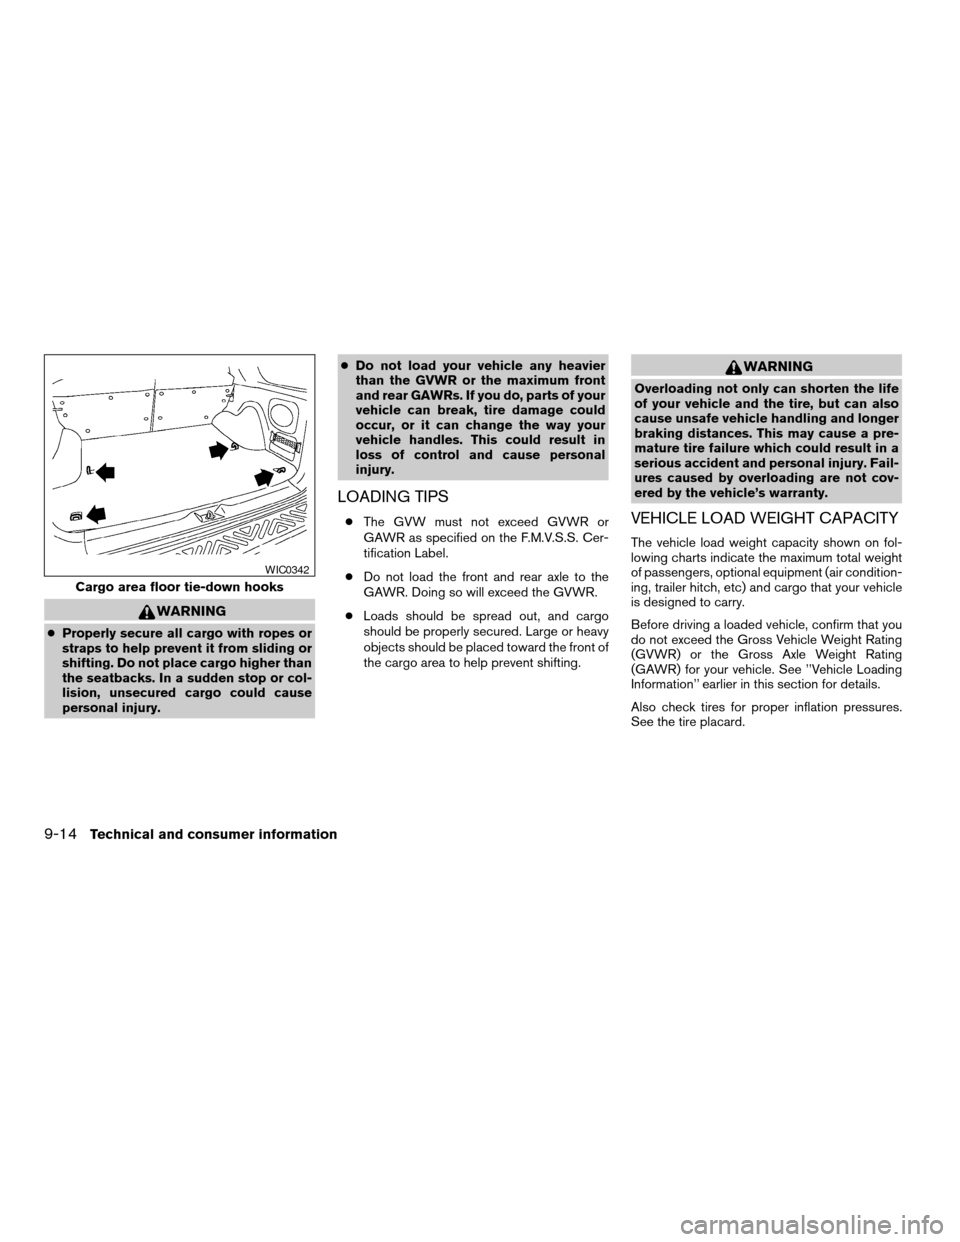
There are tie down hooks located in both the
ceiling and floor of the cargo area as shown. The
tie down hooks can be used to secure cargo with
ropes or other types of straps.
Do not apply a total load of more than 33
lbs. (15 kg) to a single plastic ceiling or
metal floor tie-down hook when securing
cargo.Do not apply a total load of more than
110lbs. (50 kg) to a single metal ceiling
tie-down hook when securing cargo.
Cargo area ceiling tie-down hooks
WIC0341
Technical and consumer information9-13
ZREVIEW COPY:Ð2004 Xterra(xtr)
Owners Manual(owners)ÐUSA English(nna)
10/23/03Ðdebbie
X
Page 268 of 296
WARNING
cProperly secure all cargo with ropes or
straps to help prevent it from sliding or
shifting. Do not place cargo higher than
the seatbacks. In a sudden stop or col-
lision, unsecured cargo could cause
personal injury.cDo not load your vehicle any heavier
than the GVWR or the maximum front
and rear GAWRs. If you do, parts of your
vehicle can break, tire damage could
occur, or it can change the way your
vehicle handles. This could result in
loss of control and cause personal
injury.
LOADING TIPS
cThe GVW must not exceed GVWR or
GAWR as specified on the F.M.V.S.S. Cer-
tification Label.
cDo not load the front and rear axle to the
GAWR. Doing so will exceed the GVWR.
cLoads should be spread out, and cargo
should be properly secured. Large or heavy
objects should be placed toward the front of
the cargo area to help prevent shifting.
WARNING
Overloading not only can shorten the life
of your vehicle and the tire, but can also
cause unsafe vehicle handling and longer
braking distances. This may cause a pre-
mature tire failure which could result in a
serious accident and personal injury. Fail-
ures caused by overloading are not cov-
ered by the vehicle’s warranty.
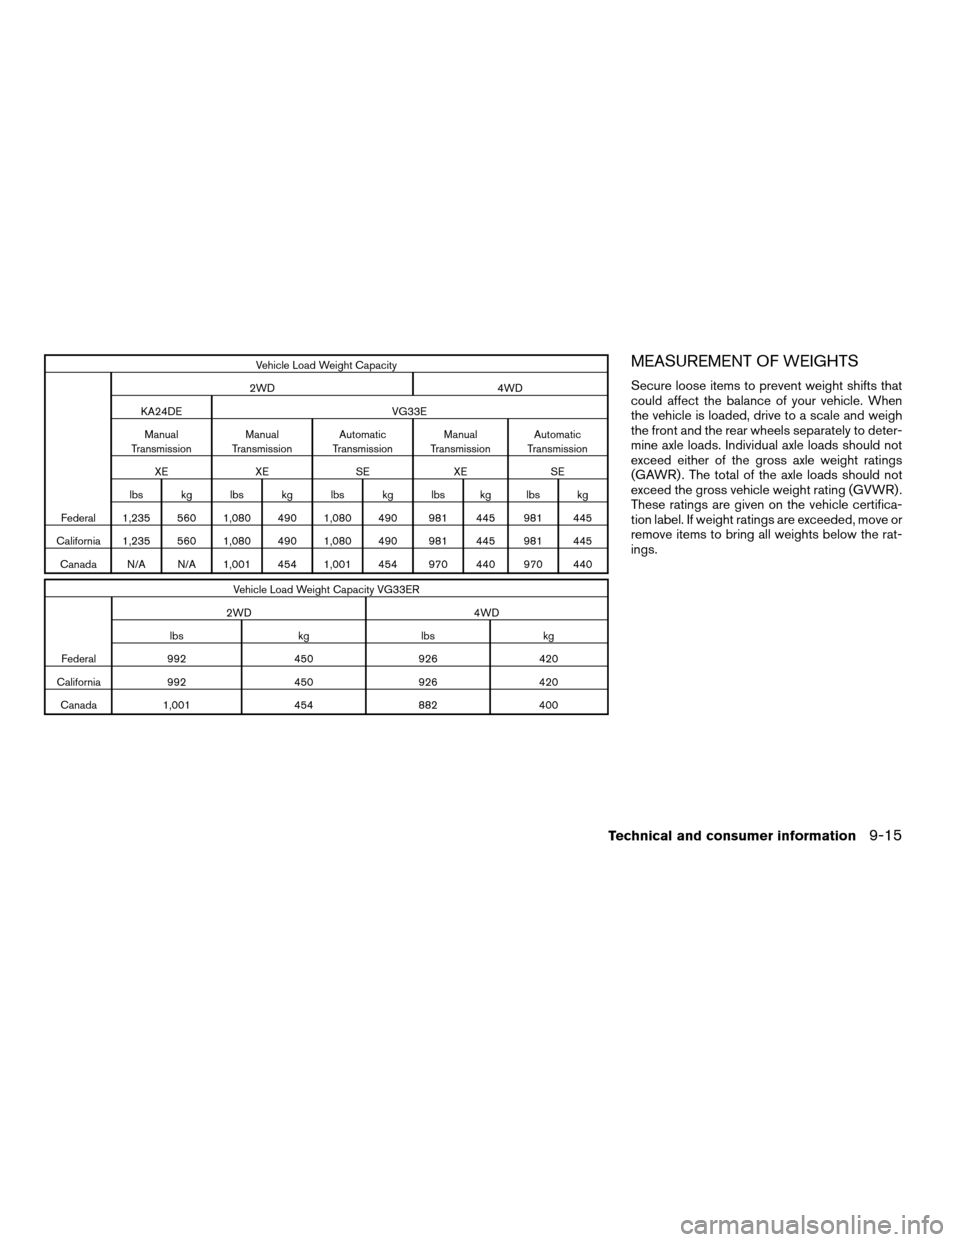
VEHICLE LOAD WEIGHT CAPACITY
The vehicle load weight capacity shown on fol-
lowing charts indicate the maximum total weight
of passengers, optional equipment (air condition-
ing, trailer hitch, etc) and cargo that your vehicle
is designed to carry.
Before driving a loaded vehicle, confirm that you
do not exceed the Gross Vehicle Weight Rating
(GVWR) or the Gross Axle Weight Rating
(GAWR) for your vehicle. See ’’Vehicle Loading
Information’’ earlier in this section for details.
Also check tires for proper inflation pressures.
See the tire placard.
Cargo area floor tie-down hooks
WIC0342
9-14Technical and consumer information
ZREVIEW COPY:Ð2004 Xterra(xtr)
Owners Manual(owners)ÐUSA English(nna)
10/23/03Ðdebbie
X
Page 269 of 296
Vehicle Load Weight Capacity
2WD 4WD
KA24DE VG33E
Manual
TransmissionManual
TransmissionAutomatic
TransmissionManual
TransmissionAutomatic
Transmission
XE XE SE XE SE
lbs kg lbs kg lbs kg lbs kg lbs kg
Federal 1,235 560 1,080 490 1,080 490 981 445 981 445
California 1,235 560 1,080 490 1,080 490 981 445 981 445
Canada N/A N/A 1,001 454 1,001 454 970 440 970 440
Vehicle Load Weight Capacity VG33ER
2WD 4WD
lbs kg lbs kg
Federal 992 450 926 420
California 992 450 926 420
Canada 1,001 454 882 400
MEASUREMENT OF WEIGHTS
Secure loose items to prevent weight shifts that
could affect the balance of your vehicle. When
the vehicle is loaded, drive to a scale and weigh
the front and the rear wheels separately to deter-
mine axle loads. Individual axle loads should not
exceed either of the gross axle weight ratings
(GAWR) . The total of the axle loads should not
exceed the gross vehicle weight rating (GVWR) .
These ratings are given on the vehicle certifica-
tion label. If weight ratings are exceeded, move or
remove items to bring all weights below the rat-
ings.
Technical and consumer information9-15
ZREVIEW COPY:Ð2004 Xterra(xtr)
Owners Manual(owners)ÐUSA English(nna)
10/23/03Ðdebbie
X
Page 273 of 296
TOWING SAFETY
Trailer hitch
Check the towing capacity of your bumper hitch
or receiver-type frame mounted hitch. Choose a
proper hitch for your vehicle and trailer. A genuine
Nissan trailer hitch is available from your NISSAN
dealer. Make sure the trailer hitch is securely
attached to the vehicle to help avoid personal
injury or property damage due to sway caused by
crosswinds, rough road surfaces or passing
trucks.
CAUTION
cSpecial hitches which include frame re-
inforcements are required for towing
above 2,000 lb (907 kg) . Suitable genu-
ine NISSAN hitches for pickup trucks
and sport utility vehicles are available
at a NISSAN dealer.
cThe hitch should not be attached to or
affect the operation of the impact-
absorbing bumper.
cDo not use axle-mounted hitches.
cDo not modify the vehicle exhaust sys-
tem, brake system, etc. to install a
trailer hitch.cTo reduce the possibility of additional
damage if your vehicle is struck from
the rear, where practical, remove the
hitch and/or receiver when not in use.
cAfter the hitch is removed, seal the bolt
holes to prevent exhaust fumes, water
or dust from entering the passenger
compartment.
cRegularly check that all trailer hitch
mounting bolts are securely mounted.
Tire pressures
cWhen towing a trailer, inflate the vehicle tires
to the recommended cold tire pressure indi-
cated on the tire placard.
cTrailer tire condition, size, load rating and
proper inflation pressure should be in accor-
dance with the trailer and tire manufacturer’s
specifications.
Safety chains
Always use suitable safety chains between your
vehicle and the trailer. The safety chains should
be crossed and should be attached to the hitch,
not to the vehicle bumper or axle. Be sure to leave
enough slack in the chains to permit turning
corners.
Trailer lights
Trailer lights should comply with federal and/or
local regulations. For assistance in hooking up
trailer lights, contact a NISSAN dealer.
Technical and consumer information9-19
ZREVIEW COPY:Ð2004 Xterra(xtr)
Owners Manual(owners)ÐUSA English(nna)
10/23/03Ðdebbie
X
Page 275 of 296
3. Route the trailer tow harness so that it does
not block access to the spare tire winch
socket.
4. Connect the tow harness connector (SAE
J1239) to your trailer.
5. Confirm proper vehicle and trailer stop/turn
lamp operation.
6. When towing is completed, disconnect the
tow harness from the trailer and the vehicle.
Store the tow harness in the glove box.
Reinstall the connector cap to the vehicle
harness.
If you need further assistance in wiring a trailer to
your NISSAN, contact a NISSAN dealer.
Always confirm proper vehicle and trailer
stop/turn lamp operation every time the
trailer light circuits are connected for use.
Trailer brakes
If your trailer is equipped with a braking system,
make sure it conforms to federal and/or local
regulations and that it is properly installed.
WARNING
Never connect a trailer brake system di-
rectly to the vehicle brake system.
Pre-towing tips
cBe certain your vehicle maintains a level
position when a loaded and/or unloaded
trailer is hitched. Do not drive the vehicle if it
has an abnormal nose-up or nose-down
condition; check for improper tongue load,
overload, worn suspension or other possible
causes of either condition.
cAlways secure items in the trailer to prevent
load shift while driving.
cBe certain your rearview mirrors conform to
all federal, state or local regulations. If not,
install any mirrors required for towing before
driving the vehicle.
Trailer towing tips
In order to gain skill and an understanding of the
vehicle’s behavior, you should practice turning,
stopping and backing up in an area which is free
from traffic. Steering stability and braking perfor-
mance will be somewhat different than under
normal driving conditions.
cAlways secure items in the trailer to prevent
load shift while driving.
cAvoid abrupt starts, acceleration or stops.
cAvoid sharp turns or lane changes.cAlways drive your vehicle at a moderate
speed.
cAlways block the wheels on both vehicle and
trailer when parking. Parking on a slope is
not recommended; however, if you must do
so, and if your vehicle is equipped with an
automatic transmission, first block the
wheels and apply the parking brake, and
then move the transmission shift selector
lever into the P (Park) position. If you move
the shift selector lever to the P (Park) posi-
tion before blocking the wheels and applying
the parking brake, transmission damage
could occur.
cWhen going down a hill, shift into a lower
gear and use the engine braking effect.
When going up a long grade, downshift the
transmission to a lower gear and reduce
speed to reduce chances of engine over-
loading and/or overheating. However, for
long steep grades, do not stay in 1st or 2nd
gear when driving above 35 MPH (56 km/h) .
cIf the engine coolant rises to an extremely
high temperature when the air conditioner
system is on, turn off the air conditioner.
Coolant heat can be additionally vented by
opening the windows, switching the fan
control to high and setting the temperature
control to the HOT position.
Technical and consumer information9-21
ZREVIEW COPY:Ð2004 Xterra(xtr)
Owners Manual(owners)ÐUSA English(nna)
10/23/03Ðdebbie
X
Page 283 of 296

10 Index
A
Air bag (See supplemental restraint
system)......................1-8
Air bag warning light...........1-19, 2-13
Air cleaner housing filter............8-23
Air conditioner
Air conditioner operation...........4-5
Air conditioner service............4-9
Air conditioner specification label.....9-11
Air conditioner system refrigerant and
lubrication recommendations........9-6
Heater and air conditioner controls.....4-2
Servicing air conditioner...........4-9
Air flow charts..................4-6
Alarm system (See vehicle security system) .2-15
Anchor point locations.............1-42
Antenna.....................4-28
Anti-lock brake system (ABS).........5-24
Anti-lock brake warning light..........2-10
Audible reminders................2-15
Audio system..................4-10
Compact disc (CD) player.........4-14
FM-AM radio with compact disc (CD)
changer...................4-16
FM-AM radio with compact disc (CD)
player....................4-12
Radio....................4-10
Steering wheel audio control switch. . . .4-28
Auto-lock free-running hubs..........5-20Automatic
Automatic power window switch.....2-38
Automatic transmission fluid (ATF). . . .8-14
Driving with automatic transmission. . . .5-10
Transmission selector lever lock release .5-13
B
Battery......................8-18
Charge warning light............2-11
Battery replacement
(See remote keyless entry system). . . .3-8, 8-32
Before starting the engine............5-9
Belts (See drive belts).............8-20
Brake
Anti-lock brake system (ABS).......5-24
Brake booster................8-30
Brake fluid..................8-16
Brake light (See stop light).........8-36
Brake pedal.................8-29
Brake system................5-23
Brake warning light.............2-10
Brake wear indicators........2-15, 8-29
Parking brake check............8-29
Parking brake operation..........5-16
Self-adjusting brakes............8-29
Break-in schedule................5-18
Brightness control
Instrument panel..............2-22
Bulb check/instrument panel..........2-9
Bulb replacement................8-36C
Capacities and recommended
fuel/lubricants...................9-2
Car phone or CB radio.............4-29
Cargo (See vehicle loading information) . . .9-12
CD care and cleaning.............4-27
CD player (See audio system).........4-14
Check engine indicator light
(See malfunction indicator lamp).......2-14
Child restraint with top tether strap......1-41
Child restraints.......1-23, 1-24, 1-30, 1-39
Precautions on child restraints.......1-30
Top tether strap anchor point locations . .1-42
Child safety rear door lock............3-4
Chimes, audible reminders...........2-15
Cleaning exterior and interior..........7-2
Clock...................4-13, 4-18
Clutch
Clutch fluid.................8-17
Cold weather driving..............5-27
Compact disc (CD) player...........4-14
Controls
Audio controls (steering wheel)......4-28
Heater and air conditioner controls.....4-2
Coolant
Capacities and recommended
fuel/lubricants.................9-2
Changing engine coolant..........8-10
Checking engine coolant level........8-9
Engine coolant temperature gauge.....2-5
ZREVIEW COPY:Ð2004 Xterra(xtr)
Owners Manual(owners)ÐUSA English(nna)
10/23/03Ðdebbie
X
Page 288 of 296

Vehicle security system.............2-15
Ventilators.....................4-2
W
Warning
Air bag warning light.........1-19, 2-13
Anti-lock brake warning light........2-10
Battery charge warning light........2-11
Brake warning light.............2-10
Door open warning light..........2-11
Engine oil pressure low/engine coolant
temperature high warning light.......2-11
Hazard warning flasher switch.......2-23
Low fuel warning light...........2-11
Low tire pressure warning light......2-11
Low washer fluid warning light.......2-12
Seat belt warning light...........2-11
Vehicle security system...........2-15
Warning labels (for SRS)..........1-19
Warning/indicator lights and audible
reminders...................2-9
Warning lights..................2-9
Washer switch
Rear window wiper and washer
switches...................2-19
Windshield wiper and washer switch . . .2-18
Weights (See dimensions and weights). . . .9-8
Wheels and tires................8-40
Wheel/tire size..................9-8
When traveling or registering your vehicle in
another country..................9-9
Window washer fluid..............8-17
Windows
Locking passengers’ windows.......2-38Manual windows..............2-38
Power windows...............2-36
Rear power windows............2-38
Windshield wiper and washer switch.....2-18
Wiper
Rear window wiper and washer switches .2-19
Windshield wiper and washer switch . . .2-18
Wiper blades................8-26
10-6
ZREVIEW COPY:Ð2004 Xterra(xtr)
Owners Manual(owners)ÐUSA English(nna)
10/23/03Ðdebbie
X