roof rack NISSAN XTERRA 2004 WD22 / 1.G Owners Manual
[x] Cancel search | Manufacturer: NISSAN, Model Year: 2004, Model line: XTERRA, Model: NISSAN XTERRA 2004 WD22 / 1.GPages: 296, PDF Size: 4.64 MB
Page 9 of 296

1. Engine hood (P. 3-9)
2. Windshield wiper and washer switch
(P. 2-18)
3. Windshield (P. 8-26)
4. Roof rack (P. 2-33)
5. Power windows (P. 2-36)
6. Door locks, keyfob, keys
(P. 3-2, 3-4, 3-2)
7. Mirrors (P. 3-13)
8. Tire pressure (P. 9-11)
9. Flat tire (P. 6-2)
10. Tire chains (P. 5-27)
11. Replacing bulbs (P. 8-33)
12. Headlight and turn signal switch
(P. 2-20)
13. Fog light switch (P. 2-22)
See the page number indicated in paren-
theses for operating details.
LII0032
EXTERIOR FRONT
Illustrated table of contents0-3
ZREVIEW COPY:Ð2004 Xterra(xtr)
Owners Manual(owners)ÐUSA English(nna)
10/23/03Ðdebbie
X
Page 10 of 296

1. Roof rack (P. 2-33)
2. Vehicle loading (P. 9-12)
3. Rear window defrost (P. 2-10)
4. Rear window washer (P.2-19)
5. Back door (P. 3-10)
6. Spare tire (P.6-2)
7. Replacing bulbs (P. 8-33)
8. Child safety rear door lock (P.3-4)
See the page number indicated in paren-
theses for operating details.
LII0031
EXTERIOR REAR
0-4Illustrated table of contents
ZREVIEW COPY:Ð2004 Xterra(xtr)
Owners Manual(owners)ÐUSA English(nna)
10/23/03Ðdebbie
X
Page 34 of 296
cNo unauthorized changes should be
made to any components or wiring of
the supplemental air bag system. This is
to prevent accidental inflation of the
supplemental air bag or damage to the
supplemental air bag system.
cDo not make unauthorized changes to
your vehicle’s electrical system, sus-
pension system or front end structure.
This could affect proper operation of
the supplemental front air bag system.
cTampering with the supplemental front
air bag system may result in serious
personal injury. Tampering includes
changes to the steering wheel and the
instrument panel assembly by placing
material over the steering wheel pad
and above the instrument panel or by
installing additional trim material
around the air bag system.cWork on and around the supplemental
front air bag system should be done by
a NISSAN dealer. Installation of electri-
cal equipment should also be done by a
NISSAN dealer. The Supplemental Re-
straint System (SRS) wiring should not
be modified or disconnected. Unautho-
rized electrical test equipment and
probing devices should not be used on
the air bag system.
cA cracked windshield should be re-
placed immediately by a qualified re-
pair facility. A cracked windshield could
affect inflation of the supplemental air
bag system.
cThe SRS wiring harness connectors are
yellow and orange for easy
identification.
When selling your vehicle, we request that you
inform the buyer about the supplemental front air
bag system and guide the buyer to the appropri-
ate sections in this Owner’s Manual.
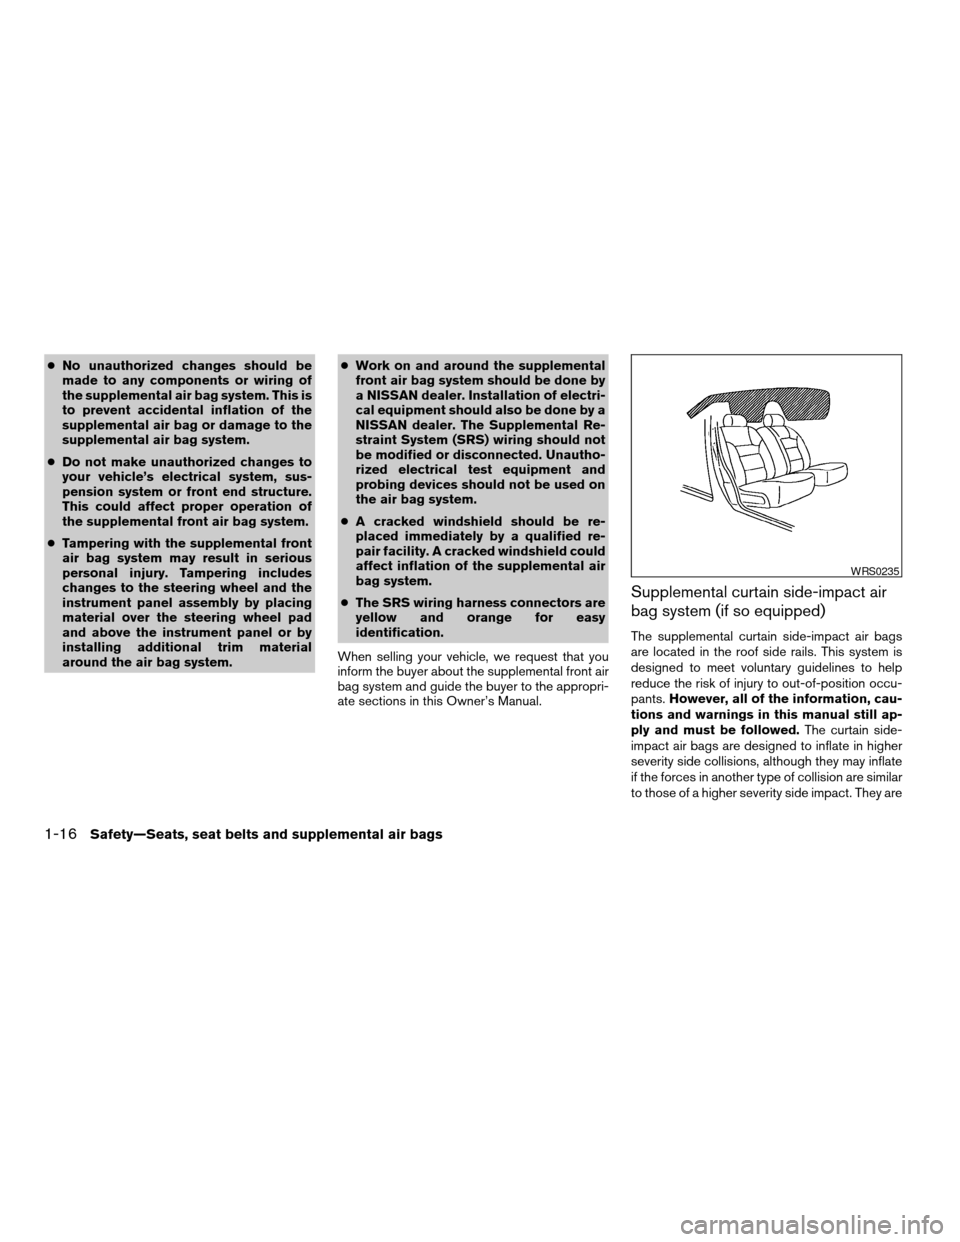
Supplemental curtain side-impact air
bag system (if so equipped)
The supplemental curtain side-impact air bags
are located in the roof side rails. This system is
designed to meet voluntary guidelines to help
reduce the risk of injury to out-of-position occu-
pants.However, all of the information, cau-
tions and warnings in this manual still ap-
ply and must be followed.The curtain side-
impact air bags are designed to inflate in higher
severity side collisions, although they may inflate
if the forces in another type of collision are similar
to those of a higher severity side impact. They are
WRS0235
1-16Safety—Seats, seat belts and supplemental air bags
ZREVIEW COPY:Ð2004 Xterra(xtr)
Owners Manual(owners)ÐUSA English(nna)
10/23/03Ðdebbie
X
Page 66 of 296

2 Instruments and controls
Instrument panel...................................2-2
Meters and gauges................................2-3
Speedometer and odometer.....................2-3
Tachometer....................................2-5
Engine coolant temperature gauge...............2-5
Fuel gauge....................................2-6
Compass and outside temperature display
(if so equipped)...................................2-6
Outside temperature display.....................2-7
Compass display...............................2-7
Warning/indicator lights and audible reminders.......2-9
Checking bulbs................................2-9
Warning lights................................2-10
Indicator lights................................2-13
Audible reminders.............................2-15
Security system (if so equipped)...................2-15
Vehicle security system.........................2-15
Windshield wiper and washer switch...............2-18
Switch operation..............................2-18
Rear window wiper and washer switch..............2-19
Rear window defroster switch......................2-20
Headlight and turn signal switch....................2-20
Headlight control switch........................2-20Daytime running light system (Canada only)......2-21
Instrument brightness control...................2-22
Turn signal switch.............................2-22
Fog light switch (if so equipped)................2-22
Hazard warning flasher switch.....................2-23
Horn............................................2-23
Vehicle dynamic control (VDC) off switch
(if so equipped)..................................2-24
Power outlet.....................................2-24
Dual 12 volt power outlets (if so equipped)..........2-26
Storage.........................................2-26
Storage compartment..........................2-26
Storage trays (if so equipped)...................2-27
Roof headliner net (if so equipped)..............2-27
Map pocket...................................2-28
Cup holders..................................2-29
Glove box....................................2-30
Console box (if so equipped)...................2-30
Luggage hooks................................2-31
Tonneau cover (if so equipped)..................2-32
Tubular roof rack with gear basket...............2-33
Windows........................................2-36
Power windows (if so equipped)................2-36
ZREVIEW COPY:Ð2004 Xterra(xtr)
Owners Manual(owners)ÐUSA English(nna)
10/23/03Ðdebbie
X
Page 99 of 296
cProperly secure all cargo with ropes or
straps to help prevent it from sliding or
shifting. Do not place cargo higher than
the seatbacks. In a sudden stop or col-
lision, unsecured cargo could cause
personal injury.
cThe child restraint top tether strap may
be damaged by contact with the ton-
neau cover or items in the cargo area.
Remove the tonneau cover from the ve-
hicle or secure it and any cargo. Your
child could be seriously injured or killed
in a collision if the top tether strap is
damaged.
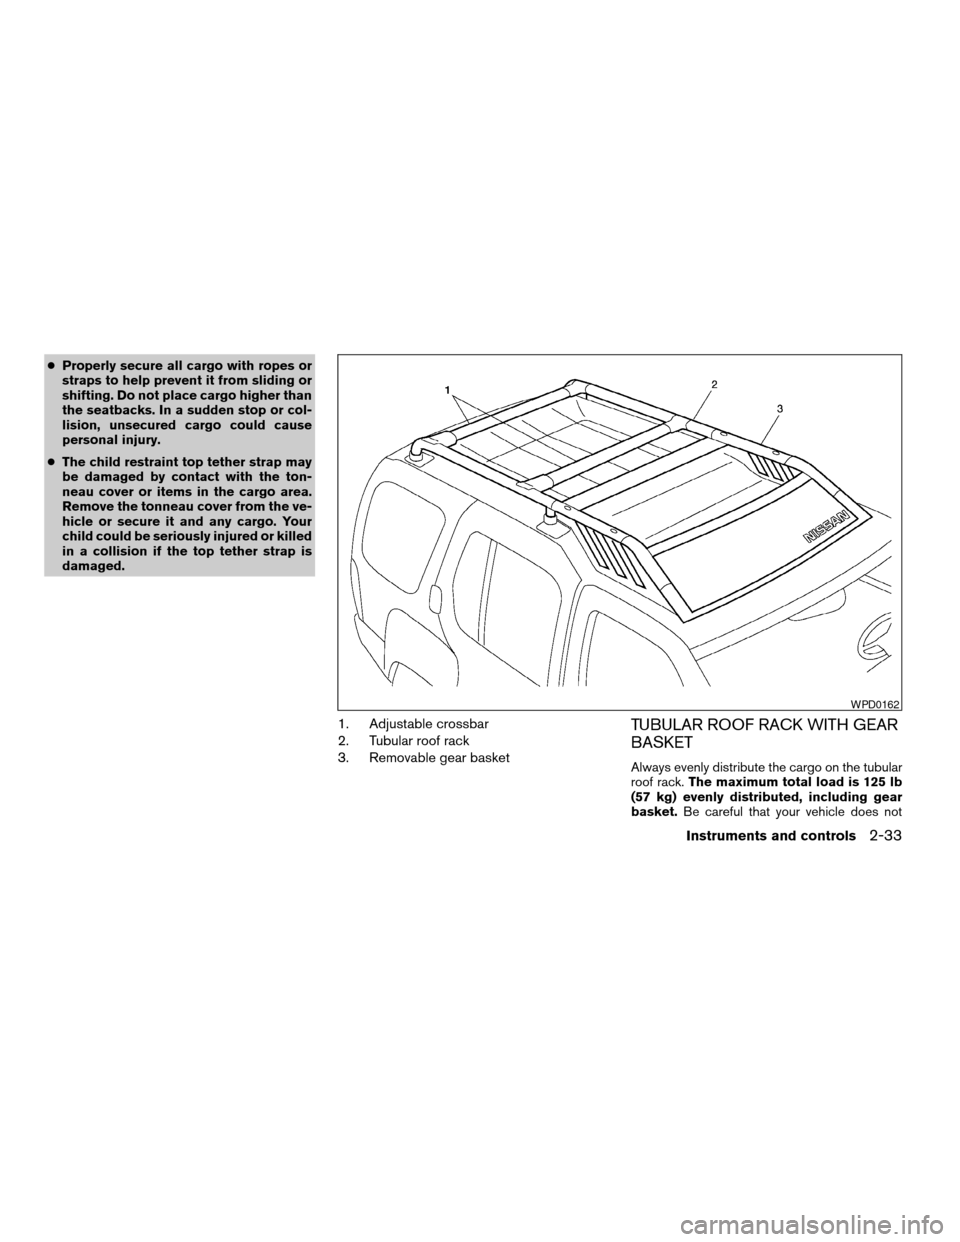
1. Adjustable crossbar
2. Tubular roof rack
3. Removable gear basketTUBULAR ROOF RACK WITH GEAR
BASKET
Always evenly distribute the cargo on the tubular
roof rack.The maximum total load is 125 lb
(57 kg) evenly distributed, including gear
basket.Be careful that your vehicle does not
WPD0162
Instruments and controls2-33
ZREVIEW COPY:Ð2004 Xterra(xtr)
Owners Manual(owners)ÐUSA English(nna)
10/23/03Ðdebbie
X
Page 100 of 296
exceed the Gross Vehicle Weight Rating
(GVWR) or the Gross Axle Weight Ratings
(GAWR front and rear) . The GVWR and GAWR
are located on the Safety Compliance Certifica-
tion Label (located on the driver’s side door jamb
pillar) . For more information regarding GVWR
and GAWR, refer to the “Technical and con-
sumer information” section of this manual.
WARNING
Properly secure all cargo with ropes or
straps to help prevent it from sliding or
shifting. In a sudden stop or collision, un-
secured cargo could cause personal
injury.
CAUTION
Use care when placing or removing items
from the tubular roof rack or gear basket.
If you cannot comfortably lift the items
onto the tubular roof rack or gear basket
from the ground, use a ladder or stool.
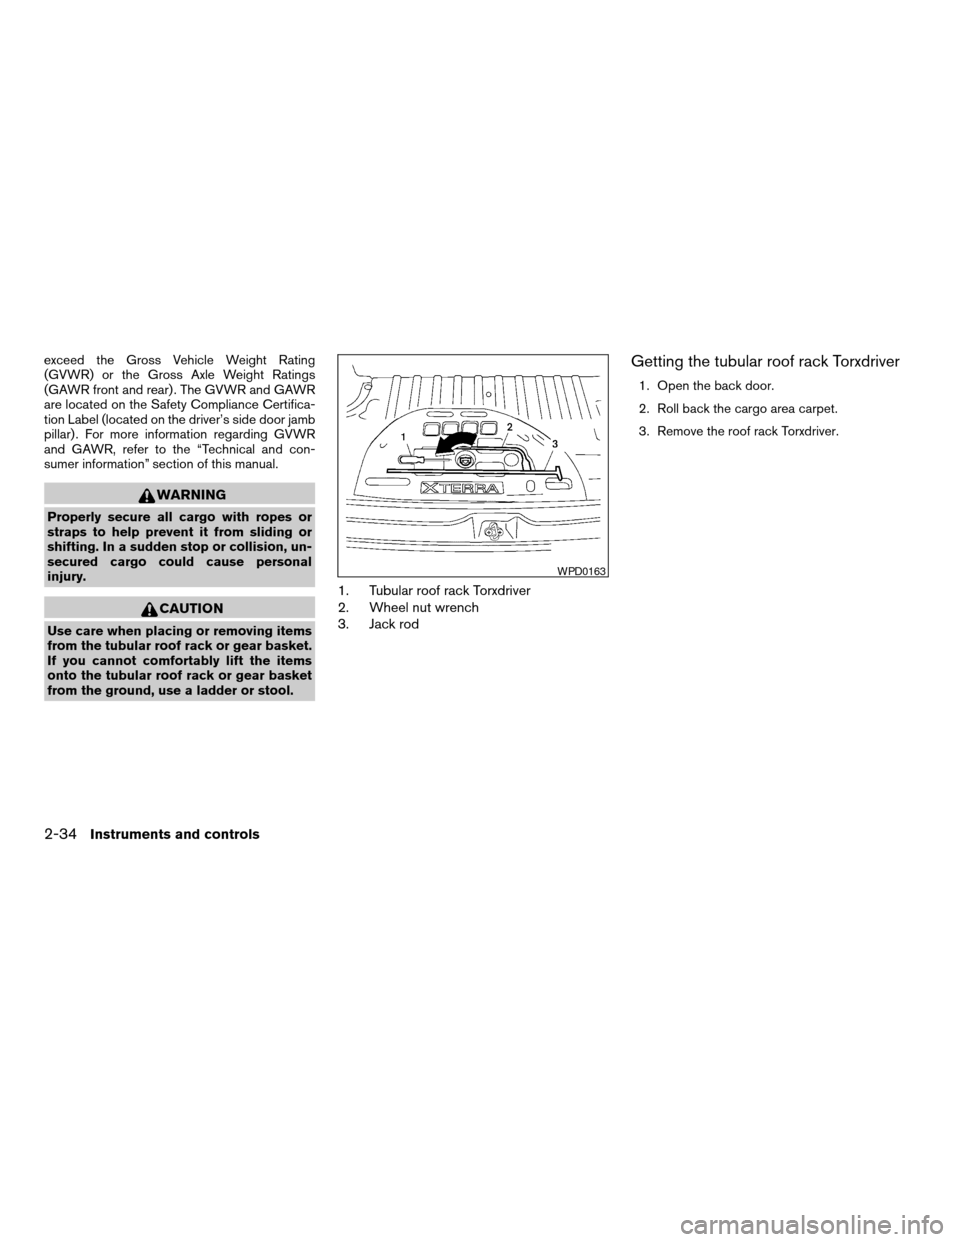
1. Tubular roof rack Torxdriver
2. Wheel nut wrench
3. Jack rod
Getting the tubular roof rack Torxdriver
1. Open the back door.
2. Roll back the cargo area carpet.
3. Remove the roof rack Torxdriver.
WPD0163
2-34Instruments and controls
ZREVIEW COPY:Ð2004 Xterra(xtr)
Owners Manual(owners)ÐUSA English(nna)
10/23/03Ðdebbie
X
Page 101 of 296

Tubular roof rack crossbar adjustment
The front and rear crossbars can be adjusted
forward, backward, or be removed. Use the
Torxdriver located in the tool kit to loosen both
crossbar adjusting screws.To adjust:
a. Loosen the adjusting screws with the
Torxdriver by turning counterclockwise.b. When the clamp is loosened, move the cross-
bars so the cargo can be positioned on the
crossbars.
c. Tighten the crossbar adjusting screws with
the Torxdriver by turning clockwise.
d. Secure the cargo with rope.
e. Always check the tightness of the crossbar
adjusting screws.
To remove:
a. Loosen the adjusting screws with the
Torxdriver by turning counterclockwise.
b. Rotate the clamps.
c. Remove the crossbars.
d. Reverse to install.
e. Always check the tightness of the crossbar
adjusting screws.
If you hear wind noise coming from the roof rack
while driving, adjust the roof rack crossbars to the
most rearward position.
AIC1146
Instruments and controls2-35
ZREVIEW COPY:Ð2004 Xterra(xtr)
Owners Manual(owners)ÐUSA English(nna)
10/23/03Ðdebbie
X
Page 102 of 296
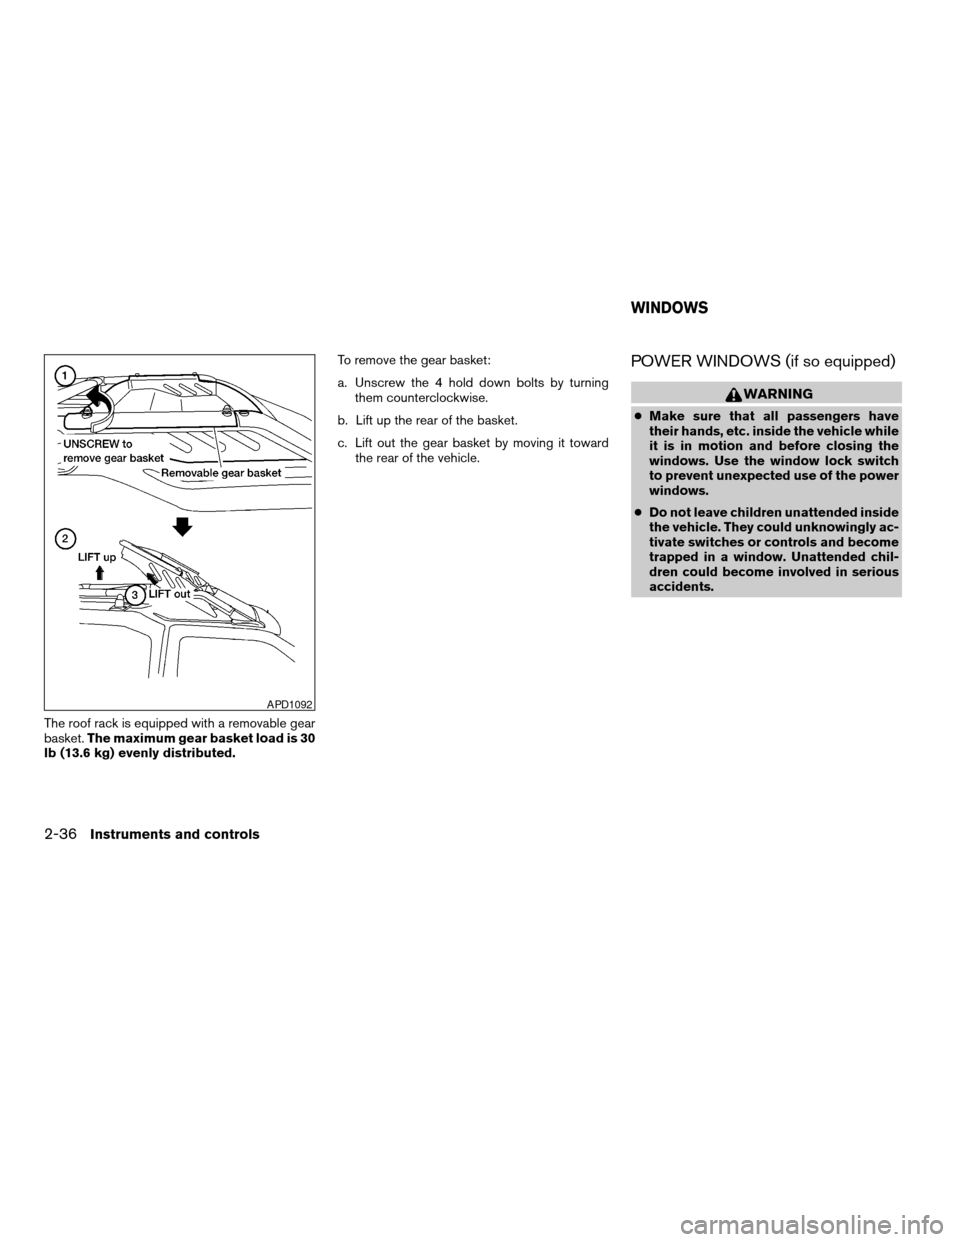
The roof rack is equipped with a removable gear
basket.The maximum gear basket load is 30
lb (13.6 kg) evenly distributed.To remove the gear basket:
a. Unscrew the 4 hold down bolts by turning
them counterclockwise.
b. Lift up the rear of the basket.
c. Lift out the gear basket by moving it toward
the rear of the vehicle.
POWER WINDOWS (if so equipped)
WARNING
cMake sure that all passengers have
their hands, etc. inside the vehicle while
it is in motion and before closing the
windows. Use the window lock switch
to prevent unexpected use of the power
windows.
cDo not leave children unattended inside
the vehicle. They could unknowingly ac-
tivate switches or controls and become
trapped in a window. Unattended chil-
dren could become involved in serious
accidents.
APD1092
WINDOWS
2-36Instruments and controls
ZREVIEW COPY:Ð2004 Xterra(xtr)
Owners Manual(owners)ÐUSA English(nna)
10/23/03Ðdebbie
X
Page 105 of 296
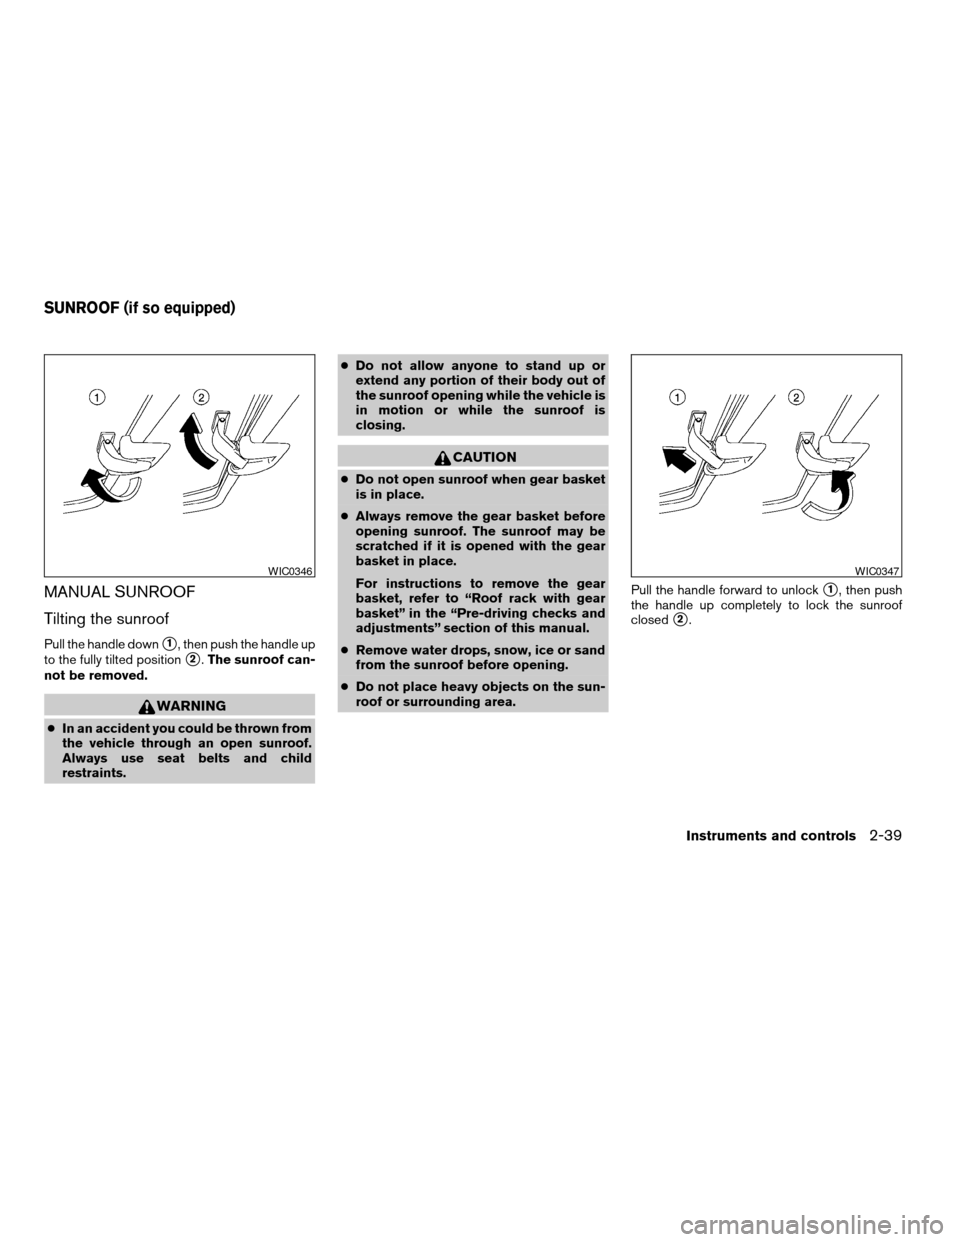
MANUAL SUNROOF
Tilting the sunroof
Pull the handle downs1, then push the handle up
to the fully tilted position
s2.The sunroof can-
not be removed.
WARNING
cIn an accident you could be thrown from
the vehicle through an open sunroof.
Always use seat belts and child
restraints.cDo not allow anyone to stand up or
extend any portion of their body out of
the sunroof opening while the vehicle is
in motion or while the sunroof is
closing.
CAUTION
cDo not open sunroof when gear basket
is in place.
cAlways remove the gear basket before
opening sunroof. The sunroof may be
scratched if it is opened with the gear
basket in place.
For instructions to remove the gear
basket, refer to “Roof rack with gear
basket” in the “Pre-driving checks and
adjustments” section of this manual.
cRemove water drops, snow, ice or sand
from the sunroof before opening.
cDo not place heavy objects on the sun-
roof or surrounding area.Pull the handle forward to unlock
s1, then push
the handle up completely to lock the sunroof
closed
s2.
WIC0346WIC0347
SUNROOF (if so equipped)
Instruments and controls2-39
ZREVIEW COPY:Ð2004 Xterra(xtr)
Owners Manual(owners)ÐUSA English(nna)
10/23/03Ðdebbie
X
Page 160 of 296
cUnsecured cargo can be thrown around
when driving over rough terrain. Prop-
erly secure all cargo so it will not be
thrown forward and cause injury to you
or your passengers.
cTo avoid raising the center of gravity
excessively, do not exceed the rated
capactiy of the roof rack/gear bin (if so
equipped) and evenly distribute the
load. Secure heavy loads in the cargo
area as far forward and as low as pos-
sible. Do not equip the vehicle with tires
larger than specified in this manual.
This could cause your vehicle to roll
over.
cDo not grip the inside or spokes of the
steering wheel when driving off-road.
The steering wheel could move sud-
denly and injure your hands. Instead
drive with your fingers and thumbs on
the outside of the rim.
cBefore operating the vehicle, ensure
that the driver and all passengers have
their seat belts fastened.
cAlways drive with the floor mats in
place as the floor may become hot.cLower your speed when encountering
strong crosswinds. With a higher center
of gravity, your NISSAN is more af-
fected by strong side winds. Slower
speeds ensure better vehicle control.
cDo not drive beyond the performance
capablity of the tires, even with 4WD
engaged.
cAccelerating quickly, sharp steering
maneuvers or sudden braking may
cause loss of control.
cIf at all possible, avoid sharp turning
maneuvers, particularly at high speeds.
Your NISSAN four-wheel drive vehicle
has a higher center of gravity than a
two-wheel drive vehicle. The vehicle is
not designed for cornering at the same
speeds as conventional two-wheel
drive vehicles. Failure to operate this
vehicle correctly could result in loss of
control and/or a rollover accident.
cAlways use tires of the same type, size,
brand, construction (bias, bias-belted,
or radial) , and tread pattern on all four
wheels. Install tire chains on the rear
wheels when driving on slippery roads
and drive carefully.cBe sure to check the brakes immedi-
ately after driving in mud or water. See
“Brake system” later in this section for
“Wet brakes”.
cAvoid parking your vehicle on steep
hills. If you get out of the vehicle and it
rolls forward, backward or sideways,
you could be injured.
cWhenever you drive off-road through
sand, mud or water as deep as the
wheel hub, more frequent maintenance
may be required. See “Periodic mainte-
nance” in the “NISSAN Service and
Maintenance Guide.”
5-6Starting and driving
ZREVIEW COPY:Ð2004 Xterra(xtr)
Owners Manual(owners)ÐUSA English(nna)
10/23/03Ðdebbie
X