trunk release Oldsmobile Achieva 1998 Owner's Manuals
[x] Cancel search | Manufacturer: OLDSMOBILE, Model Year: 1998, Model line: Achieva, Model: Oldsmobile Achieva 1998Pages: 356, PDF Size: 18.04 MB
Page 72 of 356
Trunk Release: The trunk will unlock anytime the
vehicle symbol on the transmitter is pressed and
the ignition is
OFF. If the ignition is on, the trunk
will unlock if the gear selector is in PARK
(P) or
NEUTRAL
(N) . The interior lamps will come on
for
40 seconds or until the ignition switch is turned
to the
ON position.
Matching Transmitter(s) To Your Vehicle
Each remote lock control transmitter is coded to
prevent another transmitter from unlocking your vehicle.
If a transmitter is lost or stolen, a replacement can be
purchased through your retailer. Remember to bring any
remaining transmitters with you when you go to your
retailer. When the retailer matches the replacement
transmitter to your vehicle, any remaining transmitters
must also be matched. Once your retailer has coded the
new transmitter, the lost transmitter will not unlock your
vehicle, Each vehicle can have only two transmitters
matched to
it.
You can match your transmitter to as many 1998
General Motors vehicles as you own, as long as they
have the same Remote Lock Control system. Contact
your retailer for assistance with this.
Battery Replacement
Under normal use, the battery in your remote lock
control transmitter should last about two years.
You can tell the battery is weak if the transmitter won’t
work at the normal range in any location.
If you have to
get close to your vehicle before the transmitter works,
it’s probably time to change the battery.
I NOTICE:
When replacing the battery, use care not to
touch any
of the circuitry. Static from your
body transferred to these surfaces may damage
the transmitter.
2-8
Page 74 of 356
Trunk
’
i To unlock the trunk from the outside, insert the door key
and
turn the trunk lock cylinder.
It can be dangerous to drive with the trunk lid
open because carbon monoxide (CO) gas can
come into your vehicle. You can’t see or smell
CO.
It can cause unconsciousness and even death.
If you must drive with the trunk lid open or if
electrical wiring or other cable connections must
pass through the seal between the body and the
trunk lid:
Make sure all windows are shut.
’hrn the fan on your heating or cooling
system to
its highest speed with the setting on
VENT. That
will force outside air into your
vehicle. See
“Comfort Controls” in the Index.
instrument panel, open them all the way.
If you have air outlets on or under the
See “Engine Exhaust” in the Index.
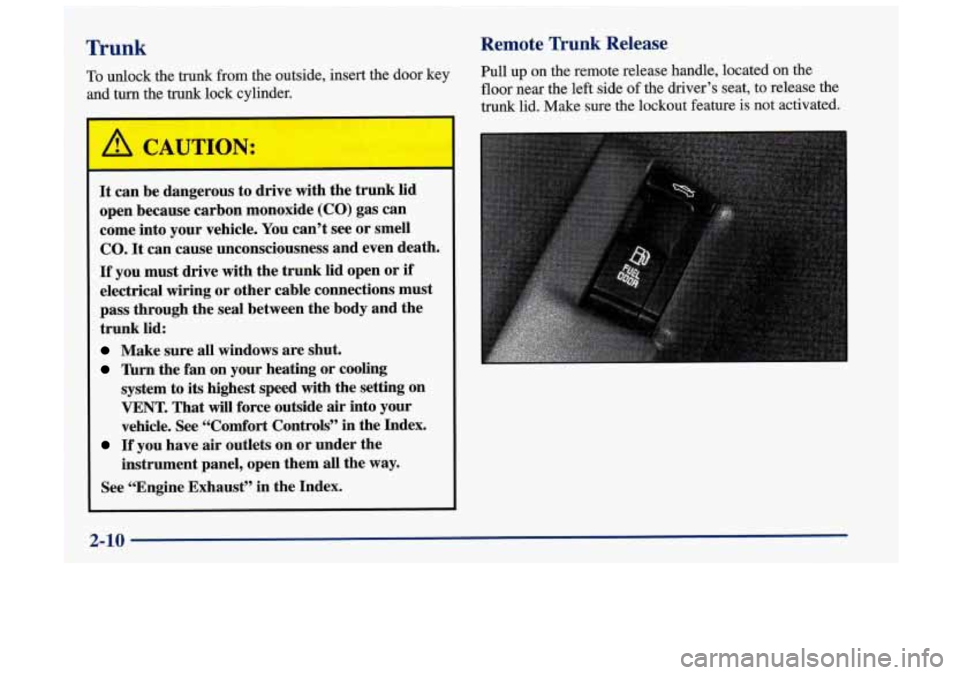
Remote Trunk Release
Pull up on the remote release handle, located on the
floor near the left side of the driver’s seat, to release the
trunk lid. Make sure the lockout feature is not activated.
2-10
Page 75 of 356
Remote Trunk Release Lockout (If Equipped)
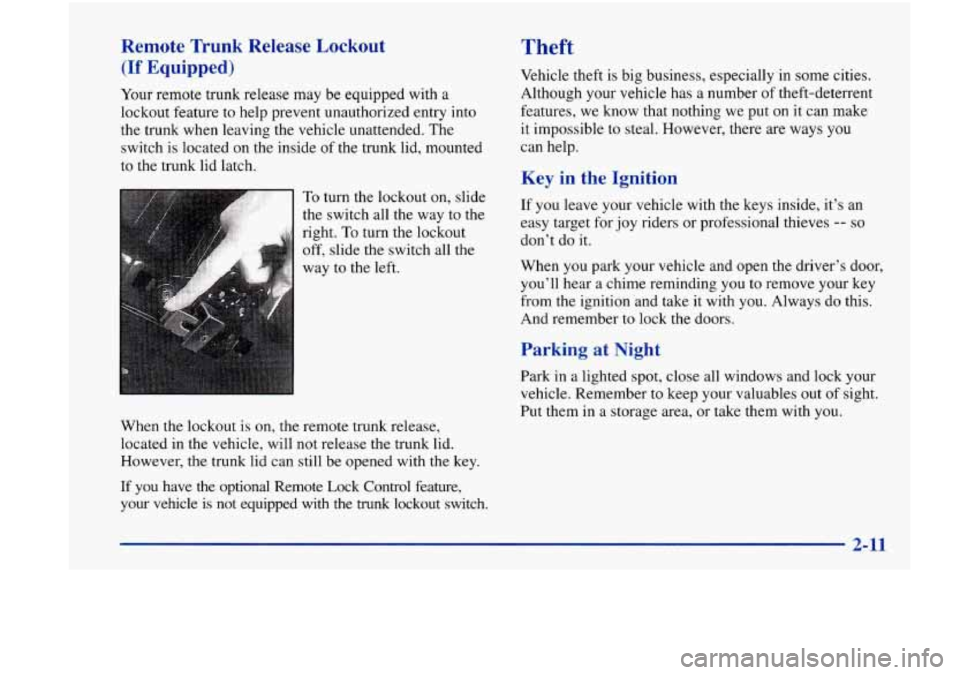
Your remote trunk release may be equipped with a
lockout feature to help prevent unauthorized entry into
the trunk when leaving the vehicle unattended. The
switch is located on the inside of the trunk lid, mounted
to the trunk lid latch.
To turn the lockout on, slide
the switch all the way to the
right. To turn the lockout
off, slide the switch all the
way
to the left.
When the lockout is on, the remote trunk release,
located in the vehicle, will not release the trunk lid.
However, the trunk lid can still be opened with the key.
If you have the optional Remote Lock Control feature,
your vehicle is not equipped with the
trunk lockout switch.
Theft
Vehicle theft is big business, especially in some cities.
Although your vehicle has a number
of theft-deterrent
features, we know that nothing we put on it can make
it impossible to steal. However, there are ways you
can help.
Key in the Ignition
If you leave your vehicle with the keys inside, it’s an
easy target for joy riders or professional thieves
-- so
don’t do it.
When you park your vehicle and open the driver’s door,
you’ll hear a chime reminding you to remove your key
from the ignition and take it with you. Always do this.
And remember to lock
the doors.
Parking at Night
Park in a lighted spot, close all windows and lock your
vehicle. Remember to keep your valuables out of sight.
Put them in a storage area, or take them with you.
2- 11
Page 76 of 356
Parking Lots
If you park in a lot where someone will be watching
your vehicle, it’s best to lock it up and take your keys.
But what if you have to leave your key?
0
0
0
0
0
0
If possible, park in a busy, well lit area.
Put your valuables in a storage area, like your
trunk or glove box. Be sure to close and lock the
storage area.
Close all windows.
Slide the remote trunk release lockout switch all
the way to the right.
Lock the glove box.
Lock all the doors except the driver’s.
Passlock@
Your vehicle is equipped with the Passlock
theft-deterrent system. During normal
operation, the SECURITY light will
go
off after the engine is started.
If the engine stalls
and the SECURITY light flashes,
wait until the light stops flashing before trying to restart
the engine. Remember to release the key from the
START position as soon as the engine starts.
If you are driving and the SECURITY light comes
on, you will be able to restart the engine if you turn
the engine
off. However, your Passlock system is
not working properly and must be serviced by your
retailer. Your vehicle is not protected by Passlock at this
time. You may also want to check the fuse (see “Fuses
and Circuit Breakers” in the Index). See your retailer
for service.
If the SECURITY light comes on while the engine is
running, a problem has been detected and the system
may need service. See your retailer for service.
In an emergency, call the Oldsmobile Roadside
Assistance Center at
1-800-442-OLDS (6537).
Passlock is a passive theft-deterrent system. The system
is armed once the key is removed from the ignition.
Passlock enables fuel
if the ignition lock cylinder is
turned with a valid key. If a correct key is not used,
fuel is disabled.
2-12
Page 262 of 356
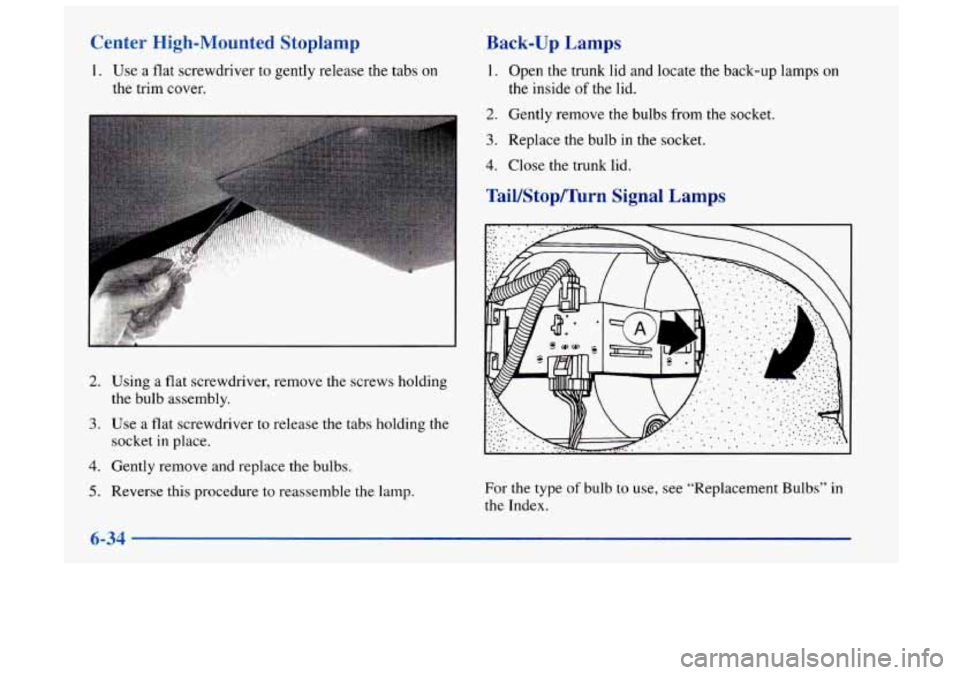
Center High-Mounted Stoplamp
1. Use a flat screwdriver to gently release the tabs on
the trim cover.
2. Using a flat screwdriver, remove the screws holding
the bulb assembly.
3. Use a flat screwdriver to release the tabs holding the
4. Gently remove and replace the bulbs.
socket
in place.
5. Reverse this procedure to reassemble the lamp.
Back-up Lamps
1. Open the trunk lid and locate the back-up lamps on
2. Gently remove the bulbs from the socket.
3. Replace the bulb in the socket.
4. Close the trunk lid.
the
inside
of the lid.
TaiYStop/Turn Signal Lamps
For the type of bulb to use, see “Replacement Bulbs” in
the Index.
6-34
Page 263 of 356
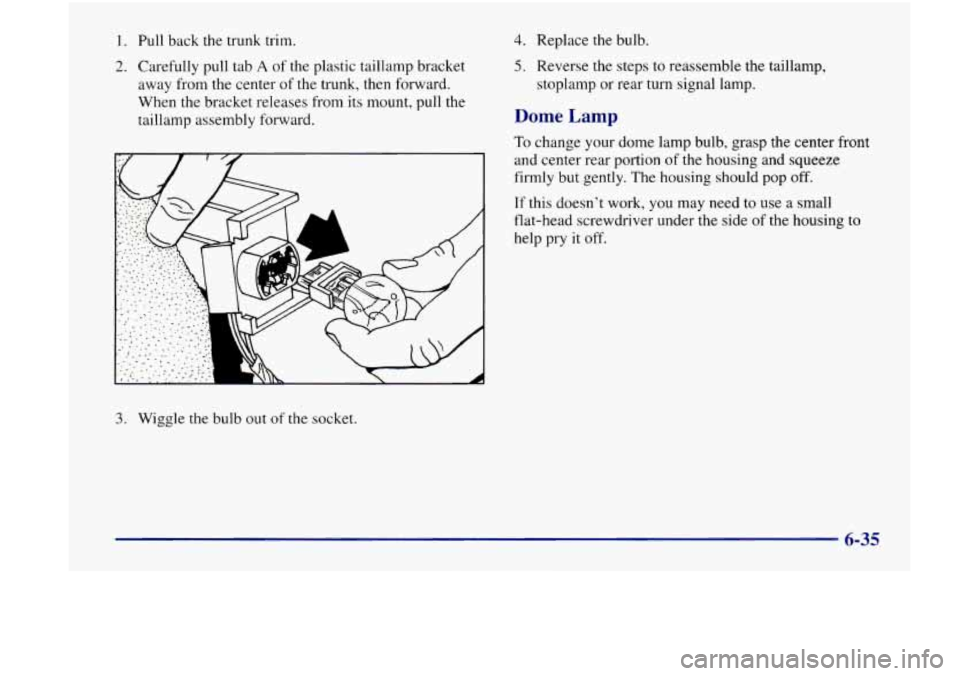
1. Pull back the trunk trim.
2. Carefully pull tab A of the plastic taillamp bracket
away from the center of the trunk, then forward.
When the bracket releases from its mount, pull the
taillamp assembly forward.
3. Wiggle the bulb out of the socket.
4. Replace the bulb.
5. Reverse the steps to reassemble the taillamp,
stoplamp or rear turn signal lamp.
Dome Lamp
To change your dome lamp bulb, grasp the center front
and center rear portion
of the housing and squeeze
firmly but gently.
The housing should pop off.
If this doesn’t work, you may need to use a small
flat-head screwdriver under the side
of the housing to
help pry it off.
6-35
Page 349 of 356
Odometer .................................... 2-49
Off-Road Recovery
............................. 4- 12
Oil. Engine
.................................... 6-12
Overdrive. Automatic Transaxle
................... 2-20
Overheating Engine
............................. 5-15
Owner Checks and Services
....................... 7-30
Owner Publications. Ordering
..................... 8-10
Paint Spotting. Chemical
........................ 6-50
Park Automatic Transaxle
.......................... 2- 18
Shifting Into
................................. 2-24
Shifting Out
of ............................... 2-26
AtNight
.................................... 2-12
Brake
...................................... 2-23
Brake Mechanism Check
....................... 7-33
Lots
....................................... 2-12
Over Things That
Burn ........................ 2-26
With a Trailer
................................ 4-39
Passenger Position
.............................. 1-21
Passing
....................................... 4-13
Passing with a Trailer
............................ 4-37
Passlock
...................................... 2-12
Passlock Warning Light
.......................... 2-59
Periodic Maintenance Inspections
.................. 7-34
Power
Accessory Outlet
............................. 2-45
DoorLocks
................................... 2-5
Option Fuses
................................ 6-53
Remote Control Mirror ........................ 2-42
Parking
Seat
......................................... 1-4
Steering
.................................... 4-10
Steering Fluid
................................ 6-25
Windows
................................... 2-28
Pregnancy. Use of Safety Belts
.................... 1-20
Problems on the Road ............................ 5-1
Publications. Service and Owner ................... 8-10
Radio Reception
.............................. 3-18
Radios
........................................ 3-6
Rain. Driving In
................................ 4-17
Reading Lamps
................................ 2-40
Rear Door Security Locks
........................... 2-5
Outside Seat Position
.......................... 1-28
Seatpassengers
.............................. 1-28
Towing
..................................... 5-13
Window Defogger
............................. 3-5
Rear Seat Cupholder
............................ 2-43
Rear Window Defogger Antenna
................... 3-21
Rearview Mirror
................................ 2-42
Inside Daymight
............................. 2-42
Reclining Front Seatbacks
......................... 1-4
Recommended Lubricants and Fluids
............... 7-36
Recreational Vehicle Towing
...................... 4-29
Refrigerants. Air Conditioning
.................... 6-58
Remote
Fuel Door Release
............................. 6-6
Lock Control
................................. 2-6
Trunk Release Lockout
........................ 2-11
Safety Belt Comfort Guides
..................... 1-32
9-7
Page 350 of 356
Remote Lock Control ............................. 2-6
Remote Trunk Release
........................... 2- 10
Replacement Bulbs
...................................... 6-57
Parts
....................................... 6-59
Wheel
...................................... 6-42
Replacing Safety Belts
........................... 1-53
Reporting Safety Defects
...................... 8-8, 8-9
Restraints
Checking
................................... 1-53
Child
....................................... 1-39
Head
........................................ 1-5
Replacing Parts After a Crash
................... 1-53
Reverse. Automatic Transaxle
..................... 2- 19
hght Front Passenger Position .................... 1-2 1
Roadside Assistance
.............................. 8-5
Roadside Assistance. Canadian
..................... 8-6
Rocking Your Vehicle
........................... 5-37
System
Check
................................ 7-3 1
Rotation. Tires
................................. 6-38
Safety Belt Extender
............................ 1-53
Safety Belts
.................................... 1-6
Adults
...................................... 1-12
Care
....................................... 6-47
Center Rear Passenger Position
.................. 1-34
Children
.................................... 1-36
Driver Position
............................... 1 - 12
Extender
.................................... 1-53
How to Wear Properly ......................... 1 - 12
Incorrect Usage
..... 1-16. 1-17. 1-18. 1-19. 1-51. 1-52 LapBelt
.................................... 1-35
Lap-Shoulder
........................... 1.12. 1.28
Larger Children
.............................. 1-50
Passenger Position
............................ 1-21
Questions and Answers
........................ 1-11
Rear Comfort Guides
.......................... 1-32
Rear Seat Outside Passenger Positions
............ 1-28
Rear Seat Passengers
.......................... 1-28
Reminder Light
.......................... 1-7, 2-5 1
Replacing After a Crash
........................ 1-53
Right Front Passenger Position
.................. 1-21
Shoulder Belt Height Adjuster
................... 1-15
Smaller Children and Babies
.................... 1-36
Use During Pregnancy
......................... 1-20
Warning Light
................................ 1-7
WhyTheyWork
............................... 1-8
Safety Chains
.................................. 4-36
Safety Defects, Reporting
..................... 8-8. 8-9
Safety Warnings and Symbols ....................... 111
Scheduled Maintenance Services .................... 7-4
Seatback
Seats
...
Reclining Front ............................... 1-4
Four-Way Manual
............................. 1-3
Folding
the Rear
............................... 1-6
ManualFront
................................. 1-2
Manual Lumbar Support
........................ 1-3
Power
....................................... 1-4
Rear
........................................ 1-6
Restraint Systems
.............................. 1-1
Seat Controls
................................. 1-2
Securing a Child Restraint
...................... 1-44
9-8
Page 354 of 356

Service Station Checkpoints
COOLANT
SURGE TANK 2.4L ENGINE
OIL DIPSTICK
FUEL
DOOR
/ P6-5
SECONDARY
WINDSHIELD FLUID TIRES
P6-36
RESERVOIR
BATTERY P6-26 P6-31
REMOTE FUEL DOOR P6-6
TRUNK RELEASE P2-10
For detailed information, refer to the page number listed, or see the Index in the back of the owner's manual.
9-12