brake light Oldsmobile Alero 2000 s Owner's Guide
[x] Cancel search | Manufacturer: OLDSMOBILE, Model Year: 2000, Model line: Alero, Model: Oldsmobile Alero 2000Pages: 327, PDF Size: 2.43 MB
Page 202 of 327
5-4
1. Check the other vehicle. It must have a 12-volt
battery with a negative ground system.
NOTICE:
If the other system isn't a 12-volt system with a
negative ground, both vehicles can be damaged.
2. Get the vehicles close enough so the jumper cables
can reach, but be sure the vehicles aren't touching
each other. If they are, it could cause a ground
connection you don't want. You wouldn't be able
to start your vehicle, and the bad grounding could
damage the electrical systems. To avoid the possibility
of the vehicles rolling, set the parking brake firmly
on both vehicles involved in the jump start procedure.
Put an automatic transaxle in PARK (P) or a
manual transaxle in NEUTRAL before setting the
parking brake.3. Turn off the ignition on both vehicles. Unplug
unnecessary accessories plugged into the cigarette
lighter. Turn off all lamps that aren't needed as well
as the radios. This will avoid sparks and help save
both batteries. In addition, it could save your radio!
NOTICE:
If you leave your radio on, it could be badly
damaged. The repairs wouldn't be covered by
your warranty.
4. Open the hoods and locate the batteries.
CAUTION:
An electric fan can start up even when the engine
is not running and can injure you. Keep hands,
clothing and tools away from any underhood
electric fan.
Page 254 of 327
6-26
There are only two reasons why the brake fluid level in
the reservoir might go down. The first is that the brake
fluid goes down to an acceptable level during normal
brake lining wear. When new linings are put in, the fluid
level goes back up. The other reason is that fluid is
leaking out of the brake system. If it is, you should have
your brake system fixed, since a leak means that sooner
or later your brakes won't work well, or won't work
at all.
So, it isn't a good idea to ªtop offº your brake fluid.
Adding brake fluid won't correct a leak. If you add fluid
when your linings are worn, then you'll have too much
fluid when you get new brake linings. You should add
(or remove) brake fluid, as necessary, only when work is
done on the brake hydraulic system.
CAUTION:
If you have too much brake fluid, it can spill on
the engine. The fluid will burn if the engine is hot
enough. You or others could be burned, and your
vehicle could be damaged. Add brake fluid only
when work is done on the brake hydraulic system.
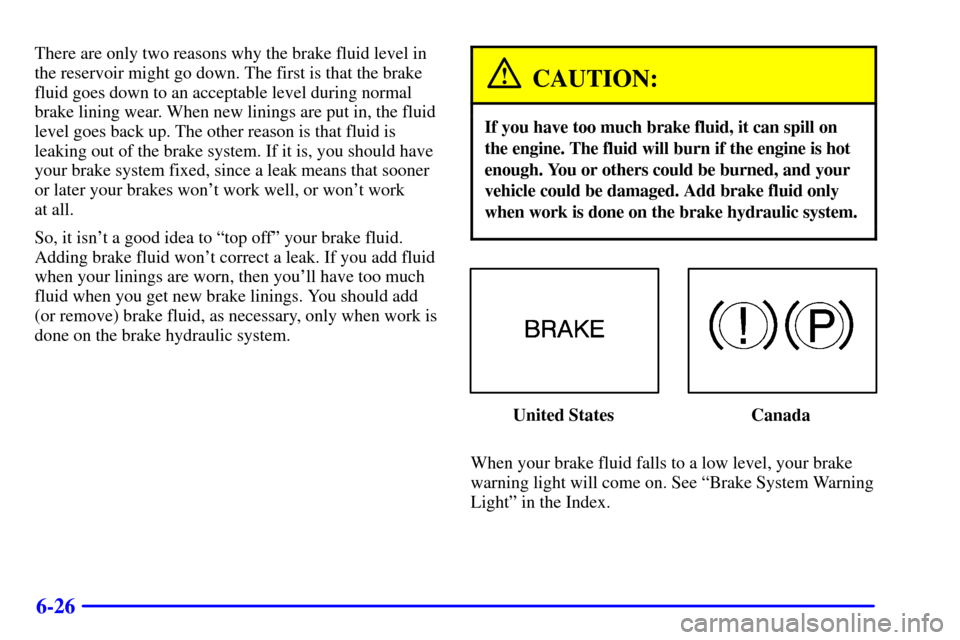
United States Canada
When your brake fluid falls to a low level, your brake
warning light will come on. See ªBrake System Warning
Lightº in the Index.
Page 256 of 327
6-28 Brake Wear
Your vehicle has four-wheel disc brakes.
Disc brake pads have built
-in wear indicators that make
a high
-pitched warning sound when the brake pads are
worn and new pads are needed. The sound may come
and go or be heard all the time your vehicle is moving
(except when you are pushing on the brake
pedal firmly).
CAUTION:
The brake wear warning sound means that soon
your brakes won't work well. That could lead to
an accident. When you hear the brake wear
warning sound, have your vehicle serviced.
NOTICE:
Continuing to drive with worn-out brake pads
could result in costly brake repair.
Some driving conditions or climates may cause a brake
squeal when the brakes are first applied or lightly
applied. This does not mean something is wrong with
your brakes.
Properly torqued wheel nuts are necessary to help
prevent brake pulsation. When tires are rotated, inspect
brake pads for wear and evenly torque wheel nuts in the
proper sequence to GM specifications.
Brake linings should always be replaced as complete
axle sets.
See ªBrake System Inspectionº in Section 7
of this manual under Part C ªPeriodic
Maintenance Inspections.º
Brake Pedal Travel
See your dealer if the brake pedal does not return to
normal height, or if there is a rapid increase in pedal
travel. This could be a sign of brake trouble.
Brake Adjustment
Every time you make a moderate brake stop, your disc
brakes adjust for wear. If you rarely make a moderate or
heavier stop, then your brakes might not adjust correctly.
If you drive in that way, then
-- very carefully -- make
a few moderate brake stops about every 1,000 miles
(1 600 km), so your brakes will adjust properly.
Page 266 of 327
6-38 Tire Pressure Monitor System (If Equipped)
The tire pressure monitor system can alert you to a large
change in the pressure of one tire. The system ªlearnsº
the pressure at each tire throughout the operating speed
range of your vehicle. The system normally takes
between 45 and 90 minutes of driving to learn the tire
pressures. This time may be longer depending on your
individual driving habits. Learning need not be
accumulated during a single trip. Once learned, the
system will remember the tire pressures until the system
is recalibrated.
After the system has learned tire pressures with properly
inflated tires, the LOW TIRE PRESSURE light will
come on if the pressure in one tire becomes 12 psi
(83 kPa) lower than the other three tires. The tire
pressure monitor system won't alert you if the pressure
in more than one tire is low, if the system is not properly
calibrated, or if the vehicle is moving at less than
15 mph (25 km/h), faster than 75 mph (120 km/h),
on rough roads or during turns. The light may also come
on if you are driving on partially cleared pavement.
The tire pressure monitor system detects differences
in tire rotation speeds that are caused by changes in
tire pressure. The system can alert you about a low
tire
-- but it doesn't replace normal tire maintenance.
See ªTiresº in the Index.If the anti
-lock brake system warning light comes on,
the tire pressure monitor system may not be working.
See your dealer for service. (Also, see ªAnti
-Lock
Brake System Warning Lightº in the Index).
When the LOW TIRE PRESSURE light comes on, you
should stop as soon as you can and check all your tires
for damage. (If a tire is flat, see ªIf a Tire Goes Flatº in
the Index.) Also check the tire pressure in all four tires
as soon as you can. See ªInflation
- Tire Pressureº
in the Index.
The light will come on and stay on until you turn off the
ignition or press the RESET button.
Don't reset the tire pressure monitor system without first
correcting the cause of the problem and checking and
adjusting the pressure in all four tires. If you reset the
system when the tire pressures are incorrect, the system
will not work properly and may not alert you when a tire
is low.
Any time you adjust a tire's pressure, rotate your tires,
have one or more tires repaired or replaced, or when any
work is done on your vehicle where tires are removed
you'll need to reset (calibrate) the tire pressure monitor
system. You'll also need to reset the system whenever
you buy new tires and whenever the vehicle's battery
has been disconnected.
Page 287 of 327
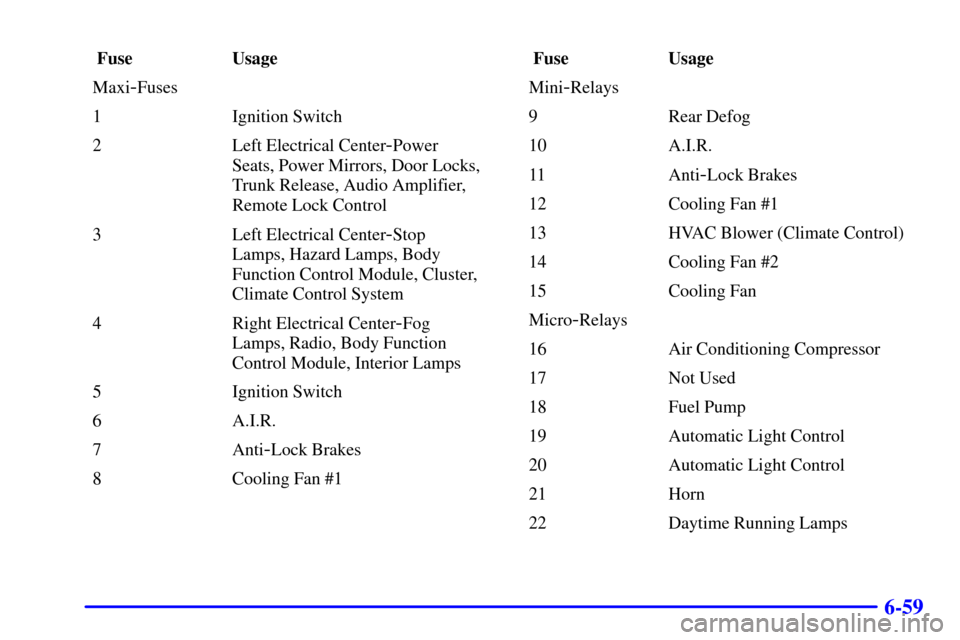
6-59
Fuse Usage
Maxi
-Fuses
1 Ignition Switch
2 Left Electrical Center
-Power
Seats, Power Mirrors, Door Locks,
Trunk Release, Audio Amplifier,
Remote Lock Control
3 Left Electrical Center
-Stop
Lamps, Hazard Lamps, Body
Function Control Module, Cluster,
Climate Control System
4 Right Electrical Center
-Fog
Lamps, Radio, Body Function
Control Module, Interior Lamps
5 Ignition Switch
6 A.I.R.
7 Anti
-Lock Brakes
8 Cooling Fan #1 Fuse Usage
Mini
-Relays
9 Rear Defog
10 A.I.R.
11 Anti
-Lock Brakes
12 Cooling Fan #1
13 HVAC Blower (Climate Control)
14 Cooling Fan #2
15 Cooling Fan
Micro
-Relays
16 Air Conditioning Compressor
17 Not Used
18 Fuel Pump
19 Automatic Light Control
20 Automatic Light Control
21 Horn
22 Daytime Running Lamps
Page 288 of 327
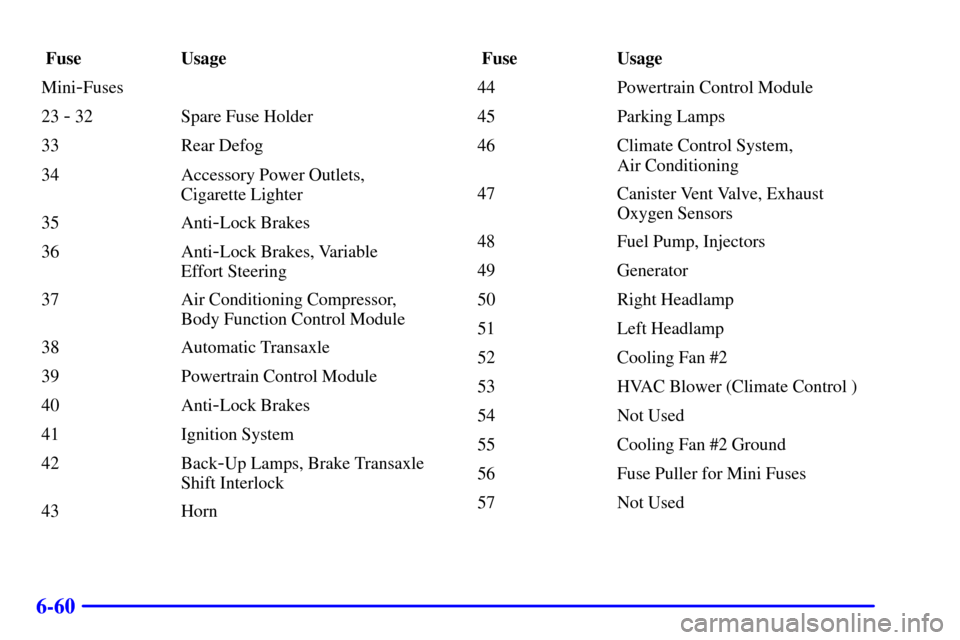
6-60
Fuse Usage
Mini
-Fuses
23
- 32 Spare Fuse Holder
33 Rear Defog
34 Accessory Power Outlets,
Cigarette Lighter
35 Anti
-Lock Brakes
36 Anti
-Lock Brakes, Variable
Effort Steering
37 Air Conditioning Compressor,
Body Function Control Module
38 Automatic Transaxle
39 Powertrain Control Module
40 Anti
-Lock Brakes
41 Ignition System
42 Back
-Up Lamps, Brake Transaxle
Shift Interlock
43 Horn Fuse Usage
44 Powertrain Control Module
45 Parking Lamps
46 Climate Control System,
Air Conditioning
47 Canister Vent Valve, Exhaust
Oxygen Sensors
48 Fuel Pump, Injectors
49 Generator
50 Right Headlamp
51 Left Headlamp
52 Cooling Fan #2
53 HVAC Blower (Climate Control )
54 Not Used
55 Cooling Fan #2 Ground
56 Fuse Puller for Mini Fuses
57 Not Used