roof Oldsmobile Alero 2003 Owner's Manuals
[x] Cancel search | Manufacturer: OLDSMOBILE, Model Year: 2003, Model line: Alero, Model: Oldsmobile Alero 2003Pages: 354, PDF Size: 16.74 MB
Page 2 of 354
The 2003 Oldsmobile Alero Owner Manual a
Seats and Restraint Systems ........................... 1-1
Front Seats
............................................... 1-2
Rear Seats
............................................... 1-8
Safety Belts
.............................................. 1-9
Child Restraints
....................................... 1-32
Supplemental Restraint System (SRS)
...................................... 1-53
Restraint System Check
............................ 1-60
Keys
........................................................ 2-2
Doors and Locks
....................................... 2-7
Windows
................................................. 2-1 4
Theft-Deterrent Systems ............................ 2-1 6
Starting and Operating Your Vehicle
........... 2-17
Mirrors
.................................................... 2-32
Siorage Areas
......................................... 2-34
Sunroof .................................................. 2-35
Instrument Panel Overview
.......................... 3-4
Climate Controls
...................................... 3-1 9
.w .arning Lights, Gages and indicators ......... 3-23
Audio System(s) ....................................... 3-38
Features and Controls
..................................... 2-1
Instrument Panel
............................................. 3-1 Driving Your Vehicle
....................................... 4-1
Your Driving, the Road, and Your Vehicle
..... 4-2
Towing
................................................... 4-31
Service
..................................................... 5-3
Fuel ......................................................... 5-5
Checking Things Under
the
Hood ............................................... 5-9
Headlamp Aiming
..................................... 5-47
Bulb Replacement .................................... 5-49
Windshield Wiper Blade Replacement
......... 5-52
Tires
...................................................... 5-53
Appearance Care
..................................... 5-72
Vehicle Identification
................................. 5-80
Electrical System
...................................... 5-81
Zapai;iiit=s at-tii ~J~LIIIL~LIUI I> 5-w~
Normal Maintenance Replacement Parts ...... 5-88
Maintenance Schedule ........................... ... 6-1
Maintenance Schedule
................................ 6-2
Customer Assistance Information
.................... 7-1
Customer
Assistance iniorrnation .................. 7-2
Index ................................................................. 1
Service
and Appearance Care
.......................... 5-1
n.- - -:I: - -1: - .- - .....................
Page 70 of 354
Section 2 Features and Controls
Keys ............................................................... 2.2
Remote Keyless Entry System
......................... 2.3
Remote Keyless Entry System Operation
.......... -2-4
Doors and
Locks ............................................. 2-7
Door Locks
................................................... -2-7
Power Door Locks
.......................................... 2-8
Delayed Locking
............................................ -2-8
Programmable Automatic Door Locks
................................................ 2.8
Rear Door Security Locks
.............................. 2-10
Lockout Protection
........................................ 2.11
Leaving Your Vehicle
.................................... 2-1 1
Trunk .......................................................... 2-1 1
Windows .......................... ...................... -2-1 4
Manual Windows
...................................... -2-1 4
Power Windows
............................. ....... 2.15
Sun Visors
............................................... 2.15
Theft-Deterrent Systems
.................................. 2.16
Passlock@
@ ................................................. 2.16
Starting and Operating Your Vehicle
................ 2.17
New Vehicle Break-In
.................................... 2.17
Ignition Positions
.......................................... 2.17 Starting
Your Engine
................................. 2.18
Engine Coolant Heater
.................................. 2.20
Automatic Transaxle Operation
....................... 2.22
Manual Transaxle Operation
........................... 2.25
Parking Brake
.............................................. 2.26
Parking Your Vehicle/Key Removal
.................. 2-29
Engine Exhaust
............................................ 2-30
Running Your Engine While You Are Parked
.... 2-30
Mirrors
........................................................... 2-32
Manual Rearview Mirror
................................. 2-32
Outside Remote Control Mirror
....................... 2-32
Outside Power Mirrors
................................... 2-33
Outside Convex Mirror
................................... 2-33
Storage Areas
................................................ 2-34
Glove Box
................................................... 2.34
Cupnoiaerjsj
d-34
Center Console Storage Area ......................... 2-34
Sunroof
......................................................... 2.35
Shifting Into
Park
(P) ..................................... 2-27
Shifting Out
of Park (P) ................................. 2-28
Parking Over Things That Burn
....................... 2-29
n e’ ................................................
2- 1
Page 104 of 354
Sunroof
If your vehicle has this feature, the switch is located on
the headliner between the sun visors. The sunroof
will only operate when the ignition is in
ON.
The sunroof can be opened to a vent position or it can
be express-opened all of the way.
To open the sunroof to the vent position, you must first
open the sunshade by hand. Then push the switch
back and release it.
To fully open the sunroof, push the switch back again
and release it. In
both the vent and fully open positions, the air
flow
can be adjusted for driving comfort by pushing and
holding the switch forward until the sunroof moves to
the desired position.
To close the sunroof, push the switch forward and hold
it until the sunroof
is closed. The sunroof will stop if
the switch is released during operation. Remember to
close the sunshade by hand.
The sunroof glass panel cannot be opened or closed
if
your vehicle has an electrical failure.
Notice: Do not attempt to force the sunshade
forward of the sliding glass panel. Damage will
occur and the sunroof may not open or close
properly.
2-35
Page 172 of 354
Notice; Do not try to clear frost or other material
from the inside
of the rear window with a razor blade
or anything else that
is sharp. This may damage
the rear defogger grid and affect your radio’s ability
to pick up stations clearly. The repairs wouldn’t
be covered by your warranty.
Because this antenna is built into your rear window,
there is a reduced risk of damage caused by car washes
and vandals.
If you choose to add a cellular telephone to your
vehicle, and the antenna needs to be attached to the
glass, be sure that you do not damage the grid lines for
the AM-FM antenna. There is enough space between
the lines to attach a cellular telephone antenna
without interfering with radio reception.
XM Satellite Radio Antenna System
Your XMTM Satellite Radio antenna is located on the
roof of your vehicle. Keep this antenna clear of
snow and ice build up for clear radio reception.
The performance of your
XM system may be affected if
your sunroof is open.
DAB Radio Antenna System
Your DAB antenna is located on the roof of your
vehicle. Keep this antenna clear of snow and ice build
up for clear radio reception.
If your vehicle is purchased in Canada and driven into
the United Stated the DAB radio antenna system will
not function. DAB radio reception is available in
Canada only.
The performance of your DAB antenna may be affected
if your sunroof is open.
Chime Level Adjustment
Chime level adjustment is only available on RDS radios.
The radio is the vehicle chime producer. The chime is
produced from the driver’s side front door speakers.
To change the volume level, press and hold
pushbutton 6 with the ignition on and the radio power
off. The chime volume level will change from the normal
level to loud, and
LOUD will be displaved on the
radio. To change back to the default or normal setting,
press and hold pushbutton
6 again. The chime level
will change from the loud level to normal, and
NORMAL
will be displayed. Each time the chime volume is
changed, three chimes will sound as an example of the
new volume selected.
Removing the radio and net
replacing it with a factory radio or chime module will
disable vehicle chimes.
3-67
Page 298 of 354
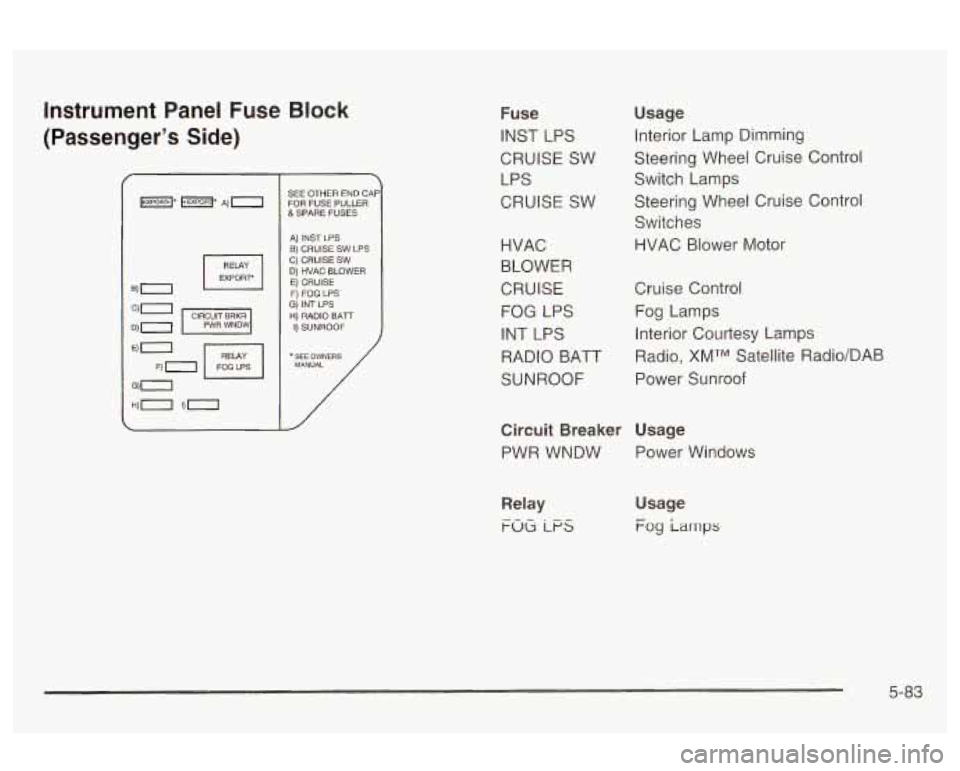
Instrument Panel Fuse Block
(Passenger’s Side)
SEE OTHER END CAF FOR FUSE PULLER &SPARE FUSES
A) INST LPS
C) CRUISE
SW B) CRUISE SW LPS
0) HVAC BLOWER E) CRUISE F) FOG LPS G) INT LPS H) RADIO BATr I) SUNROOF
* SEE OWNERS MANUAL /
1’
Fuse
INST LPS
CRUISE SW LPS
CRUISE SW Usage
Interior Lamp Dimming
Steering Wheel Cruise Control
Switch Lamps
Steering Wheel Cruise Control
Switches
HVAC Blower Motor
HVAC
BLOWER
CRUISE Cruise Control
FOG LPS
Fog Lamps
INT LPS Interior Courtesy Lamps
RADIO BAT Radio, XMTM Satellite Radio/DAB
SUNROOF Power Sunroof
Circuit Breaker Usage
PWR WNDW Power Windows
Relay
FOG LFS
Usage
Fog iarnps
5-83
Page 345 of 354
Setting the Time
Radios with Radio Data Systems (RDS)
......... 3-38
Radios without Radio Data Systems (RDS)
..... 3-38
Setting the Tone (BassTTreble)
.......... 3.40. 3.45. 3-55
Sheet Metal Damage
....................................... 5-77
Shift Speeds
.................................................. 2-26
Shifting Into Park (P)
....................................... 2-27
Shifting Out of Park (P)
................................... 2-28
Shoulder Belt Height Adjuster
........................... 1-1 7
Skidding
........................................................ 4-1 4
Some Other Rainy Weather Tips
....................... 4-19
Special Fabric Cleaning Problems
... ....... 5-73
Specifications, Capacities
.................. ... 5-86
Speedometer
.............................................. 3-25
Starter Switch Check
....................................... 6-1 1
Starting Your 2.2L L4 ECOTECTM Engine ........... 2-19
Starting Your 3400
V6 Engine ........................... 2-19
Starting Your Engine
................................... 2-18
Steering
............................................. ... 4-10
Steering in Emergencies
.................................. 4-1 1
Steering, Suspension and Front Drive Axle
Boot and Seal Inspection
.............................. 6-13
Steering Tips
....................................... , ... 4-10
Storage Areas
Center Console Storage Area
........................ 2-34
Cupholder(s)
............................................... 2-34
Glove Box
.................................................. 2-34
Storing the Flat Tire and Tools
.......................... 5-69
Storing the Spare Tire and Tools
....................... 5-70
Stuck in Sand, Mud, Ice or
Snow ...................... 4-29 Sun
Visors
................................................. 2-15
Sunroof
..................................................... 2-35
Supplemental Restraint System
(SRS) ........... 1-53
How Does an Air Bag Restrain?
.................... 1-57
Servicing Your Air Bag-Equipped Vehicle
......... 1-59
What Makes an Air Bag Inflate?
.................... 1-57
What Will You See After an Air Bag Inflates?
.. 1-57
When Should an Air Bag Inflate? ................... 1-56
Where Are the Air Bags?
.............................. 1-55
Tachometer
.................................................... 3-25
Taillamps Turn Signal, and Stoplamps
.......................... 5-50
Theft-Deterrent, Radio ..................................... 3-64
Theft-Deterrent Systems
................................... 2-16
Passlock@
.................................................. 2-16
Throttle System Inspection
............................... 6-14
Tilt Wheel
........................................................ 3-7
Tire Inflation Check
........................................... 6-9
Tires
..................................................... 5-53, 5-77
Buying New Tires
........................................ 5-56
Chains
....................................................... 5-60
Changing a Flat Tire
.................................... 5-62
Compact Spare Tire
..................................... 5-71
If a Tire Goes Flat
....................................... 5-61
Inflation
-- Tire Pressure ............................... 5-54
Inspection and Rotation ................................ 5-55
Uniform Tire Quality Grading ......................... 5-57
12