OLDSMOBILE AURORA 1995 Owners Manual
Manufacturer: OLDSMOBILE, Model Year: 1995, Model line: AURORA, Model: OLDSMOBILE AURORA 1995Pages: 372, PDF Size: 19.14 MB
Page 281 of 372

Vehicle Identification Number (VIN)
I. I
ENGINE A95 7 ASSEMBLY
CODE MODEL YEAR
PLANT
This is the legal identifier for your Aurora. It appears on
a plate in the front corner of the instrument panel, on the
driver's side. You can see
it if you look through the
windshield from outside your vehicle. The VIN also
appears on the Vehicle Certification and Service Parts
labels and the certificates of title and registration.
Engine Identification
The eighth character in your VIN is the engine code.
This code will help you identify your engine,
specifications, and replacement parts.
Service Parts Identification Label
You'll find this label inside the trunk on the side trim
near the power antenna. It's very helpful
if you ever
need
to order parts. On this label is:
your VIN,
0 the model designation,
0 paint information, and
0 a list of all production options and special
equipment.
Be sure that this label is not removed from the vehicle.
6-51
ProCarManuals.com
Page 282 of 372

Add-on Electrical Equipment
NOTICE:
Don’t add anything electrical to your Aurora
unless you check with your retailer first. Some
electrical equipment can damage your vehicle
and the damage wouldn’t be covered by your
warranty. Some add-on electrical equipment can
keep other components from working as they
should.
Your vehicle
has an air bag system. Before attempting to
add anything electrical to your AL~I-o~~, see “Servicing
Your Air Bag-Equipped Aurora”
in the Index.
Removing the Rear Seat Cushion
To access the battery and main fuse boxes, the rear seat
cushion must be removed. You may wish to have your
retailer do this for you.
NOTICE:
The battery and main fuse boxes are located
under the rear seat cushion. The battery’s ground
terminal and some relay wires are exposed. To
help avoid damage to the battery and wires, be
careful when removing or reinstalling the seat
cushion.
Do not remove covers from covered
parts.
Do not store anything under the seat, as
objects could touch exposed wires and cause
a
short.
To Remove the Rear Seat Cushion
1. Pull up on the front of the cushion to release the
front
hooks.
2. Pull the cushion up and out toward the front of the
vehicle.
ProCarManuals.com
Page 283 of 372

To Reinstall the Rear Seat Cushion
1.
2.
3.
Buckle the center passenger position safety belt, and
then route the safety belts through the proper slots
in
the seat cushion. Don’t let the safety belt get twisted.
Slide the rear
of the cushion up and under the
seatback
so the rear locating guides hook into the
wire loops on the back frame.
With the seat cushion lowered, push rearward and
then press down
on the seat cushion until the spring
locks on both ends engage.
6-53
-
ProCarManuals.com
Page 284 of 372

4. Check to make sure the safety belts are properly
routed and that
no portion of any safety belt is
trapped under
the seat. Also make sure the seat
cushion
is secured.
Fuses and Circuit Breakers
The wiring circuits in your vehicle are protected from
short circuits by
a combination of fuses and circuit
breakers. This greatly reduces the chance
of damage
caused by electrical problems.
There are three main fuse panels.
Two are located under
the rear seat.
To access these panels, you’ll need to
remove the seat. See the previous description under
“Removing
the Rear Seat Cushion” to see how. This
procedure
is somewhat difficult. You may wish to have
your retailer replace the fuse, instead.
V
Once the seat is removed,
you’ll find two fuse panels
on the driver’s side of the
battery. Each
is protected by
a plastic box with four tabs.
Pull up on all four tabs at
the same time to loosen
them and pull off the box.
Of these two panels, the cover on the passenger-side
fuse panel
has an extra plastic cap attachment. You’ll
need to slide this out of the grooves which hold it there
before removing the rest
of the box.
To replace the covers, line the four tabs up and simply
snap
them back into place. The extra plastic cap
attachment slides back into place.
6-54
ProCarManuals.com
Page 285 of 372

The third fuse panel is located on the left side of the
instrument panel.
To open it, simply pull on the latch
and the door will open.
You’ll find
a fuse puller clipped to the inside of the
cover. Place the wide end of the fuse puller over the
plastic end
of the fuse. Squeeze the ends over the fuse
and pull
it out. To close the fuse door, press the door
closed and
it will latch. Two
spare fuses are located below the fuse puller. You’ll
also find spare fuses
in the slots labeled “Spare” on the
following charts.
Look at the silver-colored band inside the fuse. If the
band is broken or melted, replace the fuse. Be sure you
replace a bad fuse with a new one of the correct amp
rating.
6-55
ProCarManuals.com
Page 286 of 372

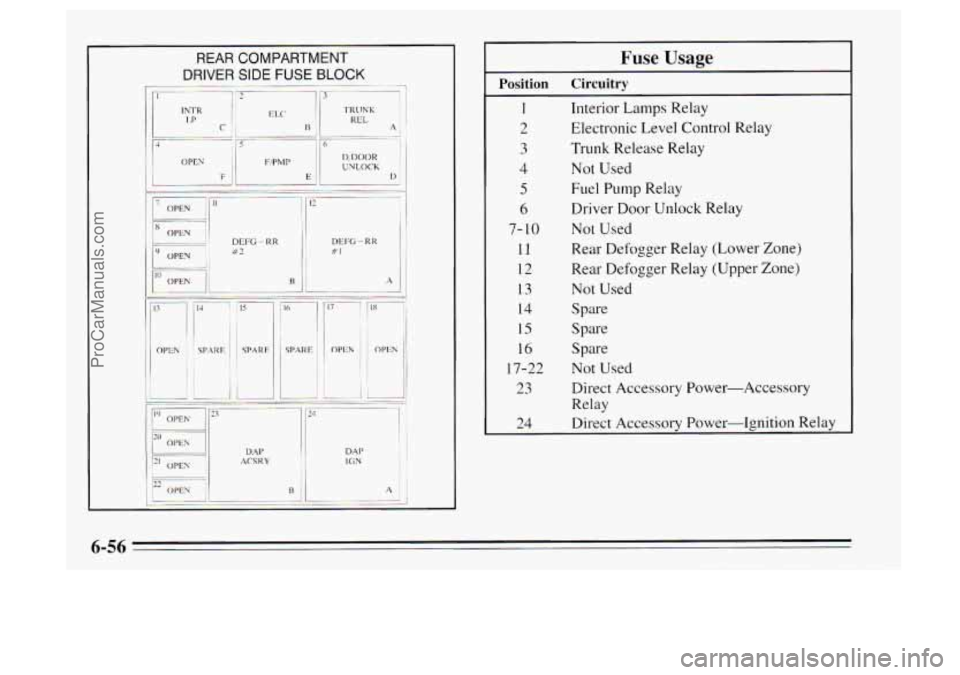
REAR COMPARTMENT
DP’
ER SIDE FUSE BLOCK
-. -~ 113 J
DEI% - RR B2
ACS K Y DM’ DM IC.; N ‘I j
Fuse Usage
1 Interior Lamps Relay
2 Electronic Level Control Relay
3 Trunk Release Relay
5 Fuel Pump Relay
Position Circuitry
4 Not Used
6 Driver Door Unlock Relay
7- 10 Not Used
11 Rear Defogger Relay (Lower Zone)
12 Rear Defogger Relay (Upper Zone)
13 Not Used
14 Spare
15 Spare
16 Spare
17-22 Not Used
23 Direct Accessory Power-Accessory
Relay
24 Direct Accessory Power-Ignition Relay
6-56
ProCarManuals.com
Page 287 of 372

r.
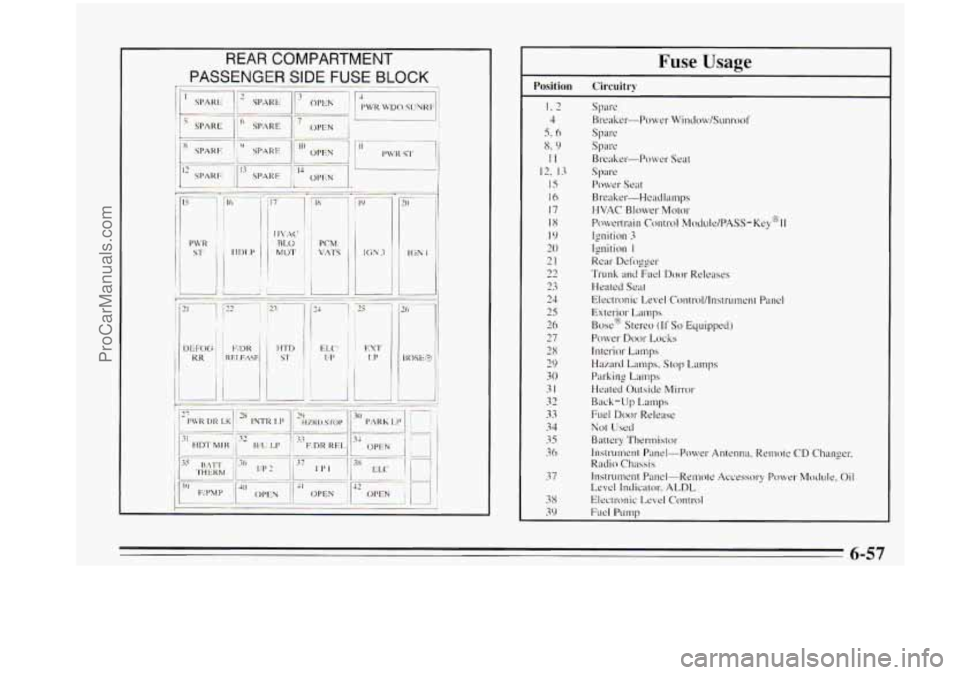
Fuse Usage
Position Circuitry
I. 2
4
5. 6
x. 9
II
12, 13
15
16
17
18
I9
20
21
22
23
24
25
26
27
28
29
30
31
32
33
34
35
36
37
38
39
Spare
Breaker-Power Window/Sunrool'
Spare
Spre
Breaker-Power Seat
spa re
Power Seat
Breaker.-Headlamps
HVAC Blower Mo~or
Ignition 3
Ignition I
Rear Defogger
Trunk and FLKI Door Releases
Heated Seat
Electronic Level Control/lnstrument Panel
Exterior Lamps
Box@ Stereo
(If So Equipped)
Power Door Locks
Interior Lamp
Hazard Lamps. Stop Lamps
Parking
Lamps
Heated Outside h4irror
Back-Up Lamps
Fuel
Door Release
Not Used
Battery Thertmislor
Instrument Panel-Power Antenna, Remote CD Changer.
Rndio
Chassis
Instrument Panel-Remote Accessory Power Module. Oil
Level Indicator, ALDL
Electronic Level Control
Fuel Pump
Powertrain
control MOCIUI~/PASS-K~~@II
6-57
ProCarManuals.com
Page 288 of 372

1 I 1 Fuse Usage -
Position Circuitrv
1
2
3
4
5
4
7
8
9
10
11
12
13
14
1s
16
17
18
19
20
Supplemental Inflatable Restraint (Air Bag)
Il?jectors
Anti-Lock Brake System
Left Exterior Lamps
Turn Signal Lamps 1n.jector.s
Climate Controls, Magnetic Speed Right Exterior Lamps
Chime (Ignition
1 ), Memory Set
Powertrain Control
Module Cruise
Control, VATS PASS-Key%
Auxiliary Power
Interior Lamps
Brake-Transaxle Shift Interlock, Heated
Oxygen Sensor: Linear
EGR
Driver Information Center
Radio
Climate Control Relay
Windshield Wipers
Cigar Lighter
Crank,
Air Bag Module
Climate Control Blower
ProCarManuals.com
Page 289 of 372

Maxifuse/Relay Center
It’s easy to check the fuses in this underhood relay
center. There are two locking arms on either side
of the
base of the cover. Reach down and unsnap each one by
pulling the cover toward you, then pushing
it away
while pulling up. Remove the cover. The inside of the
cover has a chart that explains the features and controls
governed
by each fuse and relay.
Headlamp Wiring
The headlamp wiring is protected by a circuit breaker in
the wiring harness. An electrical overload will cause the
lamps
to go on and off, or in some cases to remain off. If
this happens, have your headlamp system checked right
away.
Windshield Wipers
The windshield wiper motor is protected by an internal
circuit breaker and a fuse in the fuse panel
on the other
side
of the instrument panel. If the motor overheats due
to heavy snow, etc., the wiper will stop until the motor
cools.
If the overload is caused by some electrical
problem, have
it fixed.
Power Windows and Other Power Options
Circuit breakers in the fuse panel protect the power
windows and other power accessories. When the current
load is too heavy. the circuit breaker opens and closes,
protecting the circuit
until the problem is fixed.
ProCarManuals.com
Page 290 of 372

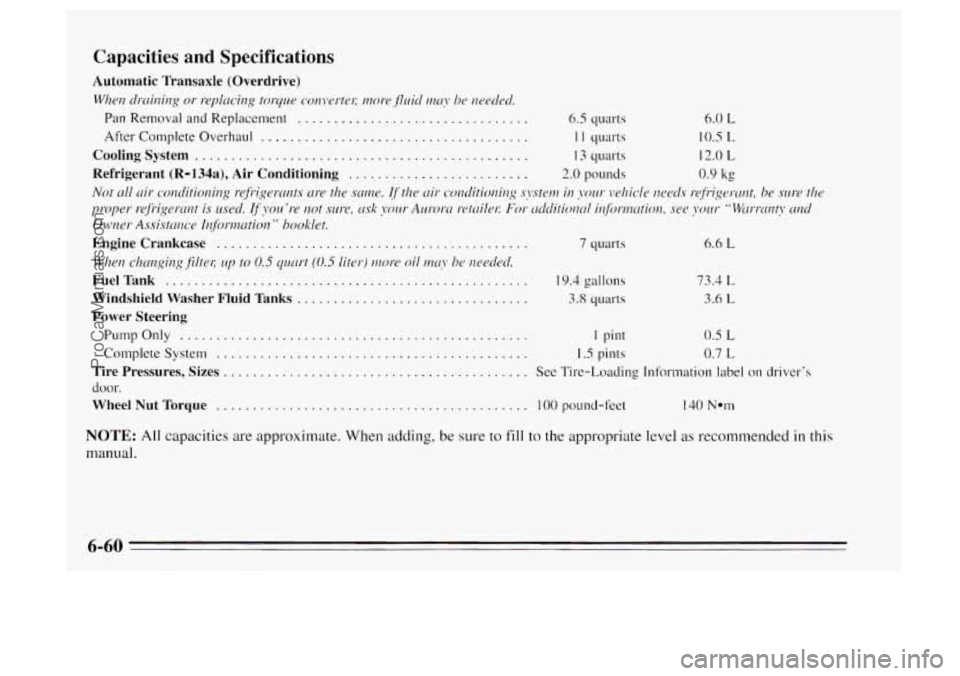
Capacities and Specifications
Automatic Transaxle (Overdrive)
Wlwn cllvrinirlg or seplcrcing tol-q~te convertel; more jlllicl n~tr~‘ bo rwederl.
Pan Removal and Replacement ................................ 6.5 quarts 6.0 L
After Complete Overhaul ..................................... I 1 quarts 10.5 L
Coolingsystem .............................................. 13 quarts 12.0 L
Refrigerant (R=134a), Air Conditioning ......................... 2.0 pounds 0.9 kg
Not trll uir conditionirlg r.efi.igel-crnts are the smw. If the nir conditiorrillg sj-steul in ~olrr vehicle Ileocls wfi-igesmt, he s1r1-e tho
proper r.cfi-igercult is used. If you ’re not ~111-e. trsk yolrr Ausoln t-etllilel: For c-tdclitionrrl i~~/i~mt~tion, .we jwrr Wirrrtrnt?* trrd
Owrwr Assistmcp Ir4fC)rmution” hooklet.
Enginecrankcase ........................................... 7 c]llasts 6.6 L
When chcmgir~g~fi’ltet; up to 0.5 qlrcu-t (0.5 liter) more oil mry be t1cecltd
FuelTank .................................................. 19.4 gallons 73.4 L
Windshield Washer Fluid Tanks ................................ 3.8 quarts 3.6 L
Power Steering
PumpOnly ................................................ 1 pint 0.5 L
Complete System ........................................... 1.5 pints 0.7 L
Tire Pressures, Sizes .......................................... See Tire-Loading Information label on driver’s
door.
Wheel Nut Torque ........................................... 100 pound-feet 140 Nom
NOTE: All capacities are approximate. When adding, be sure to fill to the appropriate level as recommended in this
manual.
6-60
ProCarManuals.com