clock OLDSMOBILE AURORA 1995 Owners Manual
[x] Cancel search | Manufacturer: OLDSMOBILE, Model Year: 1995, Model line: AURORA, Model: OLDSMOBILE AURORA 1995Pages: 372, PDF Size: 19.14 MB
Page 130 of 372

Elapsed Time (ET) Date
Press DATE to display the date. To change the date,
press DATE then RESET. The following display will
appear:
When the ignition is on, the Driver Information
Center
can be used
as a stopwatch. The display will show hours
and minutes. The elapsed time indicator
will record up
to
100 hours, then it will reset to zero and continue
counting. Press ET, and the display will show the
amount
of time that has elapsed since the elapsed time
indicator was last reset
(not including time the ignition
is off), such
as:
0 1 :OS ELAPSED TIME
To reset elapsed time to zero, press RESET while the
elapsed time
is displayed.
MONTH? XXIDDIYY
MM, DD and YY represent the month, date and year
you currently have in your system. Check to make sure
your clock is
in the correct AM or PM mode.
Notice that each key has a number. Push the key to enter
the number. The first XX’s
will flash until you enter the
first digit for the
month. You don’t need to enter the
leading zero
if the number is under 10. Press ENTER
after you’ve entered the month. The display will change
to:
DAY? MM/XX/Y
Y
Set the day just as you set the month. After the day entry
is made, press ENTER, and the display
will change to:
2-78
ProCarManuals.com
Page 141 of 372

Audio Systems
The following pages describe the audio systems available
for your Aurora, and how to get the best performance
from them. Please read about the system in your vehicle.
AM/FM Stereo Radio with Automatic Tone
Control, Cassette Tape and Compact Disc
Players
Setting the Clock
To set the clock, press and hold the HR or MN button
until
it begins to change. Let up as it gets close to the
correct time. There will be an initial two-second delay
before the clock goes into the time-set mode. The
“A”
or “P” in the display designates AM or PM in clock
adjust mode. The
“A” or “P” replaces the channel
momentarily. The clock may be set with the ignition off.
The digital display indicates information on time or radio
station frequency, the
AM or FM radio band, whether the
station
is in stereo, and other audio system functions.
PWRNOL (PowerNolume): With the ignition on,
push this knob
to turn the system on or off. Turn it
clockwise to increase the volume. Turn it
counterclockwise to decrease the volume.
3-9
ProCarManuals.com
Page 147 of 372

PWWVOL (PowerNolume): With the ignition on,
push this knob to turn the system on or off. Turn it
clockwise to increase the volume. Turn it
counterclockwise to decrease the volume.
AMD": Press this button to change between the AM,
FMI and FM2 bands. The display
will show which band
you are on.
If you press this button while a tape is
playing, the tape
will stop and the radio will return to
the AM or FM band that you were on.
TUNE: Press lightly on this knob to release it from its
recessed position. Turn
it to tune in radio stations. You
may push the knob back
in to return it to its recessed
position when not
in use.
To Preset Radio Stations
The five pushbuttons labeled 1-5 can be used to preset LIP
to 15 radio stations (five AM, five FM 1 and five FM2).
1. Tune in the station you want to store.
2. Press and hold one of the five pushbuttons
until the
display shows
a channel number. The radio will mute
until the cl1annel number is displayed. Whenever you
press that button again, the preset station
will return.
Always check whether you're
in AM, FMl or FM2.
SEEK A/V: When you press SEEK while playing the
radio, the radio
will search for the next higher or lower
station and stop. The radio will be muted while seeking.
SCAN: When you press SCAN while playing the radio,
the radio
will go through each station, pausing for a few
seconds at each station. Press SCAN again to stop
on a
station. The radio
will be muted while scanning and
"SCAN"
will appear on the display.
When you press SCAN and hold
it for about two
seconds
until the display shows "PSCAN" (Preset Scan),
the radio
will scan only stations that you've preset with
your radio pushbuttons. Press SCAN again to stop on a
station.
RECALL: When the ignition is off, press RECALL to
display the time. When the radio
is on, press RECALL
to switch the display between the radio station and the
time. After five seconds the display
will return to its
normal display.
The radio can be set
so that either the time or radio
station is normally displayed when the radio is playing.
To
do this. press RECALL to display the time or radio
station
as desired, then hold RECALL down untii the
display flashes.
ProCarManuals.com
Page 150 of 372

AR/VFM Stereo Radio with Automatic Tone
Control and Cassette Tape Player PWRNOL (PowerNolume): With the ignition on,
push this knob to turn the system on
or off. Turn it
clockwise to increase the volume. Turn
it
counterclockwise to decrease the volume.
AMEM: Press this button to change between the AM,
FMl and FM2 bands. The display will show which band
you are on.
If you press this button while a tape is
playing, the tape will stop and
the radio will return to
the
AM or FM band that you were on.
TUNE: Press lightly on this knob to release it from its
recessed position. Turn it to tune in radio stations. You
may push
the knob back in to return it to its recessed
position when
not in use.
To Preset Radio Stations
The five pushbuttons labeled 1-5 can be used to preset up
to
15 radio stations (five AM, five FM1 and five FM2).
1. Tune in the station you want to store.
2. Press TONE to select the setting that you prefer.
This audio
system may have an optional trunk-mounted
CD changer.
If so, also see “Trunk-Mounted CD
Changer” later in this section.
The digital display indicates information on time or radio
3. Press and hold one of the five pushbuttons until the
station frequency, the AM or FM radio band, whether the
display shows a channel number. The radio will mute
station is
in stereo, and other audio system functions. until the channel number is displayed. Whenever you
press that button again, the preset station and tone
setting will return. Always check whether you’re
in
AM, FMl or FM2.
3-18
ProCarManuals.com
Page 156 of 372

SEEK A/V: When you press SEEK while playing a
CD, it will go back t.o the start of the current track if more
than eight seconds
have played. If you press it again, the
changer
will go to previous tracks. When you press
SEEK A it will go to the next higher track on the disc.
SCAN: When you press SCAN while playing a CD,
you'll hear
the first few seconds of each selection on the
current disc. Press SCAN again to stop on
a selection.
The
CD will be muted while scanning and "SCAN" will
appear on the display.
FWD (Fast Forward): To advance a CD, press and
hold this button. While
the CD advances, elapsed time
will be displayed to help you find the desired passage.
REV (Fast Reverse): To reverse a CD, press and hold
this button. While the CD reverses, elapsed time
will be
displayed to help you find the desired passage.
Random: Press the number 5 button to enter the random
play mode. "RDM"
will appear on the display. In the
random mode: the tracks on all loaded discs
will be
played in random order.
If you press PROG or SEEK
while "RDM" is displayed, the next disc and track will
be selected randomly. If you press SCAN while "RDM"
is displayed, discs and tracks
will be scanned randomly.
Press the number
5 button again to turn off random and
return to normal operation.
Compression: While playing a CD, press NR to turn on
compression. "COMP"
will appear on the display.
Compression makes loud and
soft passages more equal
in volume. Press NR again to turn off compression.
Cassette Tape and CD Errors
If "Err" or "E" and a number appear in the radio display,
an error has occurred and the cassette or compact disc
temporarily cannot play.
If the error occurred while trying to play a cassette tape,
the following conditions may have caused the error:
0 The cassette tape is tight and the cassette player
cannot turn the hubs of the cassette tape. "E10" may
be displayed. Hold the cassette with the open end
down and try turning the right hub counterclockwise
with a pencil. Turn the tape over and repeat.
If the
hubs do not turn easily, your cassette tape may be
damaged and should not be used
in the cassette
player. Try
a new tape to make sure your cassette
player is working properly.
The cassette tape is broken. "El 1" may be displayed.
Check to see
if your tape is broken. Try a new
cassette tape.
3-24
ProCarManuals.com
Page 175 of 372

Steering in Emergencies
There are times when steering can be more effective
than braking. For example, you come over
a hill and
find a truck stopped in your lane, or a car suddenly pulls
out from nowhere, or a child darts out from between
parked cars and stops right
in front of you. You can
avoid these problems by braking
-- if you can stop in
time. But sometimes you can't; there isn't room. That's
the time for evasive action
-- steering around the
problem.
Your Aurora can perform very well
in emergencies like
these. First apply your brakes.
It is better to remove as
much speed
as you can from a possible collision. Then
steer around the problem,
to the left or right depending
on the space available.
An emergency like this requires close attention and a
quick decision.
If you are holding the steering wheel at
the recommended
9 and 3 o'clock positions, you can
turn it a full I80 degrees very quickly without removing
either hand.
But you have to act fast, steer quickly, and
just
as quickly straighten the wheel once you have
avoided the object.
The fact that s11ch emergency situations are always
possible
is a good reason to practice defensive driving at
all times and wear safety belts properly.
Off-Road Recovery
You may find sometime that your right wheels have
dropped off the edge
of a road onto the shoulder while
you're driving.
If the level of the shoulder is only slightly below the
pavement, recovery should be fairly easy. Ease off the
accelerator and then,
if there is nothing in the way, steer
so that your vehicle straddles the edge of the pavement.
You can
turn the steering wheel up to 1/4 turn until the
right front tire contacts the pavement edge. Then turn
your steering wheel
to go straight down the roadway.
4-11
ProCarManuals.com
Page 222 of 372

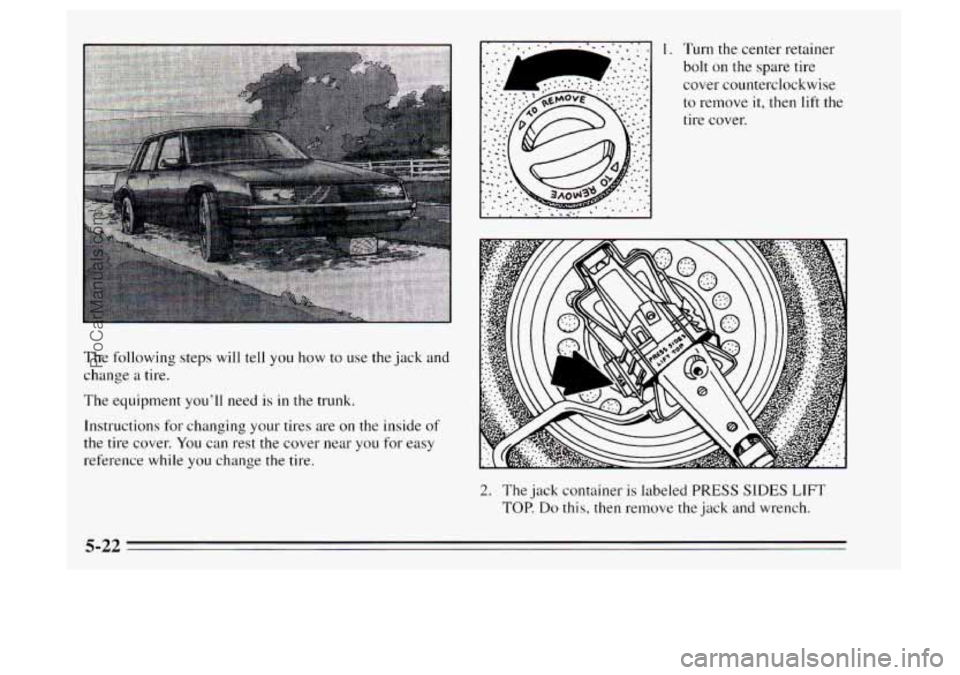
The following steps will tell you how to use the jack and
change a tire.
The equipment you’ll need is
in the trunk.
Instructions for changing your tires are on the inside of
the tire cover.
You can rest the cover near you for easy
reference while
you change the tire.
1. Turn the center retainer
bolt on the spare tire
cover counterclockwise
to remove
it, then lift the
tire cover.
2. The jack container is labeled PRESS SIDES LIFT
TOP. Do this, then remove the jack and wrench.
5-22
ProCarManuals.com
Page 223 of 372

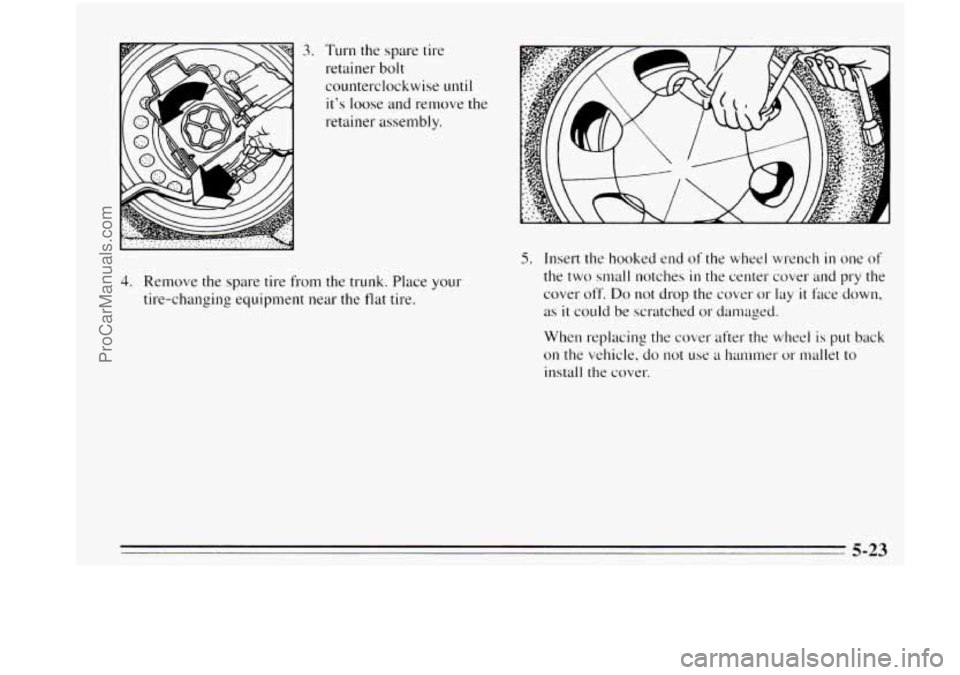
3. Turn the spare tire
retainer bolt
counterclockwise
until
it’s loose and remove the
retainer assembly.
4. Remove the spare tire from the trunk. Place your
tire-changing equipment near the flat tire.
5. Insert the hooked end of the wlleel wrench in one of
the two small notches
in the center cover and pry the
cover off.
Do not drop the cover or lay it face down,
as
it could be scratched or damaged.
When replacing the cover after the wheel is
put back
on the vehicle, do not use a han~mer or mallet to
install the cover.
5-23
ProCarManuals.com
Page 224 of 372

-4
A. P
4. Use the wheel wrench to loosen the wheel nuts. but
don't remove them.
r
7. Turn the end of the jack
clockwise
by hand to
raise the jack head
a few
inches.
8. Near each wheel well is a notch on the frame to
position the jack head. The front notch
is I 1 inches
(28 cm) back from the front wheel well. The rear
notch
is 7.5 inches (1 9 cm) forward from the rear
wheel well. You'll find the word
JACK and an arrow
stamped into the plastic near each notch.
5-24
ProCarManuals.com
Page 225 of 372

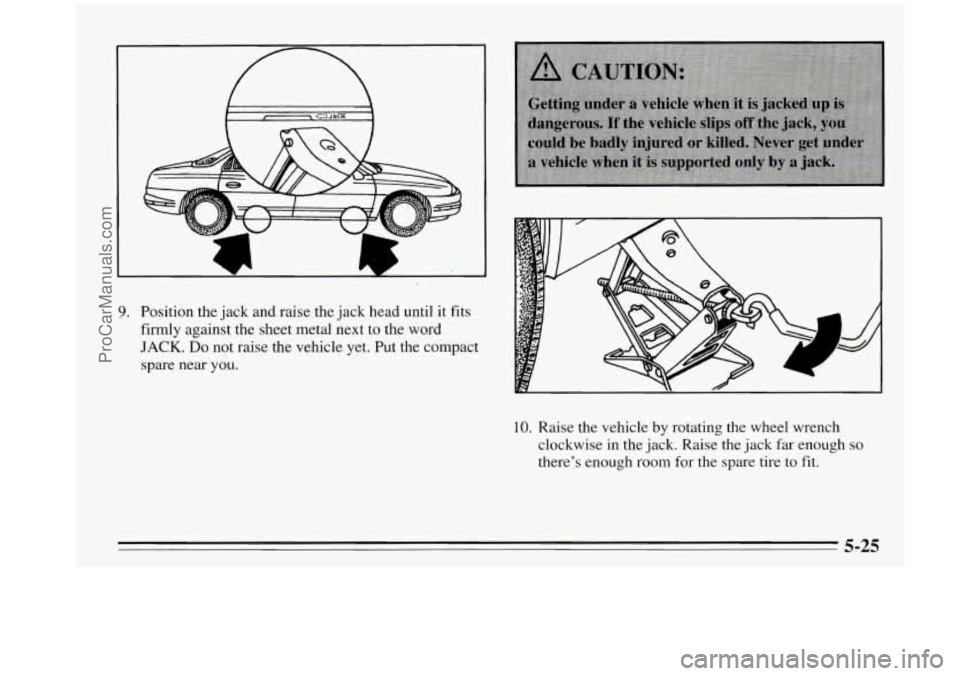
9. Position the jack and raise the jack head until it fits
firmly against the sheet metal next to the word
JACK. Do not raise the vehicle yet. Put the compact
spare near
you.
10. Raise the vehicle by rotating the wheel wrench
clockwise in the jack. Raise the jack far enough
so
there’s enough room for the spare tire to fit.
ProCarManuals.com