trunk release OLDSMOBILE AURORA 1995 Owners Manual
[x] Cancel search | Manufacturer: OLDSMOBILE, Model Year: 1995, Model line: AURORA, Model: OLDSMOBILE AURORA 1995Pages: 372, PDF Size: 19.14 MB
Page 63 of 372

Remote Trunk Release
Press the TRUNK release
button located to the right of
the steering column to
release the trunk lid. The
trunk release override
switch must be
in the ON
position.
The trunk release button
will work in any transaxle
position. The system also works with the Remote Lock
Control.
Trunk Security Override
Inside the glove box is an
override switch that is
useful if you want to leave
valuables
in the trunk when
using a commercial parking
lot.
Move the switch to
OFF to disable the remote trunk
release button. Then lock your glove box
with the door
key.
If you have your door key with you, this will help
keep someone from getting into your trunk. Move the
switch to
ON to again make the remote trunk release
button usable.
The Remote Lock Control transmitter
will open the
trunk even if the override switch is in the OFF position.
2-11
ProCarManuals.com
Page 64 of 372

Glove Box Parking at Night
Park in a lighted spot, close all windows and lock your
vehicle. Remember to keep your valuables out
of sight.
Put them
in a storage area, or take them with you.
Use the door
key to
lock and unlock the glove box. To
open, pull the latch release on the left side of the glove
box door.
Theft
Vehicle theft is big business, especially in some cities.
Although your Aurora has a number
of theft deterrent
features, we
know that nothing we put on it can make it
impossible to steal. However, there are ways you can
help.
Key in the Ignition
If you walk away from your vehicle with the keys
inside, it’s an easy target for joy riders or professional
thieves
-- so don’t do it.
When you park your Aurora and open the driver’s door,
you’ll hear a chime reminding
you to remove your key
from the ignition and take it with you. Always do this.
Your steering wheel will be locked, and
so will your
ignition and transaxle. And remember to lock the doors.
Parking Lots
If you park in a lot where someone will be watching
your vehicle, it’s best to lock
it up and take your keys.
But what if you have to leave your ignition key? What if
you have to leave something valuable
in your vehicle?
0 Put your valuables in a storage areai, like your trunk
or glove box.
0 Move the trunk security override switch to OFF.
0 Lock the glove box.
0 Lock all the doors except the driver‘s.
0 Take the door key with you.
Take the Remote Lock Control key chain with you.
2-12
ProCarManuals.com
Page 107 of 372

Storage Armrest and Cupholders Trunk Access Panel
You have
a trunk access
panel for storing long
objects such as skis. Pull the
rear armrest down. Then
push down
on the latch on
the trunk access panel to
open the panel.
To close the access panel,
push
until it clicks.
The front armrest opens into a storage area.
To open it,
lift the front edge. Inside you will find storage for
cassettes, compact discs and coins.
In front of the storage area is a cupholder. Press and
release
the cupholder cover to open. Push the cupholder
forward to lock
it when in use. Press the cupholder back
to its recessed position when not
in use.
Pull down the bolster
in the back seat to reveal
cupholders and an armrest, which opens into a storage
area.
2-55
ProCarManuals.com
Page 111 of 372

The Aurora instrument panel is designed to let you
know at a glance how your vehicle is running. You’ll
know how fast you’re going, how much fuel you’re
using, and many other things you’ll need
to drive safely
and economically.
The main components
of your instrument panel are:
1.
2.
3.
4.
5.
6.
7.
8.
9.
10.
11.
Power Mirrors Control Switch
Fog Lamp Switch
Turn SignalMultifunction Lever
Instrument ClusterIGages
Hazard Warning Flashers Switch
Horn
Windshield Wiper/Washer Control
Driver Information Center
Climate Controls
Audio System
Glove
Box (Trunk Security Override Switch inside) 12.
Passenger Side Air Bag
13. Accessory Power Outlet
14. Gearshift Lever
15. Selectable Shift
16. Traction Control Button
17. Ashtray and Lighter
18. Fuel Door Release Switch
19. Trunk Release Switch
20. Steering Wheel Touch Controls for Audio System
21. Ignition Switch
22. Driver Side Air Bag
23.
Tilt Steering Wheel Lever
24. Steering Wheel Touch Controls for Climate Control
System
25. Twilight Sentinel Control
26. Instrument Panel Intensity Control
ProCarManuals.com
Page 150 of 372

AR/VFM Stereo Radio with Automatic Tone
Control and Cassette Tape Player PWRNOL (PowerNolume): With the ignition on,
push this knob to turn the system on
or off. Turn it
clockwise to increase the volume. Turn
it
counterclockwise to decrease the volume.
AMEM: Press this button to change between the AM,
FMl and FM2 bands. The display will show which band
you are on.
If you press this button while a tape is
playing, the tape will stop and
the radio will return to
the
AM or FM band that you were on.
TUNE: Press lightly on this knob to release it from its
recessed position. Turn it to tune in radio stations. You
may push
the knob back in to return it to its recessed
position when
not in use.
To Preset Radio Stations
The five pushbuttons labeled 1-5 can be used to preset up
to
15 radio stations (five AM, five FM1 and five FM2).
1. Tune in the station you want to store.
2. Press TONE to select the setting that you prefer.
This audio
system may have an optional trunk-mounted
CD changer.
If so, also see “Trunk-Mounted CD
Changer” later in this section.
The digital display indicates information on time or radio
3. Press and hold one of the five pushbuttons until the
station frequency, the AM or FM radio band, whether the
display shows a channel number. The radio will mute
station is
in stereo, and other audio system functions. until the channel number is displayed. Whenever you
press that button again, the preset station and tone
setting will return. Always check whether you’re
in
AM, FMl or FM2.
3-18
ProCarManuals.com
Page 234 of 372

Fuels in Foreign Countries
If you plan on driving in another country outside the
U.S. or Canada, unleaded fuel may be hard to find. Do
not use leaded gasoline. If you use even one tankful,
your emission controls won't work well or at
all. With
continuous use, spark
plugs can get fouled, the exhaust
system can corrode, and your engine oil can deteriorate
quickly. Your vehicle's oxygen sensor
will be damaged.
All of that means costly repairs that wouldn't be covered
by your warranty.
To check on fuel availability, ask an auto club, or
contact
a major oil company that does business in the
country where you'll be driving.
You can also write us at the following address for
advice. Just tell
LIS where you're going and give your
Vehicle Identification Number
(VIN).
General Motors Overseas Distribution Corporation
North American Export Sales (NAES)
1908 Colonel Sam Drive
Oshawa, Ontario
LlH 8P7
Remote Fuel Door Release
The remote fuel door release can help keep your fuel
tank from being siphoned. Always be sure the fuel door
is closed and latched after refueling.
To open the fuel door
(on the left of the
vehicle), press the
button next to the
trunk release button,
to
the right of the
steering column. The
ignition need
not be
on. The remote fuel
door release
will work
in all transaxle
positions.
6-4
ProCarManuals.com
Page 235 of 372

Remote Fuel Door Manual Release
The fuel door can be
opened lnanually
in
case of an electrical
power failure.
To do
so, first open the trunk.
The release nlechanisln
is on the driver’s side
of the vehicle, at the
top of the
trunk
compartment. Pull the
tab toward you to
release the
fuel door.
NOTICE:
Prying on a locked fuel filler door could damage
it. Use the remote fuel door manual release
located in the trunk.
Filling Your Tank
The cap is behind a hinged door on the left side of your
vehicle.
6-5
ProCarManuals.com
Page 286 of 372

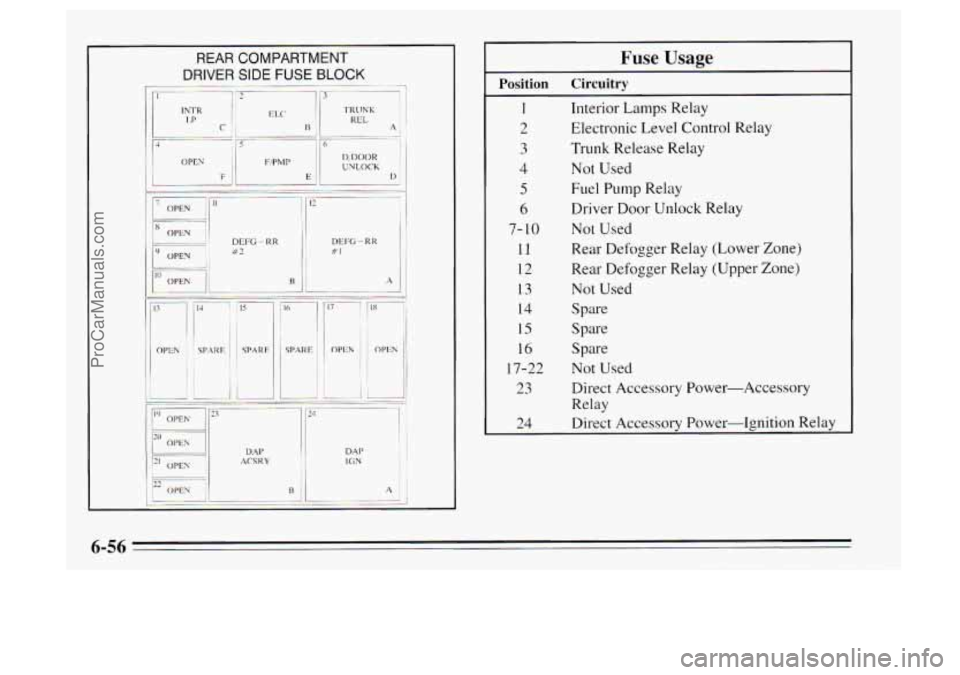
REAR COMPARTMENT
DP’
ER SIDE FUSE BLOCK
-. -~ 113 J
DEI% - RR B2
ACS K Y DM’ DM IC.; N ‘I j
Fuse Usage
1 Interior Lamps Relay
2 Electronic Level Control Relay
3 Trunk Release Relay
5 Fuel Pump Relay
Position Circuitry
4 Not Used
6 Driver Door Unlock Relay
7- 10 Not Used
11 Rear Defogger Relay (Lower Zone)
12 Rear Defogger Relay (Upper Zone)
13 Not Used
14 Spare
15 Spare
16 Spare
17-22 Not Used
23 Direct Accessory Power-Accessory
Relay
24 Direct Accessory Power-Ignition Relay
6-56
ProCarManuals.com
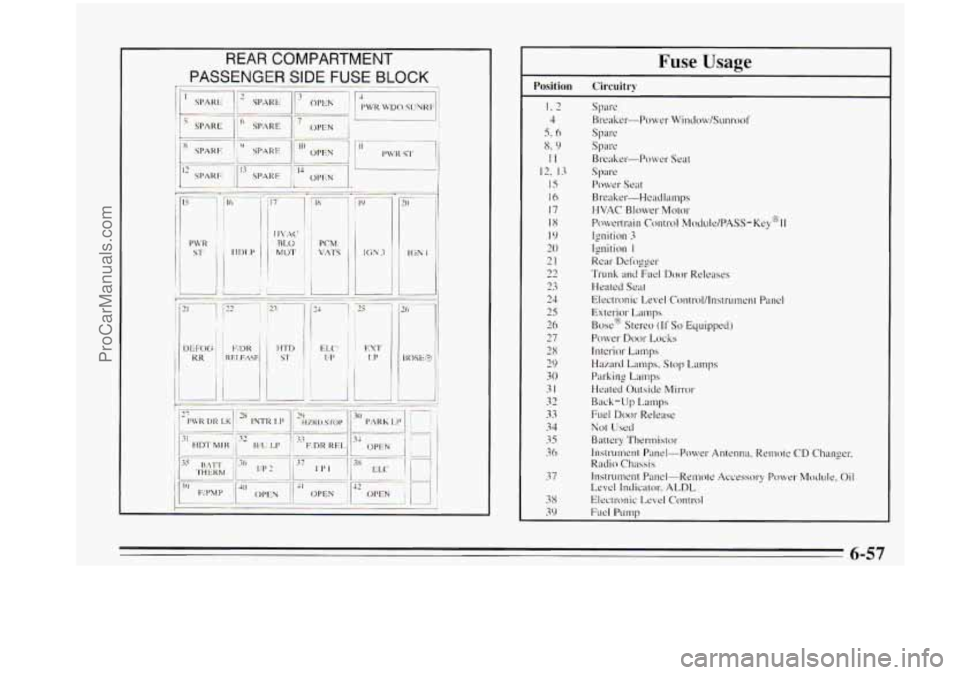
Page 287 of 372

r.
Fuse Usage
Position Circuitry
I. 2
4
5. 6
x. 9
II
12, 13
15
16
17
18
I9
20
21
22
23
24
25
26
27
28
29
30
31
32
33
34
35
36
37
38
39
Spare
Breaker-Power Window/Sunrool'
Spare
Spre
Breaker-Power Seat
spa re
Power Seat
Breaker.-Headlamps
HVAC Blower Mo~or
Ignition 3
Ignition I
Rear Defogger
Trunk and FLKI Door Releases
Heated Seat
Electronic Level Control/lnstrument Panel
Exterior Lamps
Box@ Stereo
(If So Equipped)
Power Door Locks
Interior Lamp
Hazard Lamps. Stop Lamps
Parking
Lamps
Heated Outside h4irror
Back-Up Lamps
Fuel
Door Release
Not Used
Battery Thertmislor
Instrument Panel-Power Antenna, Remote CD Changer.
Rndio
Chassis
Instrument Panel-Remote Accessory Power Module. Oil
Level Indicator, ALDL
Electronic Level Control
Fuel Pump
Powertrain
control MOCIUI~/PASS-K~~@II
6-57
ProCarManuals.com
Page 357 of 372

Tracrion Control System Active Light ........... 2.68. 4-8
Traction Control System Warning Light
............. 2-67
Trailer Brakes
.................................. 4-33
Trailer Towing
................................. 4-30
Transaxle. Automatic
............................ 2-20
Fluid
...................................... 6-16
Fluid Life Monitor ........................... 2-75
Transmitter. HomeLink Universal
.................. 2-48
Trip Odometer
................................. 2-6 1
Trunk
Access Panel ................................ 2-55
Convenicnce
Net ............................. 2-52
Lock
...................................... 2-10
Release. Remote
............................. 2-1 1
Security Override ............................ 2- I 1
Turn Signal/Mllltifunctioll Lever ................... 2-33
Indicator
................................... 2-73
Reminder
................................... 2-34
Twilight Sentinel
............................... 2-42
underbody MainLenawe
........................ 6-49
Unleaded Gasoline
............................... 6-2
Upholstery
Care ................................ 6-43
Used Oil Disposal
.............................. 6- 14 Ventilation
..................................... 3-8
Vinyl . Cleaning ................................ 6-45
Visor Vanity Mirror
............................. 2-53
warning Flashers. Hazard
........................ 5-1
Warning Lights ................................. 2-63
Air Bag ............................... 1 . 18.2-64
Anti-Lock Brake System
.................. 2-67.4-6
Battery ..................................... 2-65
Brake
...................................... 2-65
Check Oil Message
........................... 2-76
Door A-ial-
................................... 2-4
Engine Oil
.................................. 2-70
Low Coolant
................................ 2-49
Low Fuel ................................... 2-71
Oil Pressure
................................. 2-70
Salety
Belt ................................. 2-64
Security
.................................... 2- 1-7
Service Engine Soon (Malfunction Indicator Lamp) . 2-70
Traction Control Systcm
....................... 2-67
Washer Fluid Low
............................ 2-32
Washer
. Windshield ........................ 2-32. 6-22
Washing
Your Vehicle ........................... 6-47
Weatherstrips
.................................. 6-47
Engine Coolant Tcmperature
................... 2-69
Variable Assist Steering 4-
IO
Vehicle Identification Number (VIN) 6-5 1
Vehicle Storage ................................ 6-27 Weight
......................... .............. Gross Axle Weight Rating (GAWR) 4-28
Gross Vehiclc Weight Rating (GVWR)
........... 4-28
Trailer
..................................... 4-31
...............
Vehicle Loading ................................ 4-28
ProCarManuals.com