CD changer Oldsmobile Aurora 1998 Owner's Manuals
[x] Cancel search | Manufacturer: OLDSMOBILE, Model Year: 1998, Model line: Aurora, Model: Oldsmobile Aurora 1998Pages: 380, PDF Size: 19.75 MB
Page 100 of 380
Tilt Wheel Turn SignaVMultifunction Lever
.. ::..,". .: ..:. s;r:
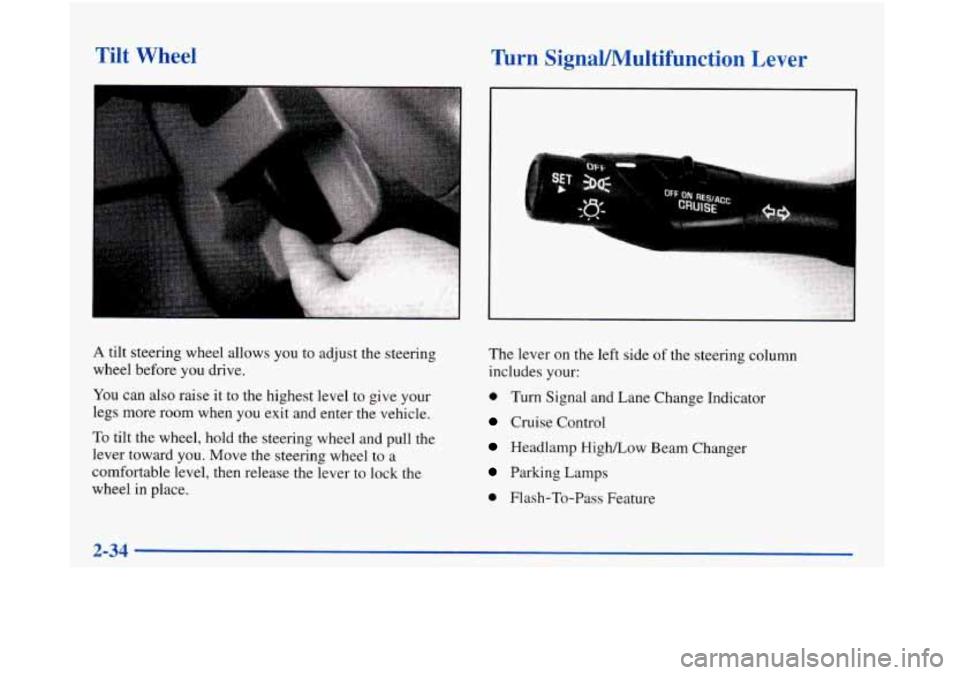
A tilt steering wheel allows you to adjust the steering
wheel before you drive.
You can also raise it to the highest level to give your
legs more room when you exit and enter the vehicle.
To tilt the wheel, hold the steering wheel and pull the
lever toward you. Move the steering wheel to a
comfortable level, then release the lever
to lock the
wheel in place. The
lever on the left side
of the steering column
includes your:
0 Turn Signal and Lane Change Indicator
Cruise Control
Headlamp High/Low Beam Changer
Parking Lamps
0 Flash-To-Pass Feature
2-34
Page 103 of 380
Headlamp High/Low Beam Changer
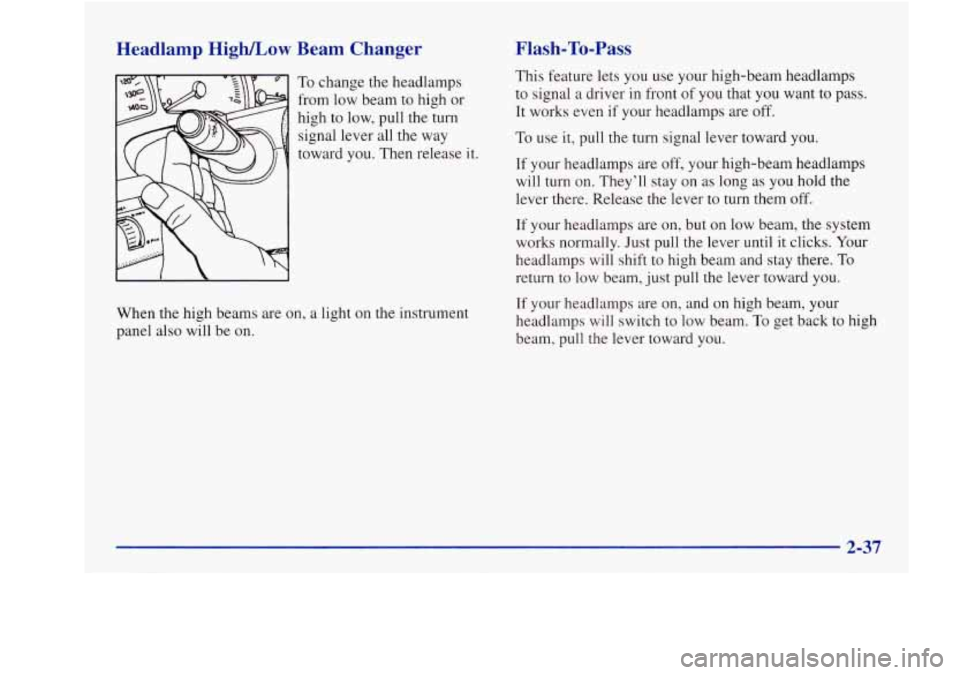
To change the headlamps
from low beam to high or
high to low, pull the turn
signal lever all
the way
toward you. Then release it.
When the high beams are on, a light on the instrument
panel also will be on.
Flash-To-Pass
This feature lets you use your high-beam headlamps
to signal a driver in front of you that you want to pass.
It works even if your headlamps are off.
To use it, pull the turn signal lever toward you.
If your headlamps are off, your high-beam headlamps
will turn on. They’ll stay on as long as you hold the
lever there. Release the lever to turn them off.
If your headlamps are on, but on low beam, the system
works normally. Just pull the lever until it clicks. Your
headlamps will shift
to high beam and stay there. To
return to low beam, just pull the lever toward you.
If your headlamps are
on, and on high beam, your
headlamps will switch
to low beam. To get back to high
beam, pull the lever toward you.
Page 151 of 380
@ Section 3 Comfort Controls and Audio Systems
In this section, you’ll find out how to operate the comfort control and audio systems offered with your vehicle. Be
sure to read about the particular systems supplied with your vehicle.
3-2 3-2
3-6
3-7 3-7
3-9
3-9
3- 10
3-10
3-11
3-11
Comfort Controls
Automatic Electronic Climate Control
Air Conditioning
Heating Ventilation System
Defogging and Defrosting
Rear Window Defogger
Passenger Temperature Control Steering
Wheel Controls for Climate Control
Audio Systems Setting
the Clock 3-11
3-18
3-21
3-23 3 -24
3 -24
3-25
3-26
3-26
3-27 AM-FM
Stereo with Cassette Tape and
Compact Disc Player with Automatic
Tone Control
Trunk Mounted CD Changer (Option)
Theft-Deterrent Feature
Audio Steering Wheel Controls
Understanding Radio Reception
Tips About Your Audio System
Care of Your Cassette Tape Player
Care of Your Compact Discs
Care of Your Compact Disc Player
Power Antenna Mast Care
Page 167 of 380
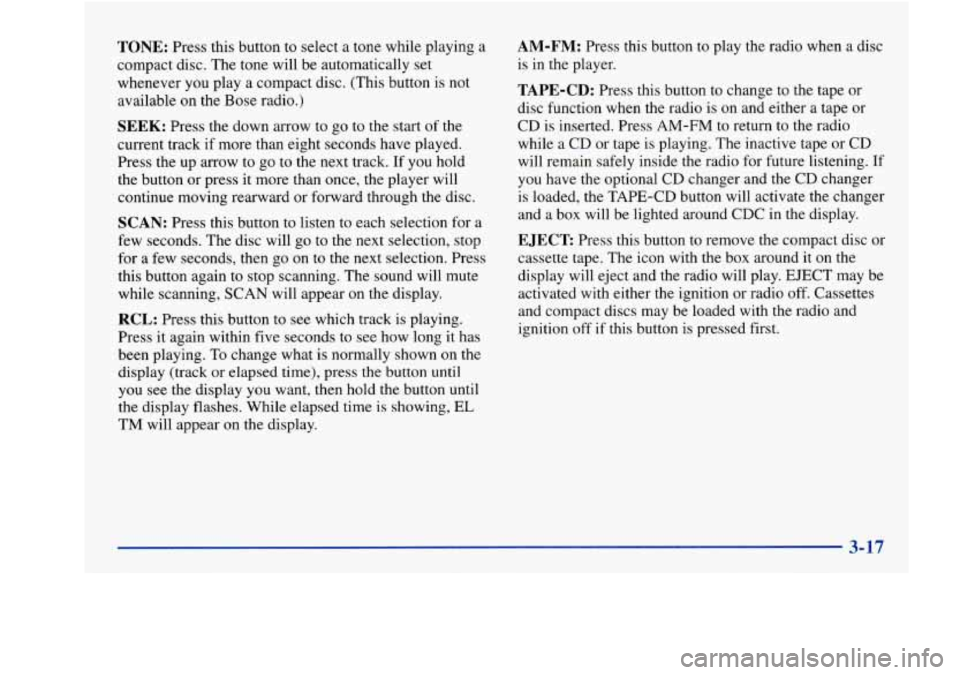
TONE: Press this button to select a tone while playing a
compact disc. The tone will be automatically set
whenever you play a compact disc. (This button is not
available on the Bose radio.)
SEEK: Press the down arrow to go to the start of the
current track if more than eight seconds have played.
Press the up arrow to go to the next track. If you hold
the button or press it more than once, the player will
continue moving rearward or forward through the disc.
SCAN: Press this button to listen to each selection for a
few seconds. The disc will go to the next selection, stop
for a few seconds, then go on to the next selection. Press
this button again to stop scanning. The sound will mute
while scanning, SCAN will appear on the display.
RCL: Press this button to see which track is playing.
Press it again within five seconds to see how long it has
been playing. To change what is normally shown on the
display (track or elapsed time), press the button until
you see the display you want, then hold the button until
the display flashes. While elapsed time is showing, EL
TM will appear on the display.
AM-FM: Press this button to play the radio when a disc
is in the player.
TAPE-CD: Press this button to change to the tape or
disc function when the radio is on and either a tape or
CD is inserted. Press AM-FM to return to the radio
while a CD or tape
is playing. The inactive tape or CD
will remain safely inside the radio for future listening. If
you have
the optional CD changer and the CD changer
is loaded, the TAPE-CD button will activate the changer
and a box will be lighted around CDC in the display.
EJECT Press this button to remove the compact disc or
cassette tape. The icon with the box around it on the
display will eject and the radio will play. EJECT may be
activated with either
the ignition or radio off. Cassettes
and compact discs may be loaded with the radio and
ignition
off if this button is pressed first.
Page 168 of 380
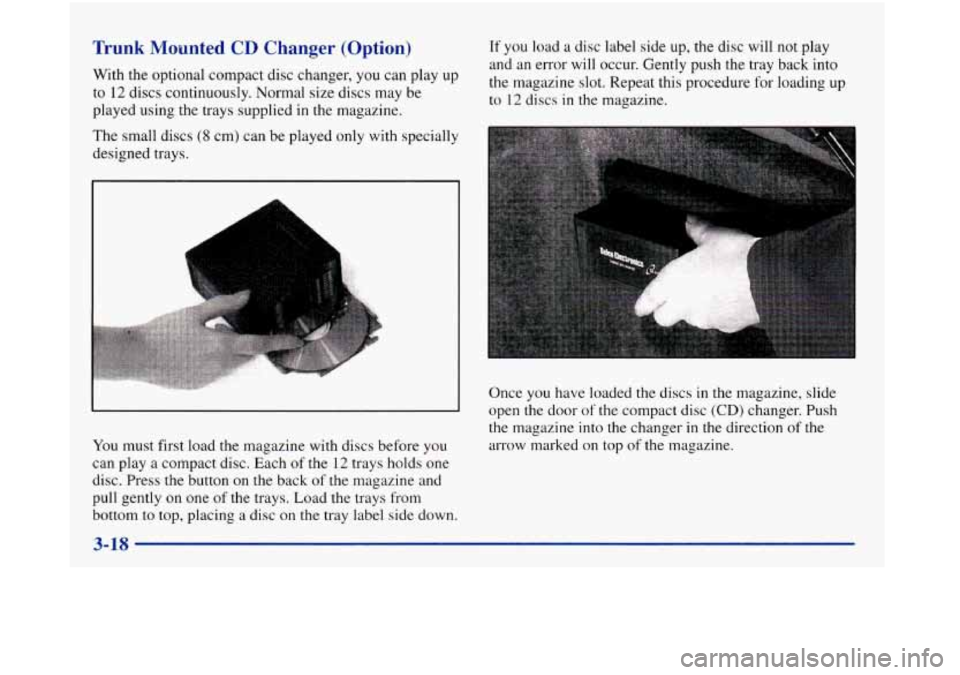
Trunk Mounted CD Changer (Option)
With the optional compact disc changer, you can play up
to 12 discs continuously. Normal size discs may be
played using the trays supplied in the magazine.
If you load a disc label side up, the disc will not play
and an error will occur. Gently push the tray back into
the magazine slot. Repeat this procedure for loading up
to 12 discs
in the magazine.
The small discs
(8 cm) can be played only with specially
designed trays.
You must first load the magazine with discs before you
can play a compact disc. Each of the 12 trays holds one
disc. Press the button on the back
of the magazine and
pull gently on one
of the trays. Load the trays from Once
you have loaded the discs
in the magazine, slide
open the door
of the compact disc (CD) changer. Push
the magazine into the changer
in the direction of the
arrow marked on top
of the magazine.
bottom to top, placing a disc on the tray label side down.
3-18
Page 169 of 380
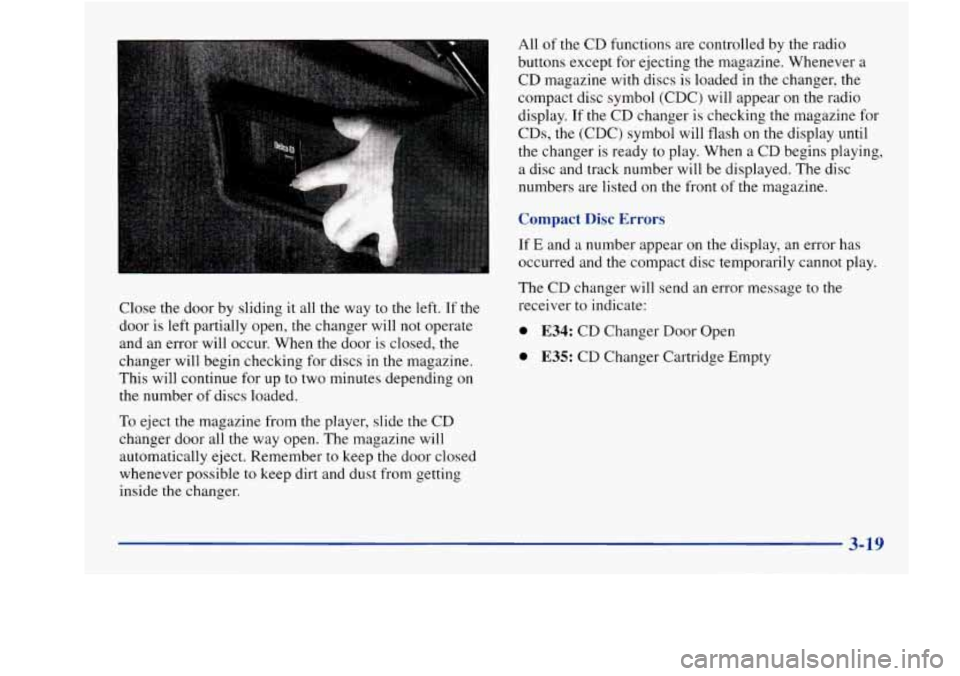
Close the door by sliding it all the way to the left. If the
door
is left partially open, the changer will not operate
and an error will occur. When the door is closed, the
changer will begin checking for discs in the magazine.
This will continue for up to two minutes depending on
the number of discs loaded.
To eject the magazine from the player, slide the CD
changer door all the way open. The magazine will
automatically eject. Remember to keep the door closed
whenever possible to keep dirt and dust from getting
inside the changer. All
of the
CD functions are controlled by the radio
buttons except for ejecting
the magazine. Whenever a
CD magazine with discs is loaded
in the changer, the
compact disc symbol (CDC) will appear on the radio
display. If the CD changer is checking the magazine for
CDs, the (CDC) symbol will flash on the display until
the changer is ready to play. When a CD begins playing,
a disc and track number will be displayed. The disc
numbers are listed on the front
of the magazine.
Compact Disc Errors
If E and a number appear on the display, an error has
occurred and the compact disc temporarily cannot play.
The CD changer will send an error message to the
receiver
to indicate:
0 E34: CD Changer Door Open
0 E35: CD Changer Cartridge Empty
3-19
Page 170 of 380
If the error occurred while trying to play a CD in the
compact disc player or changer, the following conditions
may have caused the error:
0
0
0
0
0
The road is too rough. The disc should play when the
road is smoother.
The disc is dirty, scratched, wet or upside down.
The air is very humid. If
so, wait about an hour and
try again.
The CD changer door
is open. Completely close the
door to restore normal operation.
An empty magazine is inserted in the CD changer.
Try the magazine again with a disc loaded on one of
the trays.
If any error occurs repeatedly or if
an error cannot be
corrected, please contact your retailer.
If your radio
displays an error number, write it down and provide it to
your retailer when reporting the problem.
Playing a Compact Disc
REV (1): Press and hold this button to quickly reverse
within a track.
As the CD reverses, elapsed time will be
displayed to help you find the correct passage.
FWD (2): Press and hold this button to quickly advance
within
a track. As the CD advances, elapsed time will be
displayed to help you find the correct passage.
PROG (3): Press this button to select the next disc in
the magazine. Each time
you press PROG, the disc
number on the radio display will go to that of the next
available CD. If a CD cannot be played, its number will
be skipped when selecting discs while using the
PROG button.
RANDOM (5): Press this button to enter the random
play mode.
RDM will appear on the display. While in
this mode, the tracks on the discs will be played in
random order.
If you press PROG or SEEK while in
the random mode, discs and tracks will be scanned
randomly. Press this button again to turn
off the random
feature and return to normal operation.
3-20
Page 171 of 380
RCL: Press this button to see what track is currently
playing. Press RCL again within five seconds to see how
long the track has been playing. EL TM will appear on
the display when in elapsed time mode. When a new
track starts to play, the track number will also appear.
Press RCL a third time and the time of day will
be displayed.
SEEK: Press the SEEK down arrow while playing a CD
to go back to the start of the current track if more than
eight seconds have played. If you press it again, the
changer will
go to previous tracks. Press the SEEK up
arrow and it will go to the next higher track on the disc.
SCAN: Press this button and release to listen to each
selection for a few seconds. The first
few seconds of
each selection on the current disc will be played. The
sound will mute while scanning and SCAN will appear
on the display. Press this button again to stop scanning.
P SCAN: Press and hold the SCAN button for two
seconds to hear the first selection of each loaded disc for
a few seconds. The sound will mute while scanning and
P SCAN will appear on the display. Press SCAN again
to stop scanning.
TAPEKD: Press this button to play a CD if you have a
magazine loaded
in the changer and the radio is playing.
To return to the radio while a CD is playing, press
AM-FM.
You can also press this button to switch
between a cassette tape, CD or the CD changer if all
three are loaded.
Theft-Deterrent Feature
THEFTLOCK@ is designed to discourage theft of your
radio. It works by using a secret code to disable all radio
functions whenever battery power is removed.
The THEFTLOCK feature for the radio may be used or
ignored. If ignored, the system plays normally and the
radio is not protected by the feature. If THEFTLOCK is
activated, your radio will not operate if stolen.
When THEFTLOCK is activated, the radio will display
LOC to indicate a locked condition anytime battery
power
is removed. If your battery loses power for any
reason, you must unlock the radio with the secret code
before it will operate.
Page 174 of 380
VOL: Press the up or down arrow to increase or
decrease volume.
SEEK: Press this button to tune to the next strong radio
station. When playing a cassette tape or compact disc,
press
SEEK to hear the next selection. There must be
at least a three-second gap between selections on a
cassette tape.
PROG: Press this button to tune in the next preset radio
station. When playing a cassette tape, press PROG to
hear the other side of a tape that is playing. When
listening to
a disc in the CD changer, press PROG to
select the next loaded disc.
Understanding Radio Reception
AM
The range for most AM stations is greater than for FM,
especially at night. The longer range, however, can
cause stations
to interfere with each other. AM can pick
up noise from things like storms and power lines. Try
reducing the treble to reduce this noise if
you ever get it.
FM Stereo
FM stereo will give you the best sound, but FM signals
will reach only about
10 to 40 miles (16 to 65 km). Tall
buildings or hills can interfere with
FM signals, causing
the sound to come and go.
Tips About Your Audio System
Hearing damage from loud noise is almost undetectable
until it
is too late. Your hearing can adapt to higher
volumes of sound. Sound that seems normal can be loud
and harmful to your hearing. Take precautions by
adjusting the volume control on your radio
to a safe
sound level before your hearing adapts to it.
To help avoid hearing
loss or damage:
0 Adjust the volume control to the lowest setting.
Increase volume slowly until you hear comfortably
and clearly.
3-24
Page 320 of 380
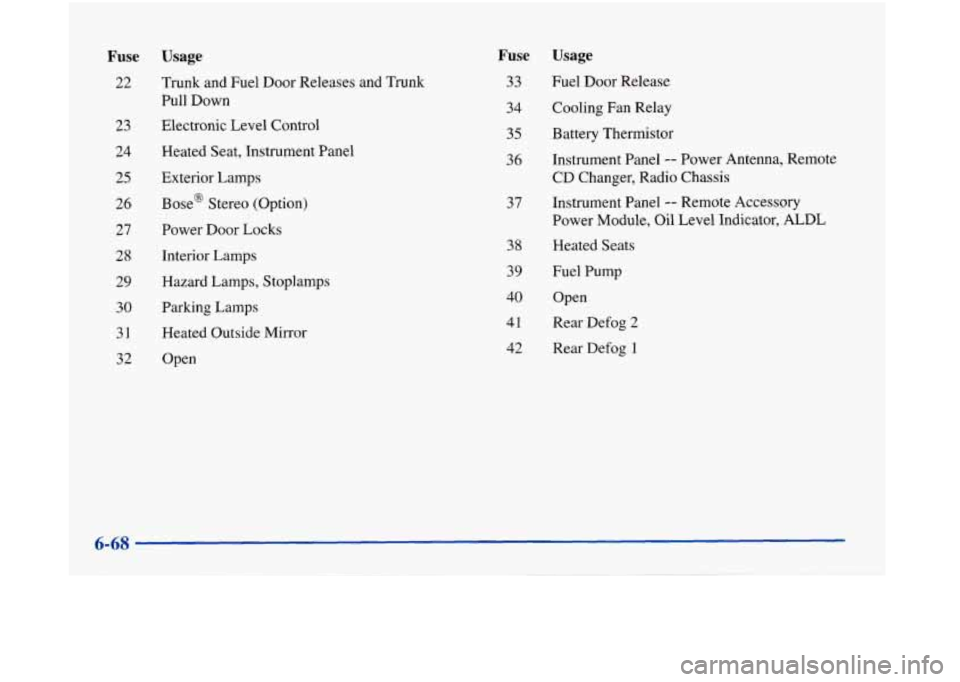
Fuse
22
23 24
25
26
27
28
29
30
31
32
Usage
Trunk and Fuel Door Releases and Trunk Pull Down
Electronic Level Control
Heated Seat, Instrument Panel Exterior Lamps
Base@ Stereo (Option)
Power Door Locks
Interior Lam]
Hazard Lamps, xoplamps
Parking Lamps
Heated Outside
Mirror
Open
Fuse Usage
33 Fuel Door Release
34 Cooling Fan Relay
35 Battery Thermistor
36 Instrument Panel
-- Power Antenna, Remote
CD Changer, Radio Chassis
Instrument Panel -- Remote Accessory
Power Module, Oil Level Indicator,
ALDL
37
38
39
40
41
42
Heated Seats
Fuel Pump
Open
Rear Defog
2
Rear Defog 1