turn signal Oldsmobile Aurora 1998 s User Guide
[x] Cancel search | Manufacturer: OLDSMOBILE, Model Year: 1998, Model line: Aurora, Model: Oldsmobile Aurora 1998Pages: 380, PDF Size: 19.75 MB
Page 192 of 380

Do nor get too close to the vehicle you want to
pass while you’re awaiting an opportunity. For one
thing, following too closely reduces your area of
vision, especially if you’re following a larger
vehicle. Also,
you won’t have adequate space if
the vehicle ahead suddenly slows or stops. Keep
back a reasonable distance.
When it looks like a chance to pass is coming up,
start to accelerate but stay in the right lane and don’t
get too close. Time your move
so you will be
increasing speed as the time comes to move into the
other lane. If the way is clear to pass, you will have
a “running start” that more than makes up for the
distance
you would lose by dropping back. And if
something happens to cause you to cancel your pass,
you need only slow down and drop back again and
wait for another opportunity.
If other cars are lined up to pass a slow vehicle, wait
your turn. But take care that someone isn’t trying to
pass you as
you pull out to pass the slow vehicle.
Remember to glance over your shoulder and check
the blind spot.
Check your mirrors, glance over your shoulder, and
start your left lane change signal before moving out
of the right lane to pass. When you are far enough
0
0
0
ahead of the passed vehicle to see its front in your
inside mirror, activate your right lane change signal
and move back into the right lane. (Remember that
your right outside mirror is convex. The vehicle you
just passed may seem to be farther away from you
than it really
is.)
Try not to pass more than one vehicle at a time
on two-lane roads. Reconsider before passing the
next vehicle.
Don’t overtake a slowly moving vehicle too rapidly.
Even though the brake lamps are not flashing, it may
be slowing down or starting to turn.
If you’re being passed, make it easy for the
following driver to get ahead of you. Perhaps you
can ease a little to the right.
Loss of Control
Let’s review what driving experts say about what
happens when the three control systems (brakes, steering
and acceleration) don’t have enough friction where the
tires meet the road to do what the driver has asked.
In any emergency, don’t give up. Keep trying to
steer and constantly seek an escape route
or area of
less danger.
Page 198 of 380

City Driving
One of the biggest problems with city streets is the
amount of traffic on them. You’ll want to watch out
for what the other drivers are doing and pay attention
to traffic signals. Here are ways to
increase your safety
in city driving:
0
0
0
Know the best way to get to where you are
going. Get a city map and plan your trip into an
unknown part
of the city just as you would for a
cross-country trip.
Try to use the freeways that rim and crisscross
most large cities. You’ll save time and energy. (See
the next
part, “Freeway Driving.”)
Treat a green light as a warning signal.
A traffic
light is there because the corner is busy enough to
need
it. When a light turns green, and just before you
start to move, check both ways for vehicles that have
not cleared the intersection or may be running the
red light.
4-20
Page 199 of 380
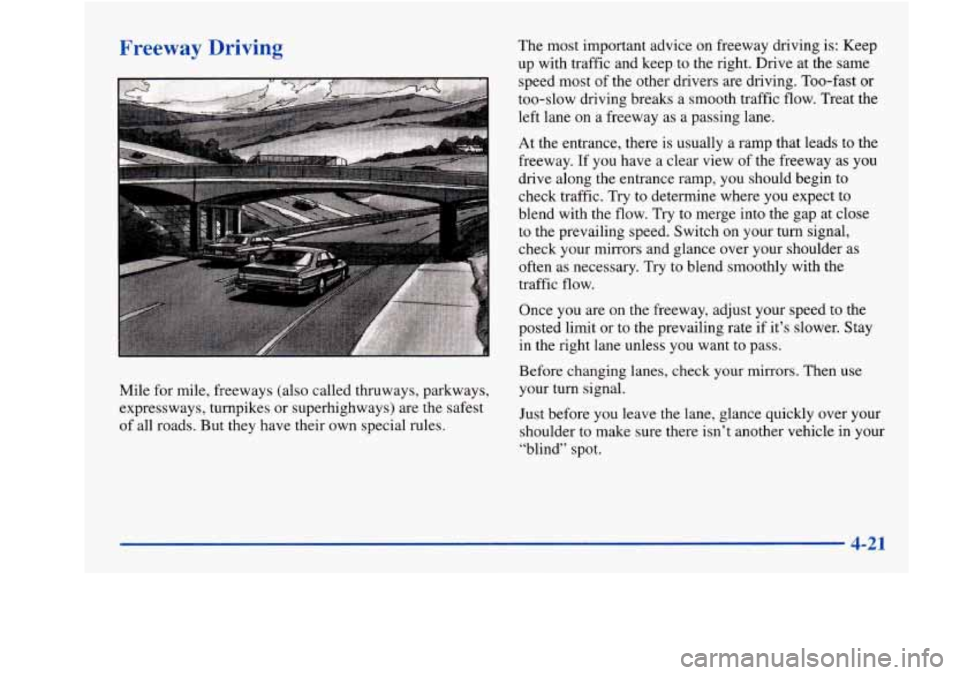
Freeway Driving The most important advice on freeway driving is: Keep
up with traffic and keep to the right. Drive at the same
speed most of the other drivers
are driving. Too-fast or
too-slow driving breaks a smooth traffic flow. Treat the
left lane on a freeway as a passing lane.
At the entrance, there is usually a ramp that leads to the
freeway. If you have a clear view
of the freeway as you
drive along the entrance ramp, you should begin to
check traffic. Try to determine where you expect
to
blend with the flow. Try to merge into the gap at close
to the prevailing speed. Switch on your turn signal,
check your mirrors and glance over your shoulder as
often as necessary. Try to blend smoothly with the
traffic flow.
Once you are
on the freeway, adjust your speed to the
posted limit or to the prevailing rate if it’s slower. Stay
in the right lane unless you want to pass.
Mile
for mile, freeways (also called thruways, parkways,
expressways, turnpikes or superhighways) are the safest
of all roads. But they have their own special rules. Before changing
lanes, check your mirrors.
Then use
your turn signal.
Just before you leave the lane, glance quickly over your
shoulder to make sure there isn’t another vehicle in your
“blind” spot.
4-21
Page 214 of 380
Making Turns
I NOTICE: 1
Making very sharp turns while trailering could
cause the trailer to come in contact with the
vehicle. Your vehicle could be damaged. Avoid
making very sharp turns while trailering.
When you’re turning with a trailer, make wider
turns than normal.
Do this so your trailer won’t
strike soft shoulders, curbs, road signs, trees or other
objects. Avoid jerky or sudden maneuvers. Signal
well in advance.
Tbrn Signals When Towing a Trailer
The green arrows on your instrument panel will flash
whenever you signal a turn or lane change. Properly
hooked up, the trailer lamps will also flash, telling other
drivers you’re about to turn, change lanes or stop.
When towing a trailer, the green arrows on your
instrument panel will flash for turns even if the bulbs on
the trailer are burned out. Thus, you may think drivers behind
you are seeing your signal when they
are not. It’s
important to check occasionally to be sure the trailer
bulbs are still working.
Your vehicle may have bulb warning messages. When
you plug a trailer lighting system into your vehicle’s
lighting system, its bulb warning messages may not let
you know if one
of your lamps goes out. So, when you
have a trailer lighting system plugged in, be sure to
check your vehicle and trailer lamps from time to time
to be sure they’re all working. Once you disconnect the
trailer lamps, the bulb warning messages again can tell
you if one of your vehicle lamps is out.
Driving On Grades
Reduce speed and shift to a lower gear before you start
down a long or steep downgrade.
If you don’t shift
down, you might have to use your brakes
so much that
they would get hot and no longer work well.
Parking on Hills
You really should not park your vehicle, with a trailer
attached, on a hill. If something goes wrong, your rig
could start
to move. People can be injured, and both
your vehicle and the trailer can be damaged.
4-36
Page 218 of 380

Hazard Warning Flashers
Your hazard warning flashers let you warn others. They
also let police know you have a problem. Your front and
rear turn signal lamps will flash on and
off.
... .. ‘-... ...*....... * .... >::*.’.!:*.-....-:.:: ..*,. .... .. ..,.. .... Press down on the button - . - . - . . - . . . , - .
1
The HAZARD light on the
instrument panel will also
HAZARD A I
come on.
Your hazard flashers work
I
no matter what position
your key is in, and even if
the key isn’t in.
To turn off the flashers, press the button down again.
When the flashers are on, your turn signals won’t work.
5-2
Page 285 of 380
Bulb Replacement
For any bulb changing procedure not listed in this
section, contact your retailer’s service department.
For the type of bulb to use, see “Replacement Bulbs” in
the Index.
Halogen Bulbs
‘ A CAUTION:
A
Exterior Front Bulbs
1
Halogen bulbs have pressurized gas inside and
can burst if you drop or scratch the bulb. You or
others could be injured. Be sure to read and
follow the instructions on the bulb package.
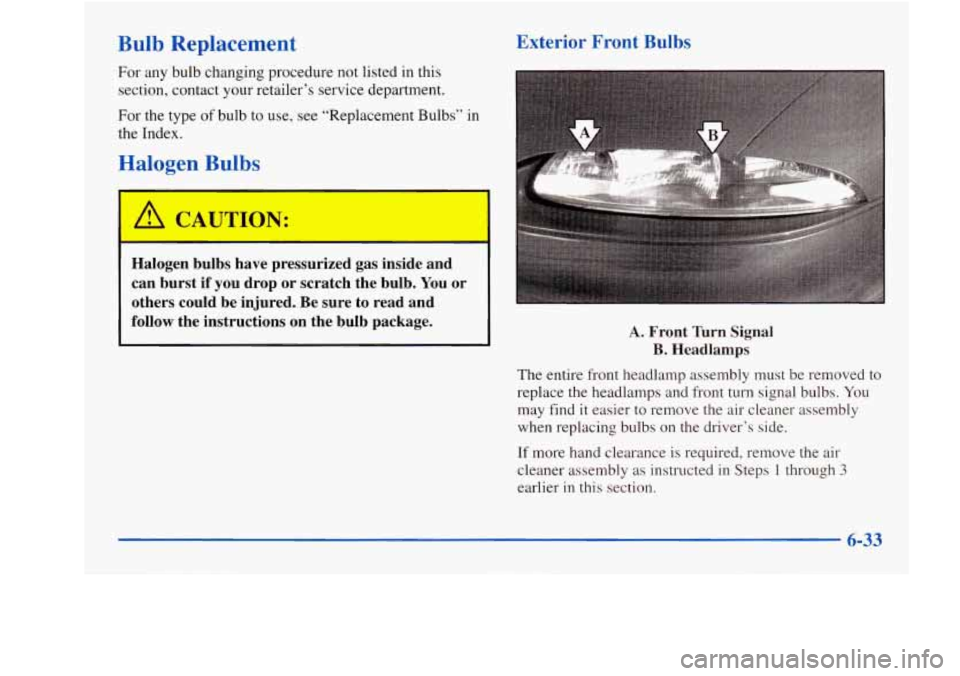
A. Front Turn Signal
B. Headlamps
The entire front headlamp assembly must be removed to
replace
the headlamps and front turn signal bulbs. You
may find it easier
to remove the air cleaner assembly
when replacing bulbs on
the driver’s side.
If more hand clearance is required, remove the air
cleaner assembly as instructed in Steps 1 through
3
earlier in this section.
6-33
Page 287 of 380
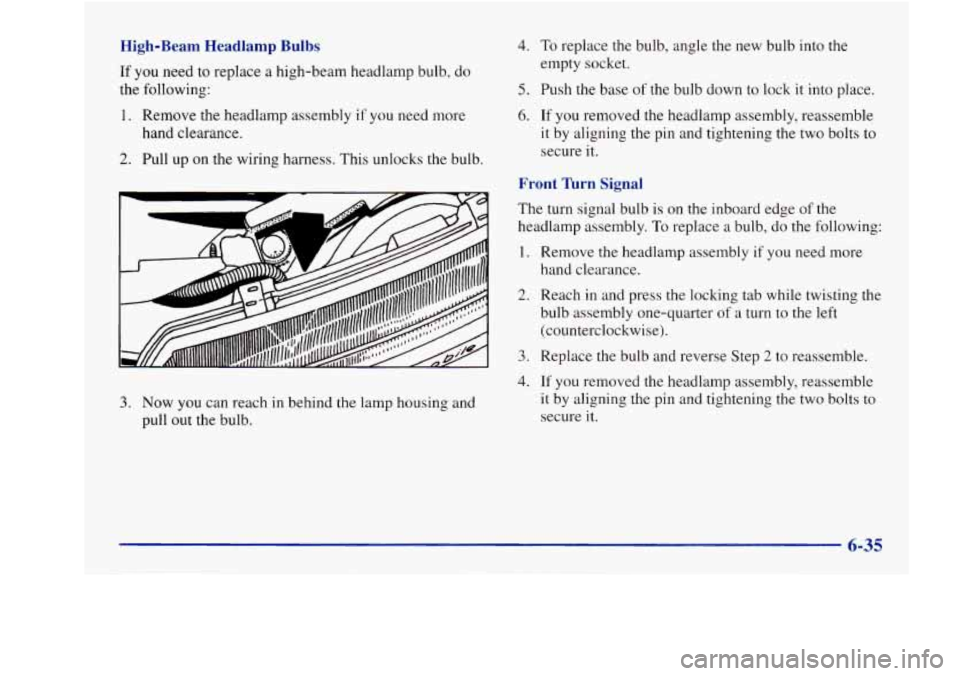
High-Beam Headlamp Bulbs
If you need to replace a high-beam headlamp bulb, do
the following:
1. Remove the headlamp assembly if you need more
hand clearance.
2. Pull up on the wiring harness. This unlocks the bulb.
1.
4. To replace the bulb, angle the new bulb into the
empty socket.
5. Push the base of the bulb down to lock it into place.
6. If you removed the headlamp assembly, reassemble
it by aligning the pin and tightening the two bolts
to
secure it.
Front Turn Signal
The turn signal bulb is on the inboard edge of the
headlamp assembly.
To replace a bulb, do the following:
2.
3.
4.
3. Now you can reach in behind the lamp housing and
pull out the bulb. Remove
the headlamp assembly
if you need more
hand clearance.
Reach in and press the locking tab while twisting the
bulb assembly one-quarter
of a turn to the left
(counterclockwise).
Replace the bulb and reverse Step
2 to reassemble.
If you removed the headlamp assembly, reassemble
it by aligning the pin and tightening
the two bolts to
secure it.
6-35
Page 292 of 380
Back-up Lamps
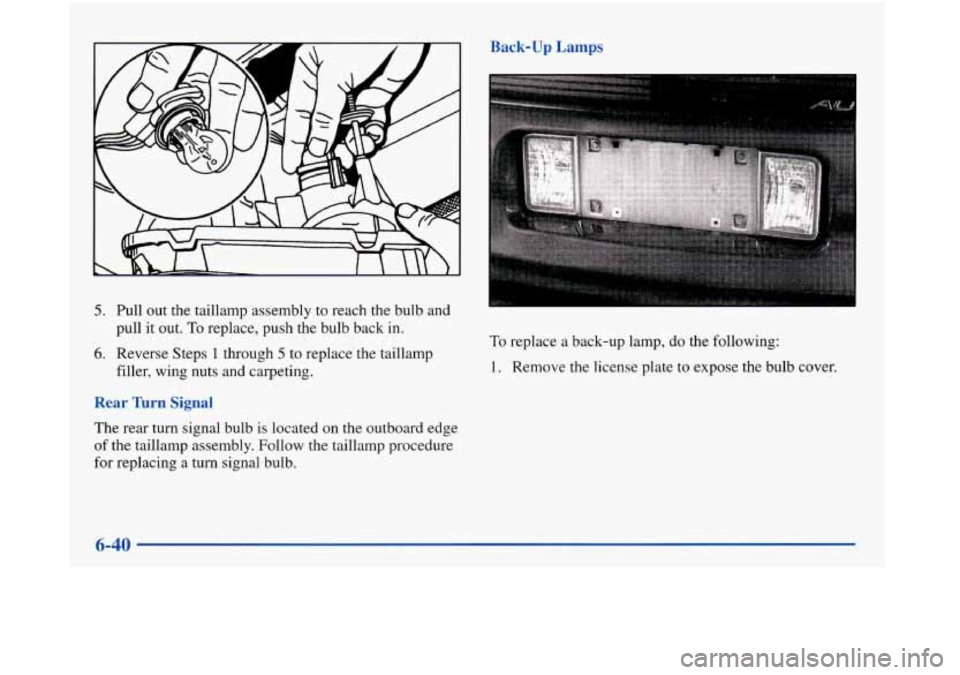
5. Pull out the taillamp assembly to reach the bulb and
pull it out.
To replace, push the bulb back in.
6. Reverse Steps 1 through 5 to replace the taillamp
filler, wing nuts and carpeting.
Rear lhrn Signal
The rear turn signal bulb is located on the outboard edge
of the taillamp assembly. Follow the taillamp procedure
for replacing a turn signal bulb.
To replace a back-up lamp, do the following:
1. Remove the license plate to expose the bulb cover.
6-40
Page 315 of 380
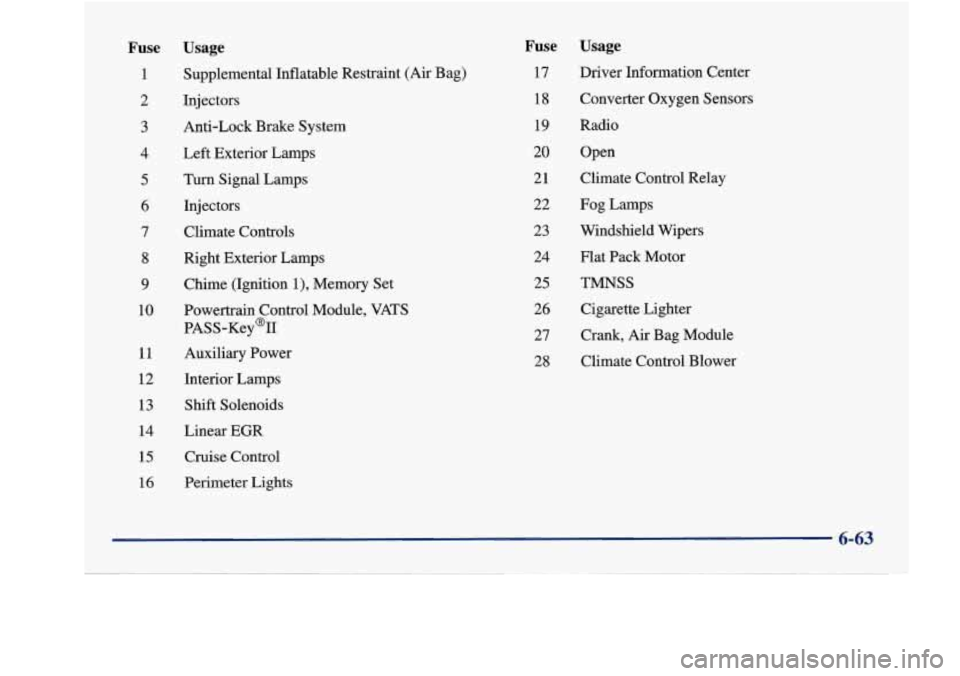
Fuse Usage
1 Supplemental Inflatable Restraint (Air Bag)
2
3
4
5
6
7
Injectors
Anti-Lock Brake System
Left Exterior Lamps Turn Signal Lamps
Injectors Climate Controls
8 Right Exterior Lamps
9 Chime (Ignition l), Memory Set
10 Powertrain Control Module, VATS
PASS-Key@II
11 Auxiliary Power
12
13
14
15
16
Interior Lamps Shift Solenoids
Linear
EGR
Cruise Control
Perimeter Lights
Fuse
17 18
19
20
21 22
23
24
25
26 27
28
Usage
Driver Information Center
Converter Oxygen Sensors
Radio Open
Climate Control Relay
Fog Lamps
Windshield Wipers
Flat Pack Motor
TMNSS
Cigarette Lighter
Crank,
Air Bag Module
Climate Control Blower
6-63
Page 322 of 380
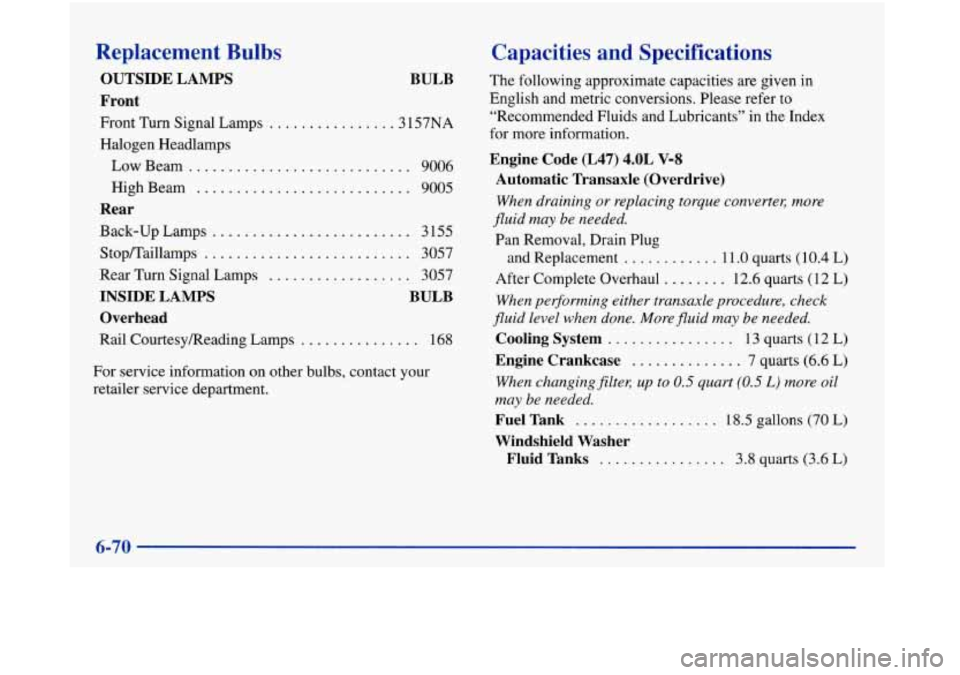
Replacement Bulbs
BULB
OUTSIDE LAMPS
Front
Front
Turn Signal Lamps ............... .3 157NA
Halogen Headlamps
Low Beam
............................ 9006
High Beam
........................... 9005
Rear
Back-up Lamps ......................... 3 155
StopKaillamps
.......................... 3057
Rear
Turn Signal Lamps .................. 3057
INSIDE LAMPS BULB
Overhead
Rail CourtesyReading Lamps ............... 168
For service information on other
bulbs, contact your
retailer service department.
Capacities and Specifications
The following approximate capacities are given in
English and metric conversions. Please refer to
“Recommended Fluids and Lubricants” in the Index
for more information.
Engine Code (L47) 4.0L V-8
Automatic Transaxle (Overdrive)
When draining or replacing torque converteq more
fluid may be needed.
Pan Removal, Drain Plug
and Replacement
............ 11 .O quarts (10.4 L)
After Complete Overhaul
........ 12.6 quarts (12 L)
When per$orming either transaxle procedure, check
fluid level when done. More fluid may be needed.
Cooling System ................ 13 quarts (12 L)
Engine Crankcase .............. 7 quarts (6.6 L)
When changingfllteq up to 0.5 quart (0.5 L) more oil
may be needed.
Fuel Tank .................. 18.5 gallons (70 L)
Windshield Washer
Fluid Tanks
................ 3.8 quarts (3.6 L)
6-70