cooling OLDSMOBILE AURORA 2003 User Guide
[x] Cancel search | Manufacturer: OLDSMOBILE, Model Year: 2003, Model line: AURORA, Model: OLDSMOBILE AURORA 2003Pages: 387, PDF Size: 18.05 MB
Page 264 of 387

Cooling System
When you decide it’s safe to lift the hood, here’s what
you’ll see:
A. Coolant Surge Tank with Pressure Cap
S. Two Electric Engine Cooling Fans
I
An electric engine cooling fan under the hood
can start up even when the engine is not
running and can injure you.
Keep hands,
clothing and tools away from any underhood
electric fan.
5-31
ProCarManuals.com
Page 265 of 387

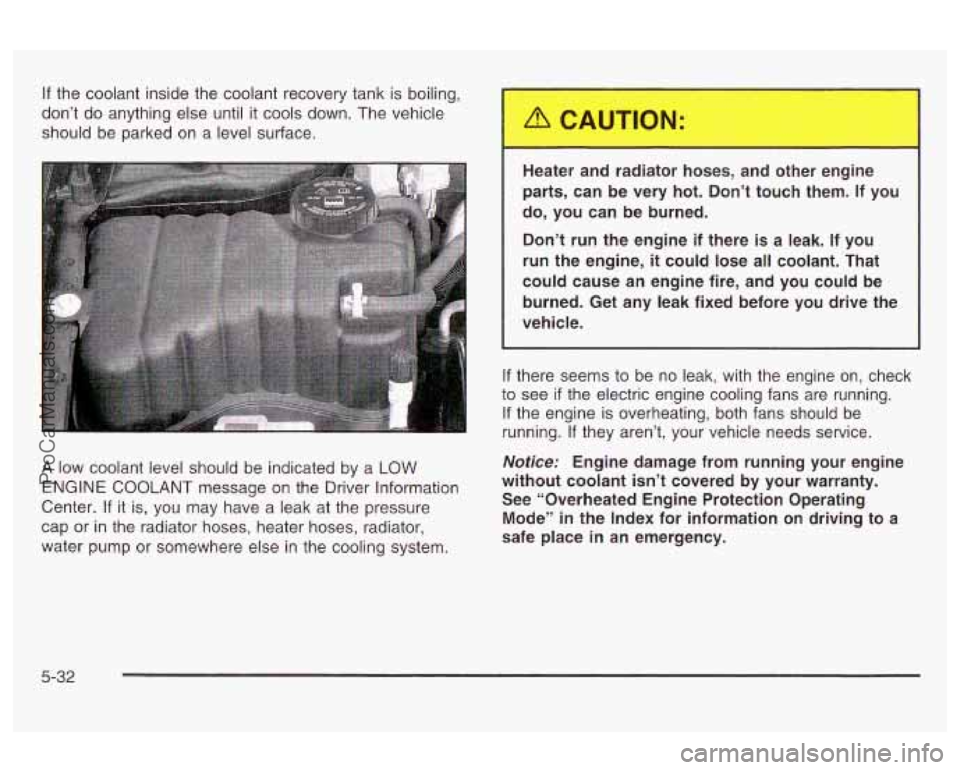
If the coolant inside the coolant recovery tank is boiling,
don’t do anything else until it cools down. The vehicle
should be parked on a level surface.
A low coolant level should be indicated by a LOW
ENGINE COOLANT message on the Driver Information
Center.
If it is, you may have a leak at the pressure
cap or
in the radiator hoses, heater hoses, radiator,
water pump or somewhere else in the cooling system. Heater
and radiator hoses, and other engine
parts, can be very hot. Don’t touch them.
If you
do, you can be burned.
Don’t run the engine if there is a leak. If you
run the engine,
it could lose all coolant. That
could cause an engine fire, and you could be
burned. Get any leak fixed before you drive the
vehicle.
If there seems to be no leak, with the engine on, check
to see
if the electric engine cooling fans are running.
If the engine is overheating, both fans should be
running.
If they aren’t, your vehicle needs service.
Notice: Engine damage from running your engine
without coolant isn’t covered by your warranty.
See “Overheated Engine Protection Operating
Mode’’ in the Index for information on driving to a
safe place
in an emergency.
5-32
ProCarManuals.com
Page 266 of 387

Notice: When adding coolant, it is important that
you use only
DEX-COOL@ (silicate-free) coolant.
If coolant other than DEX-COOL is added to
the system, premature engine, heater core or radiator corrosion may result. In addition, the engine
coolant will require change sooner
- at 30,000 miles
(50 000 km) or 24 months, whichever occurs first.
Damage caused by the use of coolant other
than DEX-COOL@
is not covered by your new vehicle
warranty.
How to Add Coolant to the Coolant
Surge Tank
If you haven’t found a problem yet, check to see if
coolant is visible in the surge tank. If coolant is visible
but the coolant level isn’t at or above the
FULL COLD fill
mark line (4.5 inches (1 1 cm) from the top of the filler
neck), add a
50/50 mixture of clean, drinkable water and
DEX-COOL@ coolant at the coolant surge tank, but be
sure the cooling system, including the coolant surge tank
Coolant on page 5-24 for more information.
If no coolant is visible in the surge tank, add coolant as
follows:
nrmnnl~vn rr-n ;r. rrnnl hnfnm Irntl An it Cnn Enn;nn pIcIaauIcI uuy, Id vvvl UcIIUIb yvu uv IL. UcIU LIlylf ICI
Steam and scalding Ii ids from a hot cooling
system can blow out and burn you badly. They
are under pressure, and
if you turn the coolant
surge tank pressure cap -- even a little -- they
can come out at high speed. Never
turn the
cap when the cooling system, including the
coolant surge tank pressure cap, is hot. Wait
for the cooling system and coolant surge tank
pressure cap to cool if you ever have to turn
the pressure cap.
5-33
ProCarManuals.com
Page 267 of 387

1 Adding only plain water to your cooling
system can be dangerous. Plain water, or
some other liquid such as alcohol, can boil before the proper coolant mixture will. Your
vehicle’s coolant warning system is set for the proper coolant mixture.
CAUTION: (Continued)
I I
With plain water or the wrong mixture, your
engine could get too hot
but you wouldn’t get
the overheat warning. Your engine could catch
fire and you or others could be burned. Use a
50/50 mixture of clean, drinkable water and
DEX COOL@ coolant.
Notice: In cold weather, water can freeze and crack
the engine, radiator, heater core and other parts.
Use the recommended coolant and the proper
coolant
IT-:-’=- e.
You can be burned if you spill coolant on hot
engine parts. Coolant contains ethylene glycol and
it will burn if the engine parts are hot
enough. Don’t spill coolant on a hot engine.
5-34
ProCarManuals.com
Page 268 of 387

1. Park the vehicle on a level surface. You can
remove the coolant surge tank pressure cap
when the cooling system, including the coolant
surge tank pressure cap and upper radiator hose,
is
no longer hot. Turn the pressure cap slowly
counterclockwise (left) about one-quarter turn and
tnen stop.
If you hear a hiss, wait for that to stop.
A hiss
means there
is still some pressure left.
2. Then keep turning the
pressure cap slowly,
and remove
it.
3. Then fill the coolant
surge tank with the
proper mixture, to the
FULL COLD fill
mark line (4.5 inches
(1 1 cm) from the top of
the filler neck).
5-35
ProCarManuals.com
Page 269 of 387

4. With the coolant surge tank pressure cap off, start
the engine and let
it run until you can feel the upper
radiator hose getting hot. Watch out for the
engine cooling fans.
By this time, the coolant level inside the coolant
surge tank may be lower.
If the level is lower, add
more of the proper mixture to the coolant surge
tank until the level reaches about
4.5 inches
(1 1 cm) from the top of the filler neck.
5. Then replace the pressure cap. Be sure the arrow
on the pressure cap lines up like this.
5-36
ProCarManuals.com
Page 302 of 387

If you need to replace any of your wheels, wheel bolts
or wheel nuts, replace them only with new GM
original equipment parts. This way, you will be sure to
have the right wheel, wheel bolts and wheel nuts
for your vehicle.
Using the wrong replacement wheels, wheel
bolts or wheel nuts on your vehicle can be
dangerous.
It could affect the braking and
handling of your vehicle, make your tires lose
air and make you lose control. You could have
a collision in which you or others could be
injured. Always use the correct wheel, wheel
bolts and wheel nuts for replacement.
Notice: The wrong wheel can also cause problems
with bearing life, brake cooling, speedometer or
ociometer caiibration, neaaiamp aim, bumper neigh,
vehicle ground clearance and tire or tire chain
clearance to the body and chassis.
Used Rep'-cement '"'heels
--
Putting a used wheel on your vehicle is
dangerous. You can't know how it's been used
or how far it's been driven. It could fail
suddenly and cause a crash.
If you have to
replace a wheel, use a new
GM original
equipment wheel.
See
Changing a Flat Tire on page 5-71 for more
information.
5-69
ProCarManuals.com
Page 327 of 387

Relays 27
28
29 30
31
32
33
34
35
36
37
38
39
40 Usage
High-Beam Headlamp
Low-Beam Headlamp
Fog Lamps
Daytime Running Lamps
Horn
Air Conditioner Clutch
HVAC Solenoid
Accessory
Air Pump
Starter
1
Cooling Fan 1
Ignition 1
Cooling Fan Series/Parallel
Cooling Fan 2 Circuit
Breakers
41
Fuses 42
43
44
45
46
47
48
49
50
51
52
53 Usage
Starter
Usage
Not Used Empty
ABS
Air Pump A
Cooling Fan
1
Cooling Fan 2
Spare
Spare
Spare
Spare
Spare Fuse Puller
5-94
ProCarManuals.com
Page 333 of 387

Capacities and Specifications
The following approximate capacities are given in
English and metric conversions. Please refer to Part
D:
Recommended Fluids and Lubricants on page 6- 15
for more information.
Capacities
I I Capacities
Application Metric
English
I Automatic Transaxle I 11 quarts I 10.4 L
I Engine Cooling System 13.0 quarts 12.3 L
Engine Oil with Filter
All capacities are approximate. When adding, be sure to fill to the appropriate level, as recommended in this
140
N*m 100 Ib-ft
Wheel Nut Torque
1.0 kg
2.2 Ibs
Air Conditioning Refrigerant R134a
70.0 L 18.5 gallons
Fuel
Tank 6.7 L
7.0 quarts
manual.
Engine Specifications
Engine Firing Order
Spark Plug Gap
Transmission
Vin Code
~ ~___~~____~~
va (~47) 1-2-7-3-4-5-6-8 0.050 inch
(1.27 mm)
Automatic
C
5-1
00
ProCarManuals.com
Page 336 of 387

Section 6 Maintenance Schedule
~~~ ~~
Maintenance Schedule ...................................... 6.2 At Least Once a Year ................................... 6.10
Introduction
................................................... 6.2 Part C: Periodic Maintenance Inspections ......... 6.13
Your Vehicle and the Environment
.................... 6-2 Steering, Suspension and Front Drive Axle
Maintenance Requirements
.............................. 6.2 Boot and Seal Inspection ............................ 6.13
How This Section is Organized
......................... 6.3
Exhaust System Inspection ............................ 6.13
Part A: Scheduled Maintenance Services ........... 6.4
Using Your Maintenance Schedule
, 6.4 Fuel System Inspection
6.13
Scheduled Maintenance Engine Cooling System Inspection
6.14
...................... ...... 6.5
Part
B: Owner Checks and Services 6-9 Throttle
System Inspection 6.14
At Each Fuel Fill
............................................ 6.9 Brake System Inspection 6.14
At Least Twice a Year
................................... 6.10 Part E: Maintenance Record ........................... 6.16
.................................. .......... ...... ...................
............................. ................. ................................
At Least Once a Month ................................... 6.9 Part D: Recommended Fluids and Lubricants .... 6-15
6- 1
ProCarManuals.com