fuse OLDSMOBILE BRAVADA 1996 Owners Manual
[x] Cancel search | Manufacturer: OLDSMOBILE, Model Year: 1996, Model line: BRAVADA, Model: OLDSMOBILE BRAVADA 1996Pages: 340, PDF Size: 17.49 MB
Page 7 of 340

L
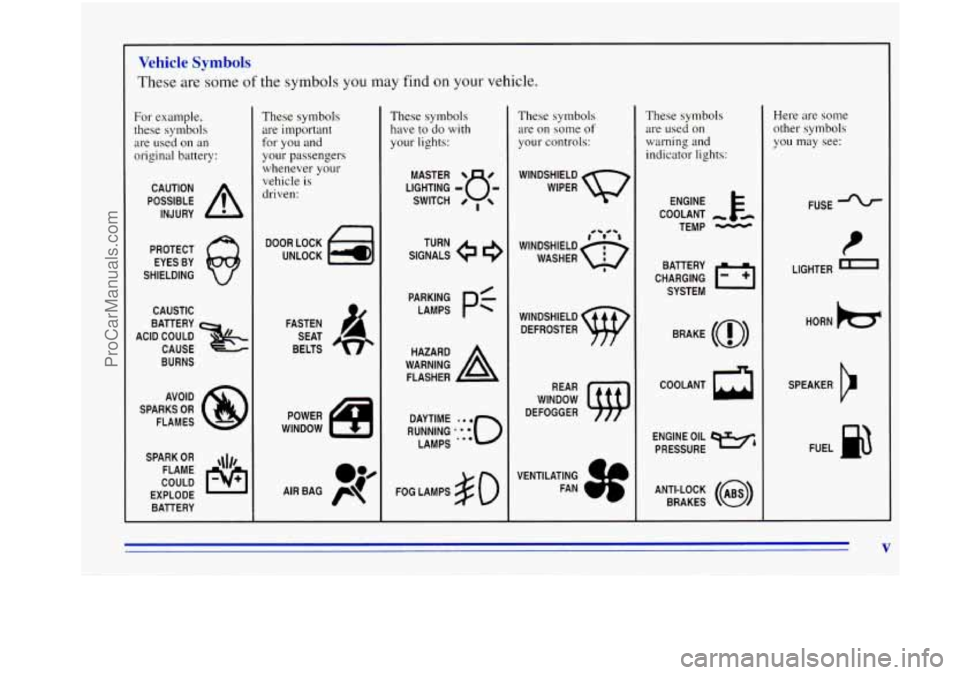
Vehicle Symbols
These are some of the symbols you may find on your vehicle.
For example,
these symbols are used on an
original battery:
POSSIBLE A
CAUTION
INJURY
PROTECT EYES BY
SHIELDING
CAUSTIC
ACID COULD BATTERY
CAUSE
BURNS
AVOID
SPARKS
OR
FLAMES
SPARK
OR ,\I/,
COULD FLAME
EXPLODE BATTERY
These symbols are important
for you and
your passengers whenever your
vehicle is
driven:
DOOR LOCK
UNLOCK
FASTEN SEAT
BELTS
These symbols have
to do with
your lights:
SIGNALS e
TURN
RUNNING
.'*'**o
DAYTIME LAMPS
'**
FOG LAMPS $0
These symbols
are on some of
your controls:
WINDSHIELD
WIPER
WINDSHIELD DEFROSTER
VENTILATING FAN
These symbols are used on
warning and
indicator lights:
ENGINE c
COOLANT - r-
TEMP -
CHARGING I-1
BATTERY
SYSTEM
BRAKE
(@)
COOLANT a
ENGINE OIL e,
PRESSURE
ANTI-LOCK
(@)
BRAKES
Here are some other symbols
you may see:
FUSE
LIGHTER
n
HORN b
SPEAKER
b
FUEL e3
V
ProCarManuals.com
Page 77 of 340

As you signal a turn or a lane change, if the arrows don’t
flash but just stay on,
a signal bulb may be burned out
and other drivers won’t see your turn signal.
If a bulb is burned out, replace it to help avoid an
accident. If the arrows don’t go on at all when you
signal
a turn, check the fuse (see “Fuses and Circuit
Breakers” in the Index) and for burned-out bulbs.
If you have a trailer towing option with added wiring for
the trailer lamps,
a different turn signal flasher is used.
With this flasher installed, the signal indicator will flash
even if
a turn signal bulb is burned out. Check the front
and rear turn signal lamps regularly to make sure they
are working.
Headlamp HighLow Beam Changer
To change the headlamps from low beam to high or high
to low, pull the multifunction lever all the way toward
you. Then release
it.
When the high beams are
on, this indicator light on
the instrument panel will
also be on.
2-25
ProCarManuals.com
Page 95 of 340

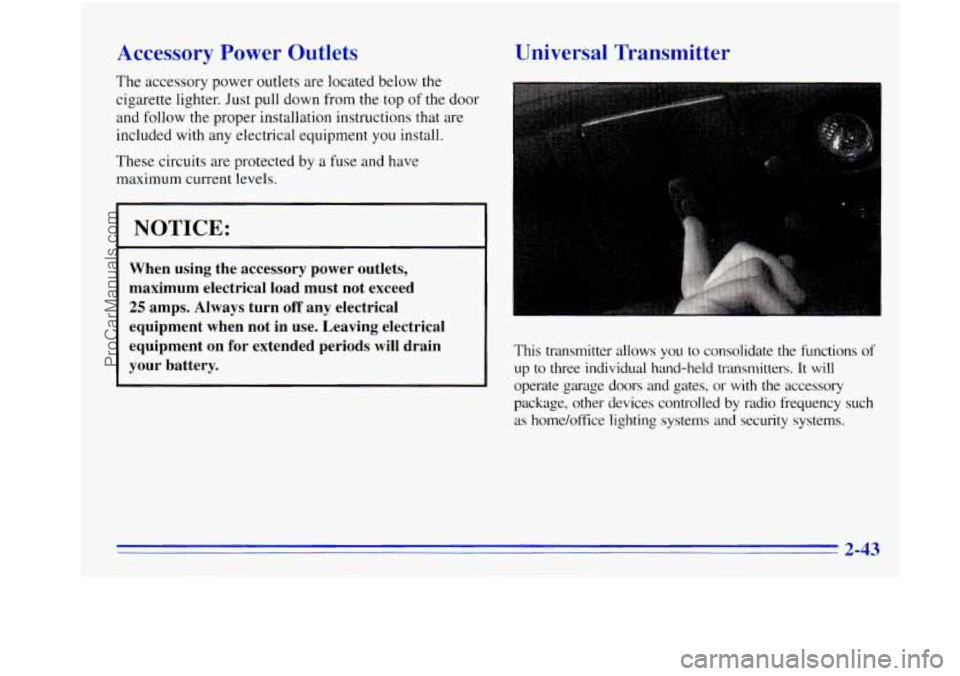
Accessory Power Outlets
The accessory power outlets are located below the
cigarette lighter. Just pull down from the top
of the door
and follow the proper installation instructions that are
included with any electrical equipment
you install.
These circuits are protected by a fuse and have
maximum current levels.
I NOTICE: 1
When using the accessory power outlets,
maximum electrical load must not exceed
25 amps. Always turn off any electrical
equipment when not in use. Leaving electrical
equipment on for extended periods
will drain
your battery.
Universal Transmitter
This transmitter allows you to consolidate the functions of
up to three individual hand-held transmitters. It will
operate garage doors and gates, or with the accessory
package, other devices controlled by radio frequency such
as home/office lighting systems and security systems.
ProCarManuals.com
Page 143 of 340

0
0
0
L
Cargo on the load floor piled higher than
the seatbacks can be thrown forward
during a sudden stop. You or your
passengers could be injured. Keep cargo
below the top of the seatbacks.
Unsecured cargo on the load floor can
be tossed about when driving over rough
terrain. You or your passengers can
be struck by flying objects. Secure the
cargo properly.
Heavy loads on the roof raise the vehicle’s
center
of gravity, making it more likely to
roll over. You can be seriously or fatally
injured if the vehicle rolls over. Put heavy
loads inside the cargo area, not on the roof.
Keep cargo in the cargo area as far forward
and low as possible.
You’ll find other important information in this manual.
See “Vehicle Loading,” “Luggage Carrier” and “Tires”
in the Index.
Environmental Concerns
Off-road driving can provide wholesome and satisfying
recreation. However,
it also raises environmental
concerns. Oldsmobile recognizes these concerns
and
urges every off-roader to follow these basic rules for
protecting the environment:
0
0
0
0
0
Always use established trails, roads and areas that
have been specially set aside for public off-road
recreational driving: obey
all posted regulations.
Avoid any driving practice that could damage the
environment
-- shrubs. flowers, trees, grasses -- or
disturb wildlife (this includes wheel-spinning.
breaking down trees
or unnecessary driving through
streams or over soft ground).
Always carry
a litter bag . . . make sure all refuse is
removed from any campsite before leaving.
Take extreme care
with open fires (where permitted),
camp stoves and lanterns.
Never park your vehicle over dry grass or other
combustible materials that could catch
fire from the
heat of the vehicle‘s exhaust system.
ProCarManuals.com
Page 180 of 340

Trailer Wiring Harness
The light duty trailer wiring is a six-wire harness
assembly. The optional heavy duty trailer wiring is an
eight-wire harness assembly. The harnesses are stored
under the vehicle, on the driver’s side corner frame
crossmember. The heavy duty trailer wiring
has a
30-amp feed wire with an inline fuse located by the
junction block. See “Fuses and Circuit Breakers”
in the
Index. Both harnesses have no connector and should be
wired by a qualified electrical technician. The technician
can use the following color code chart when connecting
the wiring harness to your trailer.
0 DARK BLUE: Use for electric trailer brakes or
auxiliary wiring.
0 RED: Use for battery charging; it connects to the
starter solenoid (eight-wire harness only).
0 LIGHT GREEN: Back-up lamps (eight-wire
harness only).
BROWN: Taillamps and parking lamps.
YELLOW: Left stoplamp and turn signal.
DARK GREEN: Right stoplamp and turn signal.
WHITE (Heavy Gage): Ground wire.
WHITE (Light Gage): Auxiliary stoplamp.
Securely attach the harness to the trailer, then tape or
strap
it to your vehicle’s frame rail. Be sure you leave it
loose enough
so the wiring doesn’t bend or break, but
not
so loose that it drags on the ground. Store the
harness
in its original place. Wrap the harness together
and tie
it neatly so it won’t be damaged.
ProCarManuals.com
Page 214 of 340

Your vehicle has an air bag system. Before attempting to
do your own service work, see “Servicing Your Air
Bag-Equipped Oldsmobile” in the Index.
You should keep a record with all parts receipts and
list the mileage and the date of any service work
you
perform. See “Maintenance Record” in the Index.
You can be injured and your vehicle could be
damaged if you
try to do service work on a
vehicle without knowing enough about it.
0 Be sure you have sufficient knowledge,
experience, and the proper replacement
’
parts and tools before you attempt any
vehicle maintenance task.
Be sure to use the proper nuts, bolts and
other fasteners. “English” and “metric”
fasteners can be easily confused. If
you use
the wrong fasteners, parts can later break
or fall off. You could be hurt.
Fuel
Use regular unleaded gasoline rated at 87 octane or
higher. At a minimum,
it should meet specifications
ASTM D4814 in the United States and
CGSB 3.5-M93
in Canada. Improved gasoline specifications have been
developed by the American Automobile Manufacturers
Association (AAMA) for better vehicle performance
and engine protection. Gasolines meeting the AAMA
specification could provide improved driveability and
emission control system protection compared to
other gasolines.
Be sure the posted octane is at least 87.
If the octane is
less than 87, you may get a heavy knocking noise when
you drive.
If it’s bad enough, it can damage your engine.
If you’re using fuel rated at 87 octane or higher and you
still hear heavy knocking, your engine needs service.
But don’t worry
if you hear a little pinging noise when
you’re accelerating or driving up
a hill. That’s normal,
and you don’t have to buy a higher octane fuel to get rid
of pinging. It’s the heavy, constant knock that means
you have a problem.
6-2
ProCarManuals.com
Page 265 of 340

Headlamps
The headlamp wiring is protected by an internal circuit
breaker. An electrical overload will cause the lamps to go
on and
off, or in some cases to remain off. If this happens,
have your headlamp wiring checked right away.
Windshield Wipers
The windshield wiper motor is protected by a circuit
breaker and
a fuse. If the motor overheats due to heavy
snow, etc., the wiper will stop until
the motor cools. If
the overload is caused by some electrical problem, be
sure
to get it fixed.
Power Windows and Other Power Options
Circuit breakers protect the power windows and other
power accessories. When the current load
is too heavy,
the circuit breaker opens and closes, protecting the
circuit until the problem is fixed or goes away.
Fuses and Circuit Breakers
The wiring circuits in your vehicle are protected from
short circuits by
a combination of fuses, circuit breakers,
and fusible thermal links. This greatly reduces the
chance of fires caused by electrical problems.
Look at the silver-colored band inside the fuse. If the band
is broken or melted, replace the fuse. Be sure you replace
a bad fuse with a new one of the identical size and rating.
lr you ever have a problem on the road and don’t have
a spare fuse, you can borrow one that has the same
amperage. Just pick some feature of your vehicle that
you can get along without
-- like the radio or cigarette
lighter
-- and use its fuse, if it is the correct amperage.
Replace
it as soon as you can.
Instrument Panel Fuse Block
The fuse block is at the
driver’s end of the
instrument panel.
Remove the cover by turning
the fastener
counterclockwise. Extra fuses and the fuse extractor are
provided in the cover.
To reinstall the fuse panel cover,
push
in and turn the fastener clockwise.
6-53
ProCarManuals.com
Page 267 of 340

Fuse/Circuit Usage Breaker
6 Blower Motor, Temperature Door
Motor, HI Blower Relay Coil
7
8
9
10
11
12
13
14
15
Power Auxiliary Outlets, Assembly
Line Diagnostic Link
Rear Window Defogger
PCM/VCM Battery, ABS Battery
PCM/VCM Ignition, Injectors, Crank
Sensor, Coil Driver Module
Radio, Inside Rearview Mirror Map
Lamp, Overhead Console Reading
Lamps, Rear Wiper, Rear Washer,
Overhead Console Display
DRAC, Anti-Lock Braking System,
Clock, Radio, Battery,
CD Player
A/C Compressor Battery Feed
Daytime Running Lamps,
Fog Lamps,
Fog Lamp Relay
VCM
IGN-3
FuseKircuit Usage
Breaker
16
17
19
20
21
22
24
Turn Signals and Back-up Lamps,
Brake-Transmission Shift
Interlock Solenoid
Windshield Washer, Windshield
Wiper Motor
Not Used
Crank Signal, Air Bag System
Cluster Illumination, Radio
Illumination, Heater Lamp, Chime
Module,
Fog Lamp Illumination,
Rear Wiper Switch, Rear Defog
Switch Illumination, Liftglass Release
Switch Illumination, Overhead
Console Illumination
Air Bag System
PRNDL Power, 4L60E Automatic
Transmission
ProCarManuals.com
Page 330 of 340

Brakes Adjustment
.................................. 6-29
Master Cylinder
.............................. 6-25
PedalTravel
................................. 6-29
Replacing System Parts
........................ 6-29
Trailer
...................................... 4-47
Wear
....................................... 6-28
Brake System Warning Light
...................... 2-53
Brake-Transmission Shift Interlock Check
........... 7-4 1
Braking ........................................ 4-5
In Emergencies ................................ 4-8
Brightness Control
.............................. 2-32
BTSICheck
................................... 7-41
Bulb Replacement
.............................. 6-30
Lapacities and Specifications
............... 6.57. 6.58
Carbon Monoxide
................ 2-7.2.21.4.40. 4.48
Cargocover
................................... 2-39
Cargo Tie Downs
............................... 2-39
Cassette Tape Player
............................. 3-6
Care
.................................. 3-14, 7-39
Center Seat Positions
............................ 1-36
Certification/Tire Label
.......................... 4-4 I
Chains
Safety
...................................... 4-47
Tire
........................................ 6-43
Changing
a Flat Tire ............................. 5-20
Charging System Light
.......................... 2-S 1
Check Gages Light .............................. 2-59
Checking Your Restraint Systems
.................. 1-42
Chemical Paint Spotting
.......................... 6-50
Child Restraints
................................ 1-32
Securing
in a Rear Outside Seat Position ........... 1-34
Securing
in the Right Front Seat Position ........... 1-36
TopStrap
................................... 1-33
Where to
Put ................................ 1-32
Cigarette Lighter
............................... 2-41
Circuit Breakers and Fuses
....................... 6-53
Cleaner.
Air ................................... 6-13
Cleaning
Aluminum Wheels ............................ 6-49
Fabric
...................................... 6-45
Glass ....................................... 6-47
Inside of Your Vehicle
......................... 6-44
Instrument Panel
............................. 6-46
Leather
..................................... 6-46
Outside of Your Vehicle
........................ 6-48
Stains
...................................... 6-45
Tires
....................................... 6-49
Vinyl ....................................... 6-46
Weatherstrips
................................ 6-47
Wheels
..................................... 6-49
Windshield. Backglass and Wiper Blades
.......... 6-47
Climate Control System
........................... 3-1
Clock
. Setting ................................... 3-6
Comfort Controls
................................ 3-1
9-2
ProCarManuals.com
Page 333 of 340

Halogen Bulbs ................................ 6-30
Hazard Warning Flashers
.......................... 5-1
Head Restraints
................................. 1-3
Headlamps
.................................... 2-31
Bulb Replacement
............................ 6-3 1
High/Low Beam Changer ...................... 2-25
OnReminder
................................ 2-31
Wiring
..................................... 6-53
Hearing Impaired. Customer Assistance
.............. 8-3
Heating
........................................ 3-3
Highway Hypnosis
.............................. 4-35
Hill and Mountain Roads
......................... 4-35
Hitches. Trailer
................................. 4-46
Hood
.......................................... 6-6
Horn
......................................... 2-23
Hydroplaning
.................................. 4-3 1
Ignition Positions .............................. 2- IO
Inflation. Tire ............................. 6.38. 7.39
Inside Daymight Rearview Mirror
................. 2-33
Inspections Brakesystem
................................ 7-44
Drive Axle
.................................. 7-44
Exhaust Systems
............................. 7-43
Radiator and Heater Hose
...................... 7-43
Steering
.................................... 7-43
Suspension
.................................. 7-43
Throttle Linkage
.............................. 7-43
Transfer Case
................................ 7-44 Instrument
Panel
............................... 2-46
Cleaning
.................................... 6-46
Cluster
..................................... 2-48
FuseBlock
.................................. 6-53
Interior Lamps
................................. 2-32
Jacking Equipment
............................. 5-21
Jump Starting
................................... 5-2
Keyless Entry System
........................... 2-5
Keys
.......................................... 2-1
Labels
Certificationflire
.............................. 4-41
Fuse
....................................... 6-54
Safety Belt
.................................. 1-43
Service Parts Identification
..................... 6-52
Vehicle Identification Number
................... 6-52
Lamps
........................................ 2-30
Dome
...................................... 2-33
Front Reading
........................... 2-32. 2-35
Interior
..................................... 2-32
OnReminder
................................ 2-31
Leaving Your Vehicle
............................. 2-4
Leaving Your Vehicle
with the Engine Running ....... 2-19
Lighter
....................................... 2-41
ProCarManuals.com