tow OLDSMOBILE BRAVADA 1997 Owner's Guide
[x] Cancel search | Manufacturer: OLDSMOBILE, Model Year: 1997, Model line: BRAVADA, Model: OLDSMOBILE BRAVADA 1997Pages: 358, PDF Size: 18.02 MB
Page 197 of 358

Rear Towing
Tow Limits -- 35 mph (56 km/h), 50 miles (80 km)
YOU must use a towing dolly under the front wheels when
towing from the reax
NOTICE:
Do not tow with sling-type equipment or rear
bumper valance damage will occur. Use wheel-lift
or car-carrier equipment. Additional ramping
may be required for car-carrier equipment. Use
safety chains and wheel straps.
Towing a vehicle over rough surfaces could
damage a vehicle. Damage can occur from vehicle
to ground or vehicle to wheel-lift equipment.
To
help avoid damage, install a towing dolly and raise
the vehicle until adequate clearance is obtained
between the ground and/or wheel-lift equipment.
Do not attach winch cables or J-hooks to
suspension components when using car-carrier
equipment. Always use
T-hooks inserted in the
T-hook slots.
5-11
ProCarManuals.com
Page 199 of 358

If No Steam Is Coming From Your Engine
If YOLI get the overheat warning but see or hear no
steam, the problem may
not be too serious. Sometimes
the engine can get
a little too hot when you:
0 Climb a long hill on a hot, day.
0 Stop after high-speed driving.
0 Idle for long periods in traffic.
Tow a trailer.
If you get the overheat warning with no sign of steam,
try this for a minute 01- so:
I. Turn off your air conditioner.
2. Turn on your heater to full hot at the highest fan
speed and open the window as necessary.
3. If;' you're in a traffic jam, shift to NEUTRAL (N);
otherwise, shift to the highest gear while
driving
-- AUTOMATIC OVERDRIVE (0)
or THIRD (3).
If you no longer have the overheat warning, you
can drive. Just to be safe, drive slower
for about
10 minutes. If the warning doesn't come back on,
you can drive normally.
If the warning continues, pull over, stop, and park
your vehicle right away.
If there's still no sign of steam, push the accelerator
until the engine speed is about twice as fast as normal
idle speed. Bring the engine speed back
to normal idle
speed after two or three minutes. Now see
if the warning
stops. But then, if you still have the warning, tLm off
the engine ulld get el)eryolw out of the vehicle until it
cools down.
You may decide not
to lift the hood but to get service
help right away.
5-13
ProCarManuals.com
Page 207 of 358

If a Tire Goes Flat
It’s Llnusual for a tire to ”blow out.’ while you’re driving,
especially
if you maintain your tires properly. If air goes
out of a tire, it’s much more likely to leak out slowly.
But
if you should ever have a “blowout,” here are a few
tips about what to expect and what to do:
If a front tire fails, the flat tire will create a drag that
pulls the vehicle toward that side. Take your
f-bot off the
accelerator pedal and grip the steering wheel
firmly.
Steer to maintain lane position, and then gently brake to
a stop well out of the traffic lane.
A rear blowout. particularly on a curve, acts much like a
skid and may require the same conxxtion you’d use in a
skid. In any rear blowout, remove your foot from the
accelerator pedal. Get the vehicle under control by
steering the way
you want the vehicle to go. It may be
very bumpy and noisy, but
YOLI can still steer. Gently
brake to
a stop -- well off the road if possible.
If a tire goes flat, the next part shows how to use your
jacking equipment to change a flat tire safely.
Changing a Flat Tire
If a tire goes flat, avoid further tire and wheel damage
by driving slowly to
a level place. Turn on your hazard
warning flashers.
c
A CAUTION:
Changing a tire can cause an injury. The vehicle
can slip off the jack and roll over you
or other
people. You and they could be badly injured.
Find a level place to change your tire.
To help
prevent the vehicle from moving:
1. Set the parking brake firmly.
2. Put the shift lever in PARK (P).
3. Turn off the engine.
To be even more certain the vehicle won’t move,
you can put blocks at the front and rear of the
tire farthest away from the one being changed.
That would be the tire on the other side of the
vehicle, at the opposite end.
The following steps
will tell you how to use the jack and
change
a tire.
5-21
ProCarManuals.com
Page 208 of 358

Removing the Spare Tire and Tools
The jacking equipment you’ll need is stored along the
driver’s rear wall. Your vehicle
is also equipped with
work gloves
and a plastic ground mat to assist in the
changing
of a flat tire.
To remove the jack
cover, pull
up on the
latch
at the end of the
cover, near the endgate.
Then pull up
on the latch on the top of the cover.
Remove the wheel blocks, jack and wheel wrench.
The spare tire
is stored under the vehicle.
I NOTICE:
Never remove or restow a tire frodto a stowage
position under the vehicle while the vehicle
is
supported by a jack. Always tighten the tire fully
against the underside of the vehicle when
restowing.
5-22
ProCarManuals.com
Page 212 of 358

4. Raise the vehicle by turning the jack handle clockwise.
Raise the vehicle
far enough off the ground so there is
enough
room for the spare tire to fit.
5. Remove all the wheel nuts and take off the flat tire.
6. Remove any rust or dirt
from the wheel bolts,
mounting surfaces and
spare wheel.
'
A CAUT 3%
I
Rust or dirt on the wheel, or on the parts to
which it is fastened, can make the wheel nuts
become loose after a time. The wheel could come
off and cause an accident. When
you change a
wheel, remove any rust or dirt from the places
where the wheel attaches to the vehicle.
In an
emergency, you can use a cloth or a paper towe
to do this; but be sure to use a scraper or wire
brush later,
if you need to, to get all the rust or
dirt
off.
!I
5-26
ProCarManuals.com
Page 213 of 358

A CAUTION:
I - -
Never use oil or grease on studs or nuts. If YOU
do, the nuts might come loose. Your wheel could
fall off, causing
a serious accident.
1
7. Place the spare on the wheel mounting surface.
8. Put the nuts on by
hand. Make sure the
cone-shaped end
is
toward the wheel.
Tighten each
nut by hand
until the wheel
is held
against the hub.
If a nut
can’t be turned by hand,
use the wheel wrench
and see your retailer
as
soon as possible.
I
9. Lower the vehicle by turning the jack handle
counterclockwise. Lower the jack completely.
5-27
-
ProCarManuals.com
Page 218 of 358

NOTICE:
Spinning your wheels can destroy parts of your
vehicle as well as the tires. If you spin the wheels
too fast while shifting your transmission back
and forth, you can destroy your transmission.
For information about using tire chains on your vehicle,
see "Tire Chains''
in the Index.
Rocking Your Vehicle To Get It Out
First, turn your steering wheel left and right. That will
clear the area around your front wheels. Then shift back
and forth between REVERSE
(R) and a forward gear,
spinning the wheels as little as possible. Release the
accelerator pedal while you shift, and press lightly on
the accelerator pedal when the transmission is
in gear.
If that doesn't get you out after a few tries, you may
need to
be towed out. Or, you can use your recovery
hooks
if your vehicle has them. If you do need to be
towed out,
see "Towing Your Vehicle" in the Index.
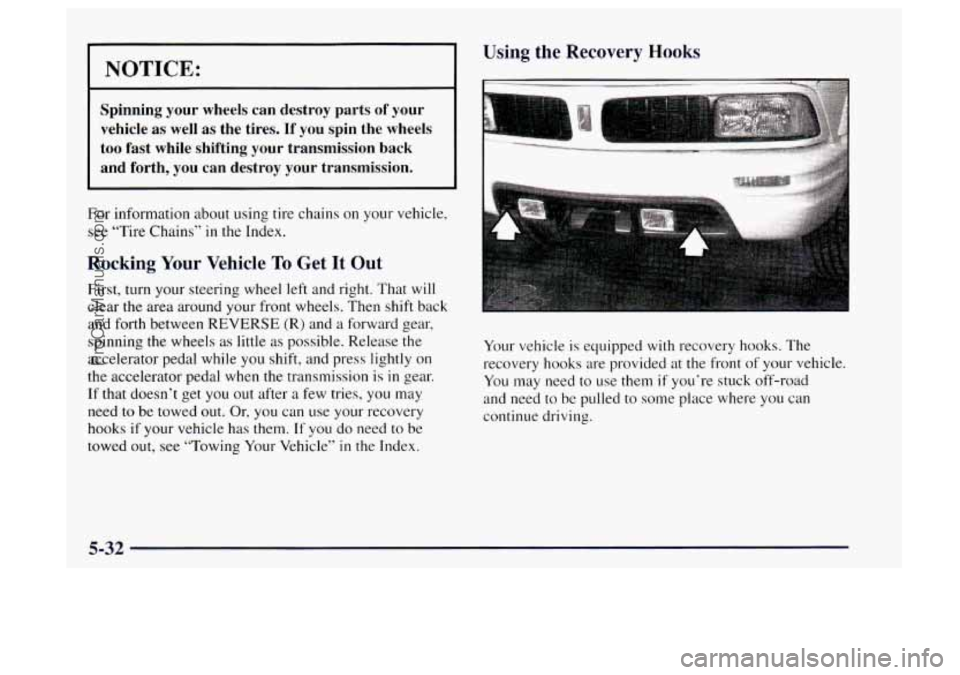
Using the Recovery Hooks
Your vehicle is equipped with recovery hooks. The
recovery hooks are provided at the front
of your vehicle.
You may need to use them
if you're stuck off-road
and need to be pulled to some place where you can
continue driving.
ProCarManuals.com
Page 219 of 358

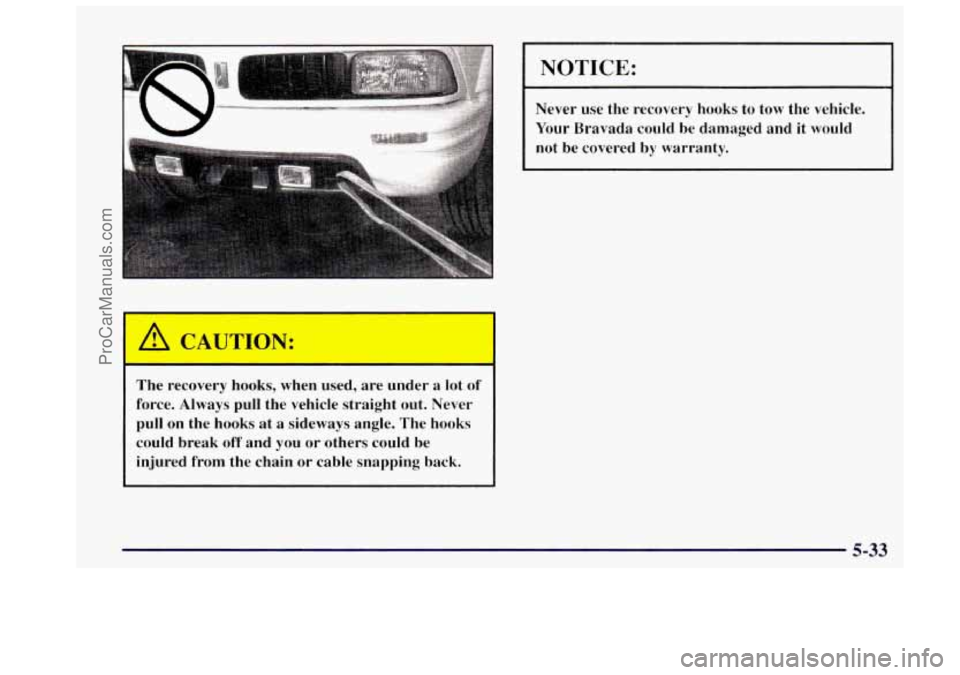
I A CAUTION:
-
The recovery hooks, when used, are under a lot of
force. Always pull the vehicle straight out. Never
pull on the hooks at a sideways angle. The hooks could break
off and you or others could be
injured from the chain or cable snapping back.
NOTICE:
-
Never use the recovery hooks to tow the vehicle.
Your Bravada could be damaged and it would
not
be covered by warranty.
5-33
ProCarManuals.com
Page 229 of 358

*--
Before closing the hood, be sure all the filler caps are on Checking Engine Oil
properly. Then lift the hood to relieve pressure on the
hood prop.
Remove the hood prop from the slot
in the hood and keeping the tip down, and check the level.
return the prop to its retainer. Pull
out the dipstick and clean it with a paper towel or
’ , . . cloth, then push it back in all the way. Remove it again,
--
Then just pull the hood down firmly to close. It will
latch when dropped from
10 to12 inches (25 to 30 cm)
without pressing on the hood.
Engine Oil
It’s a good idea to check your engine oil every time you
get fuel.
In order to get an accurate reading, the oil must
be warm and the vehicle must be
on level ground.
The oil dipstick is a
yellow ring.
Turn off the engine and give
the
oil a few minutes to
drain back into the oil pan.
If you don’t, the oil dipstick
might not show the
actual level.
6-9
ProCarManuals.com
Page 232 of 358

Engine Oil Additives
Don’t add anything to your oil. Your Oldsrnobile retailer
is ready to advise
if you think something should
be added.
When to Change Engine Oil
If any one of these is true for you, use the short tripkity
maintenance schedule:
a
a
a
a
a
Most trips are less than 5 to 10 miles (8 to 16 km).
This
is particularly important when outside
temperatures are below freezing.
Most trips include extensive idling (such
as frequent
driving
in stop-and-go traffic).
You operate your vehicle in dusty areas or
off-road frequently.
You frequently tow a trailer or use a carrier on top of
your vehicle.
The vehicle is used for delivery service, police, taxi
or other commercial application. Driving under these conditions causes
engine
oil to
break down sooner.
If any one of these is true for your
vehicle, then you need
to change your oil and filter
every
3,000 miles (5 000 km) or 3 months -- whichever
occurs first.
If none of them is true, use the long trip/highway
maintenance schedule. Change the oil and filter every
7,500 miles (1 2 500 km) or 12 months -- whichever
occurs first. Driving a vehicle with a
fully warmed
engine under highway conditions causes engine oil to
break down slower.
Remote Oil Filter
The access door for the remote oil filter is in the steering
linkage shield assembly located under the radiator
support. Twist the screw to unlock
or lock the door.
Make sure
if you open the door, it is securely closed
when
you are finished.
ProCarManuals.com