fog light OLDSMOBILE BRAVADA 1998 Owners Manual
[x] Cancel search | Manufacturer: OLDSMOBILE, Model Year: 1998, Model line: BRAVADA, Model: OLDSMOBILE BRAVADA 1998Pages: 380, PDF Size: 19.2 MB
Page 11 of 380

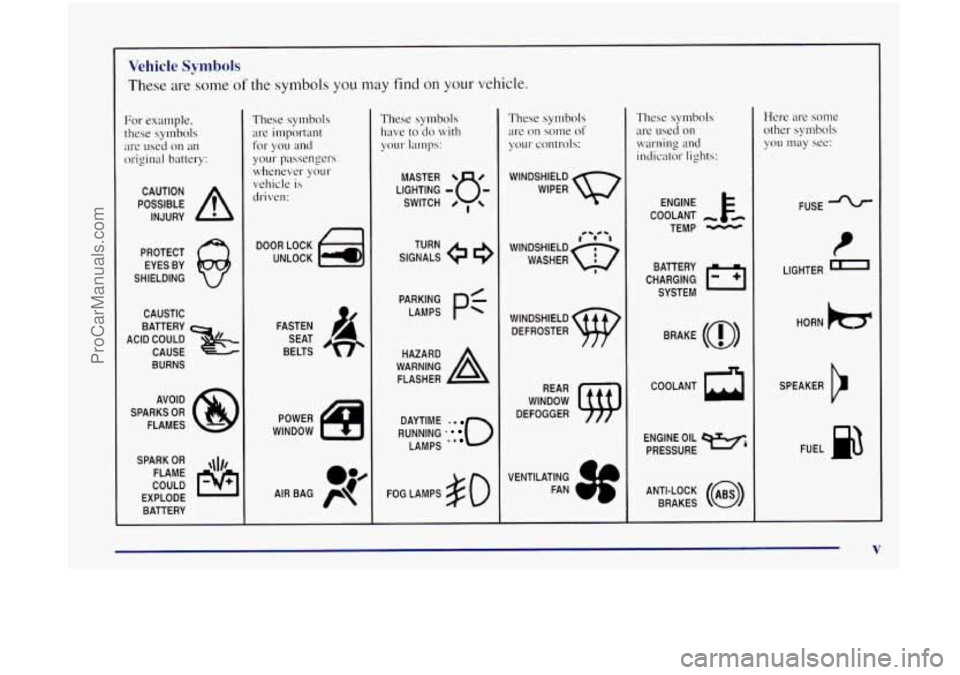
Vehicle Symbols
These are some of the symbols you may find on your vehicle.
For example,
these symbols
are used on
an
original battery:
POSSIBLE A
CAUTION
INJURY
PROTECT EYES BY
SHIELDING
CAUSTIC
ACID COULD
x
BATTERY
CAUSE
BURNS
AVOID
SPARKS
OR
FLAMES
SPARK
OR ,\I/,
COULD
FLAME
EXPLODE BATTERY
These symbols
are important
your passengers
whenever your
vehicle
is
driven:
for
you and
FASTEN
SEAT
BELTS
These symbols
have
to do with
your lamps:
SIGNALS 9
TURN
RUNNING
' 0
DAYTIME .
LAMPS **
FOG LAMPS $0
These symbols
are on some
of
your controls:
WINDSHIELD
WIPER
CS 0b
WINDSHIELD DEFROSTER
WINDOW
DEFOGGER
VEN TlLATlNG
FAN
These symbols are
used on
warning and
indicator lights:
COOLANT -
TEMP -
CHARGING BAllERY
SYSTEM
BRAKE
(0)
COOLANT a
ENGINE OIL w,
PRESSURE
Here are some
other symbols
you may see:
FUSE
LIGHTER
n
HORN )tr
SPEAKER
b
FUEL p3
ANTI-LOCK (@)
BRAKES
V
ProCarManuals.com
Page 97 of 380

To idle your vehicle with the automatic headlamp
system off, set the parking brake while the ignition is
off. Then start your vehicle. The automatic headlamp
system
will stay off until you release the parking brake.
As with any vehicle, you should turn on the regular
headlamp system when you need
it.
Lamps On Reminder
A reminder tone will sound when your headlamps or
parking lamps are manually turned on and your ignition
is
in OFF, LOCK or ACCESSORY. To turn the tone off, turn
the knob all the way to the left.
In the automatic mode, the
headlamps
turn off once the ignition key is in OF.
Daytime Running Lamps
Daytime Running Lamps (DRL) can make it easier for
others to see the front of your vehicle during the day.
DRL can be helpful in many different driving
conditions, but they can be especially helpful
in the
short periods after dawn and before sunset.
The DRL system will
make your headlamps come on at
reduced brightness when:
the ignition is on,
the headlamp switch is in automatic headlamp mode and
0 the parking brake is released. When the
DRL are on, only your headlamps will be on.
The taillamps, sidemarker and other lamps won't be on.
The instrument panel won't be
lit up either.
When
it begins to get dark, the headlamps will
automatically switch from DRL
to the regular headlamps.
When you turn the headlamp switch off, the regular lamps
will go off, and your headlamps will change to the reduced
brightness of DRL provided
it is not dark outside.
To idle your vehicle with the DRL off, set the parking
brake. The DRL will stay off
until you release the
parking brake.
As with any vehicle. you should turn on the regular
headlamp system
when you need it.
Fog Lamps
Use your fog lamps for better vision in foggy or misty
conditions. Your low-beam headlamps must be
on for
your fog lamps to work.
The fog lamp switch is
on the instrument panel under
the lamps switch. Press the switch to turn the fog lamps
on. Press the switch again to turn them off.
A light will
glow
in the switch when the fog lamps are on.
Fog lamps will go off whenever your high-beam
headlamps come on. When the high beams go off, the
fog lamps
will come on again.
ProCarManuals.com
Page 131 of 380

~ . le Knob - Automatic
Operation
I he right knob on the control panel allows you to
choose the direction of air delivery. When the system is
set
for automatic operation, sensors will control the air
delivery mode. Air will come primarily from the floor
or
instrument panel outlets, with some air directed to the
windshield to prevent fogging.
When the system is
in AUTO mode, the air conditioning
light will turn on, and
the recirculation and outside air
lights
turn off. With the system in full auto control
(both the fan and mode knobs
in AUTO), YOLI still
have the ability to override any function. However?
continually overriding the outside air or the A/C
compressor will
limit the ability of the system to cool
the vehicle quickly.
If you push a button for a function which is not
available, the light next to that button
will flash three
times to alert you that it's
not available.
To find your comfort zone, start with the
74°F (23°C)
setting and allow about 20 minutes for the system to
adjust the temperature
if necessary.
With the automatic setting, the air conditioning
compressor automatically cycles when needed to cool
the air.
In cold weather, when the system senses the need
for heat, the airflow will be directed out the floor outlets.
As the
interior temperature approaches a desired
setting,
the blower speed will decrease. To maintain
interior comfort, the airflow will adjust between the
instrument panel air outlets and
floor outlets. On bright
sunny days in cool weather, the airflow may come out
of
the air conditioning and floor outlets (bi-level mode) to
maintain comfort and prevent stuffiness.
To avoid blowing cold air
in cold weather, the system
will delay turning on the fan until warm air is available.
The length of delay depends on the outside air
temperature, engine coolant temperature or the time
since the engine was last started.
As the coolant
warms
up, the blower fan speed will gradually increase
and air will flow from the heater outlets, with some
airflow to the windshield to prevent fogging under most
normal conditions.
If your vehicle is sitting out on a warm day and you
have the filn set on AUTO, the air
will first flow out of
the floor air outlets for
a few seconds. That is normal.
This is to expel hot air from the air outlets.
As the air is
cooled, the airflow
will move through the air
conditioning outlets.
Be careful
not to put anything over the solar sensor
located around the center of the instrument panel.
This sensor is used by the automatic system
to
regulate temperature.
3-3
ProCarManuals.com
Page 133 of 380

Remember that in order for the automatic system
to perform
well, it needs A/C to provide
cooling performance.
Air Conditioning
On hot days, open the windows long enough to let hot
inside air escape. This reduces the time
it takes for your
vehicle to cool down. Then keep your windows closed
for the air conditioner to work its best.
For quick cool-down on very hot days, use
MAX A/C
with the temperature knob turned to the left. This setting
should be used to keep odors and/or dust from entering
the vehicle. For normal cooling on hot days, use A/C
with the temperature knob turned to the left.
On cool but sunny days, use BI-LEVEL A/C to deliver
warm air to the floor and cooler air to the instrument
panel outlets.
When the air conditioner is on, you may sometimes notice
slight changes
in your vehicle‘s engine speed and power.
This
is normal because the system is designed to cycle the
compressor on and off to keep the desired temperature.
Heating
The heater works best if you keep your windows closed
while using
it. On cold days, use HEATER with the
temperature knob turned
to the right. BLEND is useful
in cool weather when you have fog or ice on the
windshield or side windows.
If you use the optional engine coolant heater before
starting your engine, your heating system will produce
warmer air faster to heat the passenger compartment in
cold weather. See “Engine Coolant Heater”
in the Index.
Ventilation System
For mild outside temperatures when little heating or
cooling
is needed, use VENT to direct outside air
through your vehicle. Airflow is through the instrument
panel outlets.
Your vehicle’s ventilation system supplies outside air to
the inside of your vehicle when
it is moving. When the
vehicle is
not moving, you can get outside air to flow
through by selecting any mode and any fan speed.
3-5
ProCarManuals.com
Page 135 of 380

Rear Window Defogger
The rear window has lines that warm the glass. For best
results, clear the window of as much snow or ice as
possible before using the rear window defogger.
To turn on the rear window
defogger, find the switch
marked REAR with the
defog symbol on the lower
right corner of your climate
control system.
Press the switch
until the light in the switch comes on,
then release it. It will only work if the ignition switch is
turned
to RUN.
The rear window defogger will stay on for five to seven
minutes. then turn off.
If you need additional warming
time,
turn it on again. You can turn the defogger off at
any time by pressing the switch.
Do not attach
a temporary vehicle license, tape or decals
across the defogger grid
on the rear window.
NOTICE:
Don’t use a razor blade or something else sharp
on the inside
of’ the rear window. If you do, you
could cut or damage the warming grid, and the
repairs wouldn’t be covered by your warranty.
Audio Systems
Your Delco Electronics audio system has been designed
to operate easily and give years of listening pleasure.
You
will get the most enjoyment out of it if you acquaint
yourself
with it first. Fin-d out what your Delco
Electronics system can do and how to operate all
its
controls, to be sure you’re getting the most out of the
advanced engineering that went into it.
Setting the Clock
Press and hold HR until the correct hour appears. The
letter A or
P may appear on the display for AM or PM.
Then, press and hold MN until the correct minute
appears. The clock may be set with the ignition on
or off.
3-7
ProCarManuals.com
Page 368 of 380

Exit Lighting .................................. 2-34
Express-Down Window
.......................... 2-25
Fabric Cleaning
............................... 6-46
Filling a Portable Fuel Container
.................... 6-8
Filling Your
Tank ................................ 6-6
Filter.
Air ..................................... 6-15
Finish Care
.................................... 6-49
Finish Damage
................................. 6-5 I
FirstGear ..................................... 2-18
Flashers. Hazard Warning
......................... 5-2
Flat Tire. Changing
............................. 5-22
Fluids and Lubricants
....................... 6-51. 7-45
FogLampSwitch
............................... 2-33
Foreign Countries. Fuel
........................... 6-5
Front
Axle ....................................... 6-21
Towing
..................................... 5-11
Turn Signal Lamp Bulb Replacement ............. 6-34
Fuel
.......................................... 6-3
Filling a Portable Container ...................... 6-8
Storage
Area
................................. 2-41
Filling Your Tank
.............................. 6-6
Foreign Countries
.............................. 6-5
Gage
....................................... 2-63
Engine Compartment .......................... 6-57
Instrument Panel
............................. 6-55
Fuses and Circuit Breakers ....................... 6-55
Fuse Block Gages
Engine Coolant Temperature
.................... 2-57
Engine Oil Pressure
........................... 2-60
Garage Door Opener
............................ 2-46
GasCap ....................................... 6-6
Gate
A-jar Light ................................ 2-62
GAWR
....................................... 4-42
Gear Positions
................................. 2-16
GloveBox
.................................... 2-37
Gross Axle Weight Rating
........................ 4-42
Gross Vehicle Weight Ratlng
...................... 4-42
Fuel
....................................... 2-63
GVWR
....................................... 4-42
Halogen Bulbs
................................ 6-33
Hazard Warning Flashers
.......................... 5-2
Bulb Replacement
............................ 6-33
High/Low Beam Changer
...................... 2-28
On Reminder
................................ 2-33
Wiring
..................................... 6-54
Hearing Impaired. Customer Assistance
.............. 8-4
Heated Front Seats ............................... 1-3
Heating ........................................ 3-5
Highway Hypnosis .............................. 4-35
Hill and Mountain
Roads ......................... 4-36
Hitches. Trailer
................................. 4-47
Hood .......................................... 6-8
Hydroplaning
.................................. 4-31
Head
Restraints ................................. 1-6
Headlamps
.................................... 2-32
Horn
......................................... 2-25
9-4
ProCarManuals.com