manual radio set Oldsmobile Bravada 2003 Owner's Manuals
[x] Cancel search | Manufacturer: OLDSMOBILE, Model Year: 2003, Model line: Bravada, Model: Oldsmobile Bravada 2003Pages: 410, PDF Size: 20.1 MB
Page 128 of 410
Automatic Headlamp System
When it is dark enough outside, your automatic
headlamp system will turn on your headlamps at the
normal brightness along with other lamps such as
the taillamps, sidemarker, parking lamps and the
instrument panel lights. The radio lights will also be on.
Your vehicle is equipped with a light sensor on the
top of the instrument panel. Be sure it is not covered or
the system will be on whenever the ignition is on.
The system may also turn on your lights when driving
through a parking garage, heavy overcast weather
or a tunnel. This is normal.
There is a delay in the transition between the daytime
and nighttime operation
of the Daytime Running
Lamps (DRL) and the automatic headlamp systems,
so
that driving under bridges or bright overhead street
lights does not affect the system. The DRL and
automatic headlamp system will only be affected when
the light sensor sees a change in lighting lasting
longer than the delay. If
you start your vehicle in a dark garage, the automatic
headlamp system will come on immediately. Once
you leave the garage, it will take approximately
one minute for the automatic headlamp system to
change to DRL
if it is light outside. During that delay,
your instrument panel cluster may not be as bright
as usual. Make sure your instrument panel brightness
control is in the full bright position.
To idle your vehicle with the automatic headlamp
system off, set the parking brake while the ignition is off.
Then start your vehicle. The automatic headlamp
system will stay off until you release the parking brake,
shift out
of park or turn the exterior lamp control to
the
off position as described in “Exterior Lamps”.
Lamps On Reminder
A reminder tone will sound when your headlamps or
parking lamps are manually turned on, the driver’s door
is open and your ignition is in LOCK or ACCESSORY.
To turn the tone off, turn the knob all the way
counterclockwise. In the automatic mode, the headlamps
turn
off once the ignition key is in LOCK.
3-1 5
Page 172 of 410
AUTO EQ (Automatic Equalizer): Press this button to
choose bass, midrange and treble equalization
settings designed for country, jazz, talk, pop, rock and
classical program types.
To return to the manual mode, press the AUTO EQ
button until MANUAL appears on the display. Then you
will be able
to manually adjust the bass, midrange
and treble using the AUDIO button.
If your vehicle has the Bose radio, your audio system
allows you to choose from five different equalization
settings: talk, driver, normal, spatial, and auto eq normal.
These settings can be used while listening to the
radio or the
CD player. Press the AUTO EQ button to
select your choice.
TALK: This setting makes spoken words sound very
clear. When listening
to non-musical material such
as news, talk shows, sports broadcasts and books
on tape.
DRIVER: This setting gives the driver the best sound
quality.
NORMAL: This setting enhances the stereo effects.
AUTO EQ NORMAL (Automatic Equalization): This
setting will provide the best overall Bose performance.
The radio will save separate AUTO EQ settings for each
preset and source.
Adjusting the Speakers (Balance/Fade)
AUDIO: To adjust the balance between the right
and the left speakers, press and release the AUDIO
button until BAL appears on the display. Press the knob
above the AUDIO button to extend it, then turn the
knob
to move the sound toward the left or the right
speakers.
To adjust the fade between the front and the rear
speakers, press and release the AUDIO button until
FAD appears on the display. Press the knob above the
AUDIO button to extend it, then turn the knob
to
move the sound toward the front or the rear speakers.
Pressing and holding the AUDIO button for at least
two seconds will return all tone settings, including bass
and treble to flat.
SPATIAL: This setting makes the listening space seem
larger.
3-59
Page 181 of 410

Setting the Tone (BassTTreble)
AUDIO: Push the AUDIO knob until BASS, MID or
TREB appears on the display. Turn the knob to increase
or
to decrease. If a station is weak or noisy, you may
want to decrease the treble.
To adjust bass, midrange or treble
to the middle
position, select BASS, MID or TREB and push and hold
the AUDIO knob. The radio will produce one beep
and adjust the display level to zero.
To adjust all tone and speaker controls
to the middle
position, push and hold the AUDIO knob when no tone
or speaker control is displayed. The radio will produce
one beep and CENTERED will appear on the display.
AUTO EQ (Automatic Equalization): Press this button
to choose between bass, midrange and treble
equalization settings designed for country, jazz, talk,
pop, rock and classical program types.
To return
to the manual mode (CUSTOM), press the
AUTO EQ button until CUSTOM appears on the display
Then you will be able to manually adjust the bass,
midrange and treble using the AUDIO knob.
Adjusting the Speakers (Balance/Fade)
AUDIO: To adjust the balance between the right
and the left speakers, push the AUDIO knob until BAL
appears on the display. Turn the knob
to move the
sound toward the left or the right speakers.
To adjust the fade between the front and rear speakers,
push and hold the AUDIO knob until FAD appears on
the display. Turn the knob to move the sound toward the
front or the rear speakers.
To adjust the balance and the fade to the middle
position, select balance or fade and push and hold the
AUDIO knob. The radio will beep once and will
adjust the display level to the middle position.
To adjust all tone and speaker controls to the middle
position, push and hold the AUDIO knob when no tone
or speaker controls are displayed. The radio will
produce one beep and CENTERED will appear on the
display.
3-68
Page 186 of 410
Playing a Specific Loaded
Compact Disc
For every CD loaded, a number will appear on the radio
display. To play a specific CD, first press the CD AUX
button
to start playing a CD. Then press the numbered
pushbutton that corresponds
to the CD you want to
play. A small bar will appear under the CD number that
is playing, and the track number will appear.
If an error appears on the radio display, see “Compact
Disc Messages” later in this section.
LOAD CD /1 (Eject): Pressing the CD eject side of
this button will eject a single disc or multiple discs.
To eject the disc that is currently playing, press
and release this button. To eject multiple discs, press
and hold this button for two seconds. You will hear
a beep and the light will flash
to let you know when a
disc is being ejected.
REMOVE CD will be displayed. You can now remove
the disc. If the disc is not removed, after 25 seconds, the
disc
will be automatically pulled back into the receiver.
If you try
to push the disc back into the receiver,
before the
25 second time period is complete, the
receiver will sense an error and will try
to eject the disc
several times before stopping.
Do not repeatedly press the CD eject side of the
LOAD CD eject button
to eject a disc after you have
tried to push it in manually. The receivers 25-second eject timer
will reset at each press
of eject, which will
cause the receiver
to not eject the disc until the
25-second time period has elapsed.
Once the player stops and the disc is ejected, remove
the disc. After removing the disc, press the PWR
knob
off and then on again. This will clear the
disc-sensing feature and enable discs
to be loaded into
the player again.
<< REV (Reverse): Press and hold this button to
reverse quickly within a track. You will hear sound at a
reduced volume. Release it
to play the passage.
The display will show elapsed time.
FWD >> (Forward): Press and hold this button to
advance quickly within a track. You will hear sound at a
reduced volume. Release it to play the passage. The
display will show elapsed time.
RPT (Repeat): With repeat, you can repeat one track
or an entire disc. To use repeat, do the following:
To repeat the track you are listening to, press and
release the RPT button. RPT will appear on the
display. Press RPT again to turn it
off.
To repeat the disc you are listening to, press and
hold the RPT button for two seconds. RPT will
appear
on the display. Press RPT again to turn it off.
3-73
Page 298 of 410
Jump Starting
If your battery has run down, you may want to use
another vehicle and some jumper cables to start your
vehicle. But please use the following steps
to do it
safely.
can be dangerous
* They contain acid that can burn you.
0 They contain gas that can explode or
* They contain enough electricity to
If you don’t follow these steps exactly, some
Notice: Ignoring these steps could result in costly
damage to your vehicle that wouldn’t be covered
by your warranty.
Trying to start your vehicle by pushing or pulling
it
won’t work, and it could damage your vehicle.
1. Check the other vehicle. It must have a 12-volt
battery with
a negative ground system.
Notice: If the other system isn’t a 12-volt system
with a negative ground, both vehicles can be damaged.
2. Get the vehicles close enough so the jumper cables
can reach, but be sure the vehicles aren’t touching
each other. If they are, it could cause a ground
connection you don’t want.
You wouldn’t be able to
start your vehicle, and the bad grounding could
damage the electrical systems.
To avoid the possibility of the vehicles rolling, set
the parking brake firmly on both vehicles involved in
the jump start procedure. Put an automatic
transmission in
PARK (P) or a manual transmission
in NEUTRAL before setting the parking brake. If
you have a four- wheel-drive vehicle, be sure
the transfer case is not in NEUTRAL.
Notice: If you leave your radio on, it could be badly
damaged. The repairs wouldn’t be covered by
your warranty.
3. Turn off the ignition on both vehicles. Unplug
unnecessary accessories plugged into the cigarette
lighter or accessory power outlets (if equipped).
Turn
off the radio and all lamps that aren’t needed.
This will avoid sparks and help
to save both
batteries. And it could save your radio!
5-39
Page 397 of 410
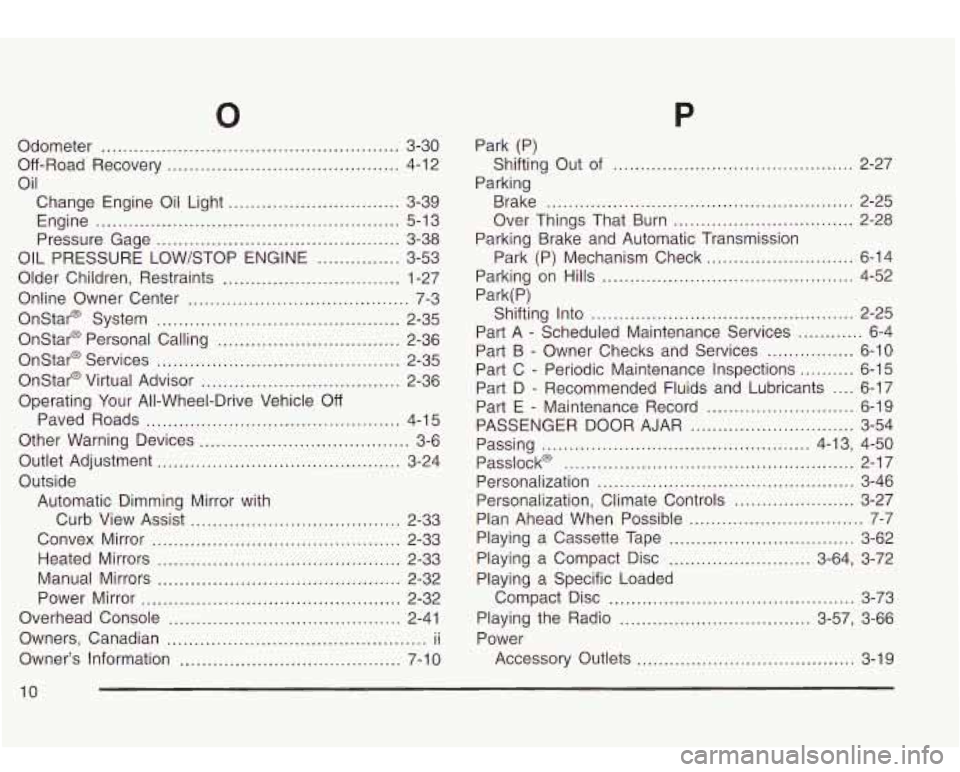
Odometer ...................................................... 3-30
Off-Road Recovery
.......................................... 4-1 2
Oil
Change Engine Oil Light
............................... 3-39
Engine
....................................................... 5-1 3
Pressure Gage
............................................ 3-38
OIL PRESSURE LOWETOP ENGINE ............... 3-53
Older Children, Restraints
................................ 1-27
Online Owner Center
........................................ 7-3
Onstar@ System
............................................ 2-35
Onstar@ Personal Calling
................................. 2-36
Onstar@ Services
............................................ 2-35
Onstar@ Virtual Advisor
.................................... 2-36
Operating Your All-Wheel-Drive Vehicle
Off
Paved Roads .............................................. 4-15
Other Warning Devices
...................................... 3-6
Outlet Adjustment
............................................ 3-24
Outside Automatic Dimming Mirror with
Curb View Assist
................ ........... 2-33
Convex Mirror
............................................. 2-33
Heated Mirrors
............................................ 2-33
Manual Mirrors
............................................ 2-32
Power Mirror
............................................... 2-32
Overhead Console
.......................................... 2-41
Owners, Canadian
............................................... ii
Owner’s Information ........................................ 7-1 0
P
Park (P)
Parking Shifting Out
of ............, .... ..... 2-27
Brake
................................................ 2-25
Over Things That Burn
............................. 2-28
Park (P) Mechanism Check
........................... 6-14
Parking Brake and
Automatic Transmission
Parking on Hills
.............................................. 4-52
Park( P)
Shifting Into
................................................ 2-25
Part A
- Scheduled Maintenance Services ............ 6-4
Part
B - Owner Checks and Services ................ 6-10
Part C
. Periodic Maintenance Inspections .......... 6-15
Part D
- Recommended Fluids and Lubricants .... 6-17
Part E
. Maintenance Record ........................... 6-19
PASSENGER DOOR AJAR
.. .................... 3-54
Passing
................................................. 4.13, 4-50
Passlock@
..................................................... 2-17
Personalization
............................................... 3-46
Personalization, Climate Controls
...................... 3-27
Plan Ahead When Possible
................................ 7-7
Playing a Cassette Tape
.................................. 3-62
Playing a Compact Disc
.......................... 3.64, 3-72
Playing a Specific Loaded
Compact Disc
............................................. 3-73
Playing the Radio
................................... 3.57, 3-66
Power
Accessory Outlets
........................................ 3-19
10