change time Oldsmobile Cutlass 1998 Owner's Manuals
[x] Cancel search | Manufacturer: OLDSMOBILE, Model Year: 1998, Model line: Cutlass, Model: Oldsmobile Cutlass 1998Pages: 348, PDF Size: 17.46 MB
Page 8 of 348
GENERAL MOTORS, GM, the GM Emblem,
OLDSMOBILE, the OLDSMOBILE Rocket Emblem are registered trademarks and the name CUTLASS is a
trademark of General Motors Corporation.
This manual includes the latest information at the time it
was printed. We reserve the right to make changes in the
product after that time without further notice. For
vehicles first sold in Canada, substitute the name
“General Motors
of Canada Limited” for Oldsmobile
Division whenever it appears in this manual.
Please keep this manual in your vehicle,
so it will be
there if you ever need it when you’re on the road.
If you
sell the vehicle, please leave this manual in it
so the new
owner can use it.
Litho in U.S.A.
Part No. 22656197 B First Edition
ii
WE SUPPORT
VOLUNTARY TECHNICIAN
CERTIFICATION THROUGH
National Institute for
AUTOMOTIVE SERVICE
EXCELLENCE
we suppxt voluntary
technician
certification.
..
For Canadian Owners Who Prefer a
French Language Manual:
Anx propribtaires canadiens: Vous pouvez vous
procurer un exemplaire de
ce guide en frangais chez
votre concessionaire ou au:
DGN Marketing Services Ltd.
1577 Meyerside Dr.
Mississauga,
Ontario L5T 1B9
@Copyright General Motors Corporation 1997 All Rights Reserved
Page 71 of 348
This device complies with Part 15 of the FCC Rules.
Operation is subject to the following two conditions:
(1) this device may not cause harmful interference,
and
(2) this device must accept any interference
received, including interference that may cause
undesired operation.
This device complies with RSS-210 of Industry
Canada. Operation is subject to the following
two
conditions: (1) this device may not cause interference,
and
(2) this device must accept any interference
received, including interference that may cause
undesired operation of the device.
Changes or modifications to this system by other than an
authorized service facility could void authorization to
use this equipment. This system has
a range of about
3 feet (1 m) up to
30 feet (9 m). At times youmay notice a decrease in
range. This is normal for any remote keyless entry
system. If the transmitter does not work or
if you have
to stand closer to your vehicle for the transmitter to
work, try this:
e
e
e
e
Check to determine if battery replacement or
synchronization is necessary. See the instructions
that follow.
Check the distance. You may be too
far from your
vehicle. You may need to stand closer during rainy
or snowy weather.
Check the location. Other vehicles or objects may be
blocking the signal. Take a few steps to the left or
right, hold the transmitter higher, and
try again.
If you’re still having trouble, see your retailer or a
qualified technician for service.
2-7
Page 73 of 348
Battery Replacement
Under normal use, the battery in your remote lock
control transmitter should last about two years.
You can tell the battery
is weak if the transmitter won’t
work at the normal range in any location.
If you have to
get close to your vehicle before the transmitter works,
it’s probably time to change the battery.
I NOTICE:
I I
I
When replacing the battery, use care not to touch
any of the circuitry. Static from your body
I
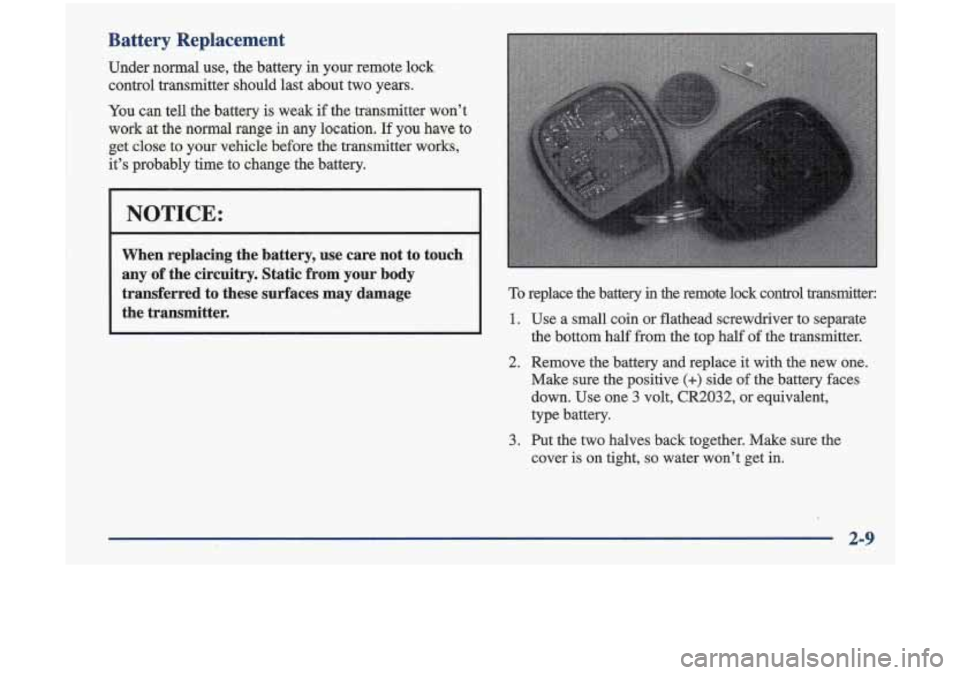
I transferred to these surfaces may damage I To replace the battery in the remote lock control transmitter:
I the transmitter. I 1.
2.
3.
Use a small coin or flathead screwdriver to separate
the bottom
half from the top half of the transmitter.
Remove the battery and replace it with the new one.
Make sure the positive
(+) side of the battery faces
down. Use one
3 volt, CR2032, or equivalent,
type battery.
ht the two halves back together. Make sure the
cover is on tight,
so water won’t get in.
2-9
Page 131 of 348
AM-FM Stereo
Playing the Radio
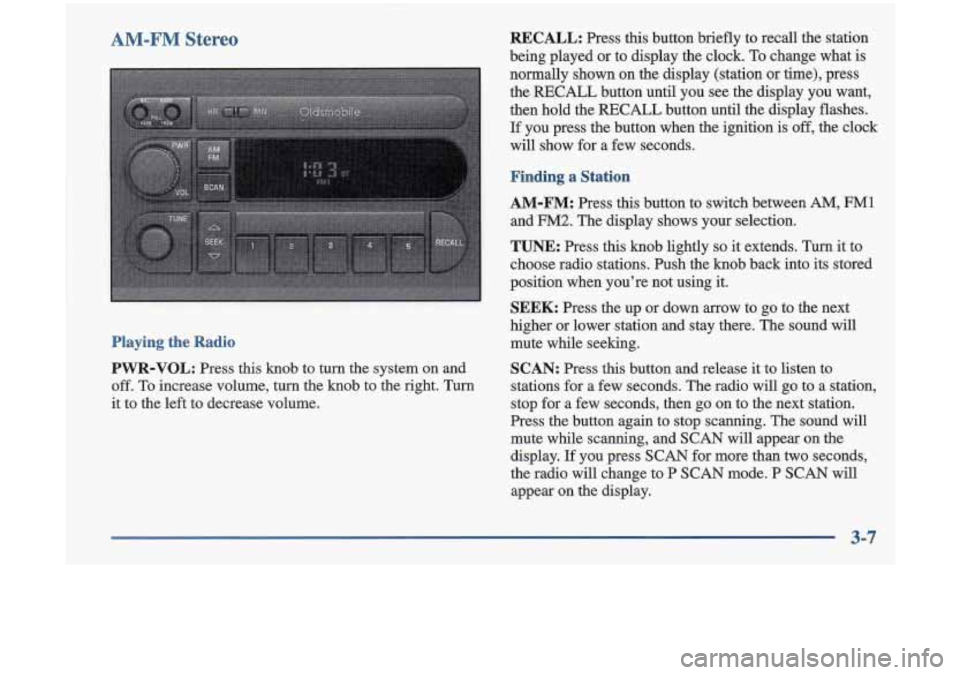
PWR-VOL:
Press this knob to turn the system on and
off.
To increase volume, turn the knob to the right. Turn
it to the left to decrease volume.
RECALL: Press this button briefly to recall the station
being played or to display the clock.
To change what is
normally shown on the display (station
or time), press
the
RECALL button until you see the display you want,
then hold the
RECALL button until the display flashes.
If you press the button when the ignition is off, the clock
will show for a few seconds.
Finding a Station
AM-FM: Press this button to switch between AM, FM1
and FM2. The display shows your selection.
TUNE: Press this knob lightly so it extends. Turn it to
choose radio stations. Push the knob back into its stored
position when you’re not using it.
SEEK: Press the up or down arrow to go to the next
higher or lower station and stay there. The sound will
mute while seeking.
SCAN: Press this button and release it to listen to
stations for a few seconds. The radio will go to a station,
stop for a few seconds, then go on to the next station.
Press the button again to stop scanning. The sound will
mute while scanning, and
SCAN will appear on the
display. If you press
SCAN for more than two seconds,
the radio will change to P
SCAN mode. P SCAN will
appear on the display.
3-7
Page 133 of 348
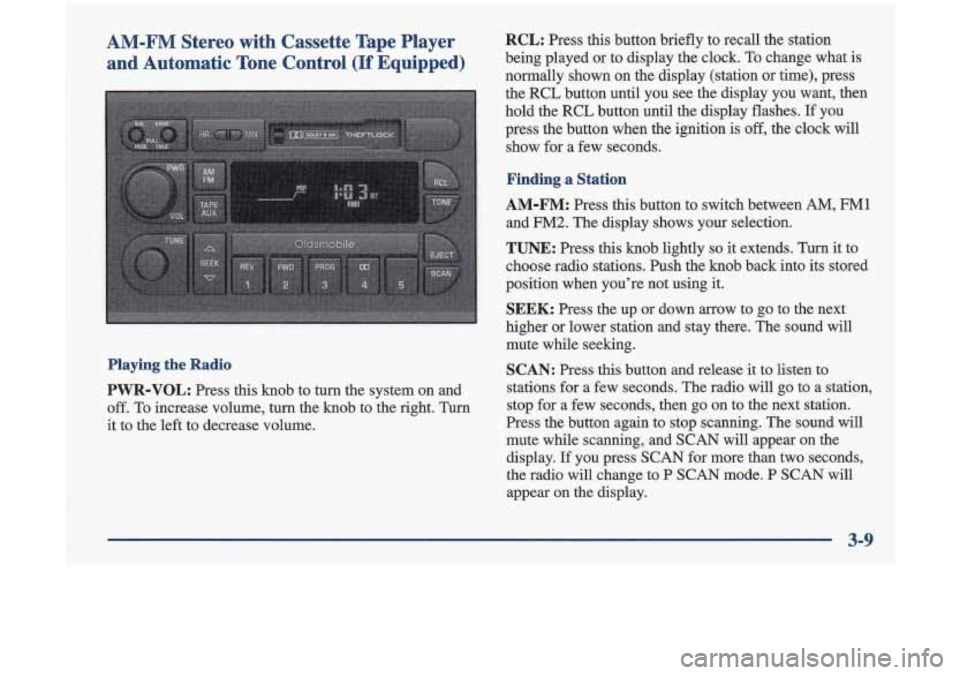
AM-FM Stereo with Cassette Tape Player and Automatic Tone Control
(If Equipped)
Playing the Radio
PWR-VOL: Press this knob to turn the system on and
off. To increase volume, turn the knob to the right. Turn
it to the left to decrease volume.
RCL: Press this button briefly to recall the station
being played or to display the clock. To change what is
normally shown on the display (station or time), press
the RCL button until you see the display you want, then
hold the RCL button until the display flashes.
If you
press the button when the ignition
is off, the clock will
show for a few seconds.
Finding a Station
AM-FM: Press this button to switch between AM, FM1
and FM2. The display shows your selection.
TUNE: Press this knob lightly so it extends. Turn it to
choose radio stations. Push the knob back into its stored
position when you’re not using
it.
SEEK: Press the up or down arrow to go to the next
higher or lower station and stay there. The sound will
mute while seeking.
SCAN: Press this button and release it to listen to
stations for a few seconds. The radio will
go to a station,
stop for a few seconds, then go on to the next station.
Press the button again to stop scanning. The sound will
mute while scanning, and SCAN will appear on the
display.
If you press SCAN for more than two seconds,
the radio will change to
P SCAN mode. P SCAN will
appear on the display.
3-9
Page 137 of 348
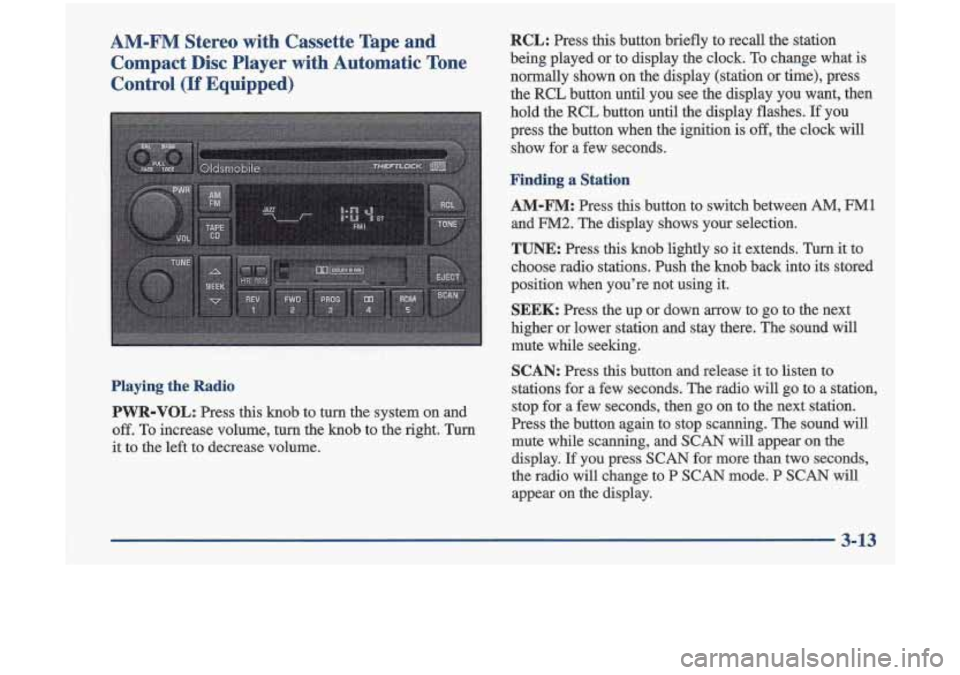
AM-FM Stereo with Cassette Tape and Compact Disc Player with Automatic Tone
Control
(If Equipped)
Playing the Radio
PVVR-VOL:
Press this knob to turn the system on and
off. To increase volume, turn the knob to the right. Turn
it to the left to decrease volume.
RCL: Press this button briefly to recall the station
being played or to display the clock. To change what is
normally shown on the display (station or time), press
the RCL button until you see the display you want, then
hold the RCL button until the display flashes.
If you
press the button when the ignition
is off, the clock will
show for a few seconds.
Finding a Station
AM-FM:
Press this button to switch between AM, FM1
and FM2. The display shows your selection.
TUNE: Press this knob lightly so it extends. Turn it to
choose radio stations. Push the knob back into its stored
position when you’re not using it.
SEEK: Press the up or down arrow to go to the next
higher or lower station and stay there. The sound will
mute while seeking.
SCAN: Press this button and release it to listen to
stations for a few seconds. The radio will go to a station,
stop for a few seconds, then go on to the next station.
Press the button again to stop scanning. The sound will
mute while scanning, and
SCAN will appear on the
display.
If you press SCAN for more than two seconds,
the radio
will change to P SCAN mode. P SCAN will
appear on the display.
3-13
Page 142 of 348

RCL: Press this button to see which track is playing.
Press it again within five seconds to see how long it has
been playing. To change what
is normally shown on the
display (track or elapsed time), press the button until
you see the display you want, then hold the button until
the display flashes.
While elapsed time is showing,
EL TM will appear on the display.
AM-FM: Press this button to play the radio when a disc
is in the player.
TAPE-CD: Press this button to change to the tape or
disc function when the radio is on and either a tape or
CD is inserted. Press AM-FM to return to the radio
while a CD or tape is playing. The inactive tape or CD
will remain safely inside the radio for future listening.
If
you have the optional CD changer and the CD changer
is loaded, the TAPE-CD button will activate the changer
and a box will be lighted around CDC in the display.
EJECT: Press this button to remove the compact disc or
cassette tape. The icon with the box around it on the
display will eject and the radio will play. EJECT may be
activated with either the ignition or radio
off. Cassettes
and compact discs may be loaded with the radio and
ignition
off if this button is pressed first.
Theft-Deterrent Feature
THEFTLOCK@ is designed to discourage theft of your
radio. It works by
using a secret code to disable all radio
functions whenever battery power is removed.
The THEFTLOCK feature for the radio may be used or
ignored.
If ignored, the system plays normally and the
radio is not protected by the feature. If THEFTLOCK
is
activated, your radio will not operate if stolen.
When THEFTLOCK is activated, the radio will display
LOC to indicate a locked condition anytime battery
power is removed.
If your battery loses power for any
reason, you must unlock the radio with the secret code
before it will operate.
Activating the Theft-Deterrent Feature
The instructions which follow explain how to enter your
secret code to activate the THEFTLOCK system. It
is
recommended that you read through all nine steps
before starting the procedure.
NOTE: If you allow more than 15 seconds to elapse
between any steps, the radio automatically reverts to
time and you must start the procedure over at Step
4.
1. Write down any three or four-digit number from
000 to 1999 and keep it in a safe place separate from
the vehicle.
Page 155 of 348
Remember: Anti-lock doesn’t change the time you neea
to get your foot up to the brake pedal or always decrease
stopping distance.
If you get too close to the vehicle in
front of you, you won’t have time to apply your brakes
if that vehicle suddenly slows or stops. Always leave
enough room up ahead to stop, even though you have
anti-lock brakes.
Using Anti-Lock
Don’t pump the brakes. Just hold the brake pedal down
firmly and let anti-lock work for you. You may feel a
slight brake pedal pulsation
or notice some noise, but
this is normal.
Braking in Emergencies
With anti-lock, you can steer and brake at the same
time. In many emergencies, steering can help you more
than even the very best braking.
Steering
Power Steering
If you lose power steering assist because the engine
stops or the system is not functioning, you can steer but
it will take much more effort.
Steering Tips
Driving on Curves
It’s important to take curves at a reasonable speed.
A lot of the “driver lost control” accidents mentioned
on
the news happen on curves. Here’s why:
Experienced driver or beginner, each of us is subject to
the same laws of physics when driving on curves. The
traction
of the tires against the road surface makes it
possible for the vehicle to change its path when you
turn
the front wheels. If there’s no traction, inertia will keep
the vehicle going in the same direction.
If you’ve ever
tried to steer a vehicle on wet ice, you’ll understand
this.
The traction you can get in a curve depends on the
condition of your tires and the road surface,
the angle at
which the curve is banked, and your speed. While you’re
in a curve, speed is the one factor you can control.
Suppose you’re steering through a sharp curve. Then you
suddenly accelerate. Both control systems
- steering and
acceleration
-- have to do their work where the tires meet
the road. Adding the sudden acceleration can demand too
much
of those places. You can lose control.
4-9
Page 179 of 348

Your vehicle can tow a trailer if it is equipped with the
proper trailer towing equipment. To identify what the
vehicle trailering capacity is for your vehicle, you
should read the information
in “Weight of the Trailer”
that appears later
in this section. But trailering is
different than just driving your vehicle by itself.
Trailering means changes in handling, durability and
fuel economy. Successful, safe trailering takes correct
equipment, and it has to be used properly.
That’s the reason for this part. In it are many
time-tested, important trailering tips and safety rules.
Many of these are important for your safety and that of
your passengers.
So please read this section carefully
before you pull a trailer.
Load-pulling components such as the engine, transaxle,
wheel assemblies and tires are forced to work harder
against the drag
of the added weight. The engine is
required to operate at relatively higher speeds and under greater loads, generating extra heat. What’s more, the
trailer adds considerably to wind resistance, increasing
the pulling requirements.
If You Do Decide To Pull A Trailer
If you do, here are some important points:
0
0
0
0
0
There are many different laws, including speed limit
restrictions, having to do with trailering. Make sure
your rig will be legal, not only where you live but
also where you’ll be driving. A good source for this
information can be state or provincial police.
Consider using a sway control. You can ask
a hitch
dealer about sway controls.
Don’t tow a trailer at all during the first
1,000 miles
(1 600 km) your new vehicle is driven. Your engine,
axle
or other parts could be damaged.
Then, during the first
500 miles (800 Ian) that you
tow a trailer, don’t drive over
50 mph (80 km/h) and
don’t make starts at full throttle.
This helps your
engine and other parts of your vehicle wear in at the
heavier loads.
Obey speed limit restrictions when towing a trailer.
Don’t drive faster than the maximum posted speed
for trailers (or no more than
55 mph (90 lun/h)) to
save wear on your vehicle’s
parts.
4-33
I
Page 214 of 348
Rust or dirt on the wheel, or on the parts to
which
it is fastened, can make the wheel nuts
become loose after a time. The wheel could come
off and cause an accident. When you change
a
wheel, remove any rust or dirt from the places
where the wheel attaches to the vehicle.
In an
emergency, you can use
a cloth or a paper towel
to do this; but be sure to use
a scraper or wire
brush later,
if you need to, to get all the rust or
dirt
off.
Never use oil or grease on studs or nuts. If you
do, the nuts might come loose. Your wheel could
fall off, causing a serious accident.
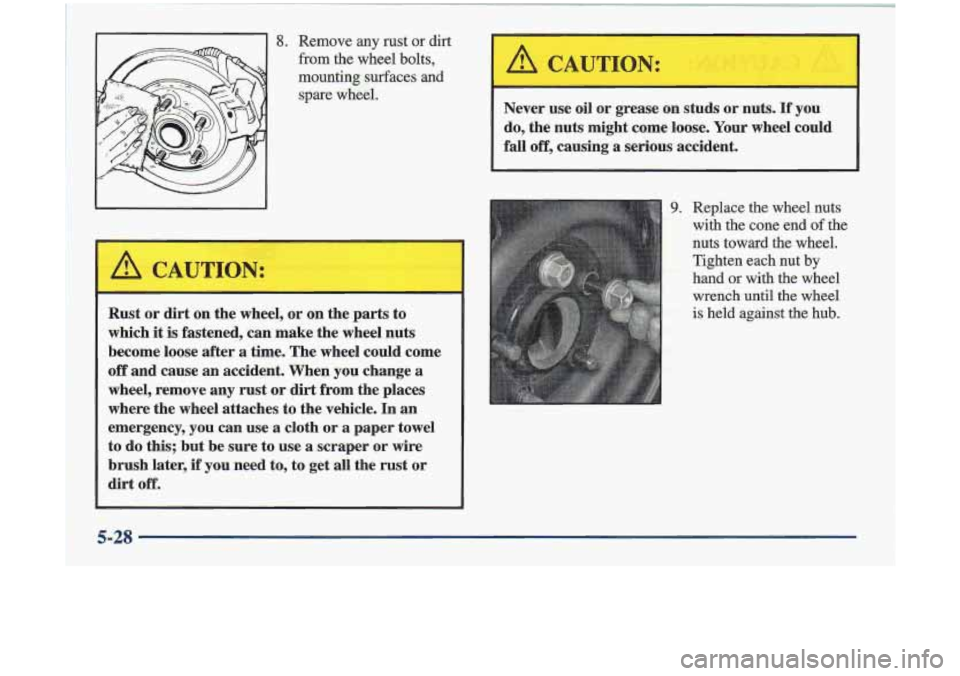
9. Replace the wheel nuts
with the cone end
of the
nuts toward the wheel.
Tighten each nut by
hand
or with the wheel
wrench until the wheel is held against the hub.