clock reset Oldsmobile Cutlass 1999 Owner's Manuals
[x] Cancel search | Manufacturer: OLDSMOBILE, Model Year: 1999, Model line: Cutlass, Model: Oldsmobile Cutlass 1999Pages: 336, PDF Size: 2.37 MB
Page 128 of 336

yellowblue
3-8
RECALL: Press this button briefly to recall the station
being played or to display the clock. To change what is
normally shown on the display (station or time), press
the RECALL button until you see the display you want,
then hold the RECALL button until the display flashes.
If you press the button when the ignition is off, the clock
will show for a few seconds.
Finding a Station
AM
-FM: Press this button to switch between AM, FM1
and FM2. The display shows your selection.
TUNE: Press this knob lightly so it extends. Turn it to
choose radio stations. Push the knob back into its stored
position when you're not using it.
SEEK: Press the up or down arrow to go to the next
higher or lower station and stay there. The sound will
mute while seeking.
SCAN: Press this button and release it to listen to
stations for a few seconds. The radio will go to a station,
stop for a few seconds, then go on to the next station.
Press the button again to stop scanning. The sound will
mute while scanning, and SCAN will appear on the
display. If you press SCAN for more than two seconds,
the radio will change to P SCAN mode. P SCAN will
appear on the display.PUSHBUTTONS: The five numbered pushbuttons let
you return to your favorite stations. You can set up to
15 stations (five AM, five FM1 and five FM2). Just:
1. Turn the radio on.
2. Press AM
-FM to select the band.
3. Tune in the desired station.
4. Press and hold one of the five numbered buttons.
The sound will mute. When it returns, release the
button. Whenever you press that numbered button,
the station you set will return.
5. Repeat the steps for each pushbutton.
P SCAN: Press SCAN for more than two seconds, and
P SCAN will appear on the display. The radio will go to
the first preset station stored on your pushbuttons, stop
for a few seconds, then go on to the next preset station.
Press SCAN again to stop scanning.
Page 130 of 336

yellowblue
3-10
RCL: Press this button briefly to recall the station
being played or to display the clock. To change what is
normally shown on the display (station or time), press
the RCL button until you see the display you want, then
hold the RCL button until the display flashes. If you
press the button when the ignition is off, the clock will
show for a few seconds.
Finding a Station
AM
-FM: Press this button to switch between AM, FM1
and FM2. The display shows your selection.
TUNE: Press this knob lightly so it extends. Turn it to
choose radio stations. Push the knob back into its stored
position when you're not using it.
SEEK: Press the up or down arrow to go to the next
higher or lower station and stay there. The sound will
mute while seeking.
SCAN: Press this button and release it to listen to
stations for a few seconds. The radio will go to a station,
stop for a few seconds, then go on to the next station.
Press the button again to stop scanning. The sound will
mute while scanning, and SCAN will appear on the
display. If you press SCAN for more than two seconds,
the radio will change to P SCAN mode. P SCAN will
appear on the display.PUSHBUTTONS: The five numbered pushbuttons let
you return to your favorite stations. You can set up to
15 stations (five AM, five FM1 and five FM2). Just:
1. Turn the radio on.
2. Press AM
-FM to select the band.
3. Tune in the desired station.
4. Press TONE to select the equalization that best suits
the type of station selected.
5. Press and hold one of the five numbered buttons.
The sound will mute. When it returns, release the
button. Whenever you press that numbered button,
the station you set will return and the tone that you
selected will also be automatically selected for
that button.
6. Repeat the steps for each pushbutton.
P SCAN: Press SCAN for more than two seconds, and
P SCAN will appear on the display. The radio will go to
the first preset station stored on your pushbuttons, stop
for a few seconds, then go on to the next preset station.
Press SCAN again to stop scanning.
Page 133 of 336

yellowblue
3-13
SCAN: Press this button to listen to each selection for a
few seconds. The tape will go to the next selection, stop
for a few seconds, then go on to the next selection. Press
this button again to stop scanning. The sound will mute,
SCAN will appear on the display and the tape direction
arrow will blink while scanning.
AM
-FM: Press this button to play the radio when a
tape is in the player. The tape will stop but remain in
the player.
TAPE AUX: If you have a tape inserted and the radio is
playing, press TAPE AUX to play your tape. To return
to the radio while a tape is playing, press AM
-FM. The
inactive tape will remain safely inside the radio for
future listening.
EJECT: Press this button to remove the tape. The radio
will play. EJECT may be activated with either the
ignition or radio off. Cassettes may be loaded with the
radio and ignition off if this button is pressed first.
CLN: If this message appears on the display, the
cassette tape player needs to be cleaned. It will still play
tapes, but you should clean it as soon as possible to
prevent damage to the tapes and player. See ªCare of
Your Cassette Tape Playerº in the Index. After you clean
the player, press and hold EJECT for five seconds to
reset the CLN indicator. The radio will display
--- to
show the indicator was reset.
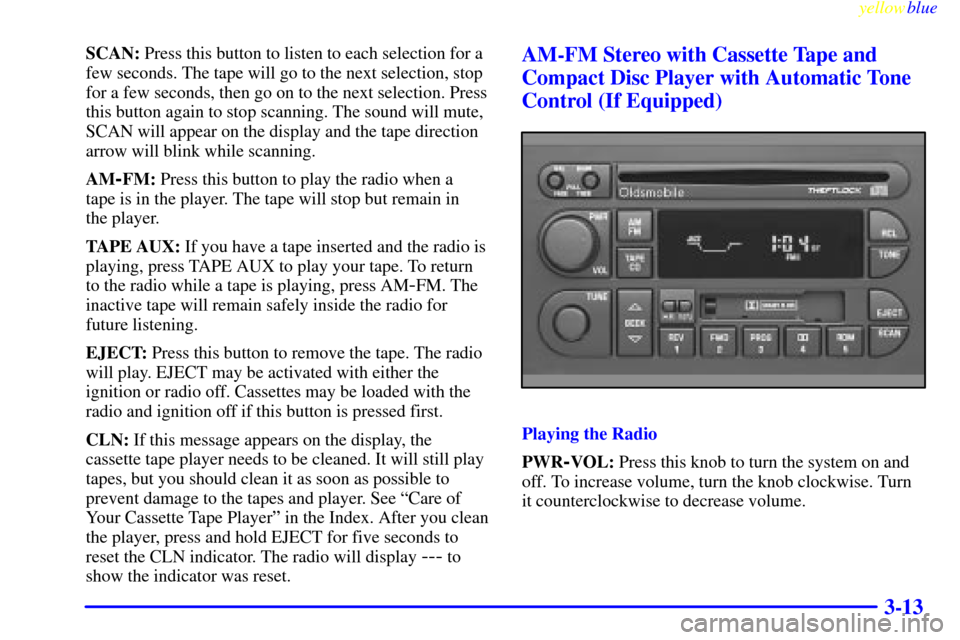
AM-FM Stereo with Cassette Tape and
Compact Disc Player with Automatic Tone
Control (If Equipped)
Playing the Radio
PWR
-VOL: Press this knob to turn the system on and
off. To increase volume, turn the knob clockwise. Turn
it counterclockwise to decrease volume.
Page 134 of 336

yellowblue
3-14
RCL: Press this button briefly to recall the station being
played or to display the clock. To change what is
normally shown on the display (station or time), press
the RCL button until you see the display you want, then
hold the RCL button until the display flashes. If you
press the button when the ignition is off, the clock will
show for a few seconds.
Finding a Station
AM
-FM: Press this button to switch between AM, FM1
and FM2. The display shows your selection.
TUNE: Press this knob lightly so it extends. Turn it to
choose radio stations. Push the knob back into its stored
position when you're not using it.
SEEK: Press the up or down arrow to go to the next
higher or lower station and stay there. The sound will
mute while seeking.
SCAN: Press this button and release it to listen to
stations for a few seconds. The radio will go to a station,
stop for a few seconds, then go on to the next station.
Press the button again to stop scanning. The sound will
mute while scanning, and SCAN will appear on the
display. If you press SCAN for more than two seconds,
the radio will change to P SCAN mode. P SCAN will
appear on the display.PUSHBUTTONS: The five numbered pushbuttons let
you return to your favorite stations. You can set up to
15 stations (five AM, five FM1 and five FM2). Just:
1. Turn the radio on.
2. Press AM
-FM to select the band.
3. Tune in the desired station.
4. Press TONE to select the equalization that best suits
the type of station selected.
5. Press and hold one of the five numbered buttons.
The sound will mute. When it returns, release the
button. Whenever you press that numbered button,
the station you set will return and the tone that
you selected will also be automatically selected for
that button.
6. Repeat the steps for each pushbutton.
P SCAN: Press SCAN for more than two seconds, and
P SCAN will appear on the display. The radio will go to
the first preset station stored on your pushbuttons, stop
for a few seconds, then go on to the next preset station.
Press SCAN again to stop scanning.