service OLDSMOBILE INTRIGUE 1998 Owners Manual
[x] Cancel search | Manufacturer: OLDSMOBILE, Model Year: 1998, Model line: INTRIGUE, Model: OLDSMOBILE INTRIGUE 1998Pages: 340, PDF Size: 17.93 MB
Page 3 of 340

The 1998 Oldsmobile Intrigue Owner’s Manual
1-1
2- 1
Seats and Restraint Systems
This section tells you how to use your seats and safety belts properly. It also explains the “SRS” system.
Features and Controls
This section explains how to start and operate your vehicle.
3- 1 Comfort Controls and Audio Systems
This section tells you how to adjust the ventilation and comfort controls and how\
to operate your audio system.
4-1
5-1
6-1
7-1
Your Driving and the Road
Here you’ll find helpful information and tips about the road and how to drive under different conditions.
Problems on the Road
This section tells what to do if you have a problem while driving, such as a flat tire or overheated engine, etc.
Service and Appearance Care
Here the manual tells you how to keep your vehicle running properly and looking good.
Maintenance Schedule
This section tells you when to perform vehicle maintenance and what fluids and lubricants to use.
8-1 Customer Assistance Information
This section tells you how to contact Oldsmobile for assistance and how to get service and owner publications.
It also gives you information on “Reporting Safety Defects” on page 8-8.
9- 1 Index
Here’s an alphabetical listing of almost every subject in this manual. You can use it to quickly find
something you want to read.
i
ProCarManuals.com
Page 4 of 340

GENERAL MOTORS, GM, the GM Emblem,
OLDSMOBILE, the OLDSMOBILE Rocket Emblem
and the name INTRIGUE are registered trademarks
of
General Motors Corporation.
This manual includes the latest information at the time it
was printed. We reserve the right to make changes in the
product after that time without further notice. For
vehicles first sold in Canada, substitute the .name
“General Motors
of Canada Limited” for Oldsmobile
Division whenever it appears in this manual.
Please keep this manual in your vehicle,
so it will be
there if you ever need it when you’re on the road. If you
sell the vehicle, please leave this manual in it
so the new
owner can use it.
Litho in U.S.A.
Part
No. 10422802 A Third Edition
..
1 We support voluntary
technician certification.
WE SUPPORT
VOLUNTARY TECHNICIAN
CERTIFICATION THROUGH
AUTOMOTIVE Natlonal Institute for
SERVICE EXCELLENCE
For Canadian Owners Who Prefer a
French Language Manual:
Aux propriktaires canadiens: Vous pouvez vous
procurer un exemplaire de ce guide en fraqais chez
votre concessionaire
ou au:
DGN Marketing Services Ltd.
1577 Meyerside Drive
Mississauga, Ontario LST 1B9
@Copyright General Motors Corporation
1998
All Rights Reserved
ProCarManuals.com
Page 33 of 340

In many crashes severe enough to inflate an air bag,
windshields are broken by vehicle deformation.
Additional windshield breakage may also occur from the
right front passenger air bag.
Air bags are designed to inflate only once. After they
inflate, you’ll need some new parts for your air bag
system. If you don’t get them, the air bag system
won’t be there to help protect you in another crash.
A new system will include air bag modules and
possibly other parts. The service manual for your
vehicle covers the need to replace other parts.
Your vehicle is equipped with a crash sensing
and diagnostic module, which records information
about the air bag system. The module records
information about the readiness of the system,
when the sensors are activated and driver’s safety
belt usage at deployment.
Let only qualified technicians work on your air
bag system. Improper service can mean that your
air bag system won’t work properly.
See your
retailer for service.
NOTICE:
If you damage the covering for the driver’s or the
right front passenger’s air bag, the bag may not
work properly. You may have to replace the air
bag module in the steering wheel or both the air
bag module and the instrument panel for the
right front passenger’s air bag.
Do not open or
break the air bag coverings.
ProCarManuals.com
Page 34 of 340

If your vehicle ever gets into a lot of water -- such as
water up to the carpeting or higher
-- or if water enters
your vehicle and soaks the carpet, the air bag controller
can be soaked and ruined.
If this ever happens, and then
you start your vehicle, the damage could make the air
bags inflate, even if there’s no crash. You would have to
replace the air bags as well
as the sensors and related
parts. If your vehicle is ever
in a flood, or if it’s exposed
to water that soaks the carpet, you can avoid needless
repair costs by turning off
the vehicle immediately.
Don’t let anyone start the vehicle, even to tow it, unless
the battery cables are first disconnected.
Servicing Your Air Bag-Equipped Vehicle
Air bags affect how your vehicle should be serviced.
There are parts
of the air bag system in several places
around your vehicle. You don’t want the system
to
inflate while someone is working on your vehicle.
Your retailer and the Intrigue Service Manual have
information about servicing your vehicle and the air
bag system.
To purchase a service manual, see “Service
and Owner Publications” in
the Index.
AC IN:
For up to 10 minutes after the ignition key is
turned off and the battery is disconnected, an
air bag can still inflate during improper service.
You can be injured if you are close to an air bag
when it inflates. Avoid yellow connectors. They
are probably part of the air bag system. Be sure
to follow proper service procedures, and make
sure the person performing work for you
is
qualified to do so.
The air bag system does not need regular maintenance.
1-26
ProCarManuals.com
Page 68 of 340

You can customize the vehicle to activate the Last Door
Closed Locking feature as described previously
or to
completely disable the Last Door Closed Locking
feature at all times. If disabled, the doors will lock
immediately when a power door lock switch is pressed.
The Last Door Closed locking feature is enabled and
disabled when the doors are closed and the ignition key
is in
ON.
Press and hold the power door lock switch in the unlock
position. While holding the door unlock switch, cycle
the transaxle out of and back into PARK
(P). After an
initial transaxle cycle, each additional cycle will toggle
the enable/disable state
of the Last Door Closed Locking
feature. During this customization procedure, the chime
will sound, providing the driver feedback. A single
chime will be heard if the Last Door Closed Locking
feature
is disabled and two chimes will be heard if the
Last
Door Closed Locking feature is enabled. When the
door unlock switch is released, the vehicle will remain
in the most recent operating mode.
The Last Door Closed Locking feature will be enabled
when the vehicle is shipped from the factory.
Disconnecting the vehicle’s battery for up to a year will
not change the programmed mode of the Last Door
Closed Locking feature.
Keyless Entry System
If your vehicle has this option, you can lock and unlock
your doors or unlock your trunk from about
3 feet (1 m)
up to
30 feet (9 m) away using the remote keyless entry
transmitter supplied with your vehicle.
Your keyless entry system operates on a radio frequency
subject to Federal Communications Commission (FCC)
Rules and with Industry Canada.
This device complies with Part 15 of the FCC Rules.
Operation is subject to the following two conditions:
(1) this device may not cause harmful interference, and
(2) this device must accept any interference received,
including interference that may cause undesired
operation.
This device complies with RSS-210 of Industry Canada.
Operation is subject to the following two conditions:
(1) this device may not cause interference, and (2) this
device must accept any interference received, including
interference that may cause undesired operation of
the device.
Changes or modifications to this system by other than an
authorized service facility could void authorization to
use this equipment.
2-8
ProCarManuals.com
Page 69 of 340

This system has a range of about 3 feet (1 m) up to
30 feet (9 m). At times you may notice a decrease in
range. This is normal for any remote keyless entry
system. If the transmitter does not work or
if you have
to stand closer to your vehicle for the transmitter to
work, try this:
Check to determine if battery replacement is
necessary. See the instructions that follow.
Check the distance. You may be too far from your
vehicle.
You may need to stand closer during rainy
or snowy weather.
Check the location. Other vehicles or objects may be
blocking the signal. Take a few steps to the left or
right, hold the transmitter higher, and try again.
If you’re still having trouble, see your retailer or a
qualified technician for service.
Operation
Press UNLOCK once to
unlock the driver’s door and
to
turn the interior lamps on
(see “Illumination on
Remote Activation” in the
Index for more details).
Press UNLOCK again within five seconds
to unlock
all doors.
To lock all doors, press LOCK. To unlock the trunk,
press the trunk symbol
on the remote keyless entry
transmitter.
The trunk will only unlock when the vehicle
is in
PARK (P).
ProCarManuals.com
Page 75 of 340

During normal operation, the SECURITY light will go
off after the engine is started.
If the engine stalls and the SECURITY light flashes,
wait until the light stops flashing before trying to restart
the engine. Remember to release the key from the
START position as soon as the engine starts.
If you
are driving and the SECURITY light comes on,
you will be able to restart the engine
if you turn the
engine
off. However, your Passlock system is not
working properly and must be serviced by your retailer.
Your vehicle is not protected by Passlock at this time.
You may also want to check the fuse (see “Fuses and
Circuit Breakers” in the Index). See your retailer
for service.
If the SECURITY light comes on while the engine is
running, a problem has been detected and the system
may need service. See your retailer for service.
In
an emergency, call the Oldsmobile Roadside
Assistance Center at
1-800-442-OLDS (6537).
New Vehicle “Break-In”
NOTICE:
Your vehicle doesn’t need an elaborate
“break-in.” But
it will perform better in the
long run if you follow these guidelines:
Don’t drive at any one speed -- fast or
slow
-- for the first 500 miles (805 km).
Don’t make full-throttle starts.
200 miles (322 km) or so. During this time
your new brake linings aren’t yet broken
in. Hard stops with new linings can mean
premature wear and earlier replacement.
Follow this breaking-in guideline every
time
you get new brake linings.
Don’t tow a trailer during break-in. See
“Towing a Trailer” in the Index for more
information.
Avoid making hard stops for the first
2-15
ProCarManuals.com
Page 76 of 340

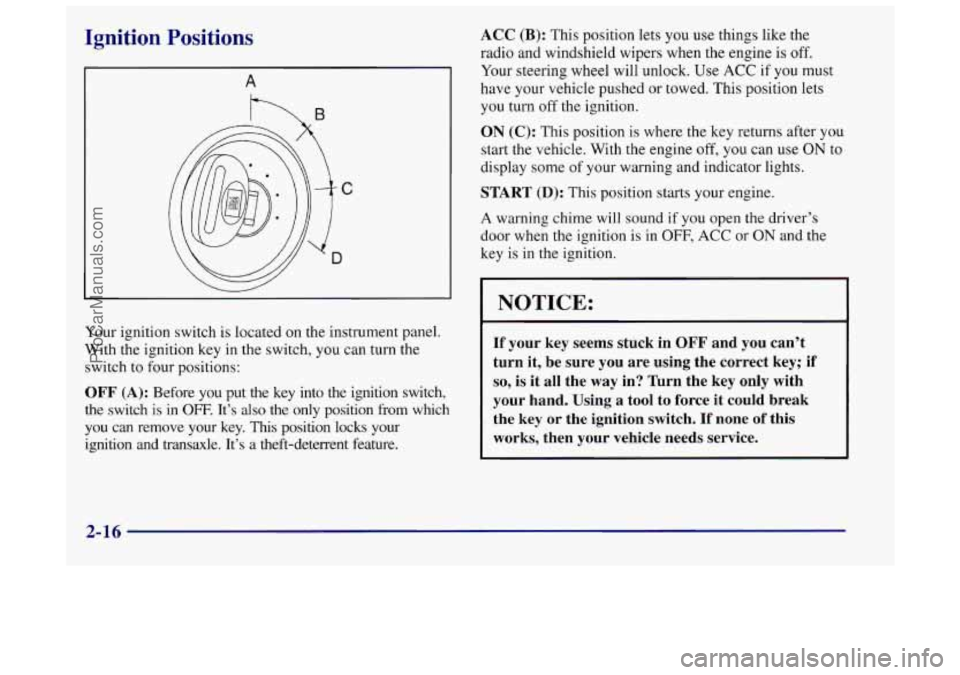
Ignition Positions
A
hB
Your ignition switch is located on the instrument panel.
With the ignition key
in the switch, you can turn the
switch to four positions:
OFF (A): Before you put the key into the ignition switch,
the switch is in OFF. It’s also the only position from which
you can remove your
key. This position locks your
ignition and transaxle. It’s a theft-deterrent feature.
ACC (B): This position lets you use things like the
radio and windshield wipers when the engine is off.
Your steering wheel will unlock. Use
ACC if you must
have your vehicle pushed
or towed. This position lets
you turn off the ignition.
ON (C): This position is where the key returns after you
start the vehicle. With the engine
off, you can use ON to
display some of your warning and indicator lights.
START (D): This position starts your engine.
A warning chime will sound if you open the driver’s
door when the ignition is in OFF, ACC or ON and the
key is in the ignition.
NOTICE:
If your key seems stuck in OFF and you can’t
turn it, be sure you are using the correct key; if
so, is it all the way in? Turn the key only with
your hand. Using
a tool to force it could break
the key
or the ignition switch. If none of this
works, then your vehicle needs service.
2-16
ProCarManuals.com
Page 82 of 340

DRIVE (D): This position is for normal driving. It is
the drive position. If you need more power for passing,
and you’re:
0 Going less than 35 mph (55 km/hj, push your
accelerator pedal about halfway down.
accelerator pedal all the way down.
0 Going about 35 mph (55 km/hj or more, push the
You’ll shift down to the next gear and have more power.
NOTICE:
If your vehicle seems to start up rather slowly, or
if it seems not to shift gears as you go faster,
something may be wrong with
a transaxle system
sensor. If you drive very far that
way, your
vehicle can be damaged.
So, if this happens, have
your vehicle serviced right away. Until then, you
can use
SECOND (2) when you are driving less
than
35 mph (55 kmh) and DRIVE (D) for
higher speeds.
THIRD (3): This position is also used for normal
driving. but it offers more power and lower fuel
economy than DRIVE (D).
Here are some times you might choose THIRD
(3)
instead of DRIVE (Dj:
0 When driving on hilly, winding roads.
0 When towing a trailer, so there is less shifting
between gears.
0 When going down a steep hill.
22
ProCarManuals.com
Page 116 of 340

Air Bag Readiness Light
There is an air bag readiness light on the instrument
panel, which shows the air bag symbol. The system
checks the air bag’s electrical system for malfunctions.
The light tells you if there is an electrical problem. The
system check includes the air bag modules, the wiring
and the crash sensing and diagnostic module. For more
information on the air bag system, see “Air Bag” in
the Index.
This light will come
on
when you start your engine.
and it will flash for a few
seconds. Then the light
should
go out. This means
the system
is ready.
If the air bag readiness light stays on after you start the
engine or comes on when you are driving, your air bag
system may not work properly. Have your vehicle
serviced right away.
The air bag readiness light should flash for
a few
seconds when you turn the ignition key to
ON. If the
light doesn’t come on then, have it fixed so it will be
ready
to warn you if there is a problem.
Charging System Light
The charging system light
will come on briefly when
you turn on the ignition
as
a check to show you it’s
working. Then it should
go out.
If it stays on, or comes
on while you are driving, you
may have a problem with the charging system.
It could
indicate that you have a loose drive belt or another
electrical problem. Have it checked right away. Driving while this light is on could drain your battery.
If you must drive a short distance with the light on, be
certain to turn off all
your accessories, such as the radio
and air conditioner.
Brake System Warning Light
Your vehicle’s hydraulic brake system is divided into
two parts. If one part isn’t working, the other part can
still work and stop you.
For good braking, though, you
need both parts working well.
If the warning light comes
on, there is a brake problem.
Have your brake system inspected right away.
2-56
ProCarManuals.com