radiator cap OLDSMOBILE SILHOUETTE 1994 Owners Manual
[x] Cancel search | Manufacturer: OLDSMOBILE, Model Year: 1994, Model line: SILHOUETTE, Model: OLDSMOBILE SILHOUETTE 1994Pages: 276, PDF Size: 15.82 MB
Page 169 of 276
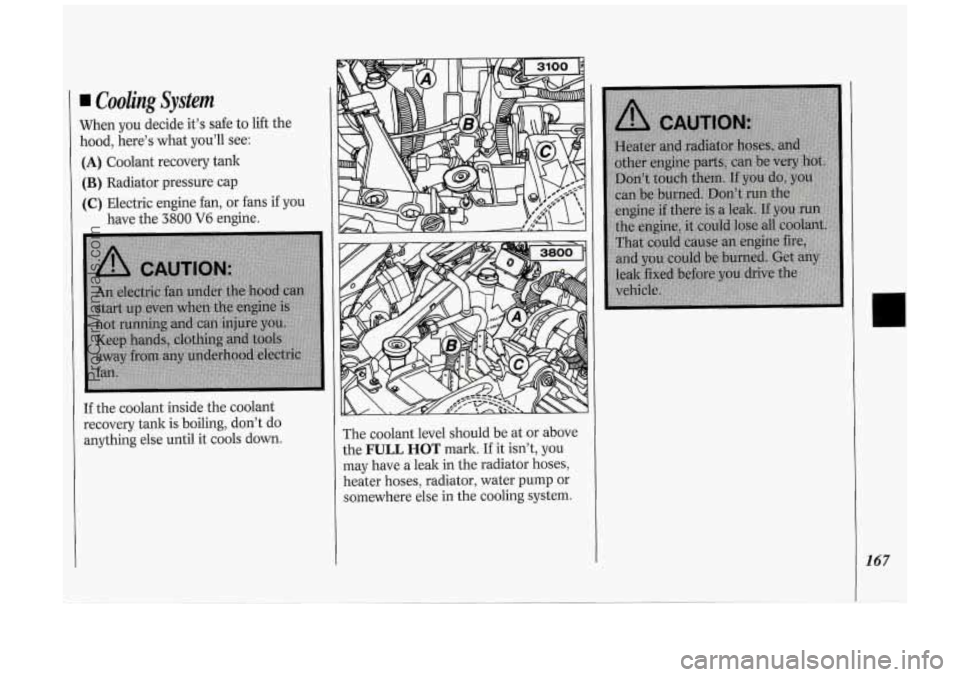
Cooling System
When you decide it’s safe to lift the
hood, here’s what you’ll see:
(A) Coolant recovery tank
(B) Radiator pressure cap
(C) Electric engine fan, or fans if you
have the
3800 V6 engine.
If the coolant inside the coolant
recovery tank is boiling, don’t do
anything else until it cools down. The coolant
level should be at or above
the
FULL HOT mark. If it isn’t, you
may have a leak in the radiator hoses,
heater hoses, radiator, water pump or
somewhere else in the cooling system.
ProCarManuals.com
Page 171 of 276
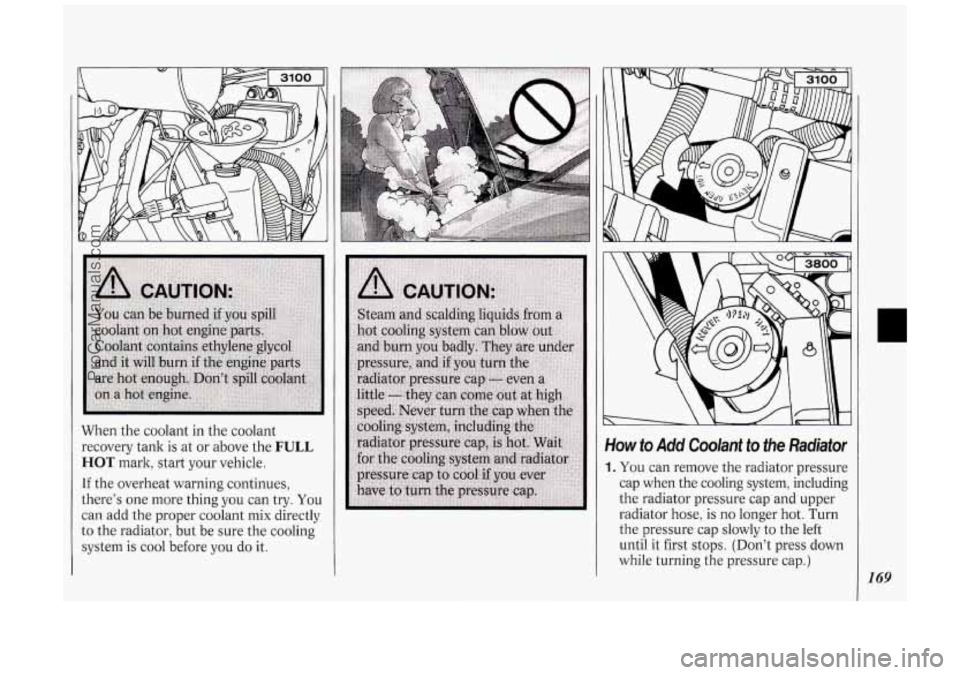
When the coolant in the coolant
recovery tank is
at or above the FULL
HOT mark, start your vehicle.
If the overheat warning continues,
there's one more thing you can try.
You
can add the proper coolant mix directly
to the radiator, but be sure the cooling
system is cool before you
do it.
Yow to Add Coolant to the Radiator
I. You can remove the radiator pressure
cap when the cooling system, including
the radiator pressure cap and upper
radiator hose, is
no longer hot. Turn
the pressure cap slowly to the left
until it first stops. (Don't press down
while turning the pressure cap.)
I69
ProCarManuals.com
Page 172 of 276
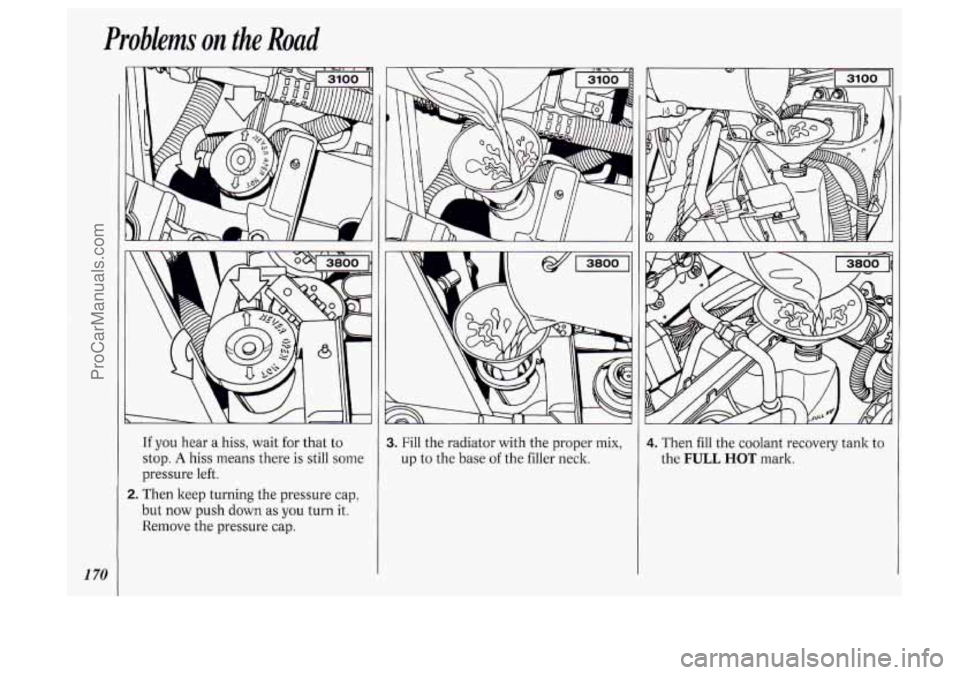
Problems on the Road
1 70
A
If you hear a hiss, wait for that to
stop.
A hiss means there is still some
pressure left.
E. Then keep turning the pressure cap,
but now push down as you turn it.
Remove the pressure cap.
I. Fill the radiator with the proper mix,
up to the base of the filler neck. 4. Then fill the coolant recovery tank to
the
FULL HOT mark.
ProCarManuals.com
Page 173 of 276
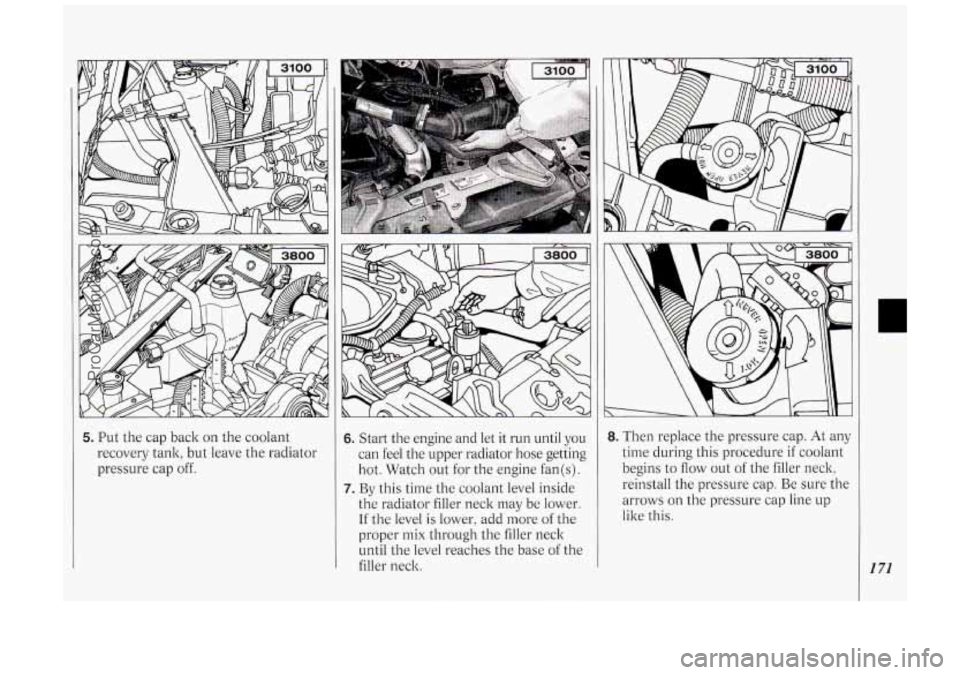
5. Put the cap back on the coolant
recovery tank, but leave the radiator
pressure cap off. 6. Start the engine and let it run until you
can feel the upper radiator hose getting
hot. Watch out for the engine fan(s).
7. By this time the coolant level inside
the radiator filler neck may be lower.
If the level is lower, add more of the
proper mix through the filler neck
until the level reaches the base of the
filler neck.
8. Then replace the pressure cap. At any
time during this procedure if coolant
begins to
flow out of the filler neck,
reinstall the pressure cap. Be sure the
arrows
on the pressure cap line up
like this.
171
ProCarManuals.com
Page 190 of 276
Service &Appearance Care
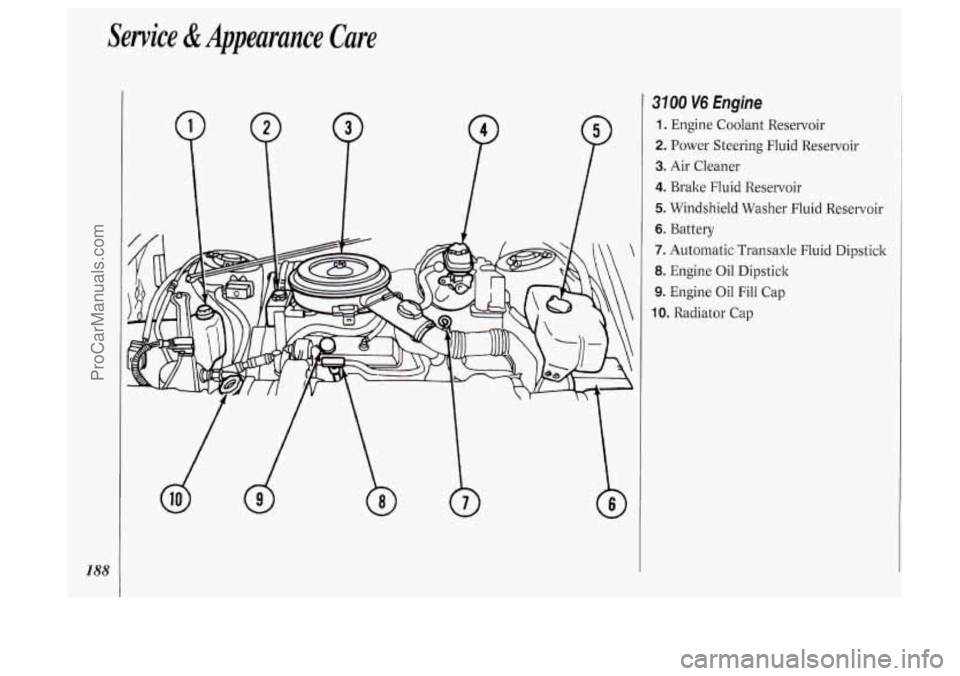
3100 V6 Engine
1. Engine Coolant Reservoir
2. Power Steering Fluid Reservoir
3. Air Cleaner
4. Brake Fluid Reservoir
5. Windshield Washer Fluid Reservoi
6. Battery r
7. Automatic
Transaxle Fluid Dipstick
8. Engine Oil Dipstick
9. Engine Oil Fill Cap
10. Radiator Cap
ProCarManuals.com
Page 191 of 276
P
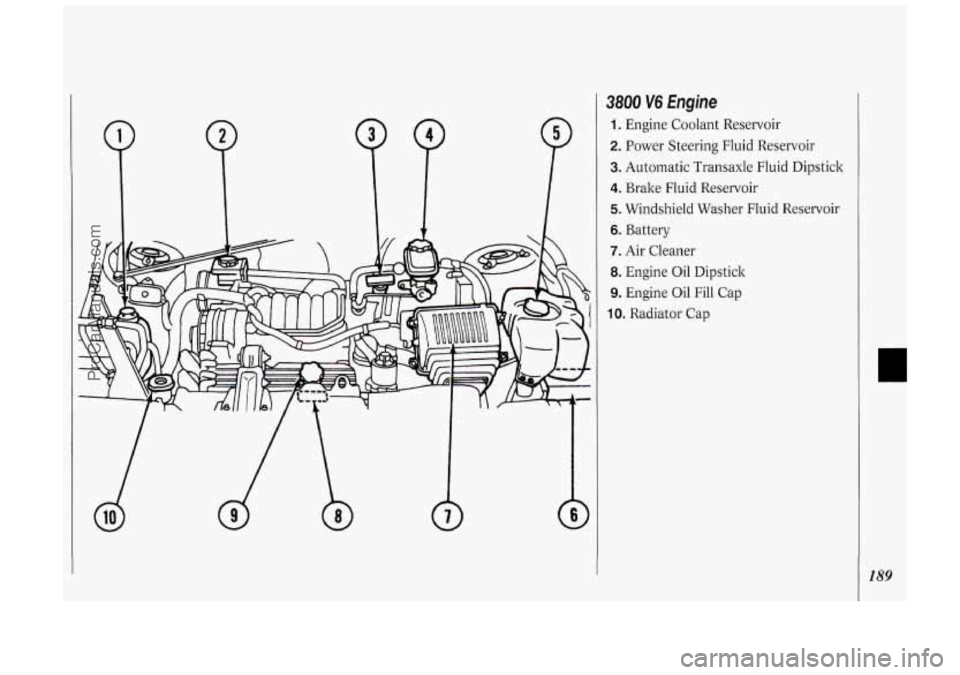
3800 V6 Engine
1. Engine Coolant Reservoir
2. Power Steering Fluid Reservoir
3. Automatic Transaxle Fluid Dipstick
4. Brake Fluid Reservoir
5. Windshield Washer Fluid Reservoir
6. Battery
7. Air Cleaner
8. Engine Oil Dipstick
9. Engine Oil Fill Cap
10. Radiator Cap
189
ProCarManuals.com
Page 201 of 276
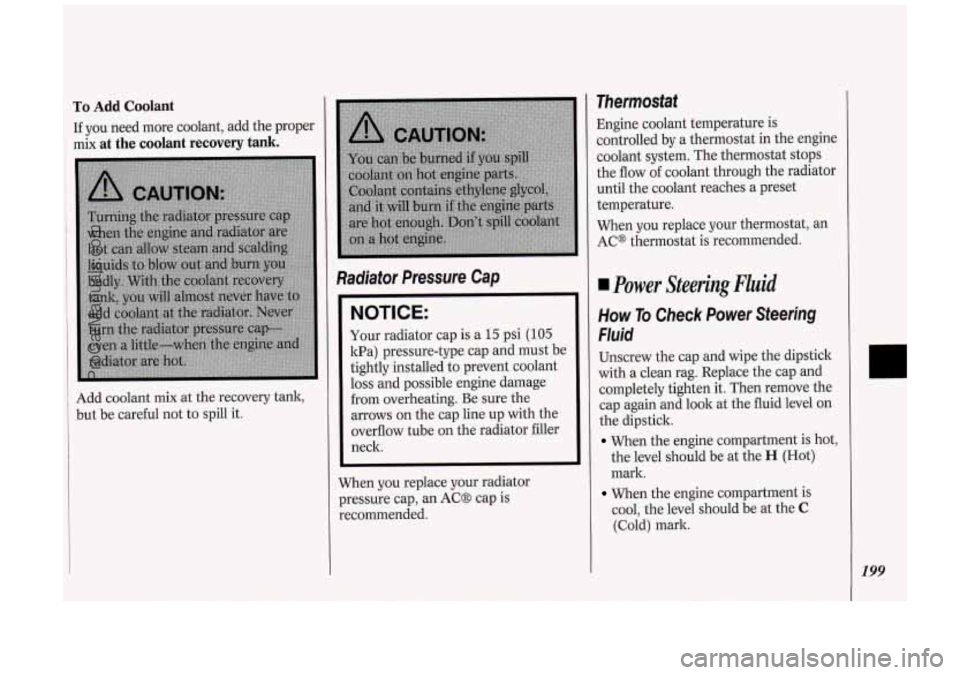
To Add Coolant
If you need more coolant, add the proper
mix
at the coolant recovery tank.
Add coolant mix at the recovery tank,
but be careful not to spill it.
Radiator Pressure Cap
NOTICE:
Your radiator cap is a 15 psi (105
kPa) pressure-type cap and must be
tightly installed to prevent coolant
loss and possible engine damage
from overheating. Be sure the
arrows on the cap line up with the
overflow tube on the radiator filler
neck.
When you replace your radiator
pressure cap, an AC8 cap is
recommended.
Thermostat
Engine coolant temperature is
controlled by a thermostat in the engine
coolant system. The thermostat stops
the flow of coolant through the radiator
until the coolant reaches a preset
temperature.
When you replace your thermostat, an
AC@ thermostat is recommended.
Power Steering Fluid
How To Check Power Steering
Fluid
Unscrew the cap and wipe the dipstick
with a clean rag. Replace the cap and
completely tighten it. Then remove the
cap again and look at the fluid level on
the dipstick.
When the engine compartment is hot,
the level should be at the
H (Hot)
mark.
When the engine compartment is
cool, the level should be at the
C
(Cold) mark.
199
ProCarManuals.com
Page 240 of 276
Maintenance Schedule
238
Explanation of Scheduled
Maintenance Services
Following are explanations of the
services listed in Schedule I and
Schedule 11.
The proper fluids and lubricants to use
are listed in Section D. Make sure
whoever services your vehicle uses
these. All parts should be replaced and
all necessary repairs done before you or
anyone else drives the vehicle.
ITEM
NO. SERVICE
1. Engine Oil and Filter Change* -
Always use SH or SG Energy
Conserving
I1 oils of proper viscosity.
The
“SH” or “SG” designation may
be shown alone
or in combination
with others, such as “SH/CD,”
“SH,
SG, CD,” “SG/CD,” etc. To
determine the preferred viscosity for
your vehicle’s engine (e.g.,
SAE 5W-
30 or SAE 10W-30), see
Engine Oil
in the Index.
2. Chassis Lubrication - Lubricate
suspension and steering linkage.
Lubricate the transaxle shift linkage,
and parking brake cable guides,
underbody contact points and
linkage.
3. Tire and Wheel Rotation and
Inspection
- For proper wear and
maximum tire life, rotate your tires
following the instructions in this
manual. See
Tires, Inspection E.
Rotation in the Index. Check the
tires for uneven wear
or damage. If
you see irregular or premature wear,
check the wheel alignment. Check for
damaged wheels also.
Engine Accessory Drive Inspection
- Inspect the drive belt for cracks,
fraying, wear and proper tension.
Replace as needed.
I
Cooling System Servicee - Drain,
flush and refill the system with new
or approved recycled coolant
conforming to GM Specification
I
1825M. Keep coolant at the proper 1
mixture as specified. See Coolant in
the
Index. This provides proper
freeze and boil protection, corrosion
I
inhibitor level and maintains proper ’
engine operating temperature.
Inspect hoses
and replace if they are
cracked, swollen or deteriorated.
Tighten screw-type hose clamps.
Clean the outside of the radiator and
air conditioning condenser. Wash tht
pressure cap and neck.
To help ensure proper operation, we
recommend
a pressure test of both the
cooling system and the pressure cap.
ProCarManuals.com
Page 269 of 276
Remote Control ................................ 48 .. Sliding Door ..................................... 52
Long Distance Driving
..................... 146
Low Battery
...................................... 158
Low Fuel Warning ............................ 101
Low Oil Pressure Warning
............... 102
Low Traction Light
........................... 105
Lubricants and Fluids ...................... 227
Luggage Carrier
.................................. 92
Maintenance Record
..................... 246
Maintenance Schedule
..................... 234
Malfunction Indicator Lamp
........... 106
Manual Front Seat
............................. 12
Manual Lap-Shoulder Safety Belt
..... 23
Methanol in Gasoline
....................... 183
Mileage Indicator
Mirrors (see
Odometer G. Speedometer)
Inside
Manual Day/Night ............... 86
Outside Convex
............................... 87
Power Remote Control
.................... 87
Mountain Driving
............................ 147
New Vehicle “Break-In”
Night Driving
................................... 142
Night Vision
..................................... 142
Visor Vanity
..................................... 88
Requirements ........................... 57.
152 Octane
Requirements
(see
Fuel Requirements)
Odometer & Speedometer ................. 99
Oil. Engine
........................................ 190
Pressure Gage
................................ 102
Pressure Indicator
......................... 101
Quality
........................................... 19 1
Thickness ....................................... 192
Used Oil
......................................... 194
When to Change
............................ 193
Oil Warning
...................................... 101
Outside Rearview Mirrors ................. 87
Overhead Console
........................ 79. 95
Overheated Engine
........................... 165
Warnings ................ 166. 187. 198. 199
Owner Checks
& Services ............... 240
Rrk. Shifting Into
............................. 66
Parking Over Things That Burn
................... 67
Parking Brake
..................................... 65
Passenger Belts (see
Safety Belts)
Passing .............................................. 140
Periodic Maintenance Inspections
.. 243
Polishing and Waxing
With
the Engine Running
........... 67. 68
Payload
............................................. 206
(see
Appearance Care )
Power (Anti-Lock) Brakes ............... 135 Power
Door Locks
............................. 46
Power Mirrors
.................................... 87
Power Outlet. Accessory
.................... 84
Power Seat Controls
.......................... 13
Power Sliding Door .................... 52. 107
Power Steering
................................. 138
Power Steering Fluid ....... 199.225. 227
Power Windows
......................... 70. 223
During
.............................................. 30
Problems on the Road
...................... 157
Publications
...................................... 254
Pregnancy.
Use
of Safety Belts
Radiator Overheating
(see
Overheated Engine )
Radiator Pressure Cap ..................... 199
Radio (see
Audio Systems)
Reading Lights .................................... 80
Rear Climate Control
....................... 113
Rear Interior Lights ............................ 84
Rear Seats
........................................... 15
Removing ......................................... 16
Replacing
......................................... 18
Third Row Entry .............................. 15
Rear Window Defogger .................... 115
Rear Window Wiper and Washer
...... 79
Rearview Mirror
................................. 86
Reclining Seatbaclts
........................... 13
.. Ad~ustmg .......................................... 17
267
ProCarManuals.com