tow OLDSMOBILE SILHOUETTE 1996 Service Manual
[x] Cancel search | Manufacturer: OLDSMOBILE, Model Year: 1996, Model line: SILHOUETTE, Model: OLDSMOBILE SILHOUETTE 1996Pages: 372, PDF Size: 19.39 MB
Page 256 of 372

Checking Engine Oil
Pull out the dipstick and clean it with a paper towel or
cloth, then push it back in all
the way. Remove it again,
keeping the tip down, and check the level.
I
When to Add Oil
If the oil is at or below the ADD mark, then you’ll need
to add some oil. But you must use the right kind. This
part explains what kind
of oil to use. For crankcase
capacity, see “Capacities and Specifications’’
in
the Index.
NOTICE:
Don’t add too much oil. If your engine has so
much oil that the oil level gets above the
cross-hatched area that shows the proper
operating range, your engine could be damaged.
6-10
ProCarManuals.com
Page 259 of 372
When to Change Engine Oil
See if any one of these is true for you:
0
0
0
0
0
Most trips are less than 5 to 10 miles (8 to 16 km).
This is particularly important when outside
temperatures
are below freezing.
Most trips include extensive idling (such as frequent driving in stop-and-go traffic).
Most trips
are through dusty areas.
You frequently tow a trailer or use a carrier on top of
your vehicle.
The vehicle is used for delivery service, police, taxi
or other commercial application.
Driving under these conditions causes engine oil to
break down sooner. If any one of these is true for your
vehicle, then you need to change your oil and filter
every
3,000 miles (5 000 km) or 3 months -- whichever
occurs first.
If none of them is true, change the oil and filter every
7,500 miles (12 500 km) or 12 months -- whichever
occurs first. Driving a vehicle with a fully warmed
engine under highway conditions causes engine oil to
break down slower.
.What to Do with Used Oil
Did you know that used engine oil contains certain
elements that may be unhealthy for your skin and could
even cause cancer? Don’t let used oil stay on your skin
for very long. Clean your skin and nails with soap and
water, or a good hand cleaner. Wash or properly throw
away clothing or rags containing used engine oil. (See
the manufacturer’s warnings about the use and disposal
of oil products.)
Used oil can be a real threat to the environment. If you
change your own oil, be sure to drain all free-flowing oil
from the filter before disposal. Don’t ever dispose of oil
by putting it in
the trash, pouring it on the ground, into
sewers, or into streams or bodies of water. Instead,
recycle it by taking it to a place that collects used oil. If
you have a problem properly disposing of your used oil,
ask your retailer, a service station or a local recycling
center for help.
6-13
ProCarManuals.com
Page 261 of 372

Checking or Replacing the Air Cleaner
1. Loosen the four wing nuts.
2. Pull the top of the air cleaner toward the fro t of the
vehicle and remove the air cleaner filter.
P
3. Be sure to install the air cleaner filter, replace the
cover and tighten the wing nuts securely.
Automatic Transaxle Fluid
When to Check and Change
A good time to check your automatic transaxle fluid
level is when the engine oil is changed.
Change both the fluid and filter every
50,000 miles
(83 000 krn) if the vehicle is mainly dnven under one or
more of these conditions:
In heavy city traffic where the outside temperature
regularly reaches
90 OF (3 2 O C) or higher.
0 In hilly or mountainous terrain.
0 When doing frequent trailer towing.
Uses such as found in taxi, police or delivery service.
If you do not use your vehicle under any
of these
conditions, the fluid and filter do not require changing.
See “Scheduled Maintenance Services” in the Index.
6-15
ProCarManuals.com
Page 263 of 372

Then, without shutting off the engine, follow these steps:
P
1. The dipstick is located toward the back of the engine
compartment, near the center. The dipstick handle
has a bright red loop design for easier identification.
Pull out the dipstick and wipe it with a clean rag or
paper towel.
2. Push it back in all the way, wait three seconds and
then pull it back out again.
3. Check both sides of the dipstick, and read the
lower level. The fluid level
must be in the
cross-hatched area.
4. If the fluid level is in the acceptable range, push the
dipstick back in all the way.
6-17
ProCarManuals.com
Page 266 of 372

I 1
I NOTICE: I
If you use an improper coolant mix, your engine
could overheat and be badly damaged. The
repair cost wouldn’t be covered by your
warranty.
Too much water in the mix can freeze
and crack the engine, radiator, heater core and
other parts.
If you have to add coolant more than four times a year,
have your retailer check your cooling system.
NOTICE:
If you use the proper coolant, you don’t have to
add extra inhibitors or additives which claim to
improve the system. These can be harmful.
Checking Coolant
The engine coolant reservoir is located on the
passenger’s side of the vehicle towards the middle of
the engine compartment.
When your engine is cold,
the coolant level should be at
FULL
COLD, or a little higher. When your engine is
warm, the level should be up to FULL
HOT, or a
little higher.
ProCarManuals.com
Page 270 of 372
rF
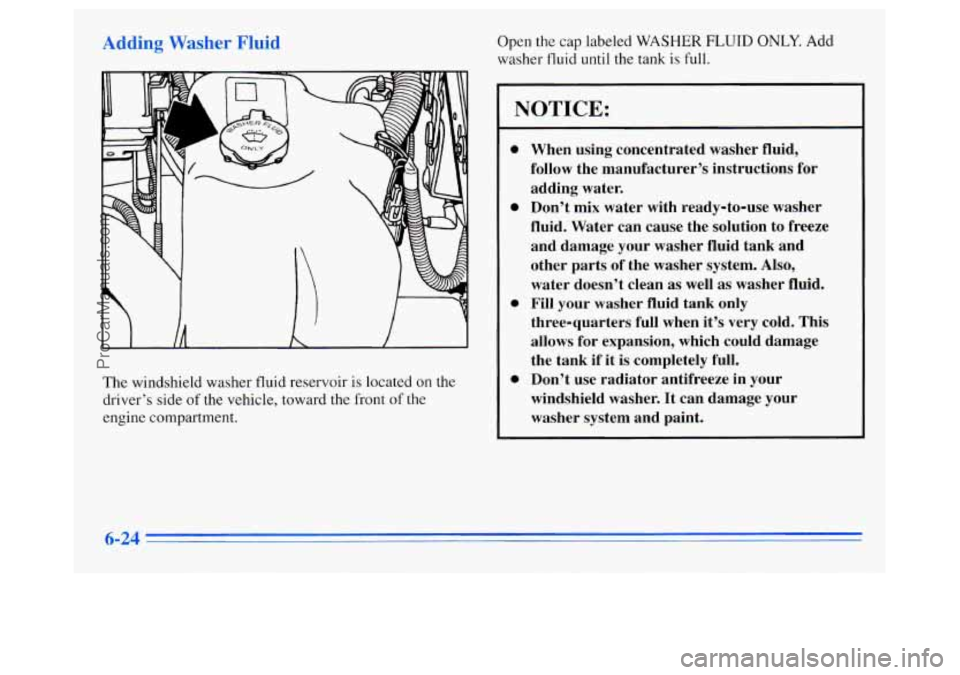
The windshield washer fluid reservoir is located on the
driver’s side
of the vehicle, toward the front of the
engine compartment. Open
the cap
labeled WASHER FLUID ONLY. Add
washer fluid
until the tank is full.
NOTICE:
0
0
0
0
When using concentrated washer fluid,
follow the manufacturer’s instructions for
adding water.
Don’t mix water with ready-to-use washer
fluid. Water can cause the solution to freeze
and damage your washer fluid tank and
other parts of the washer system. Also,
water doesn’t clean as well as washer fluid.
Fill your washer fluid tank only
three-quarters full when it’s very cold. This
allows for expansion, which could damage
the tank if it is completely full.
Don’t use radiator antifreeze in your
windshield washer. It can damage your
washer system and paint.
ProCarManuals.com
Page 283 of 372
Tire Inspection and Rotation
Tires should be inspected every 6,000 to 8,000 miles
(10 000 to 13 000 km) for any signs of unusual wear.
If unusual wear is present, rotate your tires as soon as
possible and check wheel alignment. Also check for
damaged tires or wheels. See “When It’s Time for New
Tires” and “Wheel Replacement” later in this section for
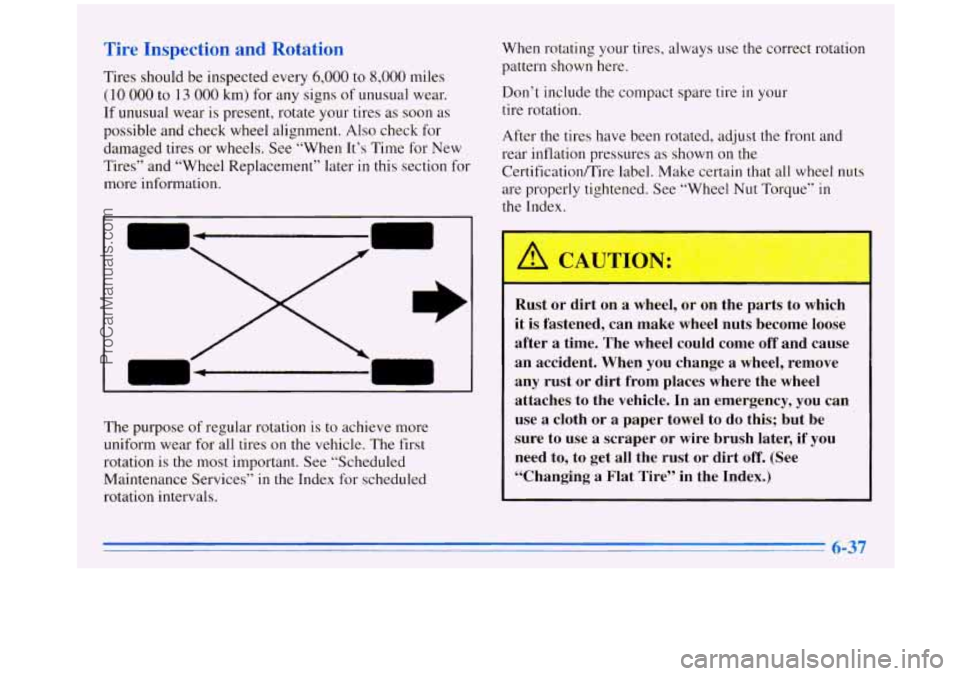
more information. When rotating your tires, always use the correct rotation
pattern shown
here.
Don’t include the compact spare tire
in your
tire rotation.
After the tires have been rotated, adjust the
,. ont and
rear inflation pressures as shown on the
CertificatiodTire label. Make certain that all wheel
nuts
are properly tightened. See “Wheel Nut Torque” in
the Index.
/
The purpose of regular rotation is to achieTe 1yicsre
uniform wear for
all tires on the vehicle. The first
rotation is the most important. See “Scheduled
Maintenance Services”
in the Index for scheduled
rotation intervals.
Rust or dirt on a wheel, or on the parts to which
it is fastened, can make wheel nuts become loose
after
a time. The wheel could come off and cause
an accident. When you change
a wheel, remove
any rust or dirt from places where the wheel
attaches to the vehicle. In an emergency, you can
use
a cloth or a paper towel to do this; but be
sure to use a scraper
or wire brush later, if you
need to, to get all the rust or dirt off. (See
“Changing a Flat Tire” in the Index.)
6-37
ProCarManuals.com
Page 289 of 372
Cleaning the Inside of
Your Oldsmobile
Use a vacuum cleaner often to get rid of dust and loose
dirt. Wipe vinyl or leather with a clean, damp cloth.
Your Oldsmobile retailer has two
GM cleaners, a
solvent-type spot lifter and a foam-type powdered
cleaner. They will clean normal spots and stains very
well. Do not
use them on vinyl or leather.
Here are some cleaning tips:
0
0
0
0
0
Always read the instructions on the cleaner label.
Clean up stains as soon as you can
-- before they set.
Use a clean cloth or sponge, and change to a clean
area often. A soft brush may be used if stains
are stubborn.
Use solvent-type cleaners
In a well-ventilated area
only. If you use them, don’t saturate the stained area.
If a ring forms after spot cleaning, clean the entire
area immediately or it will set.
Using Foam-vpe Cleaner on Fabric
I. Vacuum and brush the area to remove any
loose dirt.
2. Always clean a whole trim panel or section. Mask
surrounding trim along stitch
or welt lines.
3. Mix Multi-Purpose Powdered Cleaner following
the directions on the container label.
4. Use suds only and apply with a clean sponge.
5. Don’t saturate the material.
6. Don’t rub it roughly.
7. As soon as you’ve cleaned the section, use a sponge
to remove the suds.
8. Rinse the section with a clean, wet sponge.
9. Wipe off what’s left with a slightly damp paper
towel or cloth.
10. Then dry it immediately with a blow dryer.
11. Wipe with a clean cloth.
6-43
ProCarManuals.com
Page 290 of 372
Using Solvent-Type Cleaner on Fabric
First, see if you have to use solvent-type cleaner at all.
Some spots and stains will clean off better with just
water and mild soap.
If you need to use
a solvent:
0 Gently scrape excess soil from the trim material with
a clean, dull knife or scraper. Use very little cleaner,
light pressure and clean cloths (preferably
cheesecloth). Cleaning should start at the outside of
the stain, “feathering” toward
the center. Keep
changing to
a clean section of the cloth.
dry the area with
a blow dryer to help prevent a
cleaning ring.
0 When you clean a stain from fabric, immediately
Special Cleaning Problems
Greasy or Oily Stains
Stains caused by grease, oil, butter, margarine, shoe
polish, coffee with cream, chewing gum, cosmetic
creams, vegetable oils, wax crayon, tar and asphalt can
be removed
as follows:
I. Carefully scrape off excess stain.
2. Follow the solvent-type instructions described earlier.
3. hoe polish, wax crayon, tar and asphalt will stain if
left on a vehicle’s seat fabric. They should be removed
as soon as possible. Be careful, because the cleaner
will dissolve them and may cause them to spread.
Non-Greasy Stains
Stains caused by catsup, coffee (black), egg, fruit, fruit
juice, milk, soft drinks, wine, vomit, urine and blood can
be removed
as follows:
1. Carefully scrape off excess stain, then sponge the
soiled area with cool water.
2. If a stain remains, follow the foam-type instructions
3. If an odor lingers after cleaning vomit or urine,
treat the area with
a watedbaking soda solution:
1 teaspoon (5 ml) of baking soda to 1 cup (250 ml)
of lukewarm water.
described earlier.
4. If
needed, clean lightly with solvent-type cleaner.
Combination Stains
Stains caused by candy, ice cream, mayonnaise, chili
sauce and unknown stains can be removed
as follows:
Carefully scrape off excess stain, then clean with
If a stain remains, clean it with solvent-type cleaner.
cool water
and allow to dry.
6-44
ProCarManuals.com
Page 293 of 372
Don’t use cleaning agents that are petroleum based, or
that contain acid or abrasives.
All cleaning agents
should be flushed promptly and not allowed to dry on
the surface, or they could stain. Dry the finish with a
soft, clean chamois or a
100% cotton towel to avoid
surface scratches and water spotting.
Before you enter an automatic car wash, if your vehicle
is equipped with the optional power sliding door, be sure
to have
the ON/OFF switch in the OFF position.
High pressure car washes may cause water
to enter
your vehicle.
Finish Care
Occasional waxing or mild polishing of your
Oldsmobile by hand may be necessary to remove
residue from
the paint finish. You can get GM-approved
cleaning products from your retailer. (See “Appearance
Care and Materials”
in the Index.)
Your Oldsmobile has a “basecoat/clearcoat” paint finish.
The clearcoat gives more depth and gloss to the colored
basecoat. Always use waxes and polishes that are
non-abrasive and made for a basecoat/clearcoat
paint finish.
NOTICE:
Machine compounding or aggressive polishing on
a basecoatklearcoat paint finish may dull the
finish or leave swirl marks.
Foreign materials such as calcium chloride and other
salts, ice melting agents, road oil and tar, tree sap, bird
droppings, chemicals from industrial chimneys, etc., can
damage your vehicle’s finish
if they remain on painted
surfaces. Wash the vehicle as soon as possible. If
necessary, use non-abrasive cleaners that are marked
safe for painted surfaces to remove foreign matter.
Exterior painted surfaces are subject to aging, weather
and chemical fallout that can take their toll over a period
of years. You can help to keep the paint finish loohng
new by keeping your Oldsmobile garaged or covered
whenever possible.
6-47
ProCarManuals.com