clock OLDSMOBILE SILHOUETTE 1996 Owners Manual
[x] Cancel search | Manufacturer: OLDSMOBILE, Model Year: 1996, Model line: SILHOUETTE, Model: OLDSMOBILE SILHOUETTE 1996Pages: 372, PDF Size: 19.39 MB
Page 69 of 372

Power Door Locks (Option)
From the inside, press the front of the power door lock switch
(on either front door), to unlock all doors and the liftgate\
.
You can lock all doors and the liftgate from the inside,
by pressing the rear of the power lock switch on either
front door.
If you have the optional Remote Lock Control system,
your vehicle has a special security feature. If the driver’s
door is open and your key is in the ignition
in the OFF
position, you won’t be able to set the door locks with the power door lock switch
or the remote transmitter.
This
feature is designed to help keep you from locking your
keys in your vehicle.
If the sliding door is open when you press the power
door lock switch, it will lock automatically within
five seconds after you close it.
If
you have the optional Remote Lock Control system,
this feature will be replaced by a different lock delay
system. See “Remote Lock Control” later in this section.
With power locks, when the doors are locked, the inside as
well as the outside door latch release cannot open the
doors.
This safety feature prevents a door from being
accidentally opened from the inside by moving the handle.
To override this safety feature, slide the locking lever to
the unlock position on the door you want to open.
When the liftgate has been unlocked with the power door locks, you won’t need the key to open it. Simply
turn the
lock clockwise until the latch releases.
This is also true if
you use the optional Remote Lock Control transmitter.
See “Remote Lock Control” later in this section.
To lock the liftgate, use either the power door lock switch
or the optional Remote Lock Control transmitter.
You may
also lock it manually by turning the lock counterclockwise.
2-5
ProCarManuals.com
Page 75 of 372
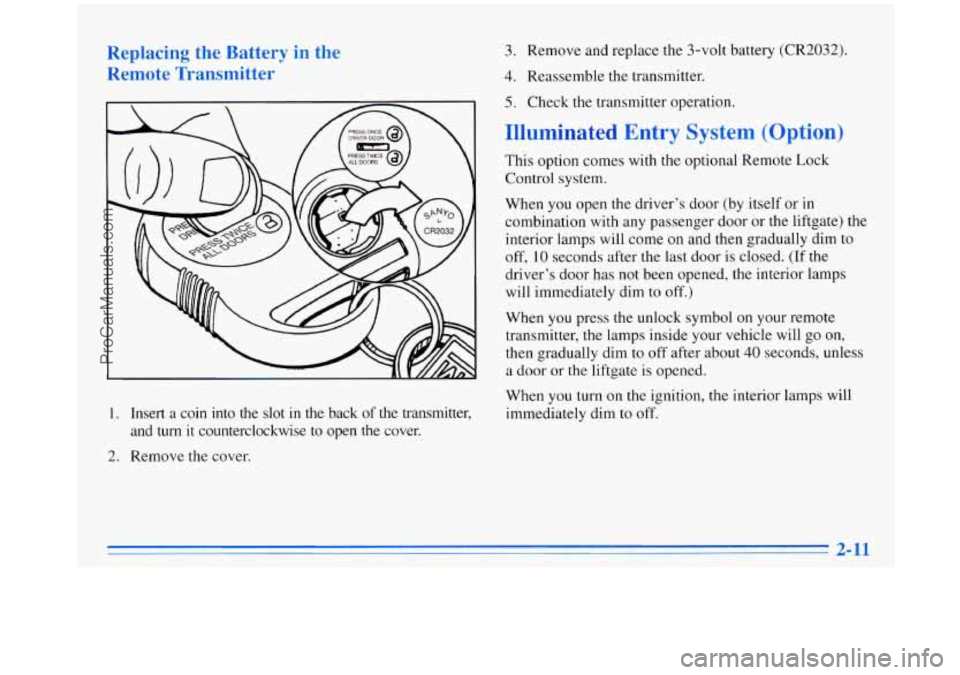
Replacing the Battery in the Remote Transmitter
1. Insert a coin into the slot in the back of the transmitter,
and
turn it counterclockwise to open the cover.
2. Remove the cover.
3. Remove and replace the 3-volt battery (CR2032).
4. Reassemble the transmitter.
5. Check the transmitter operation.
Illuminated Entry System (Option)
This option comes with the optional Remote Lock
Control system.
When
you open the driver’s door (by itself or in
combination with any passenger door or
the liftgate) the
interior lamps will come on and then gradually dim to
off, 10 seconds after the last door is closed. (If the
driver’s door has not been opened, the interior lamps
will immediately dim to off.)
When you press the unlock symbol on your remote
transmitter, the lamps inside your vehicle will go on,
then gradually dim to off after about
40 seconds, unless
a door or the liftgate is opened.
When you turn on the ignition, the interior lamps will
immediately dim to off.
2-11
ProCarManuals.com
Page 85 of 372

Liftgate Lock Theft
J
To unlock the liftgate, insert the door key and turn the
lock clockwise. The liftgate will automatically lock
when you close
it.
If you have the optional power door locks or the Remote
Lock Control system, the liftgate will lock and unlock
differently. See “Power
Door Locks” in the Index. Vehicle theft is big business, especially
in some cities.
Although your Oldsmobile has a number
of theft-deterrent
features, we know that nothing we put
on it can make it
impossible to steal. However, there are ways you
can help.
Key in the Ignition
If you leave your vehicle with the keys inside, it’s an
easy target for joy riders
or professional thieves -- so
don’t do it.
When
you park your Oldsmobile and open the driver’s
door, you’ll hear a chime reminding
you to remove your
key from the ignition and take
it with you. Always do this.
Your steering wheel will be locked, and
so will your
ignition and transaxle. And remember to lock the doors.
Parking at Night
Park in a lighted spot, close all windows and lock your
vehicle. Remember
to keep your valuables out of sight.
Put them in a storage area, or take them with you.
.~ 2-21
ProCarManuals.com
Page 128 of 372
c
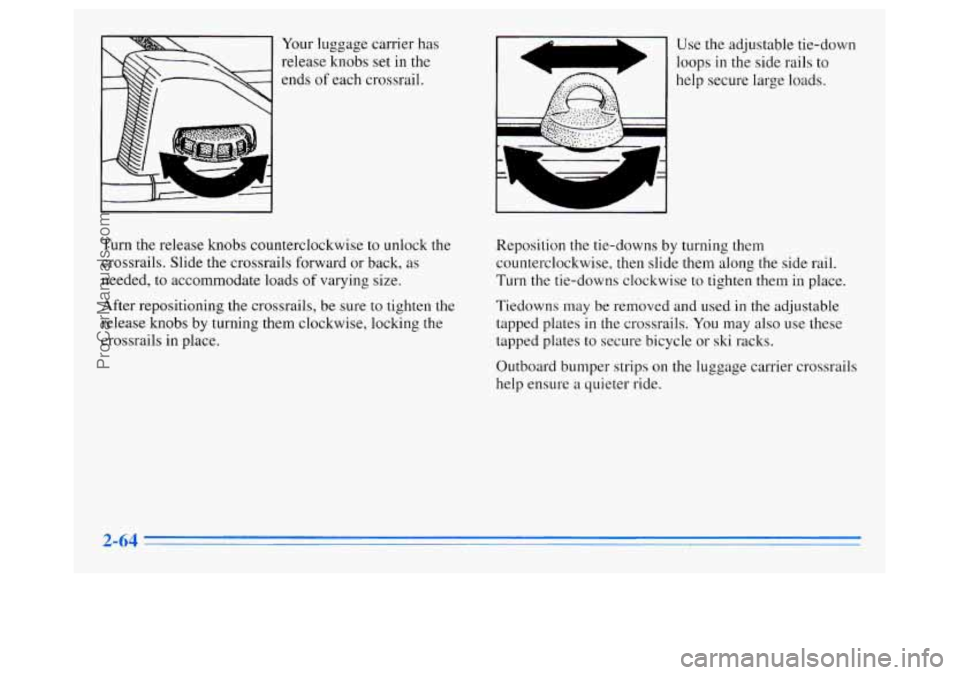
Your luggage carrier has
release knobs set in the
ends
of each crossrail. I L A
Use the adjustable tie-down
loops
in the side rails to
I help secure large loads. i
Turn the release knobs counterclockwise to unlock the
crossrails. Slide the crossrails forward or back,
as
needed, to accommodate loads of varying size.
After repositioning the crossrails, be sure to tighten the
release knobs by turning them clockwise, locking
the
crossrails in place. Reposition the tie-downs
by turning them
counterclockwise, then slide them along the side rail.
Turn the tie-downs clockwise to tighten them in place.
Tiedowns
may be removed and used in the adjustable
tapped plates
in the crossrails. You may also use these
tapped plates to secure bicycle or
ski racks.
Outboard bumper strips
on the luggage carrier crossrails
help ensure
a quieter ride.
2-64
ProCarManuals.com
Page 157 of 372

Rear Window Defogger
Press R. DEF (Rear Defog) to warm the defogger grid on
the rear window. The indicator light will glow while the
rear window defogger is operating. The rear window
defogger will turn
off automatically after about 10 minutes
of use. If you
turn it on again, the defogger will operate
for about five minutes only. You can also turn the defogger
off by turning off the ignition or pressing the switch again.
Do not attach a temporary vehicle license across the
defogger grid on the rear window.
I NOTICE:
Don’t use a razor blade or something else sharp
on the inside
of the rear window. If you do, you
could cut or damage the warming grid, and the
repairs wouldn’t be covered
by your warranty.
Audio Systems
Your Delco@ audio system has been designed to operate
easily and give years
of listening pleasure. You will get
the most enjoyment out
of it if you acquaint yourself
with it first. Find out what your Delco system can do
and how to operate all its controls, to be sure you’re
getting the most out of the advanced engineering that
went into it.
Setting the Clock for AM-FM Stereo
Press SET. Within five seconds, press and hold SEEK
down arrow
until the correct hour appears. Press and
hold SEEK up arrow
until the correct minute appears.
Setting the Clock for AM-FM Stereo with
Cassette Tape Player
Press SET. Within five seconds, press and hold SEEK
left arrow until the correct hour appears. Press and hold
SEEK right arrow until the correct minute appears.
Setting the Clock for AM-FM Stereo with
Compact Disc Player
Press SET. Within five seconds, press and hold SEEK
until the correct hour appears. Press and hold SCAN
until the correct minute appears.
ProCarManuals.com
Page 158 of 372
AM-FM Stereo Finding a Station
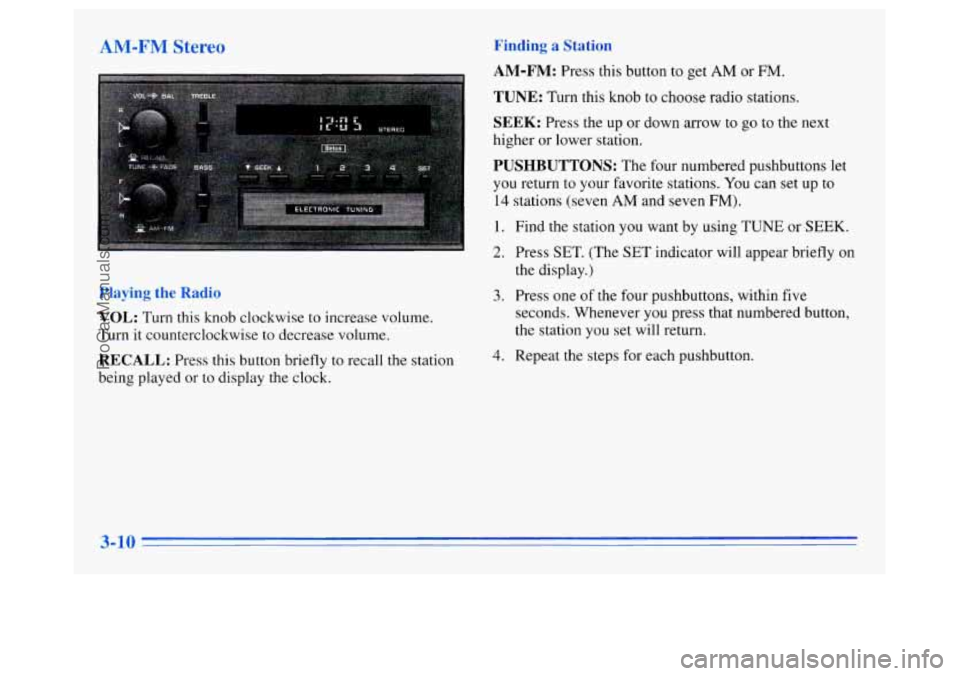
AM-FM:
Press this button to get AM or FM.
TUNE: Turn this knob to choose radio stations.
SEEK: Press the up or down arrow to go to the next
higher or lower station.
PUSHBUTTONS: The four numbered pushbuttons let
you return to your favorite stations.
You can set up to
14 stations (seven AM and seven FM).
1. Find the station you want by using TUNE or SEEK.
2. Press SET. (The SET indicator will appear briefly on
the display.)
Playing the Radio
VOL:
Turn this knob clockwise to increase volume.
Turn
it counterclockwise to decrease volume.
RECALL: Press this button briefly to recall the station
being played or to display the clock.
3. Press one of the four pushbuttons, within five
seconds. Whenever you press that numbered button,
the station you set will return.
4. Repeat the steps for each pushbutton.
3-10
ProCarManuals.com
Page 159 of 372

In addition to the four stations set as above, up to
three additional stations may be preset
on each band by
pressing two adjoining buttons at
the same time. Just:
1. Tune in the desired station.
2. Press SET. (The SET indicator will appear on
the display.)
time (within five seconds).
3. Press any two adjoining pushbuttons at the same
4. Whenever you press the same buttons, the station
you set will return.
Setting the Tone
BASS:
Slide this lever up to increase bass and down to
decrease it.
TREB: Slide this lever up to increase treble and down
to decrease it. If a station is weak or noisy, slide the
lever down
to reduce the noise.
Adjusting the Speakers
BAL:
This control behind the upper knob adjusts the
sound between the right and left speakers.
FADE: This control behind the lower knob adjusts the
sound between your front and rear speakers.
AM-FM Stereo with Cassette Tape Player
(Option)
Playing the Radio
VOL-BAL-PROG-RCL:
This knob turns the system
on and
off and controls the volume. Turn the upper knob
clockwise to increase volume. Turn
it counterclockwise
to decrease volume. Press the upper knob briefly to
recall the station being played or to display the clock. If
you press the button when the ignition is off, the clock
will show for
a few seconds.
3-11
ProCarManuals.com
Page 162 of 372
AM-FM Stereo with Cassette Tape Player
(Option)
Playing the Radio
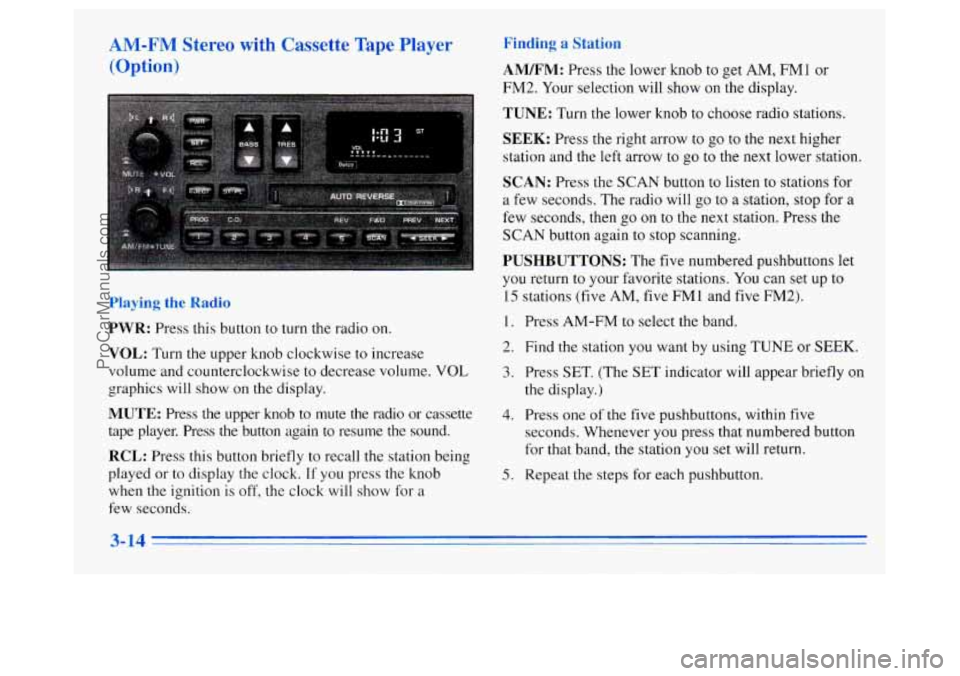
PWR: Press this button to turn the radio on.
VOL: Turn the upper knob clockwise to increase
volume and counterclockwise to decrease volume.
VOL
graphics will show on the display.
MUTE: Press the upper knob to mute the radio or cassette
tape player. Press the button again to resume the sound.
RCL: Press this button briefly to recall the station being
played
or to display the clock. If you press the knob
when the ignition is off,
the clock will show for a
few seconds.
Finding a Station
AM/FM: Press the lower knob to get AM, FMl or
FM2. Your selection will show on
the display.
TUNE: Turn the lower knob to choose radio stations.
SEEK: Press the right arrow to go to the next higher
station and the left arrow to
go to the next lower station.
SCAN: Press the SCAN button to listen to stations for
a few seconds. The radio will go to a station, stop for
a
few seconds, then go on to the next station. Press the
SCAN button again to stop scanning.
PUSHBUTTONS: The five numbered pushbuttons let
you return to your favorite stations. You can set up
to
15 stations (five AM, five FM1 and five FM2).
1.
2.
3.
4.
5.
Press AM-FM to select the band.
Find
the station you want by using TUNE or SEEK.
Press SET. (The SET indicator will appear briefly on
the display.)
Press one of
the five pushbuttons, within five
seconds. Whenever you press that numbered button
for that band, the station you set will return.
Repeat the steps for each pushbutton.
3- 14
ProCarManuals.com
Page 164 of 372

PREV: Press the SEEK left arrow to search for the
previous selection on the tape.
A four-second quiet
interval must be present for the tape to stop. The tape
will also stop when
PROG or the SEEK right arrow
is pressed.
NEXT Press the SEEK right arrow to search for the
next selection
on the tape. Your tape must have at least
four seconds of silence between each selection for
NEXT or
SEEK to work. Press PREV or the SEEK
right arrow to stop searching.
ST-PL: To switch from tape to radio immediately, press
the ST-PL button and the radio will resume playing the
station that was tuned in when you inserted a tape.
Pressing the button again will allow the tape to
resume playing.
EJECT: Press this button to remove the tape. The radio
will play. EJECT may be activated with either the
ignition or the radio off.
AM-FM Stereo with Compact Disc Player
(Option)
Playing the Radio
POWER: Press this button to turn the system on or off
when the ignition is on.
VOL: Press the up arrow to increase volume and the
down arrow to decrease volume. The bottom of the
digital screen displays the setting. For a normal listening
level preset at the factory, press the center of
the button.
RCL: Press this button to recall the station being played
or to display
the clock. RCL may be pressed with the
ignition off to display the time.
3-16
ProCarManuals.com
Page 184 of 372
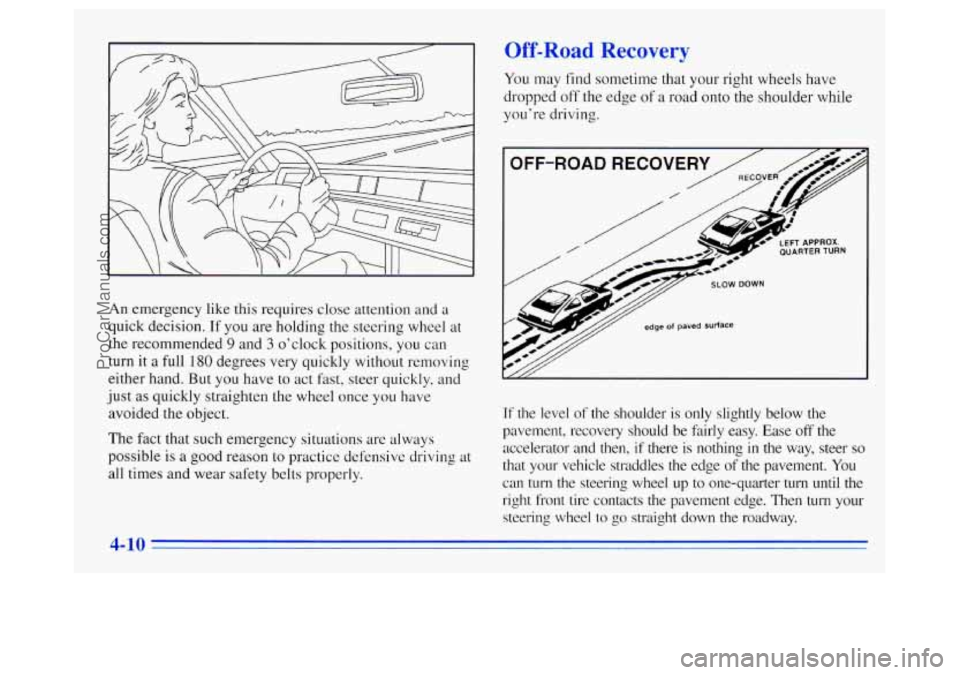
An emergency like this requires close attention and a
quick decision. If you are holding the steering wheel at
the recommended
9 and 3 o’clock positions, you can
turn it
a full 180 degrees very quickly without removing
either hand. But you have to act fast, steer quickly, and
just
as quickly straighten the wheel once you have
avoided the object.
The fact that such emergency situations are always
possible
is a good reason to practice defensive driving at
all times and wear safety belts properly.
Off-Road Recovery
You may find sometime that your right wheels have
dropped
off the edge of a road onto the shoulder while
you’re driving.
.&-/// SLOW DOWN
edge of paved surface
If the level of the shoulder is only slightly below the
pavement, recovery should be fairly easy. Ease
off the
accelerator and then, if there is nothing in the way, steer so
that your vehicle straddles the edge of the pavement. You
can turn the steering wheel up to one-quarter turn until the
right front tire contacts the pavement edge.
Then turn your
steering wheel to go straight down the roadway.
4-10
ProCarManuals.com