air condition OLDSMOBILE SILHOUETTE 1998 Owners Manual
[x] Cancel search | Manufacturer: OLDSMOBILE, Model Year: 1998, Model line: SILHOUETTE, Model: OLDSMOBILE SILHOUETTE 1998Pages: 444, PDF Size: 23.2 MB
Page 190 of 444
Charging System Indicator Light
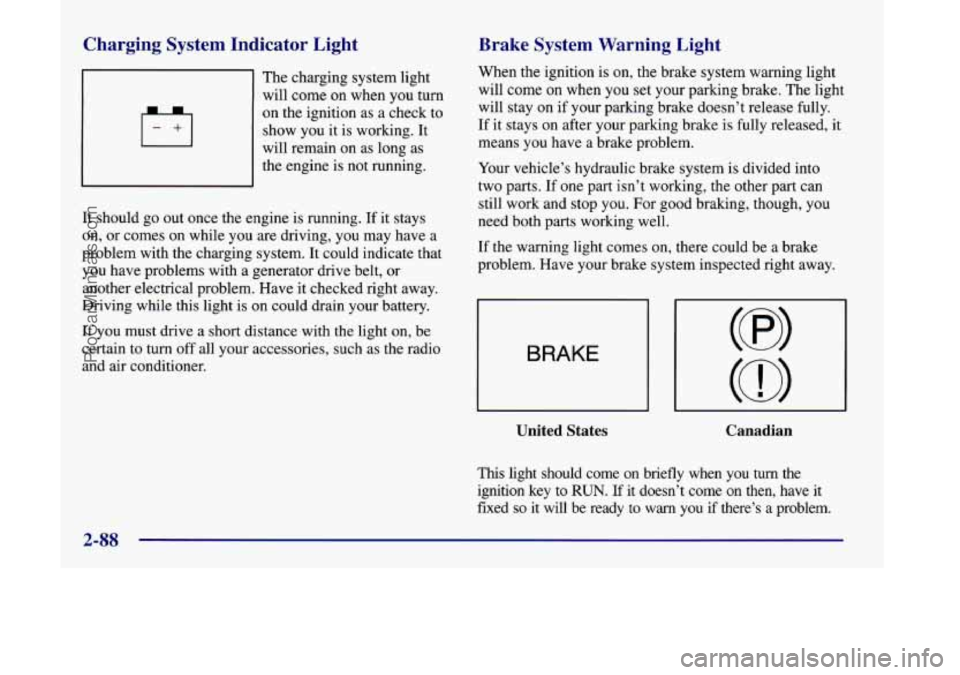
The charging system light
will come on when you turn
on the ignition as a check to
show you it is working. It
will remain on as long as
the engine is not running.
It should go out once the engine is running.
If it stays
on, or comes on while you
are driving, you may have a
problem with the charging system. It could indicate that
you have problems with a generator drive belt, or
another electrical problem. Have it checked right away.
Driving while this light is on could drain your battery.
If you must drive a short distance
with the light on, be
certain to turn off all your accessories, such as the radio
and air conditioner.
Brake System Warning Light
When the ignition is on, the brake system warning light
will come on when you set your parking brake.
The light
will stay on if your parking brake doesn’t release fully.
If
it stays on after your parking brake is fully released, it
means you have
a brake problem.
Your vehicle’s hydraulic brake system is divided into
two parts. If one part isn’t working, the other part can
still work and stop you. For good braking, though, you
need both
parts working well.
If the warning light comes on, there could be a brake
problem. Have your brake system inspected right away.
BRAKE
United States Canadian
This light should come on briefly when you turn the
ignition key to
RUN. If it doesn’t come on then, have it
fixed
so it will be ready to warn you if there’s a problem.
2-88
ProCarManuals.com
Page 196 of 444

NOTICE:
If you keep driving your vehicle with this light
on, after a while, your emission controls may not
work as well, your fuel economy may not be as
good and your engine may not run as smoothly.
This could lead
to costly repairs that may not be
covered by your warranty.
This light should come on, as a check to show you it is
working, when the ignition is on and the engine is not
running. If the light doesn’t come
on, have it repaired.
This light will also come
on during a malfunction in one
of two ways:
Light Flashing -- A misfire condition has been
detected. A misfire increases vehicle emissions and
may damage the emission control system on your
vehicle. Retailer or qualified service center diagnosis
and service may be required.
Light On Steady -- An emission control system
malfunction has been detected
on your vehicle.
Retailer or qualified service center diagnosis and
service may be required.
If the Light Is Flashing
The following may prevent more serious damage to
your vehicle:
Reducing vehicle speed.
Avoiding hard accelerations.
Avoiding steep uphill grades.
If you are towing a trailer, reduce the amount of
cargo being hauled as soon as it
is possible.
If the light stops flashing and remains on steady, see “If
the Light Is On Steady” following.
If the light continues
to flash, when it is safe to do so,
stop the vehicle. Find a safe place to park your vehicle.
Turn the key off, wait at least 10 seconds and restart the
engine. If the light remains on steady, see “If the Light
Is On Steady” following. If the light is still flashing,
follow the previous steps, and drive the vehicle to your
retailer or qualified service center for service.
2-94
ProCarManuals.com
Page 197 of 444

If the Light Is On Steady
You may be able to correct the emission system
malfunction by considering the following:
Did you recently put fuel into your vehicle?
If
so, reinstall the fuel cap, making sure to fully install
the cap. The diagnostic system can determine if
the fuel
cap has been left off or improperly installed. A loose or
missing fuel cap will allow fuel to evaporate into the
atmosphere. A few driving trips with the cap properly
installed should turn the light off.
Did you just drive through a deep puddle of water?
If
so, your electrical system may be wet. The condition
will usually be corrected when the electrical system
dries out. A few driving trips should turn
the light off.
Are you low on fuel?
As your engine starts to run out of fuel, your engine may
not run as efficiently as designed since small amounts of
air are sucked into the fuel line causing a misfire. The
system can detect this. Adding fuel should correct this
condition. Make sure to install the fuel cap properly. It
will take a few driving trips to turn the light off. Have
you recently changed brands
of fwl?
If
so, be sure to fuel your vehicle with quality fuel (see
“Fuel” in the Index). Poor fuel quality will cause your
engine not to run as efficiently as designed. You may
notice this as stalling after start-up, stalling when you
put the vehicle into gear, misfiring, hesitation on
acceleration or stumbling on acceleration. (These
conditions may
go away once the engine is warmed up.)
This will be detected by the system and cause the light
to turn on.
If you experience one or more of these conditions,
change the fuel brand you use.
It will require at least one
full tank of the proper fuel to turn the light off.
If none of the above steps have made the light turn off,
have your retailer or qualified service center check the
vehicle. Your retailer has the proper test equipment and
diagnostic tools to fix any mechanical or electrical
problems that may have developed.
2-95
ProCarManuals.com
Page 205 of 444
Section 3 Comfort Controls and Audio Systc-;
In this section, you’ll find out how to operate the comfort control and audio systems offered with your vehicle. Be
sure to read about the particular systems supplied with your vehicle.
3-2
3-3
3-4
3-4
3-5
3-6
3-8
3-9 3-10
3- 14 Comfort Controls
Air Conditioning
Heating
Defogging and Defrosting
Rear Window Defogger
Rear Climate Control (If Equipped)
Ventilation System
Setting the Clock for All Systems
AM-FM Stereo with Cassette Tape Player and
Automatic Tone Control
AM-FM Stereo with Compact Disc Player and
Automatic Tone Control
(If Equipped) 3-18
3 -20
3-21
3 -24
3 -25
3 -25
3-26
3-27
3 -27
3-27 Rear Seat
Audio
(If Equipped)
Remote Compact Disc Player (If Equipped)
Theft-Deterrent Feature Audio Steering Wheel Controls
(If Equipped)
Understanding Radio Reception
Tips About Your Audio System
Care of Your Cassette Tape Player
Care of Your Compact Discs
Care of Your Compact Disc Player
Integrated Windshield Antenna
3-1
ProCarManuals.com
Page 206 of 444
Comfort Controls
This section tells you how to make your air system work
for you. Your comfort control system uses
ozone-friendly
R- 134a refrigerant.
With these systems,
you can control the heating, cooling
and ventilation
in your vehicle. Your vehicle also has a
flow-through ventilation system described later
in
this section.
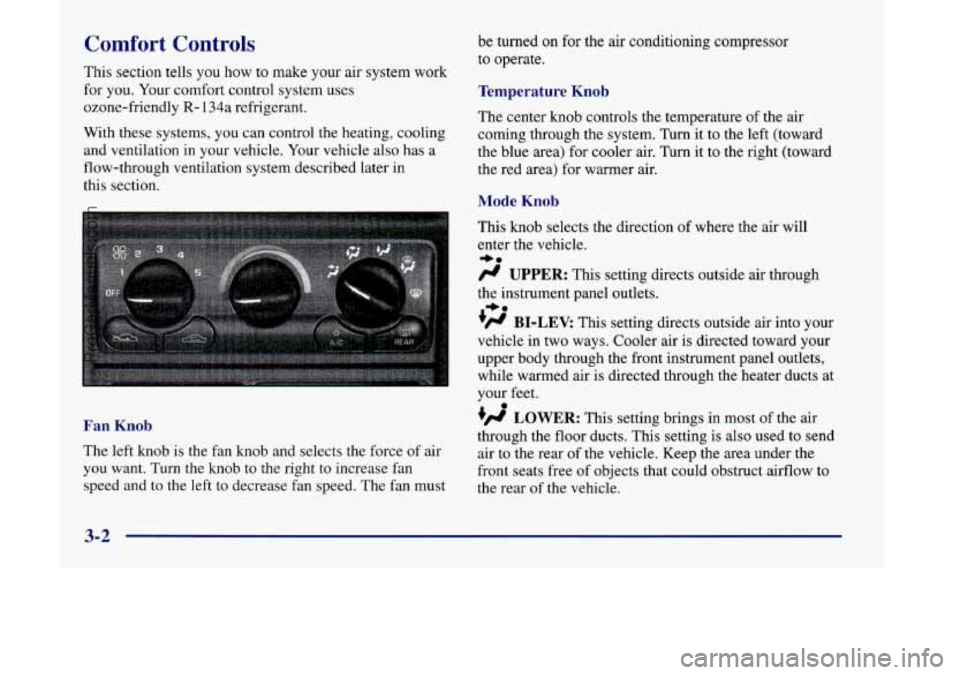
Fan Knob
The left knob is the fan knob and selects the force of air
you want. Turn the knob to the right to increase fan
speed and to the left to decrease fan speed. The fan must be turned on
for the air conditioning compressor
to operate.
Temperature Knob
The center knob controls the temperature of the air
coming through the system. Turn it to the left (toward
the blue area) for cooler air. Turn it to the right (toward
the red area) for warmer air.
Mode Knob
This knob selects the direction of where the air will
enter the vehicle.
/J UPPER: This setting directs outside air through
the instrument panel outlets.
+fl BI-LEV: This setting directs outside air into your
vehicle in two ways. Cooler air is directed toward your
upper body through the front instrument panel outlets,
while warmed air is directed through the heater ducts at
your feet.
+d LOWER: This setting brings in most of the air
through the floor ducts. This setting is also used to send
air to the rear of the vehicle. Keep the area under the
front seats free
of objects that could obstruct airflow to
the rear
of the vehicle.
+0
+e
0
3-2
ProCarManuals.com
Page 207 of 444

w.
+H DEFOG: This setting directs air to the windshield
and through the floor ducts. This mode is particularly
useful during cold or inclement weather because of your
vehicle’s larger windshield area.
the windshield and side window vents.
DEFROST This setting directs most of the air to
Mode Buttons
RECIRC: Press this button (the light will glow)
to limit the amount of fresh air entering your vehicle by
recirculating much of the air inside your vehicle.
You
may use this setting to limit odors entering your vehicle.
Press the OUTSIDE AIR button (the light on the
RECIRC button will go off) to let outside air circulate
into the vehicle.
OUTSIDE AIR: Press this button (the light will
glow) to send outside air into your vehicle. Using this
setting while trying to defrost or defog the windows will
help clear the vents
of moisture. Press the RECIRC
button (the light on the OUTSIDE AIR button will go
off> to limit outside air entering the vehicle. When the
DEFOG or DEFROST setting
is selected, the system
will automatically go to
OUTSIDE AIR mode.
Air Conditioning
On very hot days, your vehicle will cool down more
quickly and economically if you open the windows long
enough to let hot, inside air escape. For all settings,
adjust the temperature control
knob and fan speed
as desired.
To get maximum cooling or a quick cool-down on very
hot days, press the A/C and RECIRC buttons (the lights
will glow) and turn the temperature knob to the left
(toward the blue area). Adjust the mode knob to direct
the air to the desired location. This setting should not be
used for long periods of time because the air may
become too cold and dry. Push the
A/C button again (the
light will go off) to turn off the air conditioning.
When the air conditioner compressor is on, you may
sometimes notice slight changes in your vehicle’s engine
performance and power. This is normal. The system is
designed to help fuel economy while it maintains the
desired cooling level.
The air conditioner removes moisture from the air,
so
you may sometimes notice water dripping from under
your vehicle’s engine compartment when
it is idling or
after it has been turned off. This is normal.
3-3
ProCarManuals.com
Page 208 of 444
Heating
Turn the temperature knob to the right (toward the red
area) to warm the air.
In the LOWER mode, outside air will be brought in and
sent through the floor outlets.
The heater works best if
you keep your windows closed while using it.
Defogging and Defrosting
To rapidly defrost the windshield, turn the temperature
control knob all the way to the right (to the red area) and
turn the mode
knob to DEFROST.
The BI-LEV setting
is designed for use on sunny days
when the air is only moderately warm or cool. On days
like these, the sun may adequately warm your upper
body, but your lower body may not be
warm enough.
For the best results, turn the temperature control knob
to
the middle position, and then adjust it for comfort.
If
you have the optional engine coolant heater and use it
during cold weather, 0 “F (- 18 O C) or lower, your heating
system will provide heat more quickly because the
engine coolant is already warmed. See “Engine Coolant
Heater” in
the Index. Adjust the
fan to the highest speed.
To keep the windshield clear and bring in heated air
through the heater ducts, turn the mode knob
to DEFOG.
When the temperature outside
is above freezing, the air
conditioner compressor will run in these settings to help
remove moisture from the air.
Your vehicle is equipped with side window defogger
vents located
on the top of the instrument panel. For
additional side window defogging, turn the mode knob
to the BI-LEVEL setting and adjust the fan to the
highest speed. Aim the
side vents on the instrument
panel toward the side windows. For increased airflow to
the side vents, close the center vents.
3-4
ProCarManuals.com
Page 210 of 444

Rear Climate Control (If Equipped)
If you have the optional rear climate control, the rear
seat passengers can control the temperature and
the
amount of air directed to the rear of the vehicle. The
amount of air directed to the rear of the vehicle can also
be adjusted using the front control for the rear fan.
Set the main climate control mode knob to
LOWER,
DEFOG or DEFROST, when outside temperatures are
cold or moderate, to send air to the rear of the vehicle
through the lower vents.
Set the main climate control mode knob to UPPER or
BI-LEV to send air to the rear
of the vehicle through the
headliner outlets.
To send conditioned air to the rear of the vehicle, press
the
A/C button (the light will glow) on the main climate
controls.
If you do not select NC, air directed to the rear
of the vehicle will be cabin temperature.
Rear Fan Control
This option comes with the rear climate controls.
Keep the area around the base
of the center instrument
panel console and
the area between and under the front
seats free
of objects that would obstruct airflow to the
rear
of the vehicle.
O’@ ’
/C
R (
REAR) c
The rear fan control is
located below the
climate control system,
in the switchbank.
Turn the fan to the desired setting for the amount of air
to be directed to
the rear of the vehicle. The temperature
of the air will be
the same as the air in the front of the
vehicle. The rear fan control in the instrument panel
switchbank has an
R setting which allows the rear
passengers to use the rear climate control knobs to
adjust the air through the rear air outlets.
3-6
ProCarManuals.com
Page 287 of 444
Engine Overheating
You will find a coolant temperature gage on your
vehicle’s instrument panel. See “Engine Coolant
Temperature Gage” in the Index. You also have a low
coolant level light on your instrument panel. See “LOW
Coolant Light” in the Index.
Overheated Engine Protection
Operating Mode
Should an overheated engine condition exist, an
overheat protection mode which alternates firing groups
of three cylinders helps prevent engine damage. In this
mode, you will notice a significant loss in power and
engine performance. The
low coolant light may come on
and the temperature gage will indicate an overheat
condition exists. This emergency operating mode allows
your vehicle to be driven to a safe place in an
emergency. Towing a trailer in the overheat protection
mode should be avoided.
1 NOTICE:
After driving in the overheated engine protection
operating mode, to avoid engine damage, allow
the engine to cool before attempting any repair.
The engine oil will be severely degraded. Repair
the cause of coolant loss and change the oil. See
“Engine Oil, When to Change” in the Index.
ProCarManuals.com
Page 289 of 444

If No Steam Is Coming From Your Engine
If you get the overheat warning but see or hear no
steam, the problem may not be too serious. Sometimes
the engine can get a little too hot when you:
Climb a long hill on a hot day.
0 Stop after high-speed driving.
Idle for long periods in traffic.
Tow a trailer.
If you get the overheat warning with no sign of steam,
try this for a minute or
so:
1. Turn off your air conditioner.
2. Turn on your heater to full hot at the highest fan
speed and open the window as necessary.
3. If you’re in a traffic jam, shift to NEUTRAL (N);
otherwise, shift to the highest gear while
driving
-- AUTOMATIC OVERDRIVE (D)
or THIRD (3).
If you no longer have the overheat warning,
you can drive. Just to be safe, drive slower for about
10 minutes. If the warning doesn’t come back on, you
can drive normally.
If the warning continues, pull over, stop, and park your
vehicle right away.
If there’s still no sign of steam, you can idle the engine
for two or three minutes while you’re parked, to see
if
the warning stops. But then, if you still have the
warning,
turn off the engine and get everyone out of the
vehicle
until it cools down. Also, see “Overheated
Engine Protection Operating Mode” listed previously in
this section.
You may decide not to lift the hood but to get service
help right away.
5-15
ProCarManuals.com