fuse Oldsmobile Silhouette 2004 s User Guide
[x] Cancel search | Manufacturer: OLDSMOBILE, Model Year: 2004, Model line: Silhouette, Model: Oldsmobile Silhouette 2004Pages: 462, PDF Size: 3.1 MB
Page 315 of 462

A. Underhood Fuse Block.
SeeFuses and Circuit Breakers on page 5-101.
B. Remote Positive (+) Terminal.
See
Jump Starting on page 5-42.
C. Windshield Washer Fluid Reservoir.
See
Windshield Washer Fluid on page 5-37.
D. Radiator Pressure Cap.
See
Radiator Pressure Cap on page 5-25.
E. Power Steering Fluid Reservoir.
See
Power Steering Fluid on page 5-36.
F. Engine Oil Fill Cap.
See
Engine Oil on page 5-13.
G. Engine Oil Dipstick.
See
Engine Oil on page 5-13.
H. Transaxle Fluid Dipstick.
See
Automatic Transaxle Fluid on page 5-19.
I. Brake Master Cylinder Reservoir.
See
Brakes on page 5-38.
J. Engine Air Cleaner/Filter.
See
Engine Air Cleaner/Filter on page 5-18.
K. Coolant Recovery Tank.
See
Cooling System on page 5-28.
Engine Oil
Checking Engine Oil
It is a good idea to check your engine oil every time you
get fuel. In order to get an accurate reading, the oil
must be warm and the vehicle must be on level ground.
The engine oil dipstick handle is a yellow loop. See
Engine Compartment Overview on page 5-12for
the location of the engine oil dipstick.
Turn off the engine and give the oil several minutes to
drain back into the oil pan. If you don't, the oil
dipstick might not show the actual level.
Pull out the dipstick and clean it with a paper towel or
cloth, then push it back in all the way. Remove it again,
keeping the tip down, and check the level.
5-13
Page 346 of 462

The terminal is located
under a tethered cap at
the front of the underhood
fuse block. See
Engine
Compartment Overview on
page 5-12
for more
information on location.
Squeeze the tabs and pull up on the cap to access
the remote positive (+) terminal. You should
always use the remote positive (+) terminal instead
of the positive (+) terminal on your battery.
{CAUTION:
An electric fan can start up even when the
engine is not running and can injure you.
Keep hands, clothing and tools away from
any underhood electric fan.
{CAUTION:
Using a match near a battery can cause battery
gas to explode. People have been hurt doing
this, and some have been blinded. Use a
¯ashlight if you need more light.
Be sure the battery has enough water. You do
not need to add water to the ACDelco
žbattery
installed in your new vehicle. But if a battery
has ®ller caps, be sure the right amount of
¯uid is there. If it is low, add water to take care
of that ®rst. If you do not, explosive gas could
be present.
Battery ¯uid contains acid that can burn you.
Do not get it on you. If you accidentally get it
in your eyes or on your skin, ¯ush the place
with water and get medical help immediately.
5-44
Page 377 of 462
{CAUTION:
In¯ating something too much can make it
explode, and you or others could be injured.
Be sure to read the in¯ator instructions, and
in¯ate any object only to its recommended
pressure.
To use your accessory in¯ator system, do the following:
1. Turn the ignition to ACCESSORY or RUN.
2. Attach the appropriate nozzle adapter, if required,
to the end of the hose that has the pressure gage.
3. Attach that end of the hose to the object you wish
to in¯ate.
4. Remove the protective cap covering the outlet.
5. Attach the other end of the hose to the outlet.
6. Press the accessory in¯ator switch. The light in the
switch will come on to show the system is working.
If the accessory in¯ator system does not turn on or
the light does not come on, the fuse may be blown or
installed incorrectly. See
Fuses and Circuit Breakers
on page 5-101or see your dealer for service.Your accessory in¯ator will automatically shut off after
about 10 minutes. The light in the switch will blink.
After about one minute you can use the system again.
Press the switch and the indicator light will come on.
Notice:If you run the accessory in¯ator longer
than 30 minutes at a time, you could damage
the in¯ator. The repairs would not be covered by
your warranty. Run the in¯ator for short periods of
time only.
After running the accessory in¯ator for 30 minutes, wait
at least 10 minutes before restarting the accessory
in¯ator.
To turn off the in¯ator, do the following:
1. Press the switch and detach the hose, ®rst from
the in¯ated object, then from the outlet.
2. Put the protective cap back on.
3. Place the in¯ator kit tools in the pouch, and store
in the glove box.
To put the cap back on, line up the tabs at the back
of the cover and put it in place. Push down the tab to
secure the cap.
5-75
Page 403 of 462

Headlamp Wiring
The headlamp wiring is protected by an internal circuit
breaker in the instrument panel fuse panel. An electrical
overload will cause the lamps to go on and off, or in
some cases to remain off. If this happens, have
your headlamp wiring checked right away.
Windshield Wiper Fuses
The windshield wiper motor is protected by an internal
circuit breaker and a fuse. If the motor overheats due
to heavy snow, etc., the wiper will stop until the
motor cools. If the overload is caused by some electrical
problem, be sure to get it ®xed.
Power Windows and Other Power
Options
Circuit breakers in the instrument panel fuse panel
protect the power windows and other power accessories.
When the current load is too heavy, the circuit breaker
opens and closes, protecting the circuit until the
problem is ®xed.
Fuses and Circuit Breakers
The wiring circuits in your vehicle are protected from
short circuits by a combination of fuses, circuit breakers,
and fusible thermal links.
Look at the silver-colored band inside the fuse. If the
band is broken or melted, replace the fuse. Be sure you
replace a bad fuse with a new one of the identical
size and rating.
If you ever have a problem on the road and do not have
a spare fuse, you can borrow one that has the same
amperage or use one of the spare fuses in the
underhood fuse block. Just pick some feature of your
vehicle that you can get along without Ð like the radio or
cigarette lighter Ð and use its fuse, if it is the right
amperage. Replace it as soon as you can.
There are two fuse blocks in your vehicle, the instrument
panel fuse block and the underhood fuse block.
5-101
Page 404 of 462
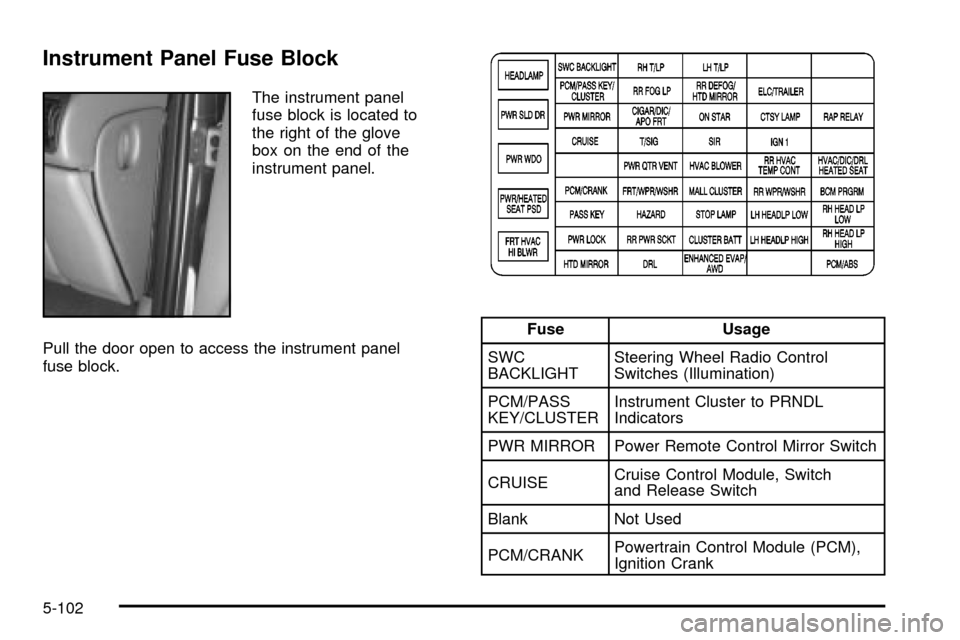
Instrument Panel Fuse Block
The instrument panel
fuse block is located to
the right of the glove
box on the end of the
instrument panel.
Pull the door open to access the instrument panel
fuse block.
Fuse Usage
SWC
BACKLIGHTSteering Wheel Radio Control
Switches (Illumination)
PCM/PASS
KEY/CLUSTERInstrument Cluster to PRNDL
Indicators
PWR MIRROR Power Remote Control Mirror Switch
CRUISECruise Control Module, Switch
and Release Switch
Blank Not Used
PCM/CRANKPowertrain Control Module (PCM),
Ignition Crank
5-102
Page 405 of 462

Fuse Usage
PASS KEY PASS-Key
žIII System
PWR LOCK Power Door Locks
HTD MIRROR Heated Mirrors
RH T/LP Not Used
RR FOG LP Not Used
CIGAR/DIC/
APO FRTCigarette Lighter, DIC, Front
Auxiliary Power Outlets, Data Link
T/SIG Turn Signal Switch
PWR QTR
VENTInterior Lamp and Multifunction
Switch (Power Vent Switch),
Auto Level
FRT/WPR/
WSHRWindshield Wiper/Washer Motor
and Switch
HAZARD Hazard Switch
RR PWR SCKTRear Electric Accessory Plug
Housing
DRLDaytime Running Lamp Control
Module
LH T/LP Not Used
Fuse Usage
RR DEFOG/
HTD MIRRORRear Window Defogger Relay,
Heated Mirrors
ON STAR OnStar
ž
SIR In¯atable Restraint Control Module
HVAC
BLOWERHeater-A/C Control
MALL
CLUSTERInstrument Cluster, Body Control
Module, Electronic Level Control
(ELC) Sensor and Relay, Theft,
Door Ajar
STOP LAMP Stoplamp Switch
CLUSTER
BATTModule/Electronic Brake Control
Module/Electronic Brake Traction
Control Module (EBCM/EBTCM)
ENHANCED
EVAP/AWDEvaporative Emissions (EVAP)
Canister Vent Solenoid Valve,
All-Wheel Drive (AWD)
Blank Not Used
ELC/TRAILERELC Air Compressor and ELC
Height Sensor, Trailer Harness
CTSY LAMP Courtesy Lamp
5-103
Page 406 of 462
Fuse Usage
IGN 1BCM, Electronic Brake Control
Indicator Lamp Driver Module,
Instrument Panel Cluster, Rear Side
Door Actuator Control Module,
Rear Windows, Rear Parking Aid
RR HVAC
TEMP CONTRear HVAC-A/C Control
RR WPR/
WSHRRear Window Wiper Motor,
Rear Window Wiper/Washer and
Multifunction Switch (Rear Window
Wiper/Washer Switch)
LH HEADLP
LOWNot Used
LH HEADLP
HIGHNot Used
Blank Not Used
Blank Not Used
Blank Not Used
RAP RELAYRetained Accessory Power (RAP)
Relay
Blank Not UsedFuse Usage
HVAC/DIC/DRL/
HEATED SEATAir Inlet Actuator, DIC Display, DRL
Control Module, Heater-A/C Control,
Temperature Door Actuator (Front)
and Rear Window Defogger Relay
BCM PRGRAM BCM Programming
RH HEAD
LP LOWNot Used
RH HEAD
LP HIGHNot Used
PCM/ABSIGN MAIN Relay and PCM,
Electronic Brake Control Module
Circuit Breaker Usage
HEADLAMPDaytime Running Lamps (DRL)
Control Module, Headlamp and
Instrument Panel Dimmer Switch
PWR SLD DR Power Sliding Door
PWR WDO Front Power Windows
PWR/HEATED
SEAT PSDSix-Way Power Seats and Rear
Side Door Actuator Motor
FRT HVAC
HI BLWRBlower Motor Hi Speed Relay
Module
5-104
Page 407 of 462
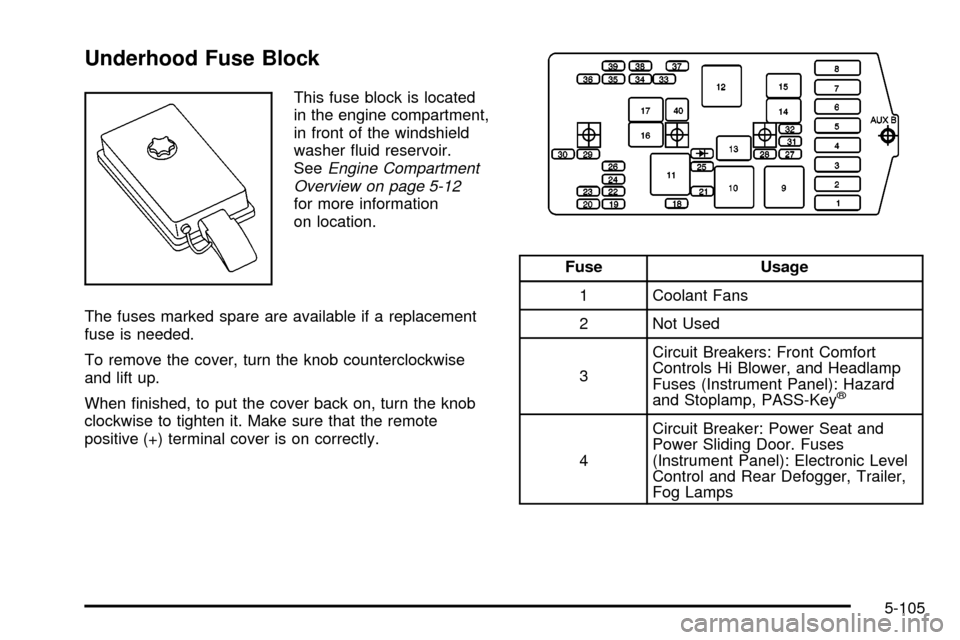
Underhood Fuse Block
This fuse block is located
in the engine compartment,
in front of the windshield
washer ¯uid reservoir.
See
Engine Compartment
Overview on page 5-12
for more information
on location.
The fuses marked spare are available if a replacement
fuse is needed.
To remove the cover, turn the knob counterclockwise
and lift up.
When ®nished, to put the cover back on, turn the knob
clockwise to tighten it. Make sure that the remote
positive (+) terminal cover is on correctly.
Fuse Usage
1 Coolant Fans
2 Not Used
3Circuit Breakers: Front Comfort
Controls Hi Blower, and Headlamp
Fuses (Instrument Panel): Hazard
and Stoplamp, PASS-Key
ž
4Circuit Breaker: Power Seat and
Power Sliding Door. Fuses
(Instrument Panel): Electronic Level
Control and Rear Defogger, Trailer,
Fog Lamps
5-105
Page 408 of 462
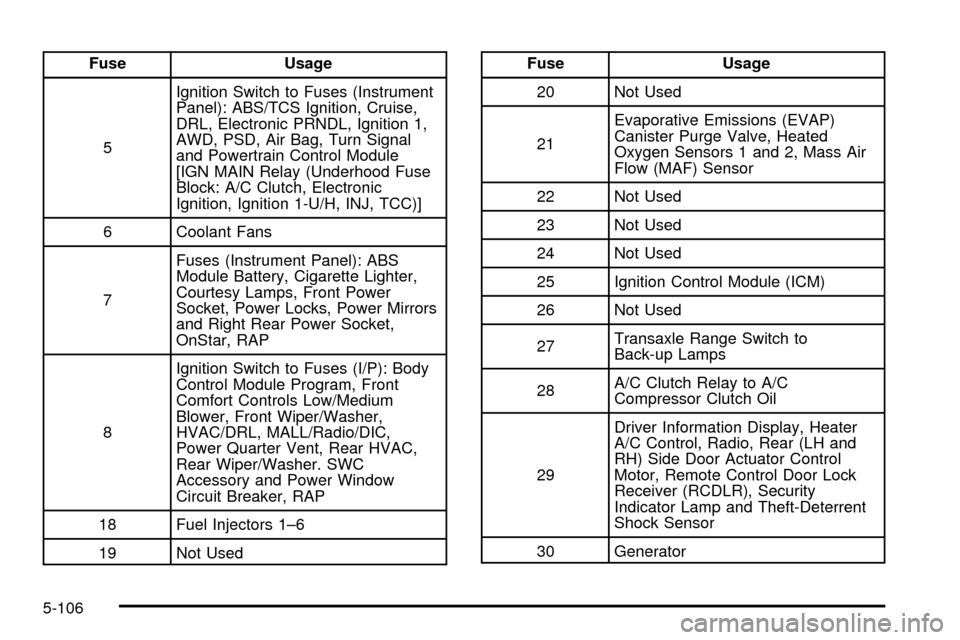
Fuse Usage
5Ignition Switch to Fuses (Instrument
Panel): ABS/TCS Ignition, Cruise,
DRL, Electronic PRNDL, Ignition 1,
AWD, PSD, Air Bag, Turn Signal
and Powertrain Control Module
[IGN MAIN Relay (Underhood Fuse
Block: A/C Clutch, Electronic
Ignition, Ignition 1-U/H, INJ, TCC)]
6 Coolant Fans
7Fuses (Instrument Panel): ABS
Module Battery, Cigarette Lighter,
Courtesy Lamps, Front Power
Socket, Power Locks, Power Mirrors
and Right Rear Power Socket,
OnStar, RAP
8Ignition Switch to Fuses (I/P): Body
Control Module Program, Front
Comfort Controls Low/Medium
Blower, Front Wiper/Washer,
HVAC/DRL, MALL/Radio/DIC,
Power Quarter Vent, Rear HVAC,
Rear Wiper/Washer. SWC
Accessory and Power Window
Circuit Breaker, RAP
18 Fuel Injectors 1±6
19 Not UsedFuse Usage
20 Not Used
21Evaporative Emissions (EVAP)
Canister Purge Valve, Heated
Oxygen Sensors 1 and 2, Mass Air
Flow (MAF) Sensor
22 Not Used
23 Not Used
24 Not Used
25 Ignition Control Module (ICM)
26 Not Used
27Transaxle Range Switch to
Back-up Lamps
28A/C Clutch Relay to A/C
Compressor Clutch Oil
29Driver Information Display, Heater
A/C Control, Radio, Rear (LH and
RH) Side Door Actuator Control
Motor, Remote Control Door Lock
Receiver (RCDLR), Security
Indicator Lamp and Theft-Deterrent
Shock Sensor
30 Generator
5-106
Page 409 of 462
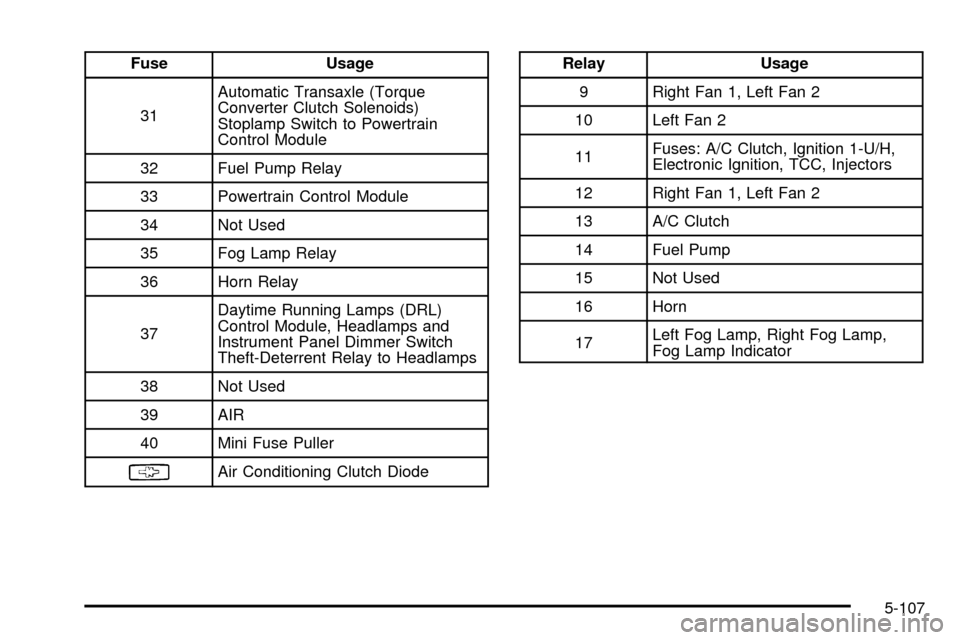
Fuse Usage
31Automatic Transaxle (Torque
Converter Clutch Solenoids)
Stoplamp Switch to Powertrain
Control Module
32 Fuel Pump Relay
33 Powertrain Control Module
34 Not Used
35 Fog Lamp Relay
36 Horn Relay
37Daytime Running Lamps (DRL)
Control Module, Headlamps and
Instrument Panel Dimmer Switch
Theft-Deterrent Relay to Headlamps
38 Not Used
39 AIR
40 Mini Fuse Puller
§Air Conditioning Clutch Diode
Relay Usage
9 Right Fan 1, Left Fan 2
10 Left Fan 2
11Fuses: A/C Clutch, Ignition 1-U/H,
Electronic Ignition, TCC, Injectors
12 Right Fan 1, Left Fan 2
13 A/C Clutch
14 Fuel Pump
15 Not Used
16 Horn
17Left Fog Lamp, Right Fog Lamp,
Fog Lamp Indicator
5-107