key Oldsmobile Silhouette 2004 s Workshop Manual
[x] Cancel search | Manufacturer: OLDSMOBILE, Model Year: 2004, Model line: Silhouette, Model: Oldsmobile Silhouette 2004Pages: 462, PDF Size: 3.1 MB
Page 385 of 462
Removing the Wheel Covers
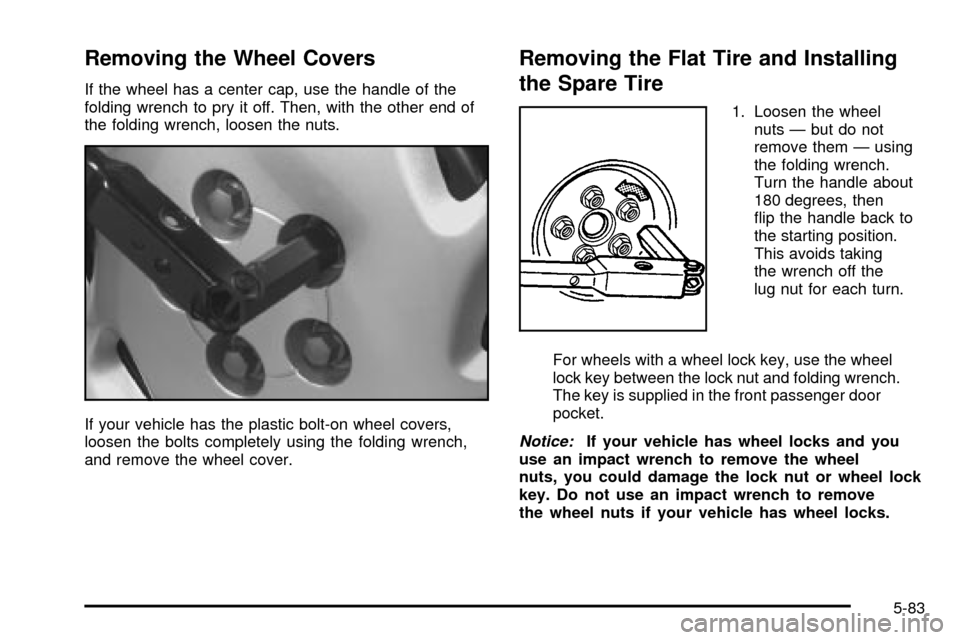
If the wheel has a center cap, use the handle of the
folding wrench to pry it off. Then, with the other end of
the folding wrench, loosen the nuts.
If your vehicle has the plastic bolt-on wheel covers,
loosen the bolts completely using the folding wrench,
and remove the wheel cover.
Removing the Flat Tire and Installing
the Spare Tire
1. Loosen the wheel
nuts Ð but do not
remove them Ð using
the folding wrench.
Turn the handle about
180 degrees, then
¯ip the handle back to
the starting position.
This avoids taking
the wrench off the
lug nut for each turn.
For wheels with a wheel lock key, use the wheel
lock key between the lock nut and folding wrench.
The key is supplied in the front passenger door
pocket.
Notice:If your vehicle has wheel locks and you
use an impact wrench to remove the wheel
nuts, you could damage the lock nut or wheel lock
key. Do not use an impact wrench to remove
the wheel nuts if your vehicle has wheel locks.
5-83
Page 404 of 462
Instrument Panel Fuse Block
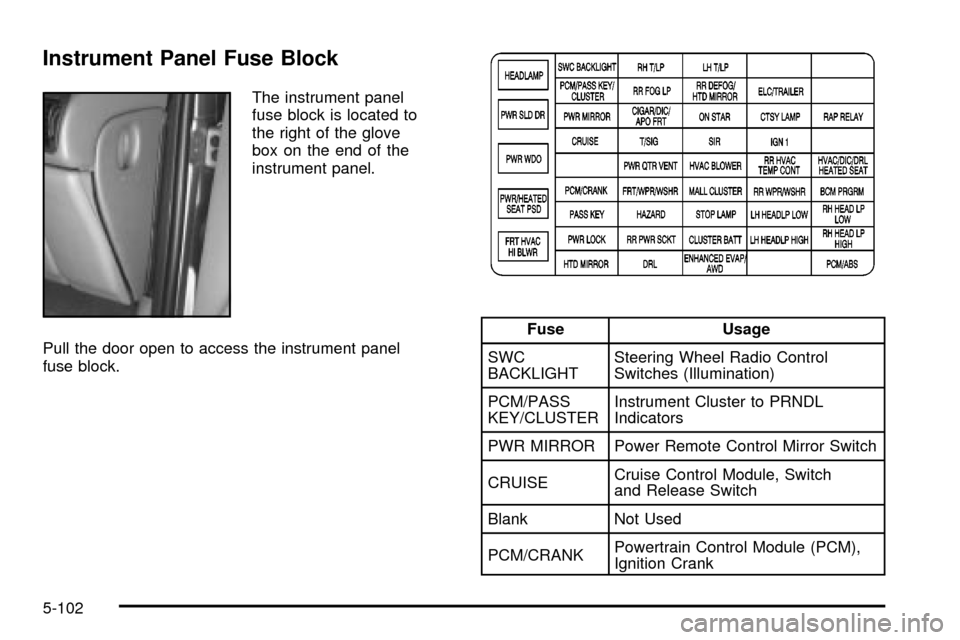
The instrument panel
fuse block is located to
the right of the glove
box on the end of the
instrument panel.
Pull the door open to access the instrument panel
fuse block.
Fuse Usage
SWC
BACKLIGHTSteering Wheel Radio Control
Switches (Illumination)
PCM/PASS
KEY/CLUSTERInstrument Cluster to PRNDL
Indicators
PWR MIRROR Power Remote Control Mirror Switch
CRUISECruise Control Module, Switch
and Release Switch
Blank Not Used
PCM/CRANKPowertrain Control Module (PCM),
Ignition Crank
5-102
Page 405 of 462

Fuse Usage
PASS KEY PASS-Key
žIII System
PWR LOCK Power Door Locks
HTD MIRROR Heated Mirrors
RH T/LP Not Used
RR FOG LP Not Used
CIGAR/DIC/
APO FRTCigarette Lighter, DIC, Front
Auxiliary Power Outlets, Data Link
T/SIG Turn Signal Switch
PWR QTR
VENTInterior Lamp and Multifunction
Switch (Power Vent Switch),
Auto Level
FRT/WPR/
WSHRWindshield Wiper/Washer Motor
and Switch
HAZARD Hazard Switch
RR PWR SCKTRear Electric Accessory Plug
Housing
DRLDaytime Running Lamp Control
Module
LH T/LP Not Used
Fuse Usage
RR DEFOG/
HTD MIRRORRear Window Defogger Relay,
Heated Mirrors
ON STAR OnStar
ž
SIR In¯atable Restraint Control Module
HVAC
BLOWERHeater-A/C Control
MALL
CLUSTERInstrument Cluster, Body Control
Module, Electronic Level Control
(ELC) Sensor and Relay, Theft,
Door Ajar
STOP LAMP Stoplamp Switch
CLUSTER
BATTModule/Electronic Brake Control
Module/Electronic Brake Traction
Control Module (EBCM/EBTCM)
ENHANCED
EVAP/AWDEvaporative Emissions (EVAP)
Canister Vent Solenoid Valve,
All-Wheel Drive (AWD)
Blank Not Used
ELC/TRAILERELC Air Compressor and ELC
Height Sensor, Trailer Harness
CTSY LAMP Courtesy Lamp
5-103
Page 407 of 462
Underhood Fuse Block
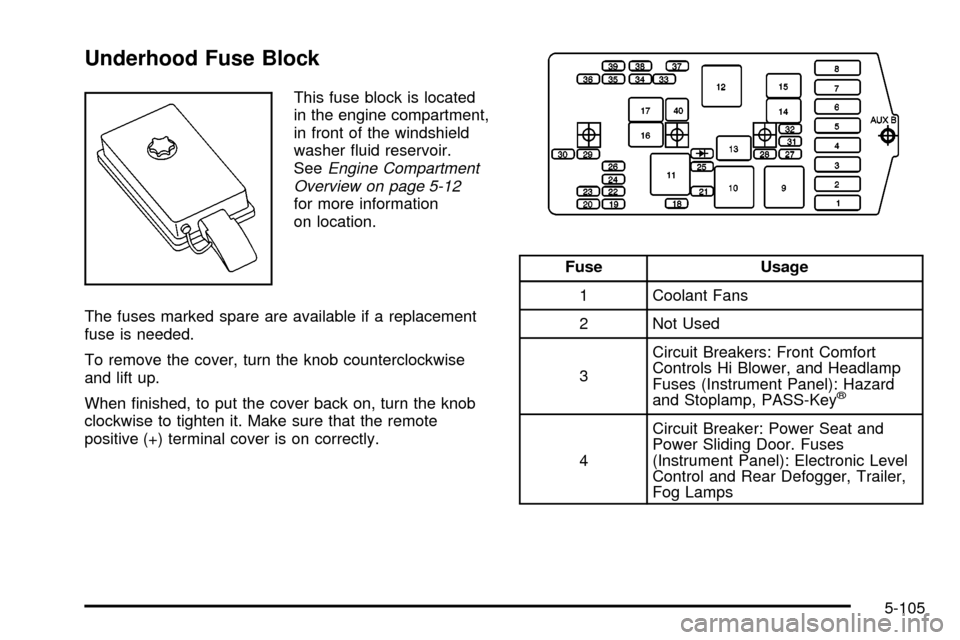
This fuse block is located
in the engine compartment,
in front of the windshield
washer ¯uid reservoir.
See
Engine Compartment
Overview on page 5-12
for more information
on location.
The fuses marked spare are available if a replacement
fuse is needed.
To remove the cover, turn the knob counterclockwise
and lift up.
When ®nished, to put the cover back on, turn the knob
clockwise to tighten it. Make sure that the remote
positive (+) terminal cover is on correctly.
Fuse Usage
1 Coolant Fans
2 Not Used
3Circuit Breakers: Front Comfort
Controls Hi Blower, and Headlamp
Fuses (Instrument Panel): Hazard
and Stoplamp, PASS-Key
ž
4Circuit Breaker: Power Seat and
Power Sliding Door. Fuses
(Instrument Panel): Electronic Level
Control and Rear Defogger, Trailer,
Fog Lamps
5-105
Page 420 of 462

(c)Visually inspect hoses and have them replaced if they
are cracked, swollen or deteriorated. Inspect all pipes,
®ttings and clamps; replace with genuine GM parts as
needed. To help ensure proper operation, a pressure test
of the cooling system and pressure cap and cleaning the
outside of the radiator and air conditioning condenser is
recommended at least once a year.
(d)Visually inspect wiper blades for wear or cracking.
Replace blade inserts that appear worn or damaged
or that streak or miss areas of the windshield.
(e)Make sure the safety belt reminder light and all your
belts, buckles, latch plates, retractors and anchorages
are working properly. Look for any other loose or
damaged safety belt system parts. If you see anything
that might keep a safety belt system from doing its
job, have it repaired. Have any torn or frayed safety belts
replaced. Also look for any opened or broken air bag
coverings, and have them repaired or replaced. (The air
bag system does not need regular maintenance.)
(f)Lubricate all key lock cylinders, hood latch
assemblies, secondary latches, pivots, spring anchor
and release pawl, hood and door hinges, rear folding
seats, liftgate hinges, fuel door hinge, power sliding door
cable and sliding door track(s). More frequent lubrication
may be required when exposed to a corrosive
environment. Applying silicone grease on weatherstrips
with a clean cloth will make them last longer, seal
better and not stick or squeak.
(g)If you drive regularly under dusty conditions, the
®lter may require replacement more often.
(h)Change automatic transaxle ¯uid and ®lter if the
vehicle is mainly driven under one or more of these
conditions:
þIn heavy city traffic where the outside temperature
regularly reaches 90ÉF (32ÉC) or higher.
þIn hilly or mountainous terrain.
þWhen doing frequent trailer towing.
þUses such as found in taxi, police or delivery
service.
(i)Drain, ¯ush and re®ll cooling system. See Engine
Coolant on page 5-22for what to use. Inspect hoses.
Clean radiator, condenser, pressure cap and ®ller neck.
Pressure test the cooling system and pressure cap.
(j)
Check system for interference or binding and
for damaged or missing parts. Replace parts as needed.
Replace any components that have high effort or
excessive wear. Do not lubricate accelerator or cruise
control cables.
(k)A ¯uid loss in any vehicle system could indicate a
problem. Have the system inspected and repaired
and the ¯uid level checked. Add ¯uid if needed.
6-8
Page 422 of 462
At Least Once a Year
Starter Switch Check
{CAUTION:
When you are doing this inspection, the
vehicle could move suddenly. If the vehicle
moves, you or others could be injured.
1. Before you start, be sure you have enough room
around the vehicle.
2. Firmly apply both the parking brake and the regular
brake. See
Parking Brake on page 2-37if
necessary.
Do not use the accelerator pedal, and be ready to
turn off the engine immediately if it starts.
3. Try to start the engine in each gear. The starter
should work only in PARK (P) or NEUTRAL (N).
If the starter works in any other position, contact
your GM Goodwrench dealer for service.
Automatic Transaxle Shift Lock Control
System Check
{CAUTION:
When you are doing this inspection, the
vehicle could move suddenly. If the vehicle
moves, you or others could be injured.
1. Before you start, be sure you have enough room
around the vehicle. It should be parked on a level
surface.
2. Firmly apply the parking brake. See
Parking Brake
on page 2-37if necessary.
Be ready to apply the regular brake immediately if
the vehicle begins to move.
3. With the engine off, turn the key to the RUN
position, but do not start the engine. Without
applying the regular brake, try to move the shift
lever out of PARK (P) with normal effort. If the shift
lever moves out of PARK (P), contact your GM
Goodwrench dealer for service.
6-10
Page 423 of 462
Ignition Transaxle Lock Check
While parked, and with the parking brake set, try to turn
the ignition key to LOCK in each shift lever position.
·The key should turn to LOCK only when the
shift lever is in PARK (P).
·The key should come out only in LOCK.
Contact your GM Goodwrench dealer if service is
required.
Parking Brake and Automatic Transaxle
Park (P) Mechanism Check
{CAUTION:
When you are doing this check, your vehicle
could begin to move. You or others could be
injured and property could be damaged. Make
sure there is room in front of your vehicle in
case it begins to roll. Be ready to apply the
regular brake at once should the vehicle begin
to move.Park on a fairly steep hill, with the vehicle facing downhill.
Keeping your foot on the regular brake, set the parking
brake.
·To check the parking brake's holding ability: With the
engine running and transaxle in NEUTRAL (N),
slowly remove foot pressure from the regular brake
pedal. Do this until the vehicle is held by the parking
brake only.
·To check the PARK (P) mechanism's holding ability:
With the engine running, shift to PARK (P). Then
release the parking brake followed by the regular
brake.
Contact your GM Goodwrench dealer if service is
required.
Underbody Flushing Service
At least every spring, use plain water to ¯ush any
corrosive materials from the underbody. Take care to
clean thoroughly any areas where mud and other debris
can collect.
6-11
Page 424 of 462
Recommended Fluids and
Lubricants
Fluids and lubricants identi®ed below by name,
part number or speci®cation may be obtained from
your dealer.
Usage Fluid/Lubricant
Engine OilEngine oil which meets GM
Standard GM6094M and displays
the American Petroleum Institute
Certi®ed for Gasoline Engines
starburst symbol. To determine
the proper viscosity for your
vehicle's engine, see
Engine Oil
on page 5-13.
Engine Coolant50/50 mixture of clean,
drinkable water and use only
DEX-COOL
žCoolant.
SeeEngine Coolant on page 5-22.
Usage Fluid/Lubricant
Hydraulic
Brake SystemDelco Supreme 11 Brake Fluid or
equivalent DOT-3 brake ¯uid.
Windshield
Washer SolventGM Optikleen
žWasher Solvent.
Power Steering
SystemGM Power Steering Fluid
(GM Part No. U.S. 89021184,
in Canada 89021186).
Automatic
TransaxleDEXRON
ž-III Automatic
Transmission Fluid.
Key Lock
CylindersMulti-Purpose Lubricant, Superlube
(GM Part No. U.S. 12346241,
in Canada 10953474.
Chassis
LubricationChassis Lubricant
(GM Part No. U.S. 12377985,
in Canada 88901242) or lubricant
meeting requirements of NLGI #2,
Category LB or GC-LB.
6-12
Page 436 of 462

GM Mobility Program for Persons
with Disabilities
This program, available to
quali®ed applicants, can
reimburse you up to $1,000
toward eligible aftermarket
driver or passenger
adaptive equipment you
may require for your vehicle
(hand controls, wheelchair/
scooter lifts, etc.).
This program can also provide you with free resource
information, such as area driver assessment centers
and mobility equipment installers. The offer is available
for a limited period of time from the date of vehicle
purchase/lease. For more details, or to determine your
vehicle's eligibility, see your GM dealer or call the
GM Mobility Assistance Center at 1-800-323-9935.
Text telephone (TTY) users, call 1-800-833-9935.
GM of Canada also has a Mobility Program.
Call 1-800-GM-DRIVE (463-7483) for details.
All TTY users call 1-800-263-3830.
Roadside Assistance Program
Security While You Travel
1-800-442-OLDS (6537)
As the proud owner of a new Oldsmobile vehicle, you
are automatically enrolled in the Oldsmobile Roadside
Assistance program. This value-added service is
intended to provide you with peace of mind as you
drive in the city or travel the open road. Oldsmobile's
Roadside Assistance toll-free number is staffed by
courteous and capable Roadside Assistance
Representatives who are available 24 hours a day,
365 days a year.
We will provide the following services during the
Bumper-to-Bumper warranty period, at no expense
to you:
·Fuel Delivery:Delivery of enough fuel
($5 maximum) for the customer to get to the
nearest service station.
·Lock-out Service (identi®cation required):
Replacement keys or locksmith service will
be covered at no charge if you are unable to gain
entry into your vehicle. Delivery of the replacement
key will be covered within 10 miles.
7-6
Page 445 of 462

A
Accessory In¯ator...........................................5-74
Accessory Power Outlets.................................3-27
Adding Washer Fluid.......................................5-37
Additional Program Information........................... 7-9
Additives, Fuel................................................. 5-6
Add-On Electrical Equipment...........................5-100
Adjusting the Captain's Chairs
(Second Row).............................................1-14
Adjusting the Speakers
(Balance/Fade)....................................3-66, 3-76
Air Bag
Readiness Light..........................................3-45
Air Bag Systems.............................................1-70
How Does an Air Bag Restrain?....................1-76
Servicing Your Air Bag-Equipped Vehicle.........1-78
What Makes an Air Bag In¯ate?....................1-75
What Will You See After an
Air Bag In¯ates?......................................1-76
When Should an Air Bag In¯ate?...................1-75
Where Are the Air Bags?..............................1-72
Air Cleaner/Filter, Engine.................................5-18
Airbag Sensing and Diagnostic
Module (SDM).............................................7-10
All-Wheel Drive......................................5-48, 5-91
All-Wheel Drive Disable Warning Message..........3-59
All-Wheel-Drive (AWD) System.........................4-10
AM ...............................................................3-98
Antenna, Fixed Mast......................................3-100Anti-lock Brake System (ABS)............................ 4-6
Anti-Lock Brake System Warning Light...............3-47
Appearance Care............................................5-92
Care of Safety Belts....................................5-95
Chemical Paint Spotting...............................5-98
Cleaning the Inside of Your Vehicle................5-92
Cleaning the Outside of Your Vehicle..............5-95
Finish Damage............................................5-98
Sheet Metal Damage...................................5-98
Underbody Maintenance...............................5-98
Vehicle Care/Appearance Materials................5-99
Weatherstrips..............................................5-95
Arming and Disarming the Content
Theft-Deterrent System.................................2-67
Arming Con®rmation........................................2-27
Arming with the Power Lock Switch...................2-26
Arming with the Remote Keyless Entry
Transmitter.................................................2-27
Arming with Your Key......................................2-27
Audio Speakers..............................................3-87
Audio System(s).............................................3-63
Audio Steering Wheel Controls......................3-97
Care of Your Cassette Tape Player................3-98
Care of Your CD and DVD Player................3-100
Care of Your CDs and DVDs........................3-99
Fixed Mast Antenna...................................3-100
Radio with Cassette and CD.........................3-64
Radio with Six-Disc CD................................3-74
Rear Seat Audio (RSA)........................3-92, 3-94
Setting the Time..........................................3-63
1