OPEL 1900 1973 Service Manual
Manufacturer: OPEL, Model Year: 1973, Model line: 1900, Model: OPEL 1900 1973Pages: 625, PDF Size: 17.22 MB
Page 331 of 625
6C- 401973 OPEL SERVICE MANUAL
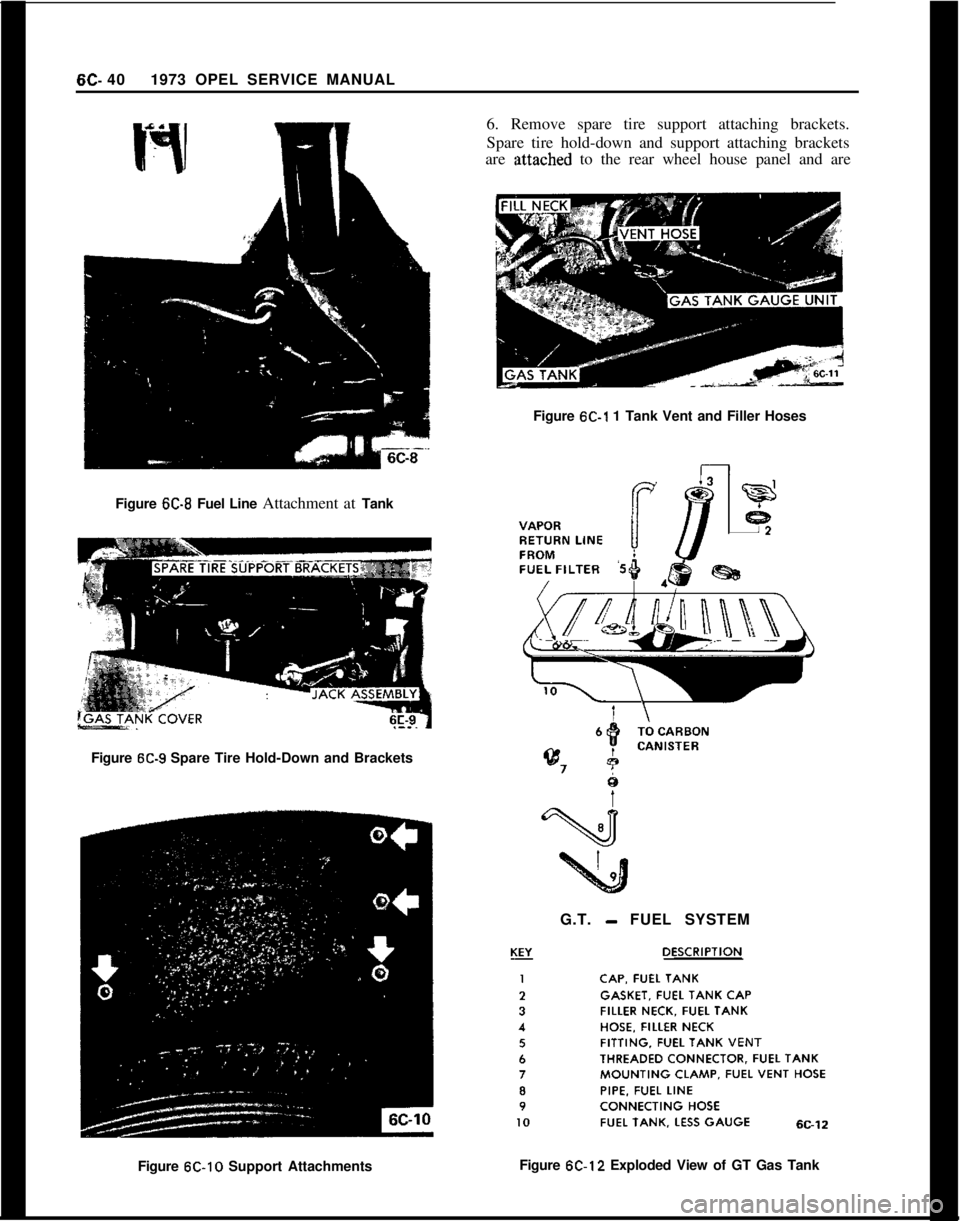
Figure K-8 Fuel Line Attachment at Tank6. Remove spare tire support attaching brackets.
Spare tire hold-down and support attaching brackets
are
;attached to the rear wheel house panel and are
Figure
6C-1 1 Tank Vent and Filler Hoses
Figure
6C-9 Spare Tire Hold-Down and Brackets
G.T.
- FUEL SYSTEM
Figure
612-10 Support AttachmentsFigure 6C-12 Exploded View of GT Gas Tank
Page 332 of 625
FUEL SYSTEM6C- 41
covered with sound deadening compound. See Fig-
ure
6C-10.7. Remove fuel tank vent hose and tiller hose. See
Figure 6C- 11.
8. Remove fuel tank attaching bolts and gauge wire
and remove tank.
Installation
1. Install tank and tighten attaching bolts.
2. Replace gauge wire. Install vent hose, making cer-
tain it is not kinked and seal vent hose hole in floor.
3. Install spare tire support attaching brackets, sup-
port panel, hold-down, and brackets.
4. Install spare tire and jack.
5. Install fuel line and rubber cap.
6. Connect battery.FUEL LINES. FUEL GAUGE TANK UNITS
All fuel lines are plastic and have an outside diameter
of
,240 inches. Unlike metal lines, plastic lines are
not flared.
When replacing a plastic line, place the line in hot
water to make it flexible. Using the old line as a
pattern, form the new line. Let the line cool com-
pletely, then route it in the same location as the old
line. To prevent chafing against the underbody, nine
(9) rubber grommets are placed at points on the line
between the fuel tank and the fuel pump. When re-
placing fuel gauge tank units, coat gasket on both
sides and first threads of attaching screws with seal-
ing compound.
CLEANING FUEL TANK
1. Remove fuel tank.
2. Empty fuel tank through filler neck.
3. Remove fuel gauge tank unit, together with suc-
tion tube and screen. Clean screen and blow out from
cover side. Flush fuel tank.
SPECIFICATIONSFuel Tank Capacity (Gallons)
Opel 1900 and Manta
....................................................................................................11.9GT
....................................................................................................................................13.2FuelGaugeType
........................................................................................................Electrical
Fuel Pump Type
......................................................................................................Mechanical
Fuel Pump Drive
..................................................................................Eccentric on Camshaft
Fuel Pump Pressure at 1950 (RPM)................................................................3.1 to 3.7 P.S.I.FuelFilter
............................................................................................................In-LineFilter
Page 333 of 625
6D. 421973 OPEL SERVICE MANUAL
EXHAUST SYSTEMS
ALL MODELS
CONTENTS
Subject
DESCRIPTION AND OPERATION: (Not Applicable)
DIAGNOSIS: (Not Applicable)
MAINTENANCE AND ADJUSTMENTS: (Not
Applicable)
MAJOR REPAIR:Page No.
Exhaust System (All Models). . . . . . . . . , . . . . . . . . . . . . . . . . . . . . . . . . . . . . . .SPECIFICA’TIONS:
Torque Specifications
. . . . . . . . . . . . . . . . . . . . . . . . . . . . . . . . . . . . . . . . . . . . * . . . . . . . . .
6D-42
6D-42
MAJOR REPAIR
EXHAUST SYSTEM (ALL MODELS)
Removal1. Remove exhaust pipe from exhaust manifold.
2. Loosen front exhaust pipe to mufller clamp and
pull exhaust pipe out of muffler.
3. Remove muffler damper rings.
4. Remove center exhaust pipe clamp. Remove rearmut&r and tail pipe(s) as an assembly. See Figure
6D-1.5. Remove front exhaust pipe clamp, and remove
front muffler and center exhaust pipe as an assembly,then remove center exhaust pipe from front mufler.
The front mufIler and center exhaust pipe are one
piece on production-built cars but are separate itemsfor service, the tail pipe of the Rallye and GT, has
a dual pipe with one resonator.
InstallationCheck rubber damper rings for muffler and tail pipe
hanger and replace as necessary.
1. Coat I.D. of rear muffler inlet neck and O.D. of
center exhaust pipe outlet (rear of pipe) with exhaust
sealer compound (several brands are currently avail-able on the market).2. Insert center exhaust pipe into rear mufIler and
tighten clamp.
3. Coat I.D. of front muffler outlet neck and O.D. of
center exhaust pipe inlet (front of pipe) with exhaust
sealer compound.4. Insert center exhaust pipe into front mufiler and
tighten clamp.
5. Install muffler and tail pipe assembly on rubber
damper rings and tighten hangers. See Figures
6D-1and
6D-2.6. Install front exhaust pipe into muffler. Do not
tighten clamp.
7. Be sure to install gasket between exhaust manifoldand exhaust pipe. Using bolts with washers, attach
the exhaust pipe to the exhaust manifold. Torque to
15 lb.ft.8. Align exhaust system and tighten all clamps.
9. Check alignment of exhaust system; make sure
that the exhaust system components have at least
3/4” clearance from the floor pan to avoid possible
overheating of the floor pan.
SPECIFICATIONS
TORQUE SPECIFICATIONSExhaust Pipe to Exhaust Manifold
- 15 lb.ft.
Page 334 of 625
EXHAUST SYSTEMS6D- 43
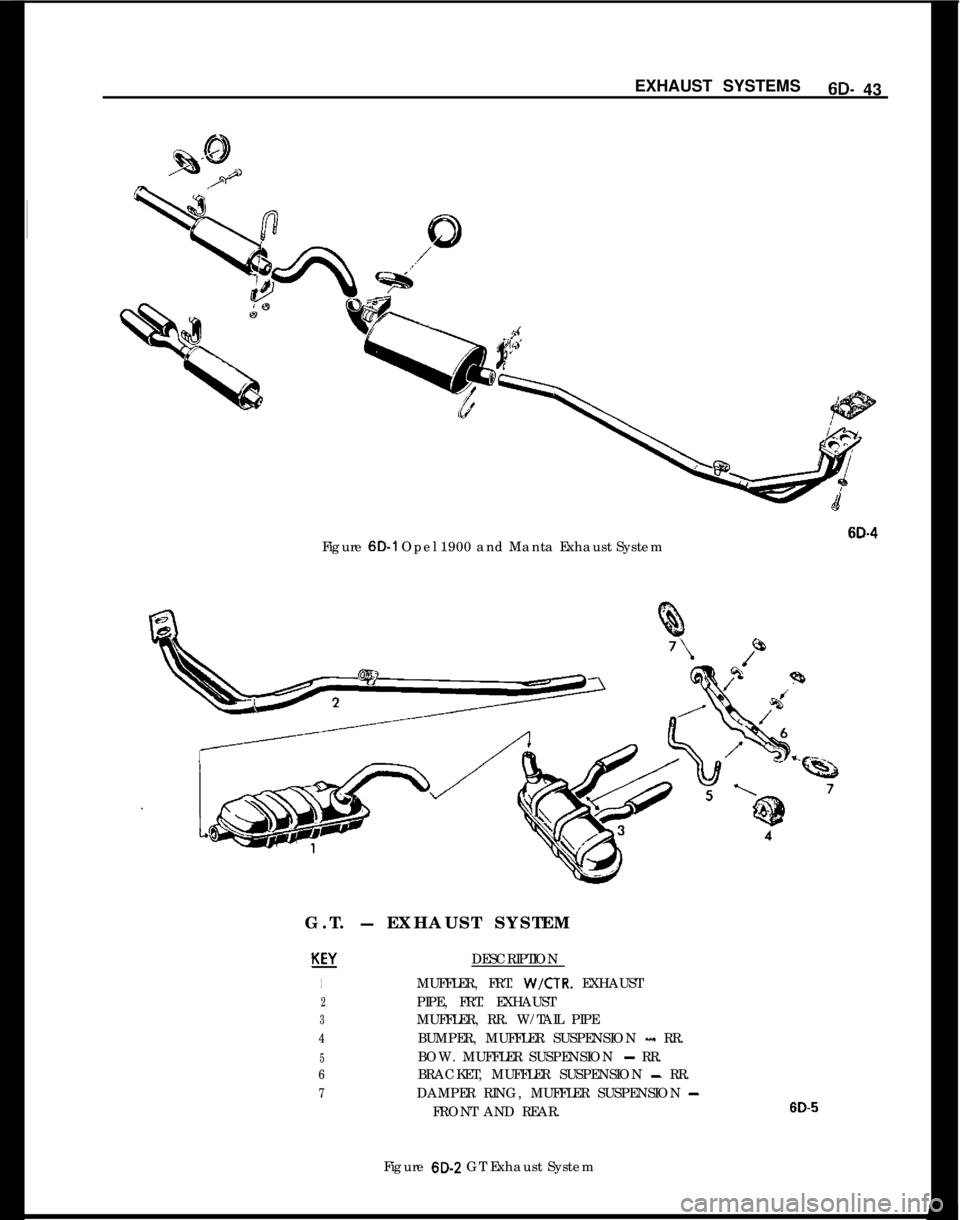
6D-4Figure 6D-1 Opel 1900 and Manta Exhaust System
G.T.
- EXHAUST SYSTEM
KEJ
1
2
3
4
5
6
7DESCRIPTION
MUFFLER, FRT. W/CTR. EXHAUST
PIPE, FRT. EXHAUST
MUFFLER, RR. W/TAIL PIPE
BUMPER, MUFFLER SUSPENSION
- RR.
BOW. MUFFLER SUSPENSION
- RR.
BRACKET, MUFFLER SUSPENSION
- RR.
DAMPER RING, MUFFLER SUSPENSION
-FRONT AND REAR.6D-5Figure
6D-2 GT Exhaust System
Page 335 of 625
SE- 441973 OPEL SERVICE MANUAL
CARBURETOR AND THROTTLE LINKAGE
ALL MODELS
CONTENTS
Subject
DESCRIPTION AND OPERATION:
Carburetor
. . . . . . . . , . . . . . . . . . . . . . . . . . . . . . . . . . . . . . . . . . . . . . . . . . . . . . . . . . . . . . . . . . . . . . . . . . . .DIAGNOSIS:
Carburetor
. . . . . . . . . . . . . . . . . . . . . . . . . . . . . . . . . . . . . . . . . . . . . . . . . . . . . . . . . . . . . . . . . . . . . . . . . . . .MAINTENANCE AND ADJUSTMENTS:
Idle Speed and Mixture Adjustments
. . . . . . . . . . . . . . . . . . . . . . . .Fast Idle Speed Adjustment
. . . . . . . . . . . . . . . . . . . . . . . . . . . . . . . . . . . . . . . . . .Throttle Linkage Adjustment
. . . . . . . . . . . . . . . , . , . . . . . . . . . . . . . . . . . . . . . .MAJOR REPAIR:
RemoveandInstallCarburetor. . . . . . . . . . . . . . . . . . . . . . . . . . . . . . . . I...Throttle Linkage Removal
. . . . . . . . . . . . . . . . . . . . . . . . . . . . . . . . . . . . . . . . . . . . . .OverhaulCarburetor
. . . . . . . . . . . . . . . . . . . . . . . . . . . . . . . . . . . . . . . . . . . . . . . . . . . . . . . .SPECIFICATIONS:
Carburetor
Specifications
. . . . . . . . . . . . . . . . . . . . . . . . . . . . . . . . . . . . . . . . . . . . . . . .Page No.
6E-44
6E-49
6E-50
6E-51
6E-51
6E-52
6E-53
6E-53
6E-58
DESCRIPTION AND OPERATION
CARBURETORThe two-barrel carburetor for all 1973 Opel1
19G0,Manta and GT models is a down-draft carburetor
with two barrels of 1.25 inch diameter each. It has
an automatic choke and a secondary valve operated
by a vacuum diaphragm, except when installed in an
Opel GT. In the GT, the secondary throttle valve is
operated by mechanical linkage from the primary
throttle valve.
The two-barrel carburetor consists of three main
parts
- throttle body, float chamber and air horn.
Each barrel is a separate system, but both barrels
discharge into a common inlet in the intake mani-
fold. The secondary barrel does not have a choke
valve or an accelerator pump. See Figure
6E-2.The throttle valve of the primary barrel is opened
through the throttle linkage. When the primary
throttle valve is almost open, at approximately half
of the maximum engine RPM, the secondary throttlevalve is opened by vacuum applied through a
vacuum diaphragm case. See Figure
6E-3. The sec-
ondary throttle valve on the GT model is opened by
mechanical linkage from the primary throttle shaft.
Choke SystemThe automatic choke is operated by a bi-metal
spring. The tension of the spring
- depending on
temperature of the heater coil
- decreases with rising
temperature and the choke valve opens progressively
until it is completely opened at engine operating tem-
perature. The choke valve is off-set so that choke
valve opening increases as air flow increases.
If the choke valve is closed, the throttle valve is
opened slightly to provide a fast idle speed. This is
done through a cam, abutment lever and throttle
connecting link. With the throttle valve opened
slightly, the vacuum during cranking can take effect
up to the choke valve, thereby drawing ample fuel
out of the main nozzle. See Figure
6E-4.With rising temperature of the heater coil, the choke
Page 336 of 625
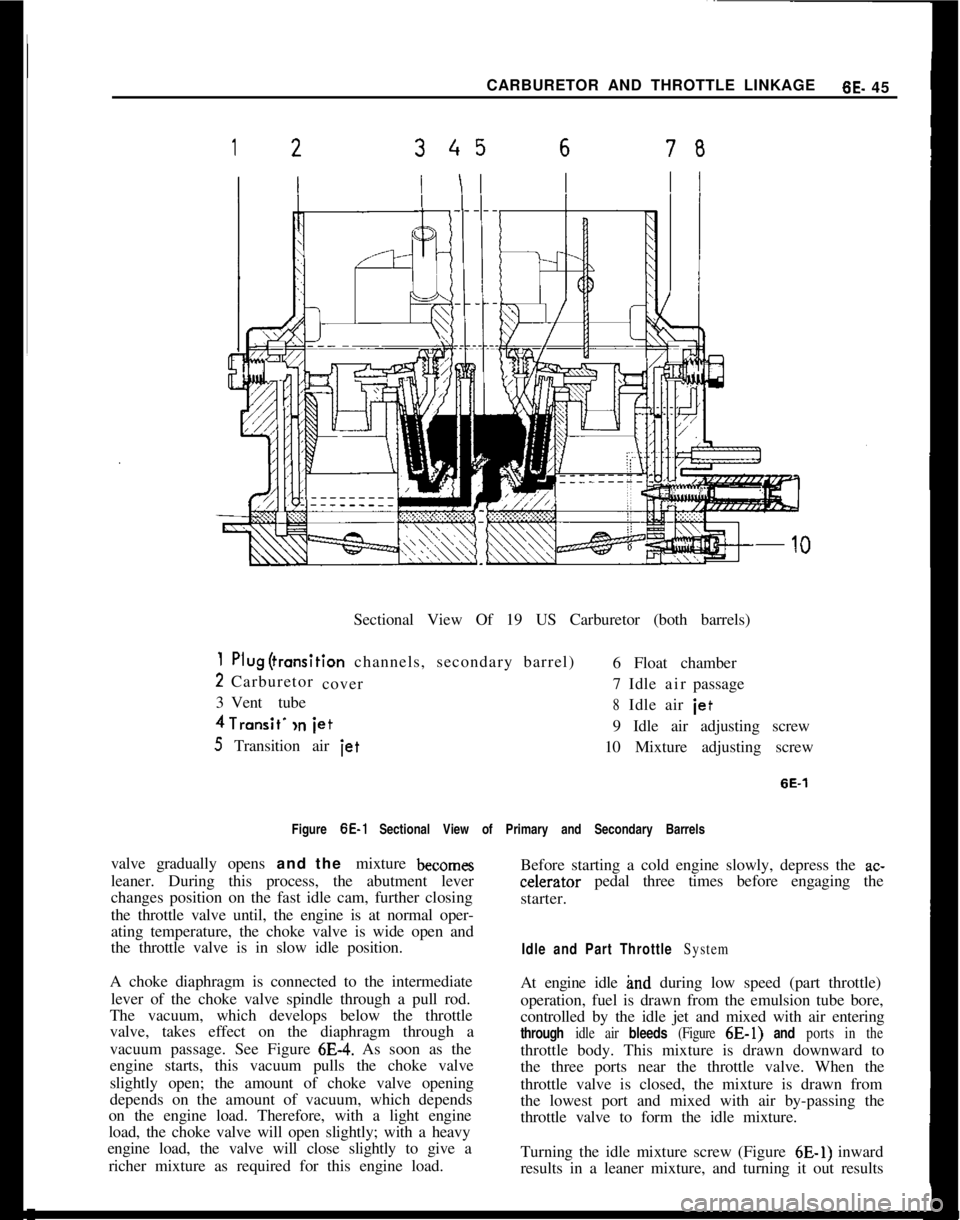
CARBURETOR AND THROTTLE LINKAGE6E- 4512345678Sectional View Of 19 US Carburetor (both barrels)
1 PIug(transition channels, secondary barrel)
6 Float chamber
2Carburetor
cover7Idleairpassage
3Vent tube
8Idleairiet4Transit’
,n iet9 Idle air adjusting screw
5 Transition air iet10 Mixture adjusting screw
6E-1Figure 6E-1 Sectional View of Primary and Secondary Barrels
valve gradually opens and the mixture
become+leaner. During this process, the abutment lever
changes position on the fast idle cam, further closingBefore starting a cold engine slowly, depress the ac-celerator pedal three times before engaging the
starter.
the throttle valve until, the engine is at normal oper-
ating temperature, the choke valve is wide open and
the throttle valve is in slow idle position.
Idle and Part Throttle SystemA choke diaphragm is connected to the intermediate
lever of the choke valve spindle through a pull rod.
The vacuum, which develops below the throttle
valve, takes effect on the diaphragm through a
vacuum passage. See Figure
6E-4. As soon as the
engine starts, this vacuum pulls the choke valve
slightly open; the amount of choke valve opening
depends on the amount of vacuum, which depends
on the engine load. Therefore, with a light engine
load, the choke valve will open slightly; with a heavy
engine load, the valve will close slightly to give a
richer mixture as required for this engine load.At engine idle grid during low speed (part throttle)
operation, fuel is drawn from the emulsion tube bore,
controlled by the idle jet and mixed with air entering
through idle air bleeds (Figure 6E-1) and ports in thethrottle body. This mixture is drawn downward to
the three ports near the throttle valve. When the
throttle valve is closed, the mixture is drawn from
the lowest port and mixed with air by-passing the
throttle valve to form the idle mixture.
Turning the idle mixture screw (Figure
6E-1) inward
results in a leaner mixture, and turning it out results
Page 337 of 625
6E.461973OPELSERVICEMANUAL
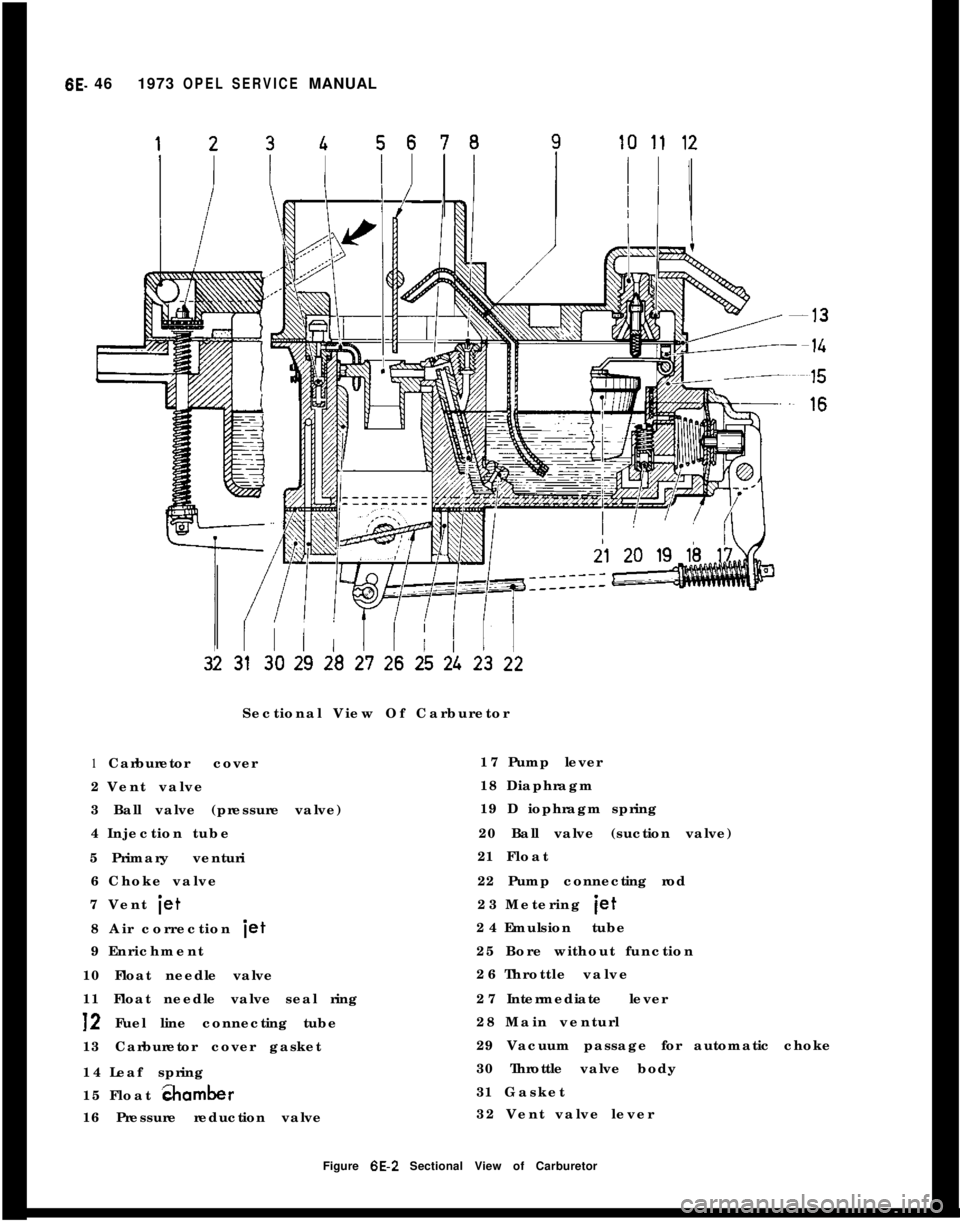
Sectional View Of Carburetor
1Carburetor cover
2Vent valve
3 Ball valve (pressure valve)
4Injection tube
5Primary venturi
6Choke valve
7Vent
iet8 Air correction
iet9Enrichment
10 Float needle valve
11 Float needle valve seal ring12 Fuel line connecting tube
13 Carburetor cover gasket
14Leaf spring
15Float
&amber16 Pressure reduction valve17Pump lever
18Diaphragm
19 D iophragm spring
20 Ball valve (suction valve)
21Float
22 Pump connecting rod
23Metering
iet24Emulsion tube
25 Bore without function
26Throttle valve
27Intermediate lever
28Main venturl
29 Vacuum passage for automatic choke
30 Throttle valve body
31Gasket
32 Vent valve lever
Figure 6E-2 Sectional View of Carburetor
Page 338 of 625
CARBURETOR AND THROTTLE LINKAGE65 47
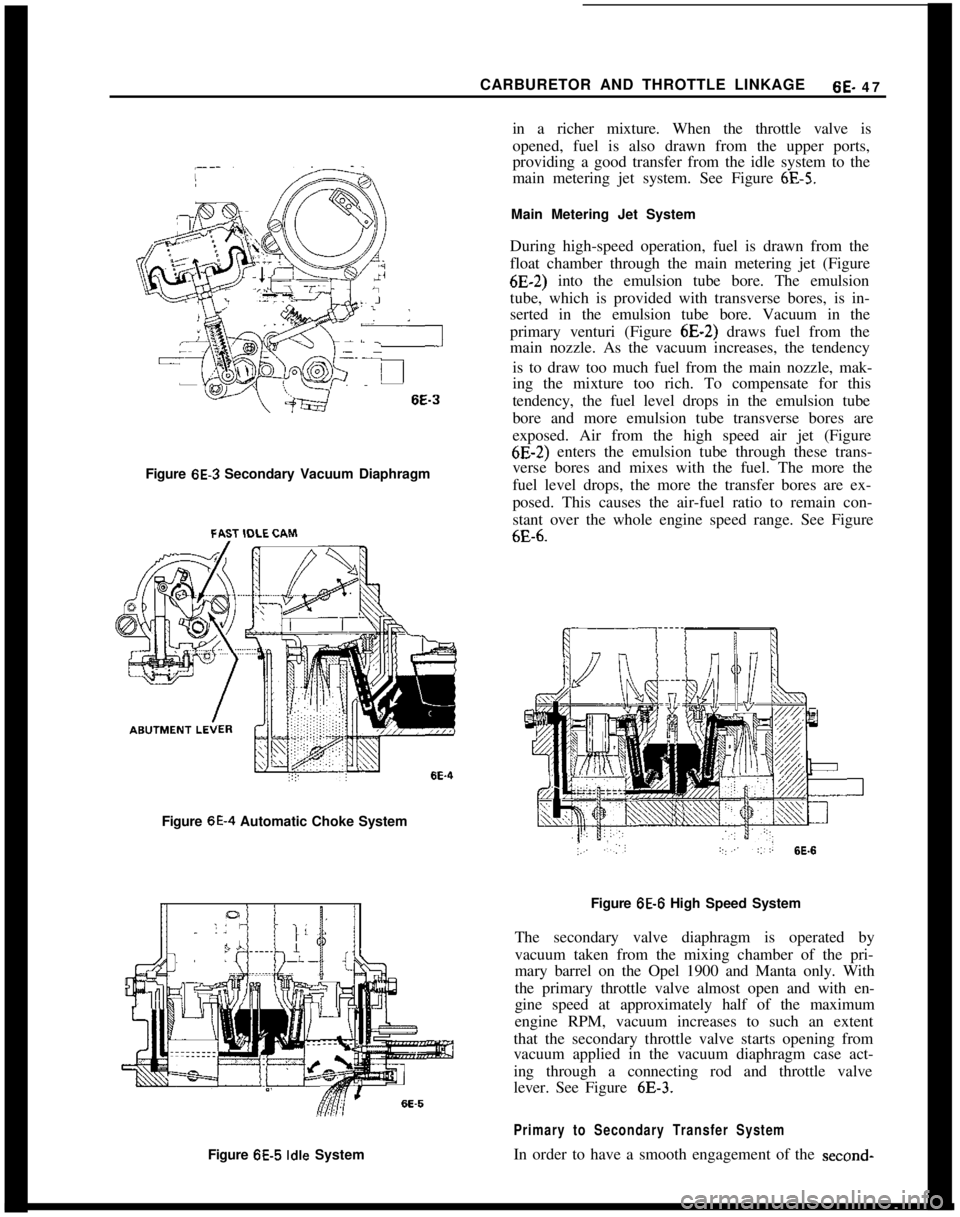
Figure 6E.3 Secondary Vacuum Diaphragm
Figure
6E-4 Automatic Choke System
Figure
6E-5 Idle Systemin a richer mixture. When the throttle valve is
opened, fuel is also drawn from the upper ports,
providing a good transfer from the idle system to the
main metering jet system. See Figure
6E-5.Main Metering Jet System
During high-speed operation, fuel is drawn from the
float chamber through the main metering jet (Figure6E-2) into the emulsion tube bore. The emulsion
tube, which is provided with transverse bores, is in-
serted in the emulsion tube bore. Vacuum in the
primary venturi (Figure 6E-2) draws fuel from the
main nozzle. As the vacuum increases, the tendency
is to draw too much fuel from the main nozzle, mak-
ing the mixture too rich. To compensate for this
tendency, the fuel level drops in the emulsion tube
bore and more emulsion tube transverse bores are
exposed. Air from the high speed air jet (Figure6E-2) enters the emulsion tube through these trans-
verse bores and mixes with the fuel. The more the
fuel level drops, the more the transfer bores are ex-
posed. This causes the air-fuel ratio to remain con-
stant over the whole engine speed range. See Figure
6E-6.Figure
6E-6 High Speed System
The secondary valve diaphragm is operated by
vacuum taken from the mixing chamber of the pri-
mary barrel on the Opel 1900 and Manta only. With
the primary throttle valve almost open and with en-
gine speed at approximately half of the maximum
engine RPM, vacuum increases to such an extent
that the secondary throttle valve starts opening from
vacuum applied in the vacuum diaphragm case act-
ing through a connecting rod and throttle valve
lever. See Figure
6E-3.
Primary to Secondary Transfer SystemIn order to have a smooth engagement of the
second-
Page 339 of 625

6~. 46,1973 OPEL SERVICE MANUAL
ary barrel, it is provided with g transfer system.
When the secondary throttle valve starts to open,
two‘ports (which are normally just above the closed
valve) are uncovered, causing fuel to feed into the
secondary bore just before the secondary nozzle
starts feeding. This provides for an additional enrich-
ment of the air-fuel mixture at the beginning of full
throttle operation. See Figure
6E-7.
nInFlFigure
6E-7 Primary to Secondary Transfer System
Full Thrdttle Enrichment SystemIf the secondary throttle valve is fully opened, the
vacuum in the throttle valve area is reduced so that
the transfer ports (mentioned above) stop feeding.
However, the vacuum increases greatly in the sec-
ondary venturi area. An enrichment tube which pro-
trudes into the primary venturi area, feeds fuel
continuously during full throttle operation. See Fig-
ure
6E-2.
Acceleration SystemWhenever the throttle is closing, the suction stroke
of the diaphragm pump causes fuel to flow from the
float chamber through the inlet ball valve into the
pump chamber. When the throttle valve is opened
the diaphragm is moved inward by the pump con-
necting rod and the pump lever. Fuel is injected into
the primary bore through the injector tube. The
amount of fuel is determined by the pump stroke.
The inlet ball valve in the pump chamber prevents
fuel from flowing back into the float chamber during
the pressure stroke of the pump. The outlet ball valve
prevents air from being drawn into the injector tube
during the suction stroke of the pump. See Figure6E- 8.
Float Bowl VentilationWhile driving, the float bowl is ventilated from insideFigure
6E-8 Acceleration System
the carburetor. That is, the float bowl is connected
through the vent valve with the area under the air
cleaner.
When the engine is idling or off, the ventilation from
inside is cut off and ventilation from the charcoal
canister is cut in. The upper spring now seats the
valve on the upper seat. See Figure
6E-9.
-6E-9
Figure
6E-9 Float Bowl VentilationThe advantage of an inside vent while driving is that
air cleaner restriction does not enrichen the air fuel
mixture. The purpose of the charcoal canister vent
while idling or after shutting-off a hot engine, is to
prevent excess fuel vapors from entering the intakemanifold and outside air. Excess fuel vapors may
cause an idling engine to stall, or may make it dif-
ficult to restart a hot engine.
Page 340 of 625

CARBURETOR AND THROTTLE LINKAGE6E- 49DIAGNOSIS
CARBURETORCondition I
Hesitation or Stall Upon Light AccelerationCorrection
1. Check spark plugs and plug gap. Plug gap should
be
,030 in.
2. Check dwell and timing.
3. Adjust carburetor.
4. Accelerator pump should discharge fuel between
throttle plate and venturi wall with engine off. If aim
is not correct, use needlenose pliers to slightly bend
nozzle so proper aim is achieved. See Figure 6E- 10.
CORRECT ACCELERATOR
PUMP DISCHARGE
NOZZLE AIM
\Figure 6E-10 Pump Shot Aim
Road test car. If hesitation still exists, check for the
folI0 wing:1. Plugged accelerator pump discharge nozzle.2. Dirt in accelerator pump circuit.
3. Defective inlet check ball.
4. Defective accelerator pump pressure relief valve.
5. Defective accelerator pump diaphragm.
6. Maladjusted accelerator pump linkage.
Condition II
Hard Start Afier Hot Soak
CorrectionPerform Steps l-4 in Condition I.
Condition Ill
Hard Start When Engine Is Cold
Correction1. Align groove on choke cover with pointer on
choke housing. See Figure
6E-17.2. Set fast idle.
3. Replace distributor points if pitted.
4. Check spark plugs and gap at
,030.5. Set dwell and timing.
If above procedure does not correct problem, replace
with new automatic choke assembly.
Condition IV
Rough, Erratic, or No Idle
Correction1. Check spark plugs and gap at
,030.2. Check dwell angle and ignition timing.
3. Clean idle jet and passages with air hose. See Fig-
ure
6E-5.4. Check manifold to head bolt torque. Should be 33
lb.ft.5. Check automatic choke linkage alignment.
6. Adjust carburetor.