battery OPEL 1900 1973 Service Manual
[x] Cancel search | Manufacturer: OPEL, Model Year: 1973, Model line: 1900, Model: OPEL 1900 1973Pages: 625, PDF Size: 17.22 MB
Page 5 of 625
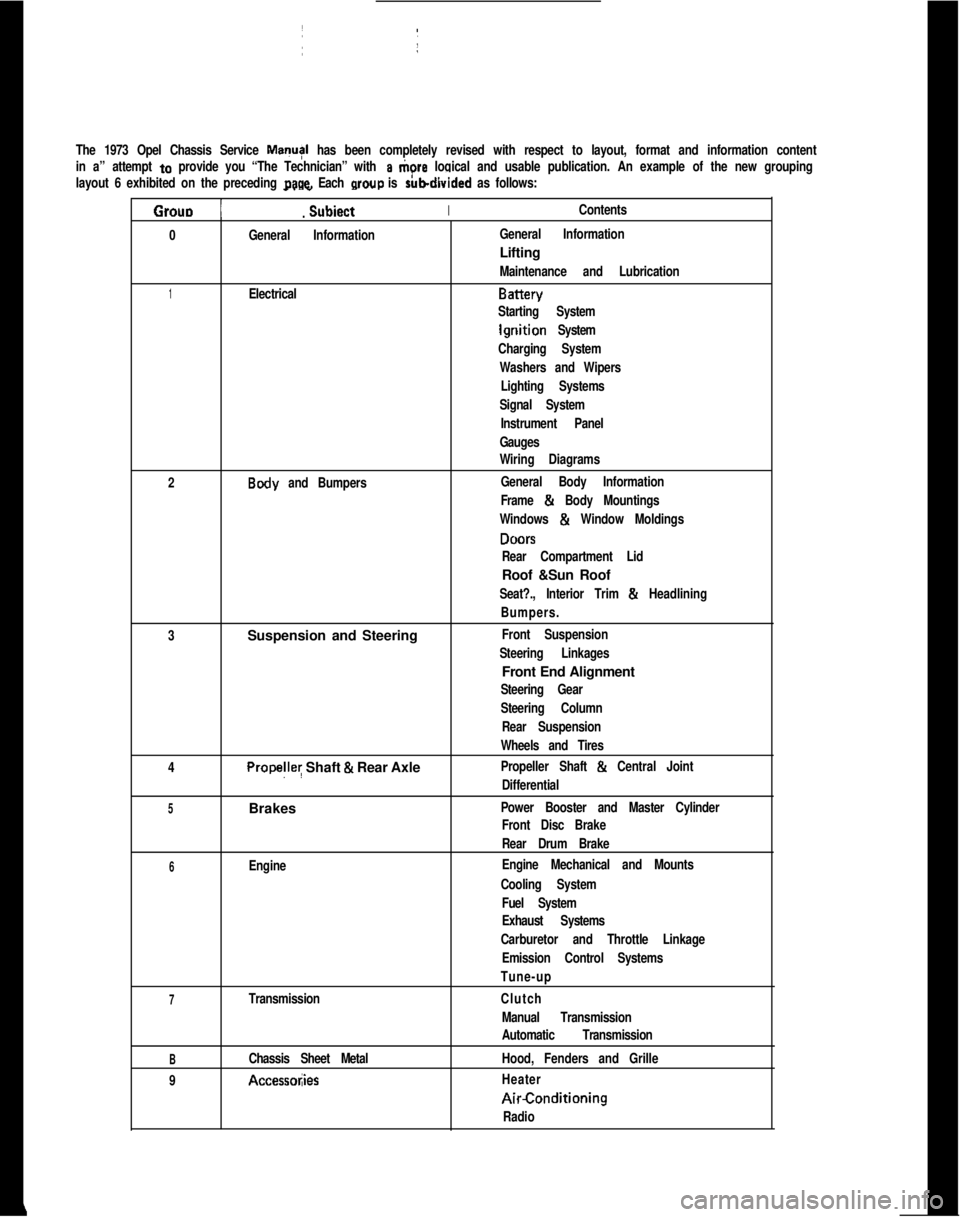
The 1973 Opel Chassis Service MayI has been completely revised with respect to layout, format and information content
in a” attempt
to provide you “The Technician” with a tiore logical and usable publication. An example of the new grouping
layout 6 exhibited on the preceding
page. Each wow is rubdivided as follows:
Grouo 1
_. _
Subiect IIContents.
0
General InformationIGeneral InformationLifting
Maintenance and Lubrication
1ElectricalBattery
Starting System
lgriition System
Charging System
Washers and Wipers
Lighting Systems
Signal SystemI
Instrument Panel
Gauges
Wiring Diagrams
2
Body and Bumpers:General Body InformationI
Frame & Body Mountings
Windows
& Window Moldings
DONS
Rear Compartment LidRoof &Sun Roof
Seat?., Interior Trim & Headlining
Bumpers.
3Suspension and Steering
Front Suspension
Steering Linkages1Front End Alignment
Steering Gear
Steering Column
Rear Suspension
Wheels and Tires
4
Propelley Shaft & Rear AxlePropeller Shaft & Central Joint
Differential
5Brakes ~Power Booster and Master Cylinder
Front Disc BrakeI
Rear Drum Brake
6EngineEngine Mechanical and Mounts
Cooling System
Fuel System
Exhaust Systems
Carburetor and Throttle Linkage
Emission Control Systems
Tune-up
7TransmissionClutch
Manual Transmission
Automatic Transmission
BChassis Sheet MetalHood, Fenders and Grille
9
Accessol;iesHeaterAirConditioning
Radio
Page 16 of 625
LUBRICATION AND MAINTENANCE OC-7SERVICESLUBE AND GENERAL MAINTENANCE
Vehicle operation under conditions such as heavy
dust, continuous short trips, use of other than un-
leaded or low lead fuels or pulling trailers, is not
considered normal use and therefore more frequent
maintenance will be required. Such additional
maintenance requirements are included where appli-
cable.
Engine OilChange each 4 months or
3,COO miles, whichever
occurs first, or each 2 months or
3,ooO miles when
the vehicle is operated under the following condi-
tions: (a) driving in dusty conditions, (b) trailer pull-
ing, (c) extensive idling or (d) short-trip operation at
freezing temperatures (with engine not thoroughly
warmed-up).Engine oils have a definite effect on ease of starting,
oil economy, combustion chamber deposits and en-
gine wear. It is recommended that a” oil which,
according to the label on the can is; (1) intended for
service SE and (2) passes car makers’ tests be used.
Oils confotming to these types contain detergent ad-
ditives. -
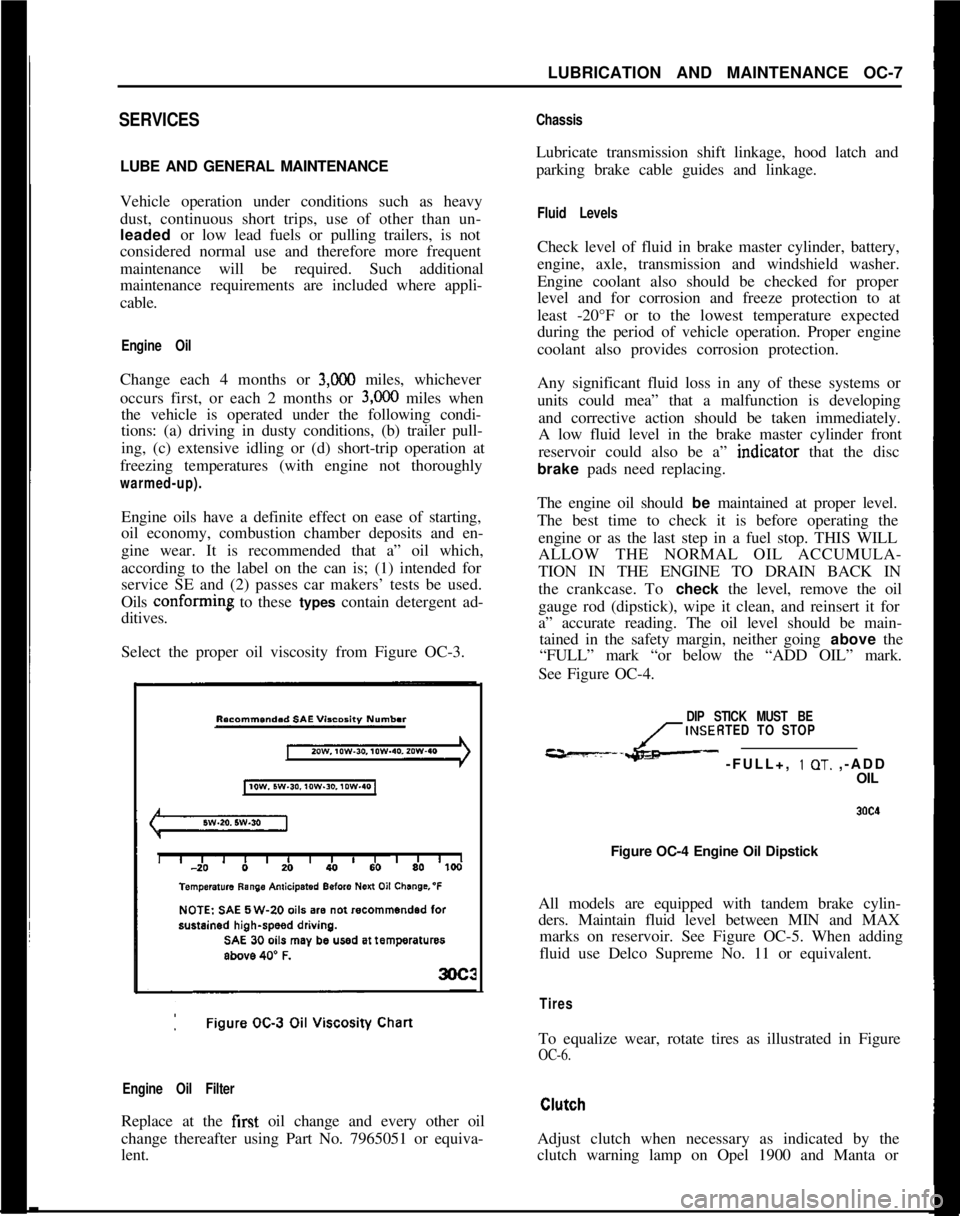
Select the proper oil viscosity from Figure OC-3.
Engine Oil FilterReplace at the first oil change and every other oil
change thereafter using Part No. 7965051 or equiva-
lent.
ChassisLubricate transmission shift linkage, hood latch and
parking brake cable guides and linkage.
Fluid LevelsCheck level of fluid in brake master cylinder, battery,
engine, axle, transmission and windshield washer.
Engine coolant also should be checked for proper
level and for corrosion and freeze protection to at
least -20°F or to the lowest temperature expected
during the period of vehicle operation. Proper engine
coolant also provides corrosion protection.
Any significant fluid loss in any of these systems or
units could mea” that a malfunction is developing
and corrective action should be taken immediately.
A low fluid level in the brake master cylinder front
reservoir could also be a” indtcator that the disc
brake pads need replacing.
The engine oil should be maintained at proper level.
The best time to check it is before operating the
engine or as the last step in a fuel stop. THIS WILL
ALLOW THE NORMAL OIL ACCUMULA-
TION IN THE ENGINE TO DRAIN BACK IN
the crankcase. To check the level, remove the oil
gauge rod (dipstick), wipe it clean, and reinsert it for
a” accurate reading. The oil level should be main-
tained in the safety margin, neither going above the
“FULL” mark “or below the “ADD OIL” mark.
See Figure OC-4.
DIP STICK MUST BE
INSERTED TO STOP
---L- -FULL+, 1 OT. ,-ADD
OIL
Figure OC-4 Engine Oil Dipstick
All models are equipped with tandem brake cylin-
ders. Maintain fluid level between MIN and MAX
marks on reservoir. See Figure OC-5. When adding
fluid use Delco Supreme No. 11 or equivalent.
TiresTo equalize wear, rotate tires as illustrated in Figure
OC-6.Adjust clutch when necessary as indicated by the
clutch warning lamp on Opel 1900 and Manta or
Page 22 of 625
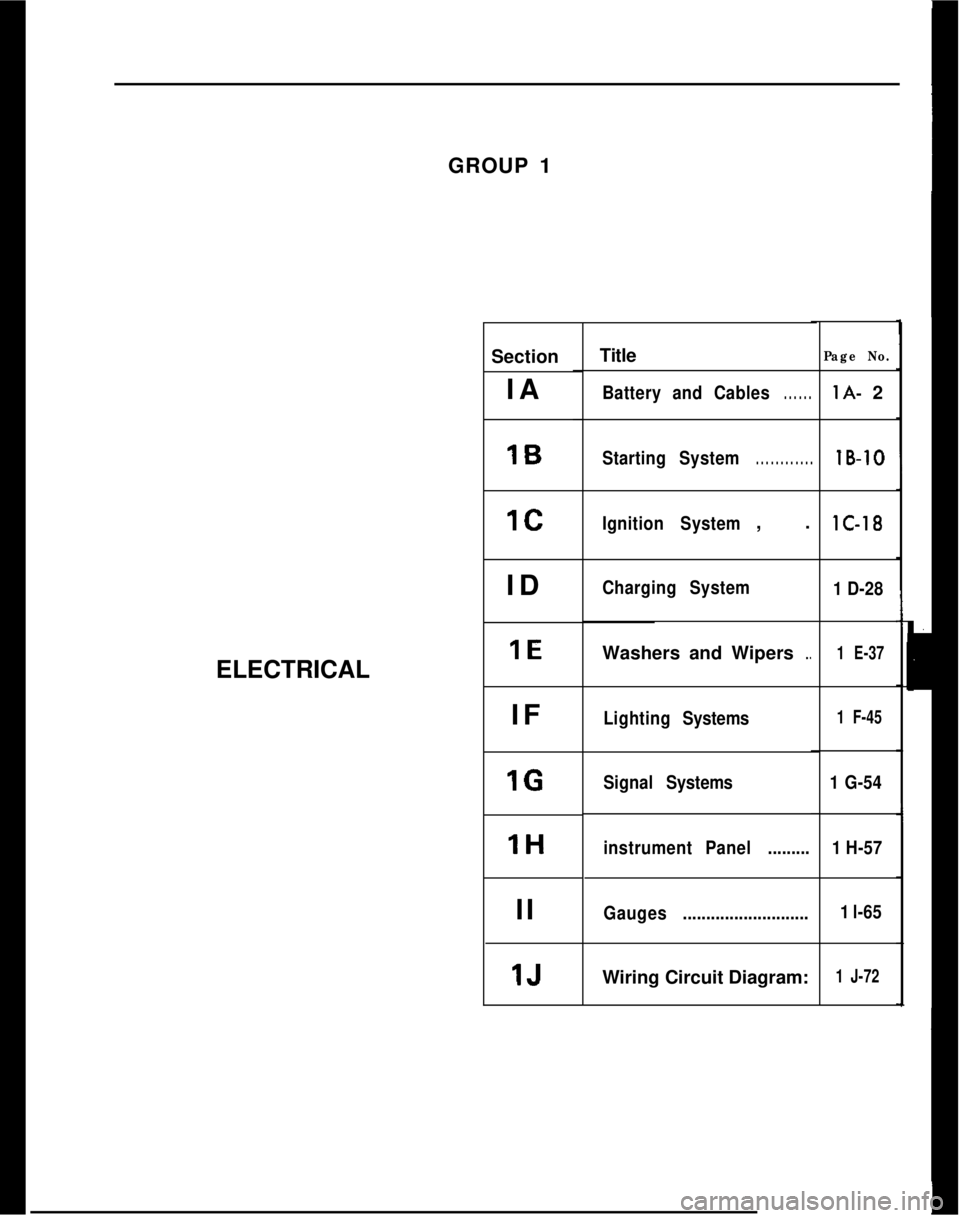
ELECTRICALGROUP 1
Section
IAIBICIDIE
IFIGIH
II
IJTitle
Battery and Cables. . . . . .
StartingSystem. . . . . . . . . . . .
Ignition System, .
ChargingSystemWashers and Wipers
.,
LightingSystems
SignalSystems
instrument Panel.........
Gauges...........................Wiring Circuit Diagram:
Page No.
lA- 2lB-10lC-18
1 D-28
1 E-37
1 F-45
1 G-54
1 H-57
1 l-65
1 J-72
Page 23 of 625
lA- 21973 OPEL SERVICE MANUAL
BATER~ AND CABLES
ALL/ MODELS
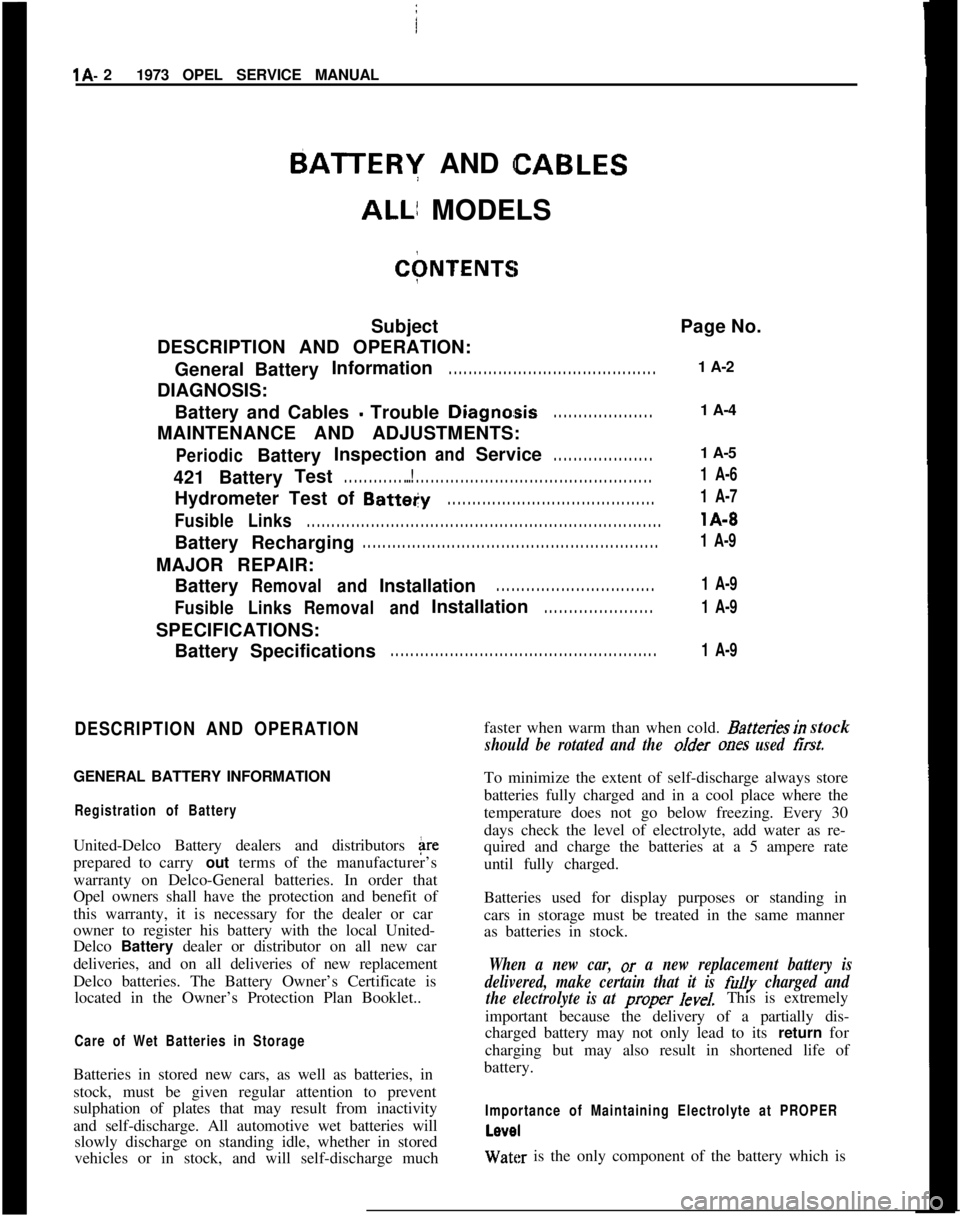
C+NTENTIiSubject
DESCRIPTION AND OPERATION:
GeneralBatteryInformation
. . . . . . . . . . . . . . . . . . . . . . . . . . . . . . . . . . . . . . . . . .DIAGNOSIS:
Battery and Cables
- Trouble Diagno:sis. . . . . . . . . . . . . . . . . . . .MAINTENANCE AND ADJUSTMENTS:
PeriodicBatteryInspectionandService. . . . . . . . . . . . . . . . . . . .421BatteryTest
. . . . . . . . . . . . ...! . . . . . . . . . . . . . . . . . . . . . . . . . . . . . . . . . . . . . . . . . . . . . . . .Hydrometer Test of Batteiy
. . . . . . . . . . . . . . . . . . . . . . . . . . . . . . . . . . . . . . . . . .
FusibleLinks. . . . . . . . . . . . . . . . . . . . . . . . . . . . . . . . . . . . . . . . . . . . . . . . . . . . . . . . . . . . . . . . . . . . . . . .BatteryRecharging
. . . . . . . . . . . . . . . . . . . . . . . . . . . . . . . . . . . . . . . . . . . . . . . . . . . . . . . . . . . .MAJOR REPAIR:
Battery
RemovalandInstallation. . . . . . . . . . . . . . . . . . . . . . . . . . . . . . . .
FusibleLinksRemovalandInstallation. . . . . . . . . . . . . . . . . . . . . .SPECIFICATIONS:
BatterySpecifications
. . . . . . . . . . . . . . . . . . . . . . . . . . . . . . . . . . . . . . . . . . . . . . . . . . . . . .Page No.
1 A-2
1 A-4
1 A-5
1 A-6
1 A-7lA-8
1 A-9
1 A-9
1 A-9
1 A-9
DESCRIPTION AND OPERATIONGENERAL BATTERY INFORMATION
Registration of BatteryUnited-Delco Battery dealers and distributors
$reprepared to carry out terms of the manufacturer’s
warranty on Delco-General batteries. In order that
Opel owners shall have the protection and benefit of
this warranty, it is necessary for the dealer or car
owner to register his battery with the local United-
Delco Battery dealer or distributor on all new car
deliveries, and on all deliveries of new replacement
Delco batteries. The Battery Owner’s Certificate is
located in the Owner’s Protection Plan Booklet..
Care of Wet Batteries in StorageBatteries in stored new cars, as well as batteries, in
stock, must be given regular attention to prevent
sulphation of plates that may result from inactivity
and self-discharge. All automotive wet batteries will
slowly discharge on standing idle, whether in stored
vehicles or in stock, and will self-discharge muchfaster when warm than when cold.
Batteriesin stock
should be rotated and the oIder ones used tirst.To minimize the extent of self-discharge always store
batteries fully charged and in a cool place where the
temperature does not go below freezing. Every 30
days check the level of electrolyte, add water as re-
quired and charge the batteries at a 5 ampere rate
until fully charged.
Batteries used for display purposes or standing in
cars in storage must be treated in the same manner
as batteries in stock.
When a new car, or a new replacement battery is
delivered, make certain that it is
fuIly charged and
the electrolyte is at
proper level.This is extremely
important because the delivery of a partially dis-
charged battery may not only lead to its return for
charging but may also result in shortened life of
battery.
Importance of Maintaining Electrolyte at PROPER
LevelWater is the only component of the battery which is
Page 24 of 625
BATTERY AND CABLES - ALL MODELSlA- 3
lost as the result of charging and discharging, and it
must be replaced before the electrolyte level falls to
the tops:of the separators. If the water is not replacedand the plates become exposed, they may become
permanently sulphated, which would impair the
per-forma”& of the plates. Also, the plates cannot take
full
par! in the battery action unless they are com-
pletely covered by the electrolyte.
Importance of Keeping Battery Properly Charged
The battery has three major functions: (1) It provides
a source of energy for cranking the engine. (2) It actsas a stabilizer to the voltage in the electrical system.
(3) It
c+n for a limited time furnish energy when the
demand: of the electrical units in operation exceed
the output of the generator.
In
ordei for the battery to continue to function, it is
necessaiy that current withdrawal from the battery
be balanced by current input from the generator so
that the battery is maintained in a properly chargedconditidn. If the outgo exceeds the input, the battery
will be&me discharged so that it cannot.supply suffi-cient energy.
The state of charge of the battery as well as the
temperature of the electrolyte has an important bear-ing on its capacity for supplying energy. Battery effi-
ciency is greatly reduced by decreased electrolyte
temper&e as it has a decided numbing effect on its
electrodhemical action. Under high discharge such
as cranking, battery voltage drops to lower values incold temperatures than in warm temperatures.
In
extrkmely cold climates it is important to keepbatter& in a nearly full charged condition to avoid
the possibility of freezing, which will damage any
battery!
The following table shows the temperatures at whichfreezing will occur in electrolytes of
differennt densi-
ties, wifh specific gravity corrected to 80 degrees l?
Specific Gravity Freezing Point
1.220 -35 degrees F.
1.200
-35 degrees F.
1.160
d degrees F.
Care of Dry Batteries in StorageA “dry charge” battery contains fully charged posi-
tive
a$ negative plates but no electrolyte.
Dry charged batteries should be stored in a dry placeaway from excessive heat. A dry charged battery
should
p kept in its original carton until ready to beput into service. This type of battery will retain its
“charged” condition indefinitely if protected from
moisture. Dry batteries may be stacked in vertical
columns provided they are not stacked more than
four high.
Preparing Dry Charged Batteries For ServiceTo prepare “dry charge” batteries for service use
approved battery-grade acid electrolyte (1.265 sp. gr.
at 80 degrees F). Care should be exercised in its useto prevent bodily injury or damage to clothing or
other material resulting from actual contact with the
electrolyte.
Electrolyte should be added to dry charged batteriesin an area where water is readily available for flush-
ing in case the electrolyte comes into contact with the
body. Refer to instructions on side of electrolyte con-tainer for antidotes to use if electrolyte comes into
contact with the body.
It is strongly recommended that a person filling bat-
teries with electrolyte wear glasses (preferably safetyglasses) to prevent possible damage to the eyes
should any spattering of the electrolyte occur.
1, Remove dry charged battery from its original car-
ton.2. Remove the vent plugs.
3. Using a glass or acid-proof plastic funnel, till eachbattery cell with electrolyte. Do not use a metal
funnel for filling the battery. The cell is properlytilled when the electrolyte level rises to the split ring
at the bottom of the vent well. Do not overfill orundertill. Overfilling will cause acid corrosion in the
,battery area; undertilling will cause early battery fail-
UR.4. After tilling cells, wait five to ten minutes and add
additional electrolyte, if necessary, to bring the elec-
trolyte to the proper level.
5. Never finish tilling a dry charge battery with wa-
ter. If electrolyte is spilled, more electrolyte must be
obtained.
Test After Batteries
ere Prepared For ServiceThe Delco Dry Charge Battery may be put into ser-
vice immediately after activation. However, to insuregood battery performance, the following activation
tests are recommended:1. After adding electrolyte,, check the open circuit
voltage. Less than 10 volts mdicates a reverse cell oran open circuit and the battery should be replaced.
2. Check the specific gravity of all cells. If the specific
Page 25 of 625
1A. 4 1973 OPEL SERVICE MANUAL
gravity corrected to 80 degrees F.’ shows more than
a thirty point
(.030) drop from the initial tilling with
electrolyte, or if one or more cells’gas violently after
addition of electrolyte, the batteiy should be fulty
charged before use.
3. For best performance in cold weather (32 degrees
F. or less), or if the battery and the electrolyte are not
at 60 degrees F., or above at time of activation, warm
the battery by boost charging.
TROUBLE DIAGNOSIS
BATTERY AND CABLES. TRDUBLE DIAGNOSIS
Quick Check of Battery and Cables
Whenever electrical trouble developes, it is desirable
to make a quick check of the battery and cables to
make certain that this source of current is in good
condition, securely connected, and is functioning
properly. This check will also give a good check on
the cranking system.
1. Turn on the lights. They should’burn steadily and
with normal brilliance.
2. With lights burnings, operate the cranking motor.
Either have the headlights shining on a wall so their
brilliance can be noted, or have someone watching
the headlights.
3. When cranking motor solenoid switch is
closeh,one of the following conditions will occur; (1) Lights
will stay bright or will dim slightly if temperature is
cold, and engine will be cranked at normal speed; (P
Lights will
gb out; (3) Lights will dim considerably;
(4) Lights will stay bright but no cranking action will
take place. The first named condition indicates that
nothing is wrong with the battery, cables, and crank-
ing system. The other conditions indicate trouble
aSfollows:
4. If fightsgo
out as cranking motor solenoid switch
is closed, it indicates a poor connection in the circuit
between battery and cranking motor. Check battery
cables and clean and tighten loose or corroded termi-
nals.
5. If
lights dim considerably as cranking motor
solenoid switch is closed, it indicates that the battery
is run down, or there is a condition in cranking
mb-tor or engine which causes an excessive current drain
on the battery. A low battery will be indicated by ,a
clattering noise in cranking motor solenoid because
the battery cannot sustain the voltage required to
hold solenoid plunger “in” after switch contacts
close and the “pull in” winding is shorted out.
Test battery with a 421 Battery Test. If battery is
found to be in good condition check cranking motor.
6.Iflights stay bright but no cranking action occurswhen cranking motor solenoid switch is closed, it
indicates an open circuit in cranking motor, switch,
or control circuit.
Testing Resistance of Cables and Terminal
Connections
Battery cables and terminal connections may be
tested with equipment comprising of a voltmeter (5
volts maximum), ammeter of 300 or more amperes
capacity, and carbonpile rheostat having a minimum
capacity of 300 amperes connected in series with the
ammeter.
I. Adjust rheostat to provide maximum resistance
(“OFF” position).
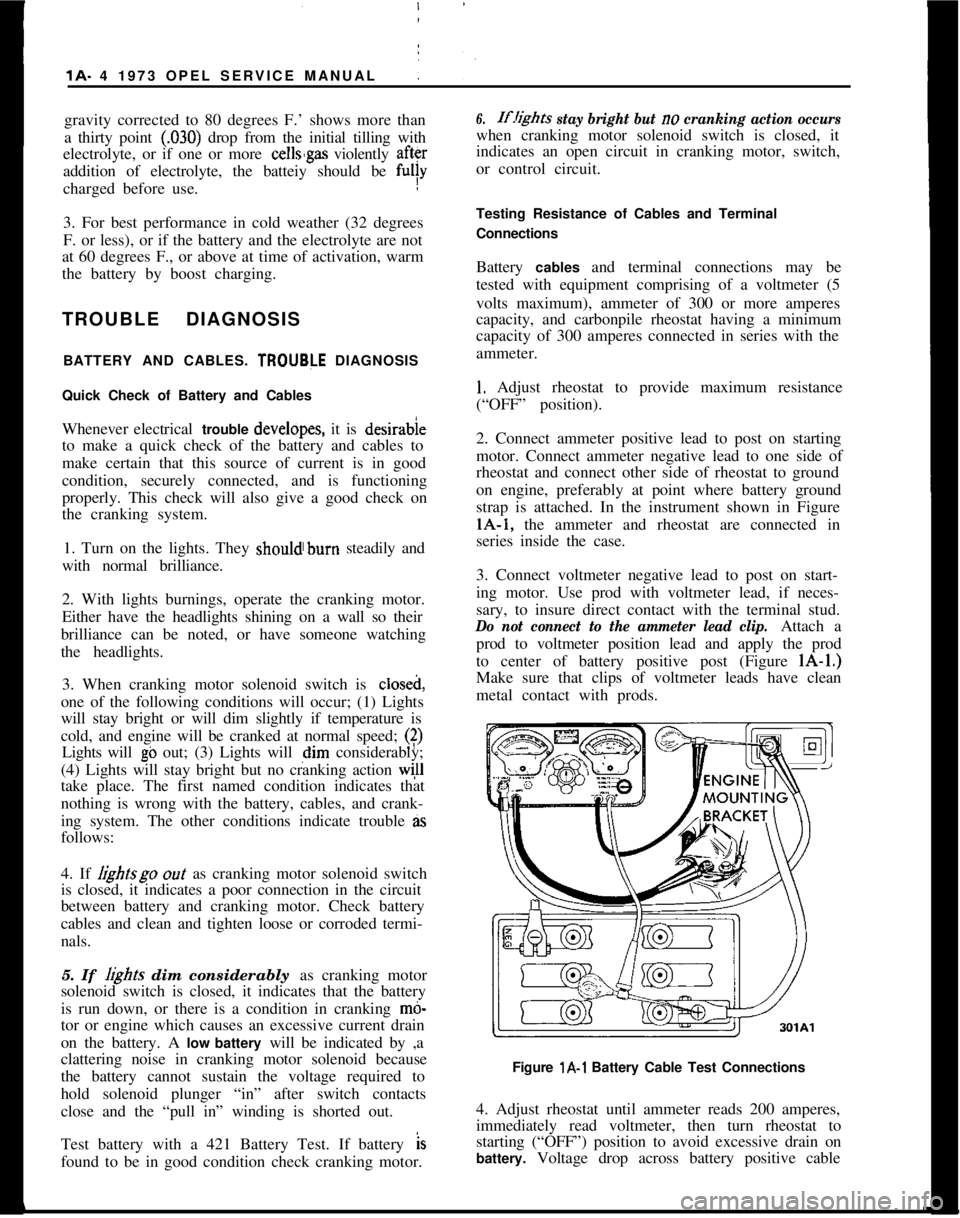
2. Connect ammeter positive lead to post on starting
motor. Connect ammeter negative lead to one side of
rheostat and connect other side of rheostat to ground
on engine, preferably at point where battery ground
strap is attached. In the instrument shown in FigurelA-1, the ammeter and rheostat are connected in
series inside the case.
3. Connect voltmeter negative lead to post on start-
ing motor. Use prod with voltmeter lead, if neces-
sary, to insure direct contact with the terminal stud.
Do not connect to the ammeter lead clip.Attach a
prod to voltmeter position lead and apply the prod
to center of battery positive post (Figure lA-1.)
Make sure that clips of voltmeter leads have clean
metal contact with prods.
Figure l A-l Battery Cable Test Connections
4. Adjust rheostat until ammeter reads 200 amperes,
immediately read voltmeter, then turn rheostat to
starting (“OFF”) position to avoid excessive drain on
battery. Voltage drop across battery positive cable
Page 26 of 625
BATTERY AND CABLES - ALL MODELSlA- 5
and terminal connections should not exceed 2/10
volt.
5. Connedt voltmeter positive lead to ground on en-
gine.
At&h prod to voltmeter negative lead and
apply prod to center of battery negative post. Volt-
age drop across the battery ground cable and termi-
nal conne$tions should not exceed 2/10 volt at
200amps.
6. A reading in excess of 2/10 volt when testing
either battery cable indicates excessive resistance in
cable or cpnnections. Clean and tighten cable or con-
nections. Clean and tighten cable terminals
(sub-para. c, below) and recheck for voltage drop. If volt-
age drop Still exceeds 2/10 volt, replace cable with a
genuine Buick-Opel cable to insure ample capacity.
Undercharge Failure of BatteryThe most frequent trouble experienced with storage
batteries is failure to maintain a state of charge suffi-
cient to crank the engine and also furnish current to
the ignitibn system, lights and accessories. Failure to
maintain a proper state of charge may be due to one
or more of the following conditions:
1.
Opertiting Conditions. When determining cause
of premature failure of a battery, consideration must
be given /to the conditions under which the car is
operated.,
In very low temperatures the capacity of a storage
battery
ii considerably reduced and the energy re-
quired f& cranking the. engine is considerably in-
creased. :
Frequent starting, particularly in cold weather,
ac-compani
place in the limited running time. This condition is
aggravated by night driving when lights are turned
on, or by operation of an air conditioner in heavy
traffic.
When thk car is operated under these conditions,adjusting,the voltage regulator to the high limit may
allow enough increase to keep the battery at a safe
state of charge. If the high limit setting does not
maintain a safe state of charge, an occasional booster
charge should be given to the battery.
2. Low charging Rate. In case of premature battery
failure, tbe charging rate of alternator should always
be checked and adjusted if below specifications.
3.
Zntemd Condition The internal condition of the
battery niay be such that it cannot hold a chargesatisfactoiily. Check electrolyte level and test the
battery using the 421 Battery Test.
Overcharge Failure of BatteryA common cause of battery failure is overcharging,
that is, continued input of excessive charging current
after the battery has reached a fully charged condi-
tion.
One evidence that battery is being overcharged is the
need for frequent addition of water to the battery in
order to maintain the electrolyte level above the tops
of the battery separators, since overcharging causes
rapid water loss. When this becomes evident, the
charging rate of alternator should be immediately
checked, as well as the voltage regulator, and ad-
justed to avoid internal damage to battery.
ADJUSTMENTS AND MINOR SERVICEPERIODIC BATTERY INSPECTION AND SERVICE
The battery requires very little attention, but peri-
odic inspection is essential to secure the maximum
efficiency and life. The following services are essen-
tial to maintain the battery at maximum efficiency.
WARNING: Never expose battery to open flame or
electric spark
- battery action generates hydrogen gas
which is flammable and explosive. Do not allow bat-
tery fluid to contact skin, eyes, fabrics or painted
surfaces
- fluidis a sulfuric acid solution which could
cause serious personal injury or property damage.
Wear eye protection when working with battery.
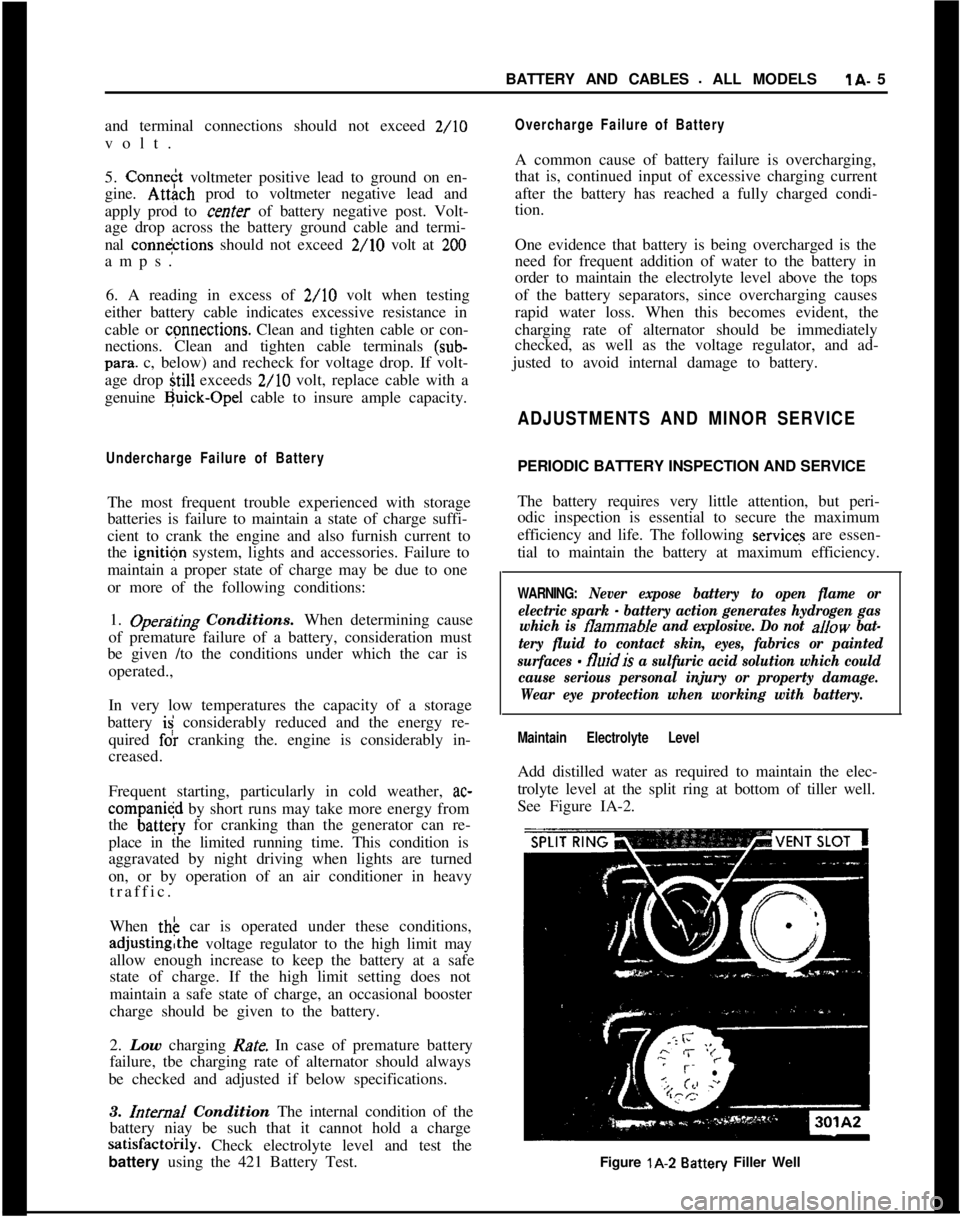
Maintain Electrolyte LevelAdd distilled water as required to maintain the elec-
trolyte level at the split ring at bottom of tiller well.
See Figure IA-2.
Figure lA-2
Battery Filler Well
Page 27 of 625
j
/lA- 61973 OPEL SERVICE MANUAL
Do not overfill, as electrolyte may
be sprayed out by
gassing or may overtlow due to heat expansion dur:
ing charging.
If distilled water is not available, it is better to add
clean, mineral-free tap water than to allow the
elec2trolyte level to remain below the top of the plates:
In freezing weather the water should be added just
before using the car or otherwise charging the bat-
tery so that the water will be mixed with the acid
before it is allowed to stand in freezing temperatures.
If it is found necessary to add water to the
batterimore frequently than about every
1,ooO miles and the
quantity of water added per cell is’ excessive, check
setting of voltage regulator and adjust, if necessary:
Abnormal water loss is an indication that the battery
is being overcharged.
Inspect Battery, Mounting and Cables
Check outside of battery for damage or signs of se&ous abuse such as broken case or broken covers:
Check inside of battery by removing the vent caps
and inspecting for signs of abuse
stich as electrolyte
level too low to see, or bad or unusual odors. If
battery shows signs of serious damage or abuse, it
should be replaced.
Check the battery hold down bolts to make certain
that battery is securely held in place. The nut should
be drawn up to 20 lbs. in.;excessjve tightening may
distort or crack the battery case.If the top of battery is dirty or the hold down str?e
is corroded, clean thoroughly with a brush dipped
IFammonia or soda solution. Care must be used td
prevent any solution from getting into battery
cellslAfter the foaming of solution stops, flush off witli
clean water and dry thoroughly. If hold down strap
is corroded it should be painted with acid-resisting
paint after cleaning.
Check battery cables to make certain they are tight
at bracket and junction block. If a connection is
found loose it should be cleaned before being tight;ened as arcing and corrosion may have taken place
in the loose connection. Check condition of cables
and replace if badly corroded or frayed.
Special attention must be given to,the battery posi-
tive cable position to eliminate the possibility of con-
tact with the exhaust manifold on the 1.1 liter engine.
The cable clamp must be rotated clockwise as neces-
sary for the cable to run at a 45 degree angle toward
the right wheelhouse panel.
Cleaning Cable Terminals
If loose connections are found by inspection, or highresistance is found by voltage test, disconnect the
cable for thorough cleaning of terminals. When
removing a corroded cable terminal from battery
post, do not pry against battery case or hammer on
terminal to break it loose, since either practice will
result in broken cell covers. Use a screw-type termi-
nal puller if terminal cannot be loosened by hand.
Thoroughly clean all corrosion from disconnected
battery cable terminals and terminal posts, using
suitable wire brushes. If wire brushes are not availa-
ble, corroded terminals may be cleaned by brushing
with a strong soda solution, using care not to get
solution into battery cells.
If
cabbz strands are broken, corroded, or loose in
terminals, the cable should be replaced with the cor-
rect cable to insure ample capacity.
To prevent corrosion of battery terminals and con-
nections, apply a coating of petroleum jelly over the
battery post and cable terminals after cables have
been installed on terminals.
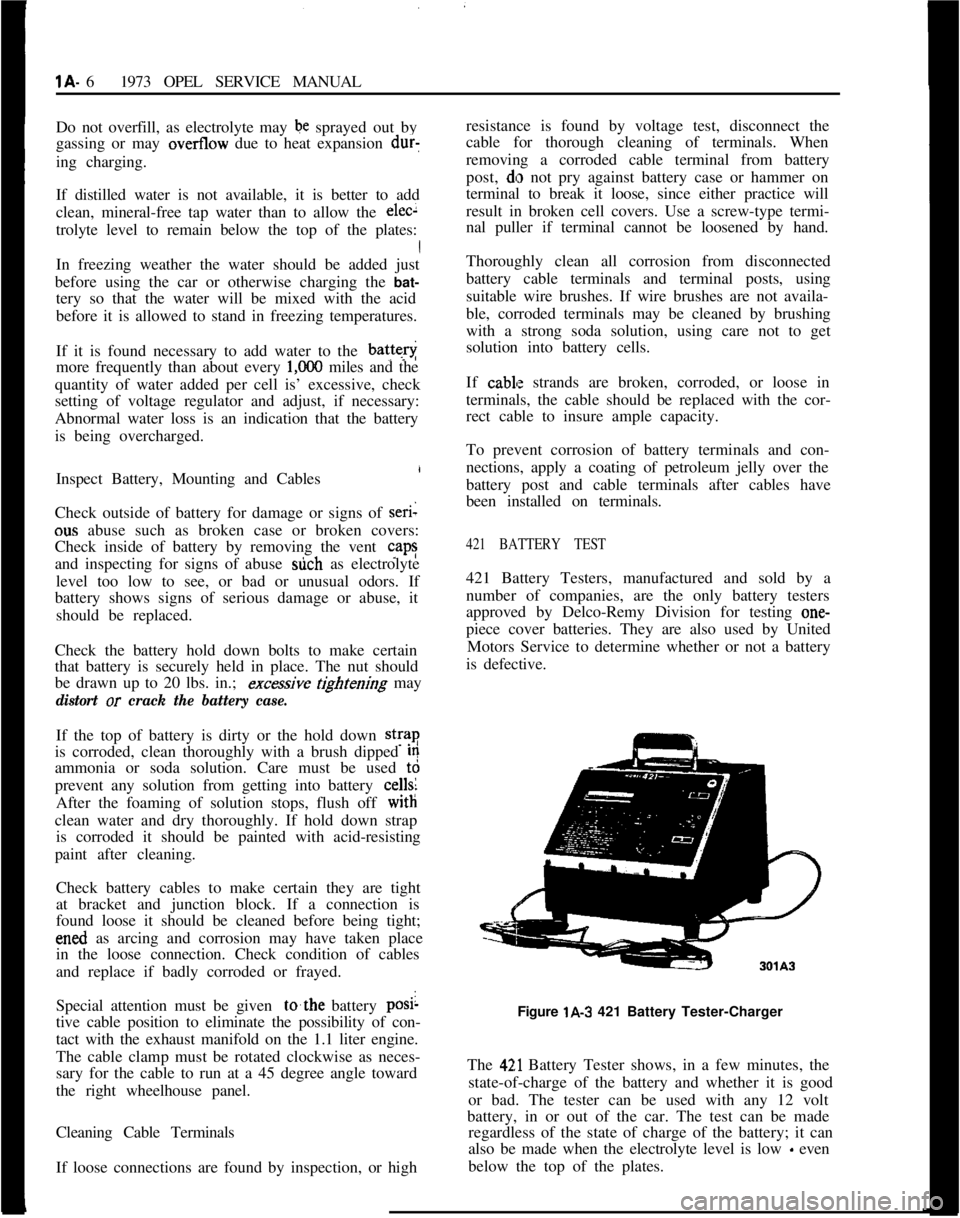
421 BATTERY TEST421 Battery Testers, manufactured and sold by a
number of companies, are the only battery testers
approved by Delco-Remy Division for testing one-
piece cover batteries. They are also used by United
Motors Service to determine whether or not a battery
is defective.
Figure lA-3 421 Battery Tester-Charger
The
42,l Battery Tester shows, in a few minutes, the
state-of-charge of the battery and whether it is good
or bad. The tester can be used with any 12 volt
battery, in or out of the car. The test can be made
regardless of the state of charge of the battery; it can
also be made when the electrolyte level is low
- even
below the top of the plates.
Page 28 of 625
BATTERY AND CABLES - ALL MODELSlA- 7
421 Test
F$ocedure1. Visual Inspection
- The first step in testing the
Energizer br 12-V& Battery should be a visual in-
spection
which very often will save time, labor and
expense in determining the condition.
(a) Check for broken or cracked case or cover.
(b) Check ,for loose terminal posts.
fiozeck Ifor defective or mutilated sealing com-(d) Check for other visible signs of physical damage.
Obvious d?mage as a result of conditions described
above indicates the need for Energizer or batteryreplaceme$t.
2. The “421” Test is a programmed test procedure
consisting bf a series of timed discharge and charge
events, reqtdring approximately 2 to 3 minutes, that
will determine the condition of the Energizer or bat-
tery with a high degree of accuracy when used inconjunctioti with this entire test procedure. “421”
Testers
a$ produced by a number of different manu-
facturers
r+nd their directions for tester operation
should be carefully followed. General comments on
overall “42 1” Tester operation follow:
(a) Energi@rs or batteries should
nor be charged
prior to
making this test. Defects within the unit can
be hidden by the charging and erroneous test results
will be obtpined.
(b) Erratic, or extremely low, initial meter readings
may indicate poor connections at the tester termi-
nals.Obt{in clean and tight connections beforeper-
forming the 421
Test.(c) All meter readings should be made immediately
after the meter indicator light comes on even if the
meter needle is still moving.
(d) If additional discharges are required after the
initial discbarge, set meter indicator following thefast discharge cycle.
(e) Batteries designated as “bad” by the tester should
be replaced.
(f) Batteries designated as “good” with no owner’s
complaint or indication of poor performance, should
be left in s+vice. Posts, cable clamps, and top should
be cleaned, water should be added and recharging
should be
,performed, if required. For dependable
and reliable battery service, the battery should be in
at least a
75 per cent state-of-charge.
(g) Batteries designated as “good” that are suspected
of being questionable because of owner complaint, orage of the battery, should be further tested by the
Hydrometer Test.
HYDROMETER TEST OF BATTERY
The 421 Battery Test as described in the previous
paragraph is the fastest and most accurate means of
determining the serviceability of a one-piece cover
battery. However, ifa 421 Battery Tester is not avail-
able, a hydrometer test may be used on a battery that
has failed to give proper service.
Hydrometer Test1. Fully charge battery.
2. Measure specific gravity of each cell as described
in sub-paragraph below.
Decide battery serviceability as follows:
(a) If all cells read between 1.230 and 1.310, the
battery is okay. All it needed was a full charge.
(b) After fully charging battery, if any cell reads less
than 1.230, the battery is defective and should be
replaced.
Use of HydrometerThe Hydrometer measures the percentage of sulphu-
ric acid in the battery electrolyte in terms of specific
gravity. As a battery drops from a charged to a dis-
charged condition, the acid leaves the solution and
enters the plates, causing a decrease in specific
gravity of electrolyte. With a hydrometer, an indica-
tion of the concentration of the electrolyte is ob-
tained.
The specific gravity of the electrolyte varies not only
with the percentage of acid in the liquid, it also varies
with temperature. As temperature increases, the
electrolyte expands so that the specific gravity is re-
duced. As temperature drops, the electrolyte con-
tracts so that the specific gravity increases. Unless
these variations in specific gravity are taken into
account, the specific gravity obtained by the hy-
drometer may not give a true indication of the con-
centration of acid in the electrolyte.
Correction can be made for temperature by adding
,004, usually referred to as 4 “points of gravity”, to
the hydrometer reading for every 10 degrees F. that
the electrolyte is above 80 degrees F. or subtracting004 for every 10 degrees F. that electrolyte is below
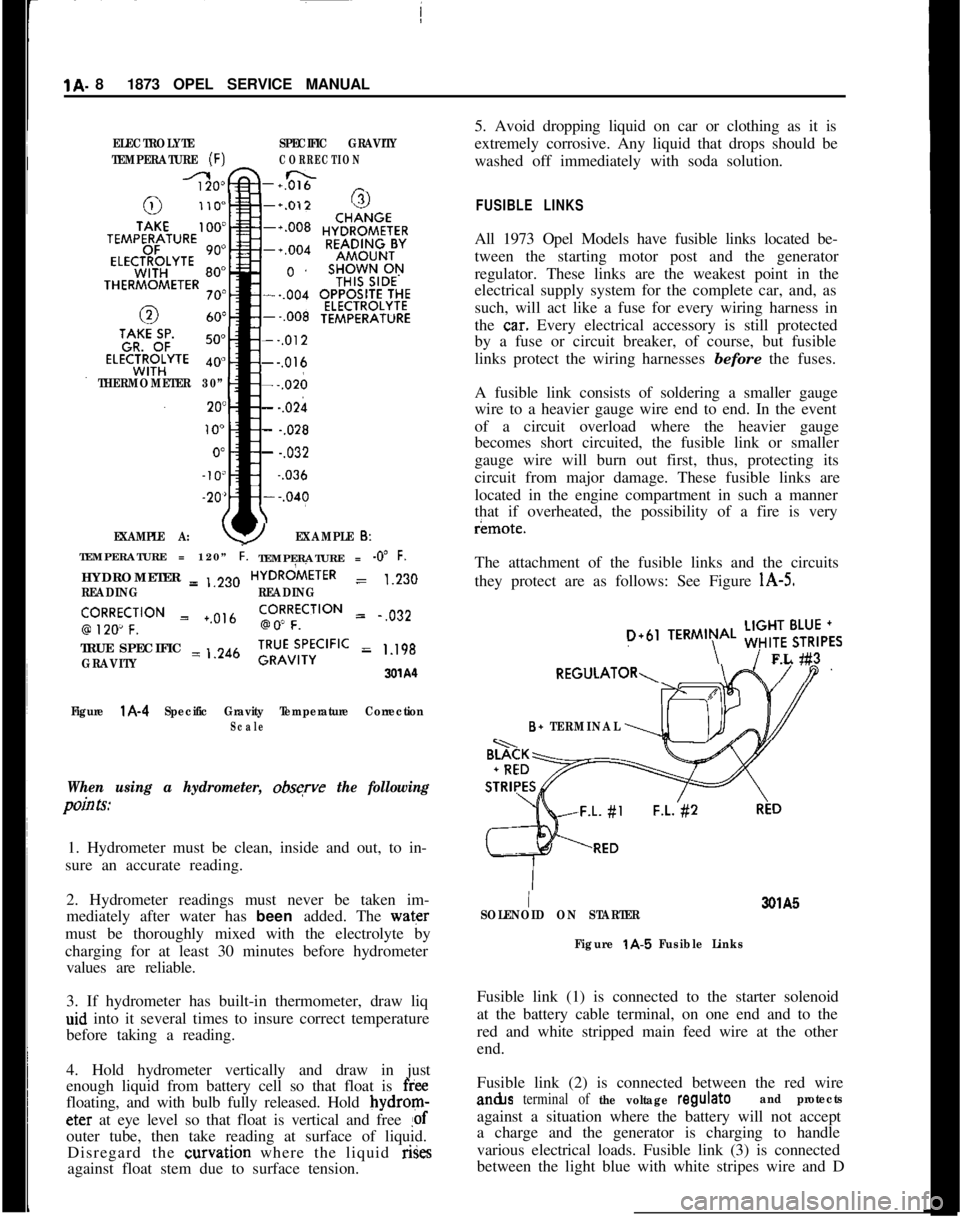
80 degrees F. Figure IA-4 shows the exact correctionfigure to use for any temperature above or below 80
degrees F., the three steps used in obtaining the cor-
rected or true specific gravity, and two examples
showing how it is figured.
Page 29 of 625
1A. 81873 OPEL SERVICE MANUALELECTROLYTESPECIFIC GRAVITY
TEMPERATURE
(F)CORRECTION
-+0&&n _
THERMOMETER 30”
EXAMPLE A:
--,012---,016---,026
- -.02h
- -.028
- -.032~
-.036
YEXAMPLE 6:TEMPERATURE = 120”
i.TEMPERATURE = -0” F.HYDROMETER = ,,230HYDRdiETER
= 1.230
READINGREADING
‘,9R2Ro~CF;‘“” = +.0,6go!RFfCilON = .,032
TRUE SPECIFIC = ,.246
GRAVITY;RU”v;,‘;CIFIC = 1.198
3xA‘l
Figure
l A-4 Specific Gravity Temperature CorrectionScale
When using a hydrometer, obsqve the following
pain Is:1. Hydrometer must be clean, inside and out, to in-
sure an accurate reading.
2. Hydrometer readings must never be taken im-
mediately after water has been added. The water
must be thoroughly mixed with the electrolyte by
charging for at least 30 minutes before hydrometer
values are reliable.
3. If hydrometer has built-in thermometer, draw liq
aid into it several times to insure correct temperature
before taking a reading.
4. Hold hydrometer vertically and draw in just
enough liquid from battery cell so that float is
freefloating, and with bulb fully released. Hold bydrom-eter at eye level so that float is vertical and free
!ofouter tube, then take reading at surface of liquid.
Disregard the curvation where the liquid rises
against float stem due to surface tension.5. Avoid dropping liquid on car or clothing as it is
extremely corrosive. Any liquid that drops should be
washed off immediately with soda solution.
FUSIBLE LINKSAll 1973 Opel Models have fusible links located be-
tween the starting motor post and the generator
regulator. These links are the weakest point in the
electrical supply system for the complete car, and, as
such, will act like a fuse for every wiring harness in
the
ca.r. Every electrical accessory is still protected
by a fuse or circuit breaker, of course, but fusible
links protect the wiring harnesses before the fuses.
A fusible link consists of soldering a smaller gauge
wire to a heavier gauge wire end to end. In the event
of a circuit overload where the heavier gauge
becomes short circuited, the fusible link or smaller
gauge wire will burn out first, thus, protecting its
circuit from major damage. These fusible links are
located in the engine compartment in such a manner
that if overheated, the possibility of a fire is veryr¬e.
The attachment of the fusible links and the circuits
they protect are as follows: See Figure
l A-5.
D+61TERMIN\AL ;;!$6,,FL #3
B+ TERMINAL
I3QlA5
SOLENOID ON STARTER
Figure
t A-5 Fusible LinksFusible link (1) is connected to the starter solenoid
at the battery cable terminal, on one end and to the
red and white stripped main feed wire at the other
end.
Fusible link (2) is connected between the red wirean&s
terminal of the voltage regulateand protectsagainst a situation where the battery will not accept
a charge and the generator is charging to handle
various electrical loads. Fusible link (3) is connected
between the light blue with white stripes wire and D