change time OPEL AMPERA E 2017.5 Manual user
[x] Cancel search | Manufacturer: OPEL, Model Year: 2017.5, Model line: AMPERA E, Model: OPEL AMPERA E 2017.5Pages: 265, PDF Size: 6.24 MB
Page 172 of 265

170Driving and operatingsupplemental use only to reduce
the vehicle speed before a
collision.
The system may not react to
animals. After a sudden lane
change, the system needs a
certain time to detect the next
preceding vehicle.
The driver must always be ready
to take action and apply the brakes and steer to avoid collisions.
Functionality
If equipped only with front camera the
active emergency braking operates in a forward gear above walking speed
up to 80 km/h.
A precondition is that the system is not deactivated in the vehicle
personalisation menu 3 92.
The system includes: ● brake preparation system
● emergency automatic braking
● forward looking brake assist ● front pedestrian protection system
Brake preparation system
When approaching a vehicle ahead
or a pedestrian so quickly that a
collision is likely, the brake
preparation system slightly
pressurises the brakes. This reduces
the response time, when a manual or automatic braking is requested.
The brake system is prepared so that braking can occur more rapidly.
If equipped only with front camera the
system operates up to a speed of
80 km/h.
Emergency automatic braking
After activation of brake preparation
system and just before the imminent
collision, this function automatically
applies limited braking to reduce the
impact speed of the collision or
prevent a crash.
Depending on the situation, the
vehicle may automatically brake
moderately or hard. This front
automatic braking can only occur if a
vehicle ahead is detected, indicated
by the vehicle ahead indicator A
3 167. On vehicles with frontpedestrian protection, automatic
braking can also occur when a
pedestrian ahead is detected,
indicated by the pedestrian ahead
indicator 7.
The system operates up to a speed of 80 km/h.
Below a speed of 40 km/h the system
can apply full braking.
Emergency automatic braking may slow the vehicle to a complete stop to try to avoid a potential crash. If this
happens, emergency automatic
braking may engage the electric
parking brake to hold the vehicle at a
stop. To release, push the electric
parking brake switch or firmly depress
the accelerator pedal.9 Warning
Emergency automatic braking is
an emergency crash preparation
feature and is not designed to
avoid crashes. Do not rely on the
system to brake the vehicle.
Emergency automatic braking will
Page 173 of 265

Driving and operating171not brake outside of its operating
speed range and only responds to
detected vehicles.
Forward looking brake assist
In addition to the brake preparation
system and emergency automatic
braking, the forward looking brake
assist function makes the brake assist more sensitive. Therefore,
depressing the brake pedal less
strongly results in immediate hard
braking. This function helps the driver brake quicker and harder before an
imminent collision.
The system operates up to a speed of 80 km/h.
9 Warning
Active emergency braking is not
designed to apply hard
autonomous braking or to
automatically avoid a collision. It is designed to reduce the vehicle
speed before a collision. It may not
react to animals. After a sudden
lane change, the system needs a
certain time to detect the next
preceding vehicle.
The complete attention of the
driver is always required while
driving. The driver must always be
ready to take action and apply the brakes and steer to avoid
collisions.
Intelligent brake assist
Intelligent brake assist may activate
when the brake pedal is applied
quickly by providing a boost to
braking based on the speed of
approach and distance to a vehicle
ahead.
Minor brake pedal pulsations or pedal movement during this time are normal and the brake pedal should continue
to be applied as required. Intelligent
brake assist will automatically
disengage only when the brake pedal is released.
9 Warning
Intelligent brake assist may
increase vehicle braking in
situations when it may not be
necessary. You could block the
flow of traffic. If this occurs, take
your foot off the brake pedal and
then apply the brakes as needed.
Front pedestrian protection
Front pedestrian protection 3 172.
Deactivation Active emergency braking can be
deactivated in the personalisation
menu in the Info display 3 92.
If deactivated, a message is
displayed in the Driver Information
Centre.
The system is reactivated the next time the vehicle is switched on.
System limitations In some cases, the active emergencybraking system may provide
automatic braking in situations that
seem to be unnecessary, for instance
Page 194 of 265

192Driving and operatingActivation
The lane keep assist is activated by
pressing a. The LED in the button
illuminates to indicate that the system
is switched on.
When the control indicator a in the
instrument cluster illuminates green,
the system is ready to assist.
The system is operational at vehicle
speeds above 60 km/h and if lane
markings are available.
The system gently turns the steering
wheel and the control indicator a
changes to yellow, if the vehicle
approaches a detected lane marking
without using the turn signal in that
direction.
The system alerts by flashing a
together with three chimes, from the respective direction, if the lane is
departed significantly.
The system is only operable when a
lane marking is detected.
If the system only detects lane
markings on one side of the road, it
will only assist for this side.
Lane keep assist detects hands-free
driving. In this case a message in the
Driver Information Centre pops-up
and a chime sounds as long as lane
keep assist detects hands-free
driving.Deactivation
The system is deactivated by
pressing a; the LED in the button
extinguishes.
The system is reactivated the next
time the vehicle is switched on.
Fault The system performance may be
affected by:
● windscreen not clean or affected by foreign items, e.g. stickers
● close vehicles ahead
● banked roads
● winding or hilly roads
● road edges
● roads with poor lane markings
● sudden lighting changes
● adverse environmental conditions e.g. heavy rain or
snow
● vehicle modifications, e.g. tyres
Page 196 of 265

194Driving and operatingCharge times will vary based on high
voltage battery condition and outside
temperature. There are three ways to program how the vehicle is charged.
Programmable charging 3 197.
The charging system may run fans and pumps resulting in noises coming
from the vehicle while it is turned off.
Additional clicking sounds may be
caused by the electrical devices used
while charging.
While the charge cord is plugged into the vehicle, the vehicle cannot be
driven.
When to charge
When the high voltage battery is getting low, charging messages may be displayed.
The Charge vehicle soon message
indicates that the driving range is low
and the vehicle needs to be charged
soon. As the charge level drops, the
Propulsion power is reduced
message is displayed and the
accelerator pedal response is
reduced. In addition, the remainingrange value will change to Low
indicating the vehicle should be
charged immediately.
When the energy is fully depleted, the Out of power. Charge vehicle now
message is displayed and the vehicle
slows to a stop. Brake and steering
assist will still operate. Once the
vehicle has stopped, switch the
vehicle off.
AC (alternating current) charging
Start charging
A portable charge cord used to
charge the vehicle high voltage
battery is stored under the rear floor
storage cover in the load
compartment.
1. Shift into P (Park) and switch off
the vehicle.
2. Push the rearward edge of the charge port door in and release to
open the door.
In cold weather conditions, ice
may form around the charge port
door. Remove ice from the area
before attempting to open or close
the charge port door.
Page 200 of 265

198Driving and operatingcomplete by the departure time only if
sufficient time is allowed after the
charge cord is plugged in.
Select the Priority charging to On or
Off (Priority charging will immediately
charge the vehicle to a predefined
level).Departure time entry
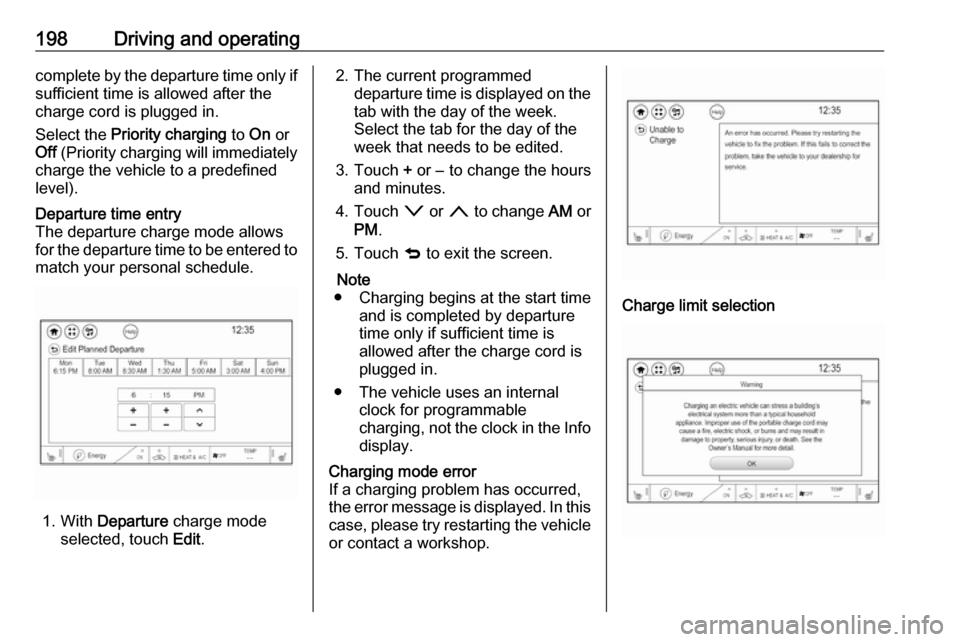
The departure charge mode allows
for the departure time to be entered to match your personal schedule.
1. With Departure charge mode
selected, touch Edit.
2. The current programmed
departure time is displayed on the
tab with the day of the week.
Select the tab for the day of the
week that needs to be edited.
3. Touch + or − to change the hours
and minutes.
4. Touch o or n to change AM or
PM .
5. Touch q to exit the screen.
Note
● Charging begins at the start time and is completed by departure
time only if sufficient time is
allowed after the charge cord is
plugged in.
● The vehicle uses an internal clock for programmable
charging, not the clock in the Info display.Charging mode error
If a charging problem has occurred,
the error message is displayed. In this
case, please try restarting the vehicle or contact a workshop.
Charge limit selection
Page 202 of 265

200Driving and operatingexample, if the vehicle is plugged in
for only one hour prior to the
departure time, and the high voltage
battery is completely discharged, the
vehicle will not be fully charged by the
departure time regardless of the rate
selection.
Also, if the selected electric rate
settings result in a very long charge
completion time, the vehicle will start
charging immediately upon plug-in.
For example, if the electric rate table
is set up with all peak rates and the
rate preference is to charge during
off-peak rates only, then the vehicle will start charging immediately uponplug-in.
Electric rate schedule
From the Charging mode screen with
Departure charge mode selected,
touch Edit in the Electric rate
preference .
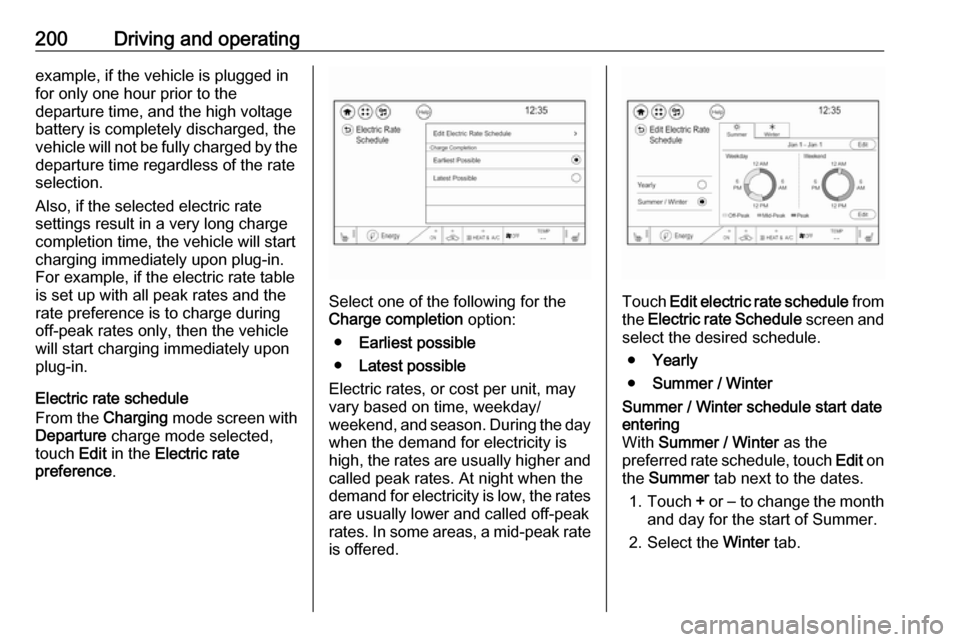
Select one of the following for the
Charge completion option:
● Earliest possible
● Latest possible
Electric rates, or cost per unit, may
vary based on time, weekday/
weekend, and season. During the day
when the demand for electricity is
high, the rates are usually higher and
called peak rates. At night when the
demand for electricity is low, the rates
are usually lower and called off-peak
rates. In some areas, a mid-peak rate is offered.Touch Edit electric rate schedule from
the Electric rate Schedule screen and
select the desired schedule.
● Yearly
● Summer / Winter
Summer / Winter schedule start date
entering
With Summer / Winter as the
preferred rate schedule, touch Edit on
the Summer tab next to the dates.
1. Touch + or − to change the month
and day for the start of Summer.
2. Select the Winter tab.
Page 203 of 265

Driving and operating2013.Touch + or − to change the month
and day for the start of Winter.
4. Touch q to exit the screen.Electric rate schedule editing
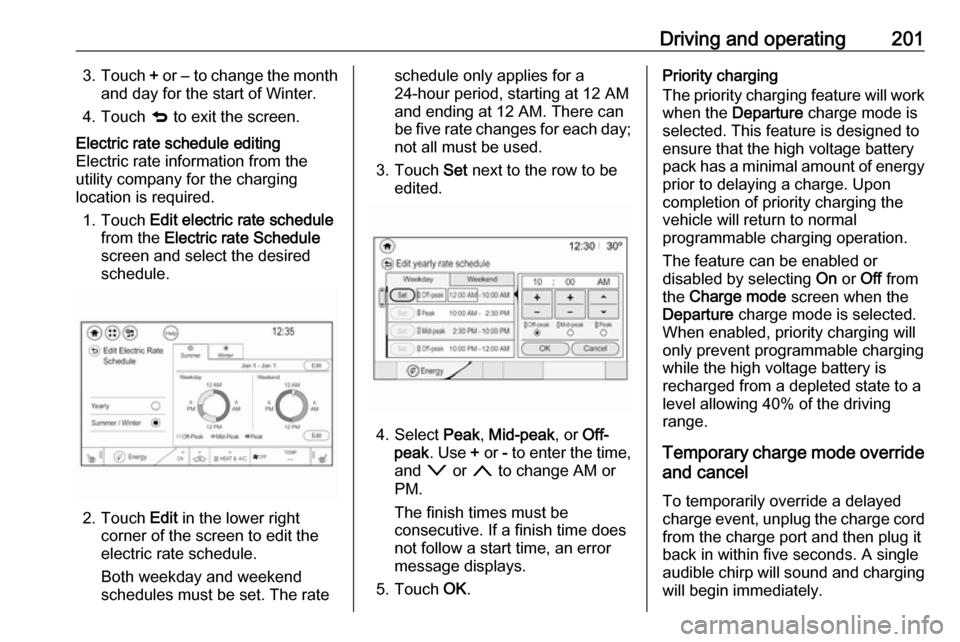
Electric rate information from the
utility company for the charging
location is required.
1. Touch Edit electric rate schedule
from the Electric rate Schedule
screen and select the desired
schedule.
2. Touch Edit in the lower right
corner of the screen to edit the
electric rate schedule.
Both weekday and weekend
schedules must be set. The rate
schedule only applies for a
24-hour period, starting at 12 AM
and ending at 12 AM. There can
be five rate changes for each day; not all must be used.
3. Touch Set next to the row to be
edited.
4. Select Peak, Mid-peak , or Off-
peak . Use + or - to enter the time,
and o or n to change AM or
PM.
The finish times must be
consecutive. If a finish time does not follow a start time, an error
message displays.
5. Touch OK.
Priority charging
The priority charging feature will work
when the Departure charge mode is
selected. This feature is designed to ensure that the high voltage battery
pack has a minimal amount of energy prior to delaying a charge. Uponcompletion of priority charging the
vehicle will return to normal
programmable charging operation.
The feature can be enabled or
disabled by selecting On or Off from
the Charge mode screen when the
Departure charge mode is selected.
When enabled, priority charging will
only prevent programmable charging
while the high voltage battery is
recharged from a depleted state to a
level allowing 40% of the driving
range.
Temporary charge mode override
and cancel
To temporarily override a delayed
charge event, unplug the charge cord
from the charge port and then plug it
back in within five seconds. A single
audible chirp will sound and charging
will begin immediately.
Page 205 of 265

Driving and operating203To store a Home location:
1. From the Energy home screen,
touch Energy settings .
2. Touch Location-based charging .
3. Touch Set home location v .
4. Touch OK.
5. Touch On to enable Location-
based charging .
To change the stored Home location:
1. Touch Update Home Location v
on the Location-based charging
screen.
2. Touch Update, then OK to set the
new home location.
● Touch Cancel to make no
changes.
● Touch Remove to clear the
location and turn location
based charging off.Charging interrupted or
overridden pop-up
The Charging override / interruption
occurred pop-up will appear if any of
the following conditions occur:
● The charging settings have been
modified via OnStar through the
website or the mobile app. For
example, the departure time
tables, the rate tables, or the
charge mode were updated using
the customer website (available
in select regions).
● There was an unintended loss of AC power during the plug-in
charge event. For example, there was a power outage or the
charge cord was unplugged from the wall.Programmable charging disabled
When the programmable charging
system is disabled, the Unable to
charge screen will be displayed.
Programmed charging override
To temporarily override a delayed charge event, unplug the charge cord from the charge port and then plug it
back in within five seconds. A single
horn chirp will sound and charging will begin immediately.
Page 222 of 265

220Vehicle careBulb replacement
Switch off the vehicle and switch off
the relevant switch or close the doors.
Only hold a new bulb at the base. Do not touch the bulb glass with bare
hands.
Use only the same bulb type for
replacement.
Replace headlight bulbs from within
the engine compartment.
Bulb check After a bulb replacement switch on
the vehicle, operate and check the
lights.
Halogen bulbs9 Warning
Halogen bulbs have pressurised
gas inside and can burst if you
drop or scratch the bulb. You or others could be injured. Be sure to read and follow the instructions onthe bulb package.
Xenon headlights9 Danger
Xenon headlights work under
extremely high electrical voltage.
Do not touch. Have bulbs replaced by a workshop.
Bulbs for front turn signal and
corner lighting can be changed.
Sidelight/Daytime running lights are
designed as Light Emitting Diodes
(LEDs) and cannot be replaced.
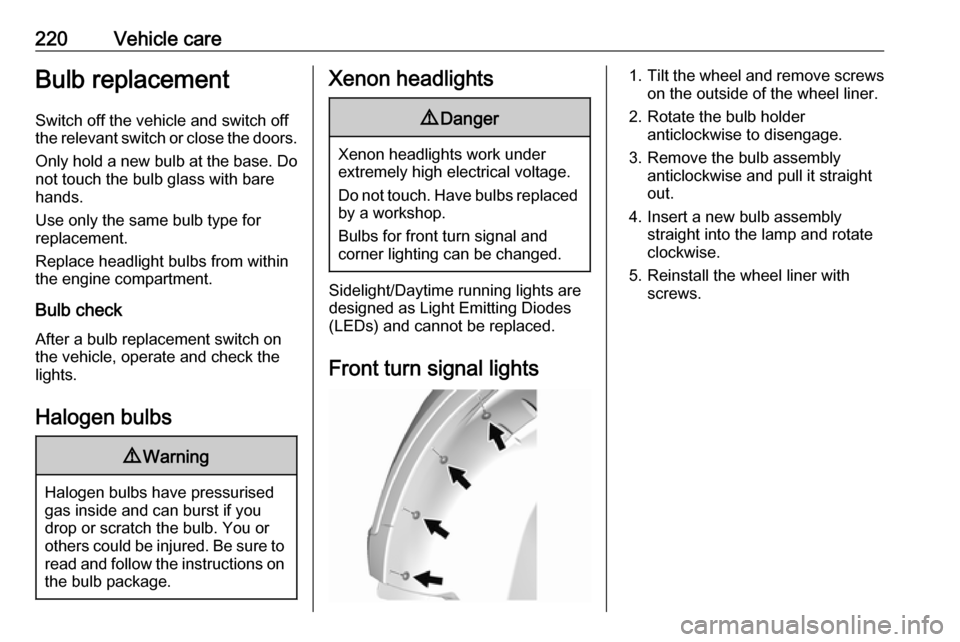
Front turn signal lights
1. Tilt the wheel and remove screws
on the outside of the wheel liner.
2. Rotate the bulb holder anticlockwise to disengage.
3. Remove the bulb assembly anticlockwise and pull it straight
out.
4. Insert a new bulb assembly straight into the lamp and rotate
clockwise.
5. Reinstall the wheel liner with screws.