change time OPEL AMPERA E 2018.5 Manual user
[x] Cancel search | Manufacturer: OPEL, Model Year: 2018.5, Model line: AMPERA E, Model: OPEL AMPERA E 2018.5Pages: 273, PDF Size: 6.6 MB
Page 99 of 273

Instruments and controls97Note
The workshop notification function
can be disabled in your account.
The report contains the status of key
operating systems of the vehicle like
propulsion system, airbags, ABS, and
other major systems. It also provides
information on possible maintenance
items and tyre pressure (only with tyre
pressure monitoring system).
To look at the information in greater
detail, select the link within the email and log in to your account.
Destination download
A desired destination can be directly
downloaded to the navigation system.
Press Z to call an advisor and
describe the destination or point of
interest.
The advisor can look up any address
or point of interest and directly send
the destination to the built-in
navigation system.OnStar settings
OnStar PIN
To have full access to all OnStar
services, a four-digit PIN is required.
The PIN has to be personalised when first talking to an advisor.
To change the PIN, press Z to call an
advisor.
Account data
An OnStar subscriber has an account
where all the data is stored. To
request a change of the account
information, press Z and talk to an
advisor or log in to your account.
If the OnStar service is used on
another vehicle, press Z and request
that the account be transferred to the new vehicle.
Note
In any case, if the vehicle is disposed
of, sold or otherwise transferred,
immediately inform OnStar about
the changes and terminate the
OnStar service on this vehicle.Vehicle location
The vehicle location is transmitted to OnStar when service is requested or triggered. A message on the Info
Display informs about this
transmission.
To activate or deactivate the
transmission of the vehicle location,
press and hold j until an audio
message is heard.
The deactivation is indicated by the
status light flashing red and green for a short period of time and each time
the vehicle is started.
Note
If the transmission of the vehicle
location is deactivated, some
services are no longer available.
Note
The vehicle location always remains
accessible to OnStar in the case of
an emergency.
Find the privacy policy in your
account.
Page 109 of 273

Infotainment system107The well-thought-out design of the
control elements, the touch screen and the clear displays enable you to
control the system easily and
intuitively.
Note
This manual describes all options
and features available for the
various Infotainment systems.
Certain descriptions, including those
for display and menu functions, may
not apply to your vehicle due to
model variant, country
specifications, special equipment or
accessories.
Important information on
operation and traffic safety9 Warning
The Infotainment system must be
used so that the vehicle can be
driven safely at all times. If in
doubt, stop the vehicle and
operate the Infotainment system
while the vehicle is stationary.
Radio reception
Radio reception may be disrupted by
static, noise, distortion or loss of
reception due to:
● changes in distance from the transmitter
● multipath reception due to reflection
● shadowing
Theft-deterrent feature The Infotainment system is equipped
with an electronic security system for the purpose of theft deterrence.
The Infotainment system therefore
functions only in your vehicle and is
worthless to a thief.
Page 134 of 273

132Infotainment systemInterrupting and resuming playback
Touch = to interrupt playback. The
screen button changes to l.
Touch l to resume playback.
Playing the next or previous track
Touch v to play the next movie file.
Touch t within the first seconds of
the movie playing to return to the
previous movie file.
Returning to the beginning of the
current movie
Touch t after a few seconds of the
movie playing.
Fast forwarding and rewinding
Touch and hold t or v. Release to
return to normal playback mode.
Movie menu
Select Menu to display the movie
menu.
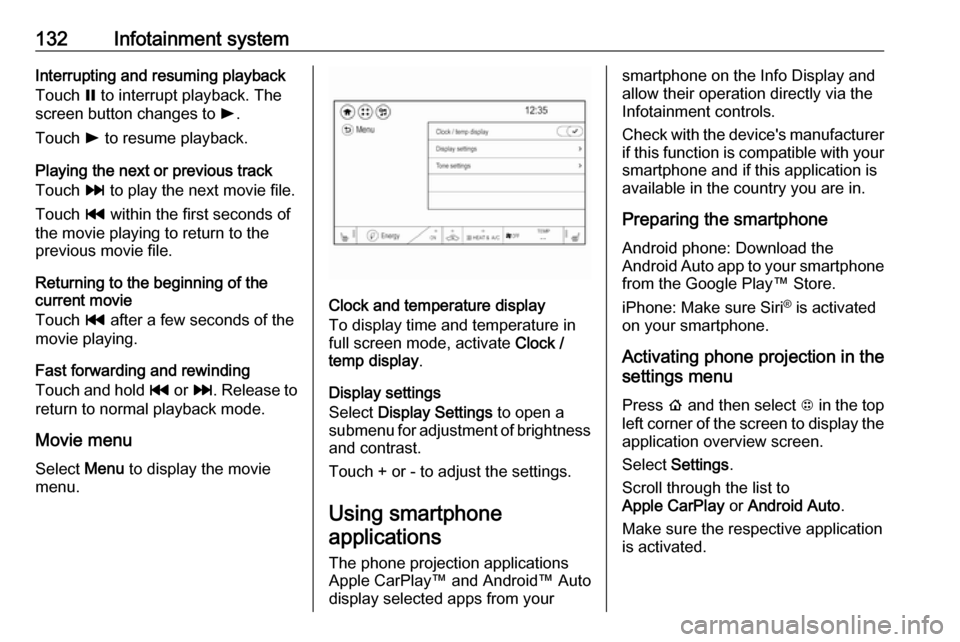
Clock and temperature display
To display time and temperature in
full screen mode, activate Clock /
temp display .
Display settings
Select Display Settings to open a
submenu for adjustment of brightness and contrast.
Touch + or - to adjust the settings.
Using smartphone
applications
The phone projection applications
Apple CarPlay™ and Android™ Auto
display selected apps from your
smartphone on the Info Display and
allow their operation directly via the
Infotainment controls.
Check with the device's manufacturer
if this function is compatible with your
smartphone and if this application is
available in the country you are in.
Preparing the smartphone
Android phone: Download the
Android Auto app to your smartphone from the Google Play™ Store.
iPhone: Make sure Siri ®
is activated
on your smartphone.
Activating phone projection in the
settings menu
Press p and then select 1 in the top
left corner of the screen to display the application overview screen.
Select Settings .
Scroll through the list to
Apple CarPlay or Android Auto .
Make sure the respective application
is activated.
Page 170 of 273

168Driving and operatingAlerting the driver
The vehicle ahead control indicator
A illuminates green in the instrument
cluster when the system has detected
a vehicle in the driving path.
The control indicator A changes to
yellow when the distance to a
preceding moving vehicle gets too
small or when approaching another
vehicle too rapidly.Caution
The colour lighting of this control
indicator does not correspond to
local traffic laws on following
distance. The driver bears full
responsibility for maintaining safe
following distance according to
applicable traffic rules, weather
and road conditions etc. at all
times.
When the time to a potential collision
with a vehicle in front gets too small
and a collision is imminent, the driver
is notified by a flashing red LED stripe which is projected on the windscreen
in the driver's field of view.
Simultaneously a warning chime
sounds. Depress the brake pedal and
steer the vehicle, if it is required by the
situation.
Selecting the alert sensitivity
The alert sensitivity to near, medium
or far.Press V, the current setting is shown
on the Driver Information Centre.
Press V repeatedly to change the
alert sensitivity. The selected setting is also displayed in the Driver
Information Centre. The last selected setting will be stored when the vehicle
is switched off.
Page 172 of 273

170Driving and operatingActive emergency braking
Active emergency braking can help to reduce the damage and injury from
crashes with vehicles, pedestrians
and obstacles directly ahead, when a
collision can no longer be avoided
either by manual braking or by
steering. Before the active
emergency braking applies, the driver is warned by the forward collision
alert 3 167 and front pedestrian
protection 3 172.
The feature uses various inputs (e.g.
camera sensor, brake pressure,
vehicle speed) to calculate the
probability of a frontal collision.9 Warning
This system is not intended to
replace the driver responsibility for driving the vehicle and looking
ahead. Its function is limited to
supplemental use only to reduce
the vehicle speed before a
collision.
The system may not react to
animals. After a sudden lane
change, the system needs a
certain time to detect the next
preceding vehicle.
The driver must always be ready
to take action and apply the brakes and steer to avoid collisions.
Functionality
If equipped only with front camera the
active emergency braking operates in
a forward gear above walking speed
up to 80 km/h.
A precondition is that the system is
not deactivated in the vehicle
personalisation menu 3 91.
The system includes: ● brake preparation system
● emergency automatic braking
● forward looking brake assist
● front pedestrian protection system
Brake preparation system
When approaching a vehicle ahead
or a pedestrian so quickly that a
collision is likely, the brake
preparation system slightly
pressurises the brakes. This reduces
the response time, when a manual or automatic braking is requested.
The brake system is prepared so that braking can occur more rapidly.
If equipped only with front camera the
system operates up to a speed of
80 km/h.
Emergency automatic braking
After activation of brake preparation
system and just before the imminent
collision, this function automatically
applies limited braking to reduce the
impact speed of the collision or
prevent a crash.
Depending on the situation, the
vehicle may automatically brake
moderately or hard. This front
automatic braking can only occur if a
vehicle ahead is detected, indicated
by the vehicle ahead indicator A
3 167. On vehicles with front
Page 173 of 273

Driving and operating171pedestrian protection, automatic
braking can also occur when a
pedestrian ahead is detected,
indicated by the pedestrian ahead
indicator 7.
The system operates up to a speed of
80 km/h.
Below a speed of 40 km/h the system can apply full braking.
Emergency automatic braking may slow the vehicle to a complete stop to
try to avoid a potential crash. If this
happens, emergency automatic
braking may engage the electric
parking brake to hold the vehicle at a
stop. To release, push the electric
parking brake switch or firmly depress the accelerator pedal.9 Warning
Emergency automatic braking is
an emergency crash preparation
feature and is not designed to
avoid crashes. Do not rely on the
system to brake the vehicle.
Emergency automatic braking will
not brake outside of its operating speed range and only responds to
detected vehicles.
Forward looking brake assist
In addition to the brake preparation
system and emergency automatic
braking, the forward looking brake
assist function makes the brake assist more sensitive. Therefore,
depressing the brake pedal less
strongly results in immediate hard
braking. This function helps the driver
brake quicker and harder before an
imminent collision.
The system operates up to a speed of 80 km/h.
9 Warning
Active emergency braking is not
designed to apply hard
autonomous braking or to
automatically avoid a collision. It is designed to reduce the vehicle
speed before a collision. It may not
react to animals. After a sudden
lane change, the system needs a
certain time to detect the next
preceding vehicle.
The complete attention of the
driver is always required while
driving. The driver must always be
ready to take action and apply the brakes and steer to avoid
collisions.
Intelligent brake assist
Intelligent brake assist may activate
when the brake pedal is applied
quickly by providing a boost to
braking based on the speed of
approach and distance to a vehicle
ahead.
Minor brake pedal pulsations or pedal movement during this time are normal and the brake pedal should continue
to be applied as required. Intelligent
brake assist will automatically
disengage only when the brake pedal is released.
Page 191 of 273

Driving and operating189Select the relevant setting in Settings
I Vehicle settings in the Info Display.
Info Display 3 85.
Vehicle personalisation 3 91.
Fault
The system may not operate properly
when:
● Ice, snow, mud, or anything else covers the sensors.
● The vehicle had a rear end accident.
● There are extreme temperature changes.
Traffic sign assistant
Functionality
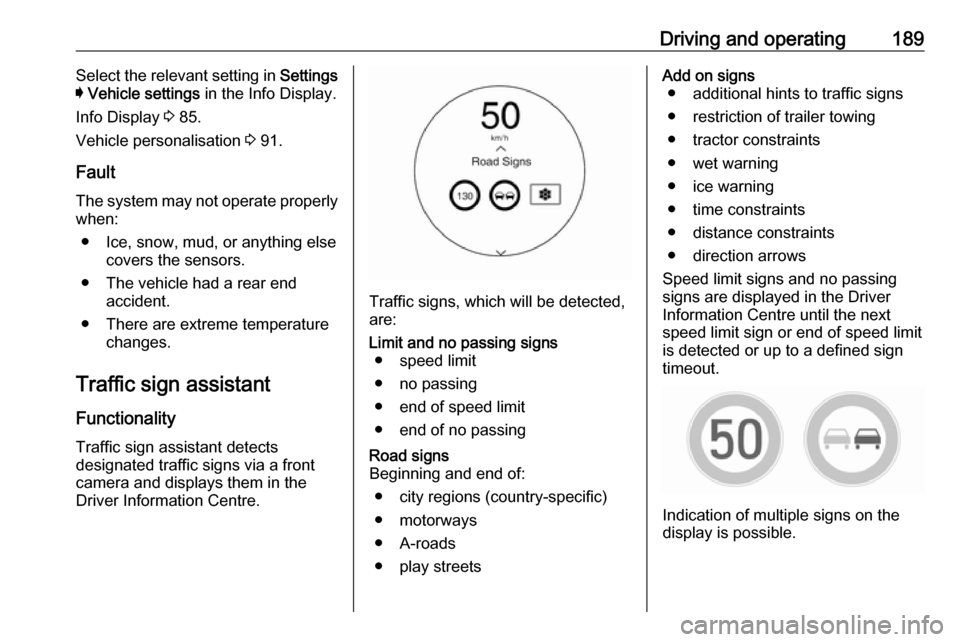
Traffic sign assistant detects
designated traffic signs via a front
camera and displays them in the
Driver Information Centre.
Traffic signs, which will be detected,
are:
Limit and no passing signs ● speed limit
● no passing
● end of speed limit
● end of no passingRoad signs
Beginning and end of:
● city regions (country-specific)● motorways
● A-roads
● play streetsAdd on signs ● additional hints to traffic signs
● restriction of trailer towing
● tractor constraints
● wet warning
● ice warning
● time constraints
● distance constraints
● direction arrows
Speed limit signs and no passing
signs are displayed in the Driver
Information Centre until the next
speed limit sign or end of speed limit
is detected or up to a defined sign
timeout.
Indication of multiple signs on the
display is possible.
Page 195 of 273

Driving and operating193timing of alert and the occurrence of
alert. Move the steering wheel to stop
the alert.
Deactivation The system is deactivated by
pressing a. The LED in the button
extinguishes.
The system is reactivated the next time the vehicle is switched on.
Fault
The system performance may be affected by:
● windscreen not clean or affected by foreign items, e.g. stickers
● close vehicles ahead
● banked roads
● winding or hilly roads
● road edges
● roads with poor lane markings
● sudden lighting changes
● adverse environmental conditions e.g. heavy rain or
snow
● vehicle modifications, e.g. tyresSwitch off the system if the system is
disturbed by tar marks, shadows,
road cracks, temporary or
construction lane markings, or other
road imperfections.9 Warning
Always keep your attention on the
road and maintain proper vehicle
position within the lane, otherwise
vehicle damage, injury or death
could occur.
The system does not detect
pedestrians, cyclists or animals on
the road. Steer the vehicle
manually to avoid injuries and
deaths.
Lane keep assist does not
continuously steer the vehicle.
The system may not keep the
vehicle in the lane or give an alert, even if a lane marking is detected.
The steering of the lane keep
assist may not be sufficient to
avoid a lane departure.
The system may not detect hands-
off driving due to external
influences (road condition and
surface, weather etc). The driver
has full responsibility to control the vehicle and is always required tokeep the hands on the steeringwheel while driving.
Using the system while driving on
slippery roads could cause loss of control of the vehicle and a crash.
Switch off the system.
Page 196 of 273

194Driving and operatingCharging
This section explains the process of
charging the vehicle's high voltage
battery. Do not allow the vehicle to
remain in places with extremes of
temperature for long periods without
being driven or plugged in.
It is recommended to keep the vehicle plugged in, even if fully charged, to
keep the high voltage battery
temperature ready for the next drive.
The vehicle must be plugged in when
the temperatures are below -25 °C, to
operate properly and to maximise
high voltage battery life.
However, we recommend plugging in the vehicle when temperatures drop
below 0 °C or raise above 32 °C.
When using the portable charge cord, it will take approximately 33 hours to
charge the vehicle with the 10 A
setting.
When using a 230 V charging station,
it will take approximately 10 hours to
charge the vehicle with the 32 A
setting.Charge times will vary based on high
voltage battery condition and outside
temperature. There are three ways to programme how the vehicle is
charged.
Programmable charging 3 197.
The charging system may run fans
and pumps resulting in noises coming from the vehicle while it is turned off.
Additional clicking sounds may be
caused by the electrical devices used
while charging.
While the charge cord is plugged into
the vehicle, the vehicle cannot be
driven.
When to charge When the high voltage battery is
getting low, charging messages may
be displayed.
The Charge vehicle soon message
indicates that the driving range is low
and the vehicle needs to be charged
soon. As the charge level drops, the
Propulsion power is reduced
message is displayed and the
accelerator pedal response is
reduced. In addition, the remainingrange value will change to Low
indicating the vehicle should be charged immediately.
When the energy is fully depleted, the
Out of power. Charge vehicle now
message is displayed and the vehicle slows to a stop. Brake and steering
assist will still operate. Once the
vehicle has stopped, switch off the
vehicle.
AC (alternating current) charging
Start charging
A portable charge cord used to
charge the vehicle high voltage
battery is stored under the rear floor
storage cover in the load
compartment.
1. Shift into P (Park) and switch off
the vehicle.
Page 200 of 273

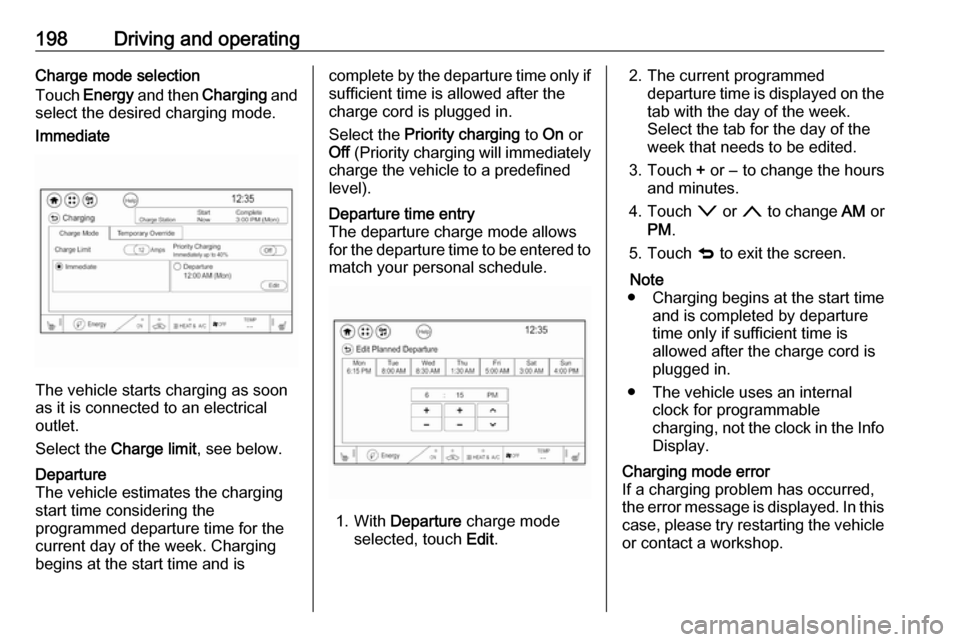
198Driving and operatingCharge mode selection
Touch Energy and then Charging and
select the desired charging mode.Immediate
The vehicle starts charging as soon
as it is connected to an electrical outlet.
Select the Charge limit , see below.
Departure
The vehicle estimates the charging start time considering the
programmed departure time for the
current day of the week. Charging
begins at the start time and iscomplete by the departure time only if
sufficient time is allowed after the
charge cord is plugged in.
Select the Priority charging to On or
Off (Priority charging will immediately
charge the vehicle to a predefined
level).Departure time entry
The departure charge mode allows
for the departure time to be entered to match your personal schedule.
1. With Departure charge mode
selected, touch Edit.
2. The current programmed
departure time is displayed on the
tab with the day of the week.
Select the tab for the day of the
week that needs to be edited.
3. Touch + or − to change the hours
and minutes.
4. Touch o or n to change AM or
PM .
5. Touch q to exit the screen.
Note
● Charging begins at the start time and is completed by departure
time only if sufficient time is
allowed after the charge cord is
plugged in.
● The vehicle uses an internal clock for programmable
charging, not the clock in the Info Display.Charging mode error
If a charging problem has occurred,
the error message is displayed. In this
case, please try restarting the vehicle or contact a workshop.