service OPEL AMPERA E 2018.5 Manual user
[x] Cancel search | Manufacturer: OPEL, Model Year: 2018.5, Model line: AMPERA E, Model: OPEL AMPERA E 2018.5Pages: 273, PDF Size: 6.6 MB
Page 149 of 273

Climate control147Maintenance
Air intake
The air intake in front of the
windscreen in the engine
compartment must be kept clear to
allow air intake. Remove any leaves,
dirt or snow.
Air conditioning regular
operation
In order to ensure continuously
efficient performance, cooling must
be operated for a few minutes once a
month, irrespective of the weather
and time of year. Operation with
cooling is not possible when the
outside temperature is too low.
Service For optimal cooling performance, it is recommended to annually check the
climate control system, starting
three years after initial vehicle
registration, including:
● functionality and pressure test
● heating functionality
● leakage check
● check of drive belts
● cleaning of condenser and evaporator drainage
● performance check
Page 152 of 273

150Driving and operatingIf the vehicle will not start, place the
electronic key in the transmitter
pocket inside the centre console.
Starting and stopping the vehicle
3 151.Switching on the vehicle
With the vehicle off and the brake
pedal applied, pressing POWERm
once will switch on the vehicle. When 4 illuminates in the instrument
cluster, the vehicle is ready to be
driven. This could take up to
15 seconds at extremely cold
temperatures.Switching off the vehicle
With the vehicle in P, press
POWER m briefly in service mode or
when engine is running and vehicle is
stationary. Some functions remain
active until driver's door is opened.
If the vehicle is not in P when
switching off the vehicle, P will be
automatically engaged before the
vehicle is switched off.A chime will sound if the driver's door is opened while the vehicle is
switched on. Always press
POWER m to switch off the vehicle
before exiting the vehicle.Emergency shut off during driving
If the vehicle needs to be switched off during driving in case of emergency,
press POWER m for more than
2 seconds or press twice briefly within
5 seconds.
Starting and stopping the vehicle
3 151.
Service mode
This power mode is available for
service and diagnostics and to verify
the proper operation of the service
vehicle soon control indicator as may
be required for emission inspection
purposes.
With the vehicle switched off and the
brake pedal not applied, pressing and holding POWER m for more than
5 seconds will place the vehicle in service mode. The instruments and
audio systems will operate as they do when the vehicle is switched on, but
the vehicle will not be able to be
driven. The propulsion system will not start in service mode. Press
POWER m again to switch off the
vehicle.Caution
Service mode will discharge the
12 V vehicle battery. Do not use
service mode for an extended
period, or the vehicle may not
start.
Operation in case of failure
If the vehicle does not start due to a
low electronic key battery, a message
will be displayed in the Driver
Information Centre.
To still drive the vehicle, proceed as
follows:
1. Open the centre console and remove the small tray from the
centre console. Place the
electronic key in the pocket with
the buttons facing the bottom of
the vehicle.
Page 174 of 273

172Driving and operating9Warning
Intelligent brake assist may
increase vehicle braking in
situations when it may not be
necessary. You could block the
flow of traffic. If this occurs, take
your foot off the brake pedal and
then apply the brakes as needed.
Front pedestrian protection
Front pedestrian protection 3 172.
Deactivation Active emergency braking can be
deactivated in the personalisation
menu in the Info Display 3 91.
If deactivated, a message is
displayed in the Driver Information
Centre.
The system is reactivated the next time the vehicle is switched on.
System limitations In some cases, the active emergencybraking system may provide
automatic braking in situations that
seem to be unnecessary, for instance
in parking garages, due to traffic signs in a curve or due to vehicles in
another lane. This is normal
operation, the vehicle does not need
a service. Firmly apply the accelerator
pedal if the situation and
surroundings permit to override the
automatic braking.
In the following cases, active
emergency braking performance is
limited:
● When driving on winding or hilly roads.
● When not all vehicles are detected, especially vehicles witha trailer, tractors, muddy
vehicles, etc.
● When detecting a vehicle when weather limits visibility, such as in
fog, rain, or snow.
● During nighttime driving.
● When weather limits visibility, such as fog, rain, or snow.
● When the sensor in the windscreen is blocked by snow,
ice, slush, mud, dirt, windscreen
damage or affected by foreign
items, e.g. stickers.To avoid malfunction keep the areas
of the camera sensor in the
windscreen always clear of dirt, dust,
ice and snow.
Complete attention is always required while driving, and you should beready to take action and apply the
brakes and / or steer the vehicle to
avoid crashes.
Fault
In case the system requires a service, a message is displayed in the Driver
Information Centre.
If the system does not work as it
should do, vehicle messages are
displayed in the Driver Information
Centre.
Vehicle messages 3 89.
Front pedestrian protection
The front pedestrian protection
system may help avoid or reduce the
harm caused by front-end crashes
with nearby pedestrians when driving in a forward gear.
Page 176 of 273
174Driving and operatingAutomatic braking
If a crash into a pedestrian directly ahead is imminent and the brakes
have not been applied, the braking
strength is automatically adapted.
This can help to avoid some very low speed pedestrian crashes or reduce
pedestrian injury.
Automatic braking levels may be
reduced under certain conditions,
such as higher speeds.
If this happens, automatic braking
may engage the electric parking
brake to hold the vehicle at a stop.
Release the electric parking brake. A
firm press of the accelerator pedal will also release automatic braking and
the electric parking brake 3 159.
This system includes intelligent brake
assist, and the emergency automatic
braking system may also respond to
pedestrians.
Active emergency braking 3 170.
Automatic braking can be disabled
through vehicle personalisation 3 91.General information9 Warning
The driver must always be ready
to take action and apply the brakes and steer to avoid collisions.
9 Warning
Front pedestrian braking may alert
or automatically brake the vehicle
suddenly in situations where it is
unexpected and undesired. It
could falsely alert or brake for
objects similar in shape or size to
pedestrians, including shadows.
This is normal operation and the
vehicle does not need a service.
To override Automatic braking,
firmly depress the accelerator
pedal, if it is safe to do so.
System limitations
In the following cases, front
pedestrian protection may not detect
a pedestrian ahead or sensor
performance is limited:
● When vehicle speed is out of range from 8 km/h to 80 km/h .
● When the distance to an pedestrian ahead is more than
40 m.
● When weather limits visibility, such as fog, rain, or snow.
● During nighttime driving.
● When the sensor in the windscreen is blocked by snow,
ice, slush, mud, dirt, windscreen
damage or affected by foreign
items, e.g. stickers.
Parking assist
Rear parking assist9 Warning
It is the driver who bears full
responsibility for the parking
manoeuvre.
Always check the surrounding
area while reversing and using the rear parking assist system.
Page 186 of 273
184Driving and operatingDetection zones
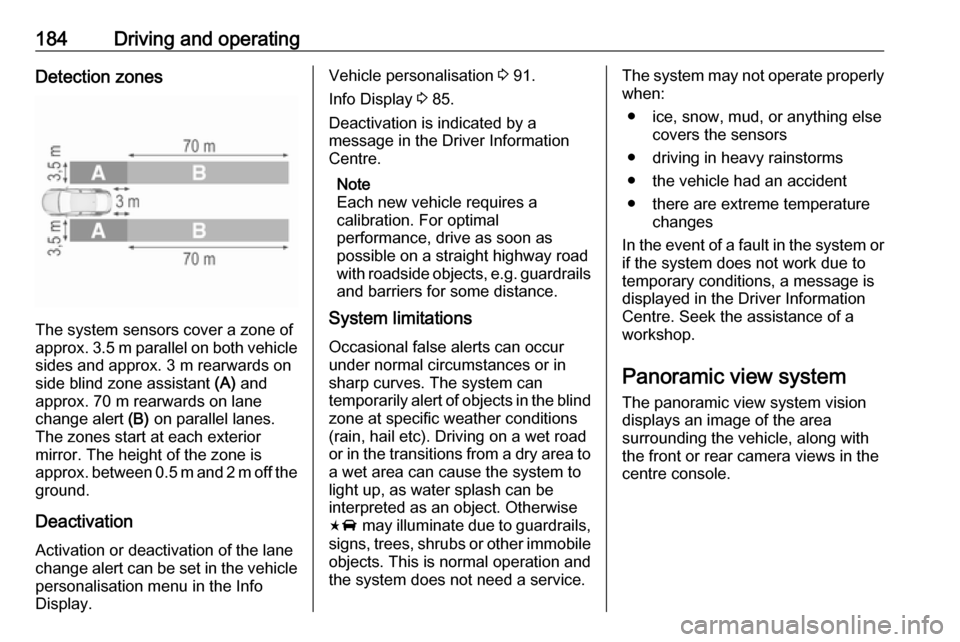
The system sensors cover a zone of
approx. 3.5 m parallel on both vehicle
sides and approx. 3 m rearwards on
side blind zone assistant (A) and
approx. 70 m rearwards on lane
change alert (B) on parallel lanes.
The zones start at each exterior
mirror. The height of the zone is
approx. between 0.5 m and 2 m off the ground.
Deactivation Activation or deactivation of the lane
change alert can be set in the vehicle
personalisation menu in the Info
Display.
Vehicle personalisation 3 91.
Info Display 3 85.
Deactivation is indicated by a
message in the Driver Information
Centre.
Note
Each new vehicle requires a
calibration. For optimal
performance, drive as soon as
possible on a straight highway road
with roadside objects, e.g. guardrails
and barriers for some distance.
System limitations
Occasional false alerts can occur
under normal circumstances or in
sharp curves. The system can
temporarily alert of objects in the blind zone at specific weather conditions
(rain, hail etc). Driving on a wet road
or in the transitions from a dry area to a wet area can cause the system to
light up, as water splash can be
interpreted as an object. Otherwise
F may illuminate due to guardrails,
signs, trees, shrubs or other immobile
objects. This is normal operation and
the system does not need a service.The system may not operate properly
when:
● ice, snow, mud, or anything else covers the sensors
● driving in heavy rainstorms
● the vehicle had an accident
● there are extreme temperature changes
In the event of a fault in the system or if the system does not work due to
temporary conditions, a message is
displayed in the Driver Information
Centre. Seek the assistance of a
workshop.
Panoramic view system The panoramic view system vision
displays an image of the area
surrounding the vehicle, along with
the front or rear camera views in the
centre console.
Page 207 of 273

Driving and operating205● Solid green – No horn chirps:Charging is complete.
● Solid yellow – No horn chirp: Vehicle is plugged in. It is normalfor the charging status indicator
to turn yellow for a few seconds
after plugging in a compatible
charge cord. The solid yellow
may remain illuminated
depending on the vehicle.
This may also indicate that the
charging system has detected a
fault and will not charge the high
voltage battery.
● No light signal (upon plug‐in) – No horn chirps: Charge cord
connection should be checked.
● No light signal (after indication of
green or yellow charging status
indicator) – No horn chirps:
Charge cord connection should
be checked. If connection is
correct, this may be due to a
power failure and charging will
begin later. This may also occur
if the vehicle has detected a high voltage charging system fault.● No light signal – Three horn chirps: Charge port door is open.
● No light signal – Horn chirps repeatedly: The power supply
was interrupted before the
charging process could be
completed. Repeated chirps will stop if power is restored within
90 seconds.
Vehicle personalisation 3 91.
The system may be thermally
conditioning the high voltage battery
during any of the states mentioned
above, requiring electric energy to be
transferred to the vehicle.
If the vehicle is plugged in and vehicle power is on, the charging status
indicator will flash or illuminate solid green, depending on the charge level.
This also happens during Engine
Assisted Heating if the vehicle is
plugged in.
If the vehicle is plugged in and the
charging status indicator is off, a
charging fault has been detected.Charge cord9 Danger
There is a risk of electric shock
that may cause personal injury or
death.
Do not use the charge cord if any part of the charge cord is
damaged.
Do not open or remove the charge cord cover.
Service by qualified personnel
only. Connect the charge cord to a
properly grounded outlet with
cords that are not damaged.
A portable charge cord used to
charge the vehicle high voltage
battery is stored under the rear floor
storage cover in the load
compartment 3 194.
Page 208 of 273
206Driving and operatingImportant information about
portable electric vehicle charging
● Charging an electric vehicle can stress a building's electrical
system more than a typical
household appliance.
● Before you plug in to any electrical outlet, have a qualified
electrician inspect and verify the
electrical system (electrical
outlet, wiring, junctions and
protection devices) for heavy-
duty service at a 10 A continuous load.
● Electrical outlets may wear out with normal usage or be
damaged over time, making them
unsuitable for electric vehicle
charging.
● Check the electrical outlet / plug while charging and discontinue
use if the electrical outlet / plug is hot, then have the electrical
outlet serviced by a qualified
electrician.● When outdoors, plug into an electrical outlet that is weather-
proof while in use.
● Mount the charging cord to reduce strain on the electricaloutlet / plug.9 Warning
Improper use of portable electric
vehicle charge cords may cause a fire, electrical shock, or burns, and
may result in damage to property,
serious injury, or death.
● Do not use extension cords, multi-outlet power strips,
splitters, grounding adaptors,
surge protectors, or similar
devices.
● Do not use an electrical socket that is worn or damaged, or onethat will not hold the plug firmly
in place.
● Do not use an electrical socket that is not properly grounded.
● Do not use an electrical socket that is on a circuit with other
electrical loads.
9 Warning
Read all the safety warnings and
instructions before using this
product. Failure to follow the
warnings and the instructions may result in electric shock, fire, and /
or serious injury.
Never leave children unattended
near the vehicle while the vehicle is charging and never allow
children to play with the charge
cord.
If the plug provided does not fit the electrical outlet, do not modify the
plug. Arrange for a qualified
electrician to inspect the electrical
outlet.
Do not put fingers into the electric
vehicle connector.
9 Warning
To reduce the risk of fire,
installations shall comply with the
requirements of National Electric
Code IEC 60364 – Electrical
Page 209 of 273
Driving and operating207installations in buildings,
depending on the region in which
the unit is being installed. The
installer shall comply with any
additional local requirements
mandated by the country and / or
municipality.
Do not use this product if the
flexible power cord or the electric
vehicle cable is frayed, has broken insulation, or shows any other
signs of damage.
Do not use this product if the
enclosure or the vehicle plug is
broken, cracked, open, or shows
any other indication of damage.
The plug must be plugged into an
appropriate electrical outlet that is
properly installed in accordance
with all local codes and
ordinances. Do not modify the
plug provided with the product. If
the plug does not fit the electrical
outlet, have a proper electrical
outlet installed by a qualified
electrician. If ground is missing,the charge cord indicators will
indicate an electrical system fault
and the vehicle may not charge.
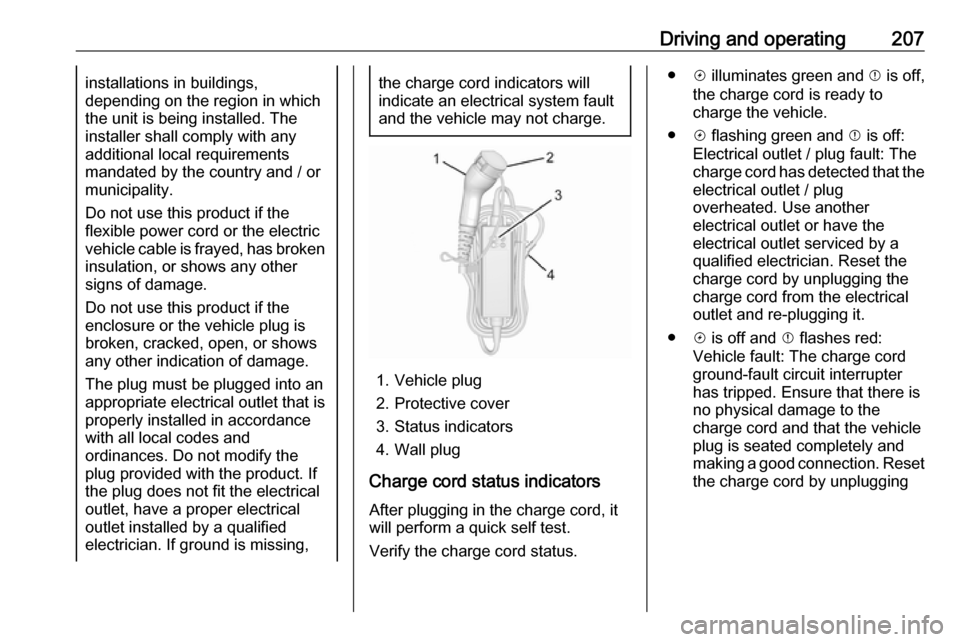
1. Vehicle plug
2. Protective cover
3. Status indicators
4. Wall plug
Charge cord status indicators
After plugging in the charge cord, it
will perform a quick self test.
Verify the charge cord status.
● c illuminates green and d is off,
the charge cord is ready to
charge the vehicle.
● c flashing green and d is off:
Electrical outlet / plug fault: The
charge cord has detected that the electrical outlet / plug
overheated. Use another
electrical outlet or have the
electrical outlet serviced by a
qualified electrician. Reset the
charge cord by unplugging the
charge cord from the electrical
outlet and re-plugging it.
● c is off and d flashes red:
Vehicle fault: The charge cord
ground-fault circuit interrupter
has tripped. Ensure that there is no physical damage to the
charge cord and that the vehicle
plug is seated completely and making a good connection. Reset
the charge cord by unplugging
Page 210 of 273

208Driving and operatingfrom the electrical outlet and re-
plugging it. If the fault remains,
consult a workshop for a service.
● c solid green and d flashes red:
charge cord fault: The charge cord has detected a potential
problem with the charge cord.
Reset the charge cord by
unplugging from the electrical
outlet and re-plugging it. If the fault remains, seek the
assistance of a workshop.
If no status indicator is lit, ensure the
electrical outlet is powered.
Charge level selection9 Warning
If the capacity of the electrical
circuit or AC socket is not known,
only use the lowest charge level
until the circuit capacity has been
inspected by a qualified
electrician. Using a charge level
that exceeds either the electrical
circuit or the AC outlet capacity
may start a fire or damage the
electrical circuit.
Note
By choosing a reduced charge level,
the charging time is increased.
Charge limit selection can be made
using the Charge limit preference
screen on the Info Display.
Charge limit selection 3 197.
Grounding instructions This product must be grounded. If this
product should malfunction or break
down, grounding provides a path of
least resistance for electric current to
reduce the risk of electric shock. This product is equipped with a cord that
has an equipment grounding
conductor and a grounding plug. The
plug must be plugged into an
appropriate outlet that is properly
installed and grounded in accordance
with all local codes and ordinances.9 Warning
Improper connection of the charge
cord ground may cause electrical
shock. Check with a qualified
electrician if there is doubt as to
whether the charge circuit is
properly grounded. Do not modify
the plug provided with the product.
If it will not fit the electrical outlet,
have a proper electrical outlet
installed by a qualified electrician.
Charge cord mounting
instructions
Choose an appropriate, solid location for mounting the charge cord. The
appropriate height for mounting the
charge cord is 91 cm from the floor.
Space the holes 18.7 cm apart.
Install the mounting screws leaving
the head of the screws 5 mm from the
surface.
Securely mount the charge cord on to
the screws.
Connect the wall plug to the electrical
outlet.
Connect the vehicle plug to the
charge port.
Page 214 of 273
212Vehicle care● Vehicle storage at extremetemperatures may cause
damage to the high voltage
battery.
● Remove the black negative (−) cable from the 12 V vehicle
battery and attach a trickle
charger to the vehicle battery
terminals or keep the 12 V
vehicle battery cables connected and trickle charge from the
positive (+) and negative (−)
terminals in the engine
compartment.Caution
The vehicle is equipped with an
AGM 12 V vehicle battery, which
can be damaged by using the
incorrect type of trickle charger.
An AGM compatible charger must be used with the appropriate
setting selected.
Follow the trickle charger
manufacturer instructions.
After the 12 V vehicle battery cable is reconnected, it is possible that the
vehicle may not operate. If this
happens, the high voltage battery
may need to be charged.
Putting back into operation
When the vehicle is to be put back into operation:
● Connect the clamp to the negative terminal of the 12 V
vehicle battery. Activate the
electronics of the power
windows.
● Check tyre pressure.
● Fill up the washer fluid reservoir.
● Check the coolant level.
● Fit the number plate if necessary.
End-of-life vehicle recovery
Information on end-of-life vehicle
recovery centres and the recycling of
end-of-life vehicles is available on our website, where legally required. Only
entrust this work to an authorised
recycling centre.Vehicle checks
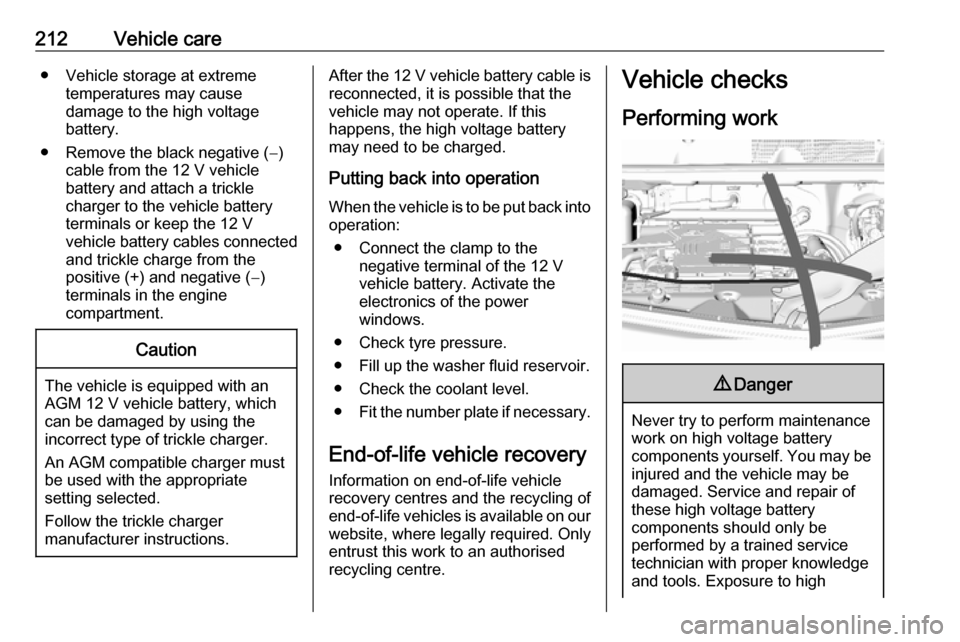
Performing work9 Danger
Never try to perform maintenance
work on high voltage battery
components yourself. You may be
injured and the vehicle may be
damaged. Service and repair of
these high voltage battery
components should only be
performed by a trained service
technician with proper knowledge
and tools. Exposure to high