instrument cluster OPEL AMPERA E 2018 Manual user
[x] Cancel search | Manufacturer: OPEL, Model Year: 2018, Model line: AMPERA E, Model: OPEL AMPERA E 2018Pages: 267, PDF Size: 6.45 MB
Page 155 of 267

Driving and operating153Electric vehicle
operation modes
Operation This vehicle is a purely electrically
driven vehicle. It always uses an
electric propulsion system to drive the
vehicle. Electricity is the vehicle's only source of energy.
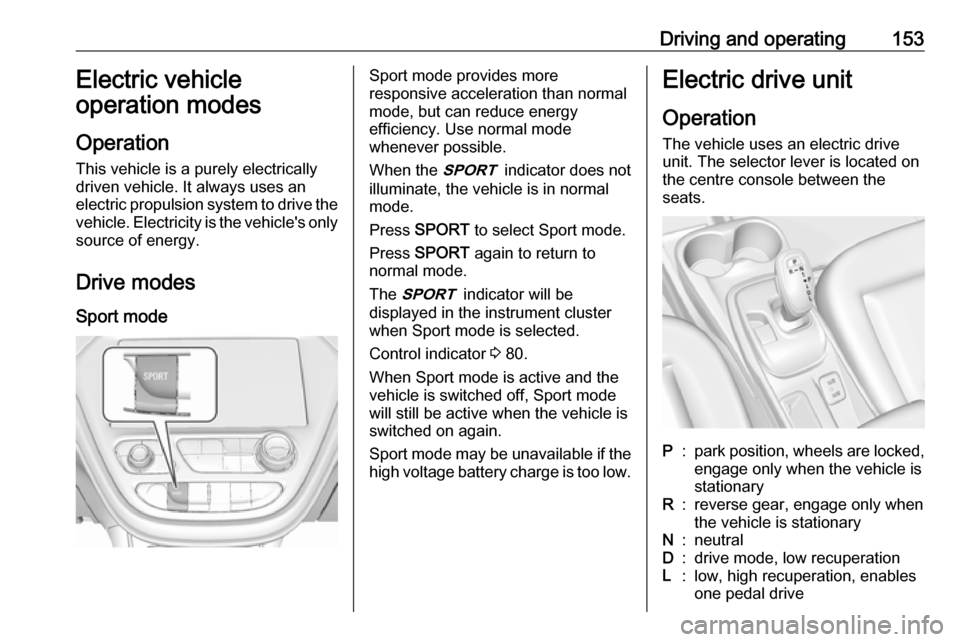
Drive modes Sport modeSport mode provides more
responsive acceleration than normal
mode, but can reduce energy
efficiency. Use normal mode
whenever possible.
When the 3 indicator does not
illuminate, the vehicle is in normal
mode.
Press SPORT to select Sport mode.
Press SPORT again to return to
normal mode.
The 3 indicator will be
displayed in the instrument cluster
when Sport mode is selected.
Control indicator 3 80.
When Sport mode is active and the
vehicle is switched off, Sport mode
will still be active when the vehicle is switched on again.
Sport mode may be unavailable if the high voltage battery charge is too low.Electric drive unit
Operation The vehicle uses an electric drive
unit. The selector lever is located on
the centre console between the
seats.P:park position, wheels are locked, engage only when the vehicle is
stationaryR:reverse gear, engage only when
the vehicle is stationaryN:neutralD:drive mode, low recuperationL:low, high recuperation, enables
one pedal drive
Page 166 of 267

164Driving and operatingSwitching on
Press m; control indicator m in
instrument cluster illuminates white
and cruise control is on standby.
Press m again to deactivate cruise
control.
Activation
Accelerate to the desired speed and
press SET/-, the current speed is
stored and maintained. The desired set speed briefly appears in the
instrument cluster. Accelerator pedal
can be released.
Vehicle speed can be increased by depressing the accelerator pedal. When the accelerator pedal is
released, the previously stored speed
is resumed.
Control indicator m 3 81.
Increase speed
With cruise control active, press
RES/+ until the desired speed is
reached or press RES/+ repeatedly:
speed is increased in small increments.
Reduce speed With cruise control active, pressSET/- until the desired speed is
reached or press SET/- repeatedly:
speed is decreased in small
increments.
Resume speed
If the cruise control is set at a desired speed and then the brakes are
applied, the cruise control is
disengaged without erasing the set
speed from memory. Once the
vehicle speed is approx. 25 km/h or
higher, press RES/+. The vehicle
returns to the previously set speed.
Deactivation Press y; control indicator m in
instrument cluster illuminates white.Cruise control is deactivated, but not
switched off. Last stored speed
remains in memory for later speed
resume.
Automatic deactivation: ● Vehicle speed is below approx. 25 km/h.
● The brake pedal is depressed.
● The selector lever is in N.
● The Traction Control system or Electronic Stability Control is
operating.
Switching off
Press m, control indicator m in
instrument cluster extinguishes. The stored speed is deleted.
Speed limiter
The speed limiter prevents the
vehicle exceeding a preset maximum
speed.
The maximum speed can be set at
speeds above 25 km/h.
Page 168 of 267

166Driving and operatingResume limit speed
Press RES/+ . The stored speed limit
will be obtained.
Switching off
Press L, the speed limit indication
extinguishes in the Driver Information Centre. The stored speed is deleted.
By pressing m to activate cruise
control or adaptive cruise control,
speed limiter is also deactivated and
the stored speed is deleted.
By switching off the vehicle, speed
limiter is also deactivated, but the
speed limit will be stored for next
speed limiter activation.
Forward collision alert The forward collision alert may help toavoid or reduce the harm caused by
front-end crashes.
The forward collision alert uses the
front camera system in the
windscreen to detect a vehicle
directly ahead, in your path, within a
distance of approx. 60 m.
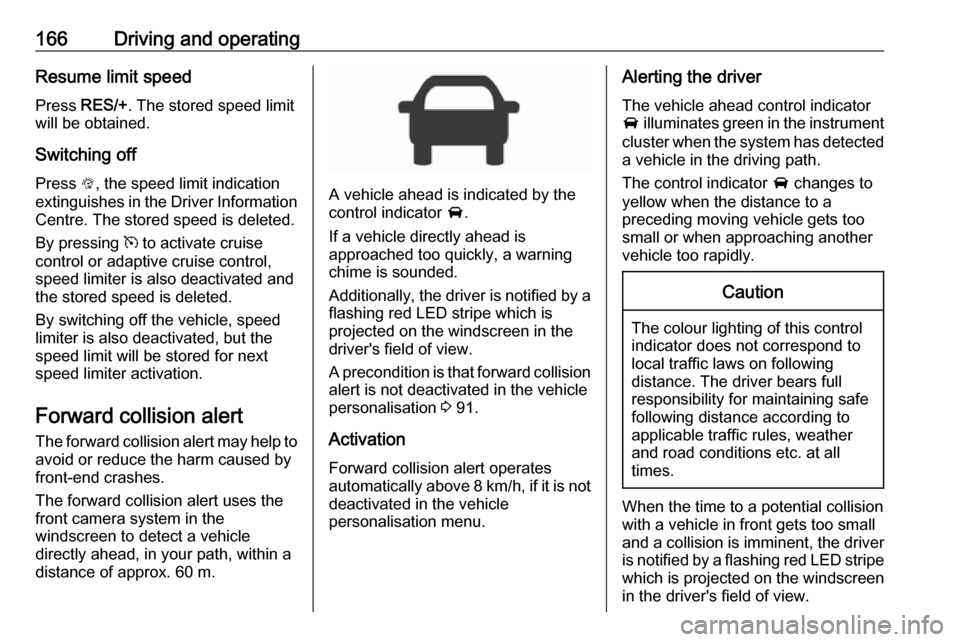
A vehicle ahead is indicated by the
control indicator A.
If a vehicle directly ahead is
approached too quickly, a warning
chime is sounded.
Additionally, the driver is notified by a
flashing red LED stripe which is
projected on the windscreen in the
driver's field of view.
A precondition is that forward collision alert is not deactivated in the vehicle
personalisation 3 91.
Activation
Forward collision alert operates
automatically above 8 km/h, if it is not deactivated in the vehicle
personalisation menu.
Alerting the driver
The vehicle ahead control indicator
A illuminates green in the instrument
cluster when the system has detected
a vehicle in the driving path.
The control indicator A changes to
yellow when the distance to a
preceding moving vehicle gets too
small or when approaching another
vehicle too rapidly.Caution
The colour lighting of this control
indicator does not correspond to
local traffic laws on following
distance. The driver bears full
responsibility for maintaining safe
following distance according to
applicable traffic rules, weather
and road conditions etc. at all
times.
When the time to a potential collision
with a vehicle in front gets too small
and a collision is imminent, the driver
is notified by a flashing red LED stripe which is projected on the windscreen
in the driver's field of view.
Page 174 of 267

172Driving and operating9Danger
Front pedestrian braking does not
provide an alert or automatically
brake the vehicle, unless it detects
a pedestrian.
The system may not detect
pedestrians, including children,
when the pedestrian is not directly ahead, not fully visible, not
standing upright, or when part of a
group.
Front pedestrian protection includes:
● detecting front pedestrian ahead● front pedestrian alert
● automatic braking
Pedestrian detected ahead
A pedestrian ahead is indicated up to
a distance of approximately 40 m by control indicator 7 in the instrument
cluster.
Front pedestrian alert
When the vehicle approaches a
detected pedestrian ahead too
rapidly, a red flashing LED alert is projected onto the windscreen in the
driver's field of view and a warning
chime is sounded. The brake system
may prepare for driver braking to
occur more rapidly which can cause a
brief, mild deceleration. Continue to
apply the brake pedal as required.
Cruise control may be disengaged
when the front pedestrian alert
occurs.
Automatic braking If a crash into a pedestrian directly
ahead is imminent and the brakes
have not been applied, the braking
strength is automatically adapted.
This can help to avoid some very low speed pedestrian crashes or reduce
pedestrian injury.
Automatic braking levels may be
reduced under certain conditions, such as higher speeds.
If this happens, automatic braking
may engage the electric parking
brake to hold the vehicle at a stop.
Release the electric parking brake. A
firm press of the accelerator pedal will
also release automatic braking and
the electric parking brake 3 158.
This system includes intelligent brake assist, and the emergency automatic
braking system may also respond to
pedestrians.
Active emergency braking 3 168.
Page 193 of 267

Driving and operating191When crossing a lane marking
significantly, lane keep assist starts a
visual and acoustic warning.
Unintended lane departure is
assumed:
● without using turn signal
● using the turn signal in the opposite direction of the lane
departure
● without braking
● without acceleration
● without active steering
Note
The system is switched off during
detection of ambiguous lane
markings, e.g. in construction areas.
Note
The system may be switched off if it
detects lanes which are too narrow,
too wide or too curved.Activation
The lane keep assist is activated by
pressing a. The LED in the button
illuminates to indicate that the system
is switched on.
When the control indicator a in the
instrument cluster illuminates green,
the system is ready to assist.
The system is operational at vehicle
speeds above 60 km/h and if lane
markings are available.
The system gently turns the steering
wheel and the control indicator a
changes to yellow, if the vehicle
approaches a detected lane marking
without using the turn signal in that
direction.
The system alerts by flashing a
together with three chimes, from the respective direction, if the lane is
departed significantly.
The system is only operable when a
lane marking is detected.
If the system only detects lane
markings on one side of the road, it
will only assist for this side.
Lane keep assist detects hands-free
driving. In this case a message in the
Driver Information Centre pops-up
and a chime sounds as long as lane
keep assist detects hands-free
driving.
Page 212 of 267

210Vehicle careLifting the vehicle9Warning
Lifting the vehicle improperly can
cause serious injuries and
damage to the vehicle.
The vehicle should be lifted only by well-trained staff at an
authorised workshop.
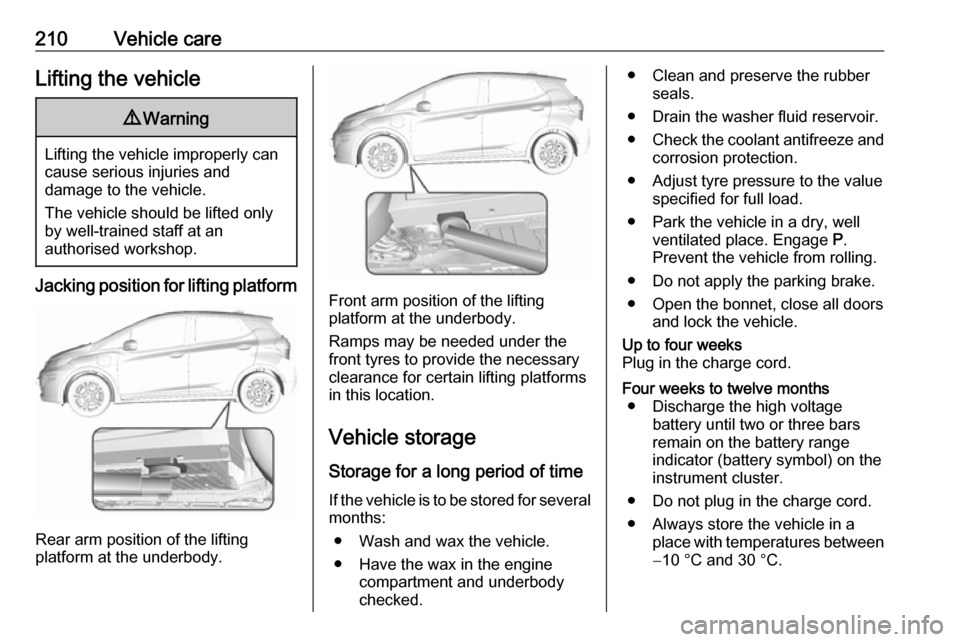
Jacking position for lifting platform
Rear arm position of the lifting
platform at the underbody.
Front arm position of the lifting
platform at the underbody.
Ramps may be needed under the
front tyres to provide the necessary
clearance for certain lifting platforms
in this location.
Vehicle storage Storage for a long period of timeIf the vehicle is to be stored for several months:
● Wash and wax the vehicle.
● Have the wax in the engine compartment and underbody
checked.
● Clean and preserve the rubber seals.
● Drain the washer fluid reservoir.
● Check the coolant antifreeze and
corrosion protection.
● Adjust tyre pressure to the value specified for full load.
● Park the vehicle in a dry, well ventilated place. Engage P.
Prevent the vehicle from rolling.
● Do not apply the parking brake.
● Open the bonnet, close all doors and lock the vehicle.Up to four weeks
Plug in the charge cord.Four weeks to twelve months ● Discharge the high voltage battery until two or three bars
remain on the battery range
indicator (battery symbol) on the
instrument cluster.
● Do not plug in the charge cord.
● Always store the vehicle in a place with temperatures between−10 °C and 30 °C.
Page 231 of 267

Vehicle care229The instrument panel fuse block is on
the left side of the instrument panel.
To access the fuses, open the fuse
panel door by pulling out.NumberUsage1Video processing module2Indicator light solar sensor3Side blind zone alert4Passive entry, passive start5Central gateway module6Body control module 47Body control module 38Body control module 29Body control module 110Trailer interface module 111Amplifier12Body control module 813Data link connector 114Automatic parking assist15Data link connector 2NumberUsage16Single power inverter
module 117Body control module 618Body control module 519–20–21–22–23USB24Wireless charging module25Reflected LED alert display26Heated steering wheel27–28Instrument cluster 229Trailer interface module 230Headlight levelling device31OnStar32–NumberUsage33Heating, ventilation, and air
conditioning module34–35Instrument panel cluster 136Regen on demand37–38–39–40–41–42–43Body control module 744Sensing and diagnostic
module45Front camera module46Vehicle integration control
module47Single power inverter
module 2
Page 241 of 267

Vehicle care239Route the leads so that they cannot
catch on rotating parts in the engine
compartment.
To start the vehicle: 1. Start the engine of the vehicle providing the jump.
2. After five minutes, press POWER m to switch on the
vehicle.
After the instrument cluster
initialises, the vehicle will use
power from the high voltage
battery to charge the 12 V vehicle
battery.
3. Switch on electrical consumers (e.g. headlights, heated rear
window) of the vehicle receiving
the jump start.
4. Reverse above sequence exactly when removing leads.Towing
Towing the vehicleCaution
Incorrect towing of a disabled
vehicle may cause damage to the
vehicle. The disabled vehicle
should only be towed on a flatbed
car carrier.
Ensure the vehicle is only towed
by well trained technicians.
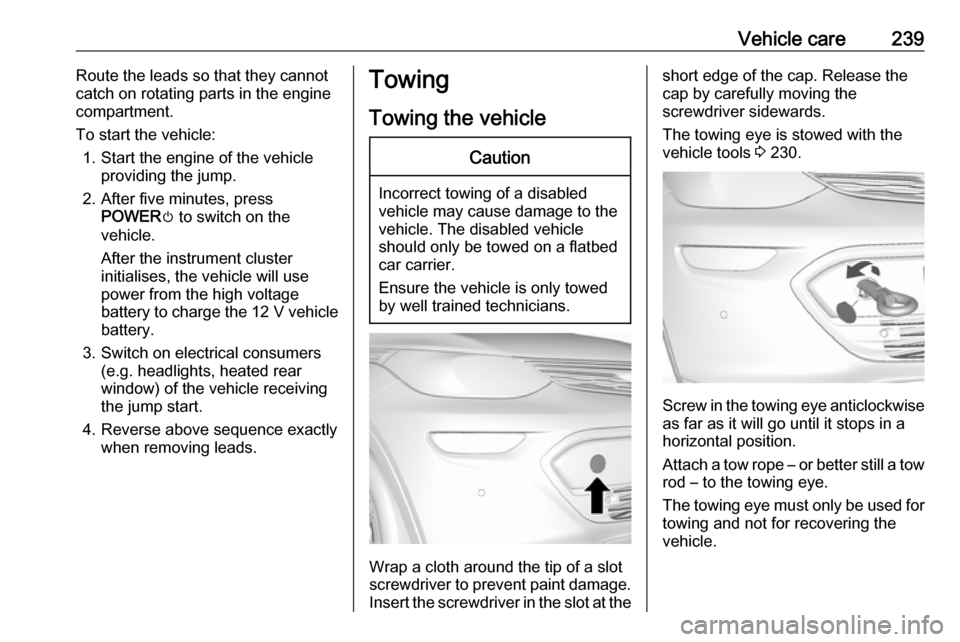
Wrap a cloth around the tip of a slot
screwdriver to prevent paint damage. Insert the screwdriver in the slot at the
short edge of the cap. Release the
cap by carefully moving the
screwdriver sidewards.
The towing eye is stowed with the vehicle tools 3 230.
Screw in the towing eye anticlockwise
as far as it will go until it stops in a
horizontal position.
Attach a tow rope – or better still a tow
rod – to the towing eye.
The towing eye must only be used for
towing and not for recovering the
vehicle.
Page 244 of 267

242Vehicle careRemove dirt residues from smearingwiper blades by using a soft cloth and window cleaner. Also make sure to
remove any residues such as wax,
insect residues and similar from the
window.
Ice residues, pollution and continuous wiping on dry windows will damage or
even destroy the wiper blades.
Wheels and tyres Do not use high-pressure jet
cleaners.
Clean rims with a pH-neutral wheel
cleaner.
Rims are painted and can be treated
with the same agents as the body.
Paintwork damage Rectify minor paintwork damage witha touch-up pen before rust forms.
Have more extensive damage or rust areas repaired by a workshop.Underbody
Some areas of the vehicle underbody
have a PVC undercoating while other critical areas have a durable
protective wax coating.
After the underbody is washed, check
the underbody and have it waxed if
necessary.
Bitumen / rubber materials could damage the PVC coating. Have
underbody work carried out by a
workshop.
Before and after winter, wash the
underbody and have the protective
wax coating checked.
Interior care
Interior and upholstery
Only clean the vehicle interior,
including the instrument panel fascia
and panelling, with a dry cloth or
interior cleaner.
Clean the leather upholstery with
clear water and a soft cloth. In case of heavy soiling, use leather care.The instrument cluster and the
displays should only be cleaned using
a soft damp cloth. If necessary use a
weak soap solution.
Do not spray cleaners directly on any switches or controls.
Clean fabric upholstery with a
vacuum cleaner and brush. Remove
stains with an upholstery cleaner.
Clothing fabrics may not be
colourfast. This could cause visible
discolourations, especially on light-
coloured upholstery. Removable
stains and discolourations should be
cleaned as soon as possible.
Clean seat belts with lukewarm water or interior cleaner.Caution
Close Velcro fasteners as open
Velcro fasteners on clothing could damage seat upholstery.
The same applies to clothing with
sharp-edged objects, like zips or
belts or studded jeans.
Page 262 of 267

260Folding mirrors ............................. 32
Following distance indication ......168
Forward collision alert................. 166
Front airbag system .....................48
Front pedestrian protection ........171
Front seats.................................... 38
Front turn signal lights ...............219
Fuses ......................................... 222
G
Gauges ......................................... 74
General information ...125, 132,
133, 208
AUX ......................................... 125
Bluetooth ................................. 125
DAB ......................................... 123
Infotainment system ................105
Phone ...................................... 133
Smartphone applications ........125
USB ......................................... 125
Glovebox ..................................... 57
H Halogen bulbs ............................ 219
Hand brake ......................... 157, 158
Hazard warning flashers ............101
Headlight aiming .........................218
Headlight flash ........................... 100
Headlight range adjustment ......100
Headlights..................................... 98
Head restraint adjustment .............6Head restraints ............................ 37
Heated mirrors ............................. 33
Heated rear window ..................... 35
Heated steering wheel .................65
Heating .................................. 41, 42
High beam ............................. 81, 99
High beam assist ....................81, 99
High voltage devices and wiring 222
Home menu ................................ 112
Horn ....................................... 11, 66
I
Identification plate .....................247
Immobiliser ............................ 31, 80
Indicators ...................................... 74
Inductive charging ........................70
Info display ................................... 85
Information displays...................... 82
Infotainment control panel ..........107
Instrument cluster ........................72
Instrument panel fuse box .........227
Instrument panel illumination control .................................... 102
Instrument panel overview ............. 8
Intellitext ..................................... 123
Interior care ............................... 242
Interior lighting ............................ 102
Interior lights .............................. 103
Introduction ............................... 0iPod............................................ 125
Connecting device ..................125
J Jump starting ............................. 237
K Key, memorised settings ..............20
KeyPass ....................................... 26
Keys ............................................. 16
Keys, locks ................................... 16
L Lane change alert .......................182
Lane keep assist ..................80, 190
Lashing eyes ............................... 61
Lifting the vehicle ........................210
Light switch .................................. 98
Load compartment ................28, 59
Load compartment cover .............60
Loading information .....................62
Location based charging ............196
M Manual seat adjustment ...............39
Maximum speed ......................... 231
Maximum startup volume ...........115
Memorised settings ......................20
Menu operation .......................... 112
Mirror adjustment ........................... 6
Misted light covers .....................102