instrument cluster OPEL AMPERA E 2019 Manual user
[x] Cancel search | Manufacturer: OPEL, Model Year: 2019, Model line: AMPERA E, Model: OPEL AMPERA E 2019Pages: 271, PDF Size: 6.7 MB
Page 155 of 271
Driving and operating153Electric vehicle
operation modes
Operation This vehicle is a purely electrically
driven vehicle. It always uses an
electric propulsion system to drive the
vehicle. Electricity is the vehicle's only source of energy.
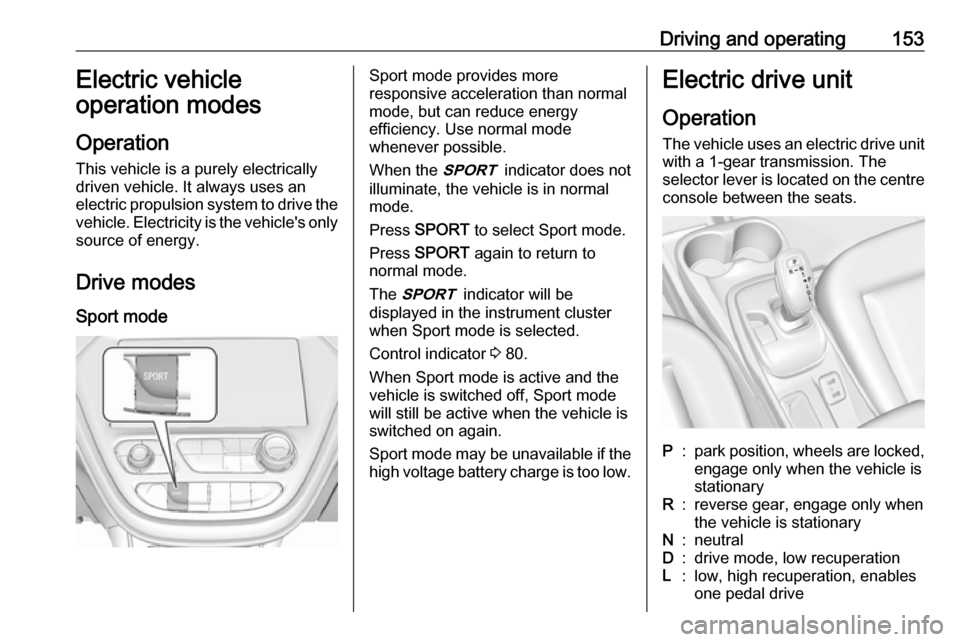
Drive modes Sport modeSport mode provides more
responsive acceleration than normal
mode, but can reduce energy
efficiency. Use normal mode
whenever possible.
When the 3 indicator does not
illuminate, the vehicle is in normal
mode.
Press SPORT to select Sport mode.
Press SPORT again to return to
normal mode.
The 3 indicator will be
displayed in the instrument cluster
when Sport mode is selected.
Control indicator 3 80.
When Sport mode is active and the
vehicle is switched off, Sport mode
will still be active when the vehicle is switched on again.
Sport mode may be unavailable if the high voltage battery charge is too low.Electric drive unit
Operation The vehicle uses an electric drive unitwith a 1-gear transmission. The
selector lever is located on the centre
console between the seats.P:park position, wheels are locked, engage only when the vehicle is
stationaryR:reverse gear, engage only when
the vehicle is stationaryN:neutralD:drive mode, low recuperationL:low, high recuperation, enables
one pedal drive
Page 166 of 271

164Driving and operatingSwitching on the system
Press m, control indicator m in
instrument cluster illuminates white
and cruise control is on standby.
Press m again to deactivate cruise
control.
Activation of the functionality Accelerate to the desired speed and
press SET/-, the current speed is
stored and maintained. The desired set speed briefly appears in the
instrument cluster. Accelerator pedal
can be released.
Vehicle speed can be increased by depressing the accelerator pedal.
When the accelerator pedal is
released, the previously stored speed
is resumed.
Control indicator m 3 81.
Increase speed
With cruise control active, press
RES/+ until the desired speed is
reached or press RES/+ repeatedly:
speed is increased in small
increments.
Reduce speed
With cruise control active, press SET/- until the desired speed is
reached or press SET/- repeatedly:
speed is decreased in small
increments.
Resume speedIf the cruise control is set at a desired speed and then the brakes are
applied, the cruise control is
disengaged without erasing the set
speed from memory. Once the
vehicle speed is approx. 25 km/h or
higher, press RES/+. The vehicle returns to the previously set speed.
Deactivation of the functionality
Press y, control indicator m in
instrument cluster illuminates white.Cruise control is deactivated, but not
switched off. Last stored speed
remains in memory for later speed
resume.
Automatic deactivation: ● Vehicle speed is below approx. 25 km/h.
● The brake pedal is depressed.
● The selector lever is in N.
● The Traction Control system or Electronic Stability Control is
operating.
Switching off the system
Press m, control indicator m in
instrument cluster extinguishes. The stored speed is deleted.
Speed limiter
The speed limiter prevents the
vehicle exceeding a preset maximum
speed.
The maximum speed can be set at
speeds above 25 km/h.
Page 168 of 271

166Driving and operatingResume limit speed
Press RES/+ . The stored speed limit
will be obtained.
Switching off the system
Press L, the speed limit indication
extinguishes in the Driver Information Centre. The stored speed is deleted.
By pressing m to activate cruise
control or adaptive cruise control,
speed limiter is also deactivated and
the stored speed is deleted.
By switching off the vehicle, speed
limiter is also deactivated, but the
speed limit will be stored for next
speed limiter activation.
Forward collision alert The forward collision alert may help to
avoid or reduce the harm caused by
front-end crashes.
The forward collision alert uses the front camera system in the
windscreen to detect a vehicle
directly ahead, in your path, within a
distance of approx. 60 m.
A vehicle ahead is indicated by the
control indicator A.
If a vehicle directly ahead is
approached too quickly, a warning
chime is sounded.
Additionally, the driver is notified by a flashing red LED stripe which is
projected on the windscreen in the
driver's field of view.
A precondition is that forward collision alert is not deactivated in the vehicle
personalisation 3 90.
Activation
Forward collision alert operates
automatically above 8 km/h, if it is not deactivated in the vehicle
personalisation menu.
Alerting the driver
The vehicle ahead control indicator
A illuminates green in the instrument
cluster when the system has detected
a vehicle in the driving path.
The control indicator A changes to
yellow when the distance to a
preceding moving vehicle gets too
small or when approaching another
vehicle too rapidly.Caution
The colour lighting of this control
indicator does not correspond to
local traffic laws on following
distance. The driver bears full
responsibility for maintaining safe
following distance according to
applicable traffic rules, weather
and road conditions etc. at all
times.
When the time to a potential collision
with a vehicle in front gets too small
and a collision is imminent, the driver
is notified by a flashing red LED stripe which is projected on the windscreen
in the driver's field of view.
Page 174 of 271
172Driving and operatingThe front pedestrian protection
system can detect and alert about
pedestrians when in a forward gear at
speeds between 8 km/h and
80 km/h.
Additionally, the front pedestrian protection system can provide a
boost to braking or automatically
brake the vehicle.
During daytime driving, the system
detects pedestrians up to a distance
of approximately 40 m. During
nighttime driving, system
performance might be limited.
The front pedestrian protection can
be set to Off, Alert or Alert and
Brake in the vehicle personalisation
3 90.9 Danger
Front pedestrian braking does not
provide an alert or automatically
brake the vehicle, unless it detects
a pedestrian.
The system may not detect
pedestrians, including children,
when the pedestrian is not directly
ahead, not fully visible, not
standing upright, or when part of a
group.
Front pedestrian protection includes:
● detecting front pedestrian ahead● front pedestrian alert
● automatic braking
Pedestrian detected ahead
A pedestrian ahead is indicated up to
a distance of approximately 40 m by control indicator 7 in the instrument
cluster.
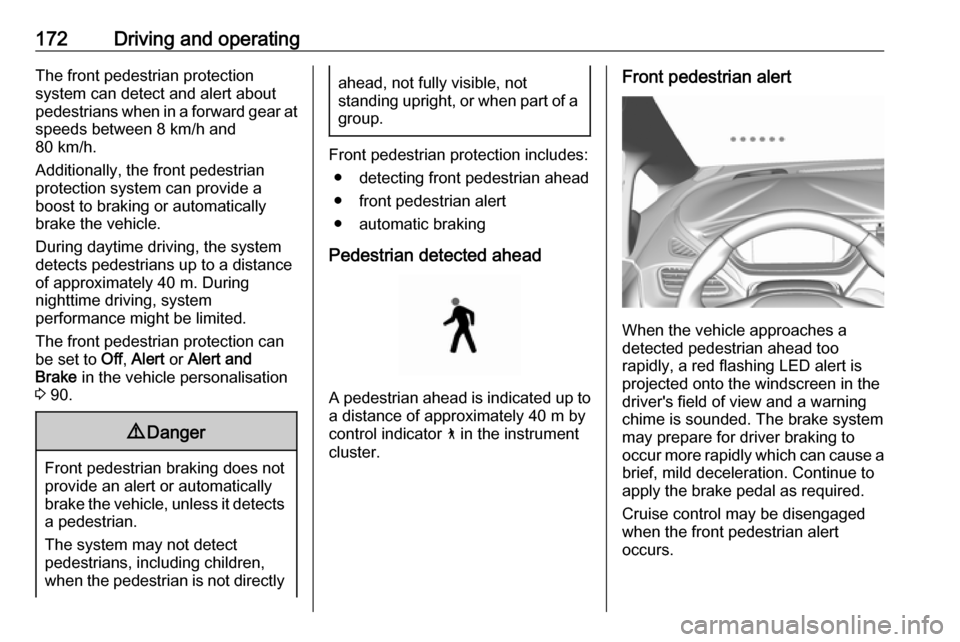
Front pedestrian alert
When the vehicle approaches a
detected pedestrian ahead too
rapidly, a red flashing LED alert is projected onto the windscreen in the
driver's field of view and a warning
chime is sounded. The brake system
may prepare for driver braking to
occur more rapidly which can cause a
brief, mild deceleration. Continue to
apply the brake pedal as required.
Cruise control may be disengaged
when the front pedestrian alert
occurs.
Page 193 of 271
Driving and operating191Activation
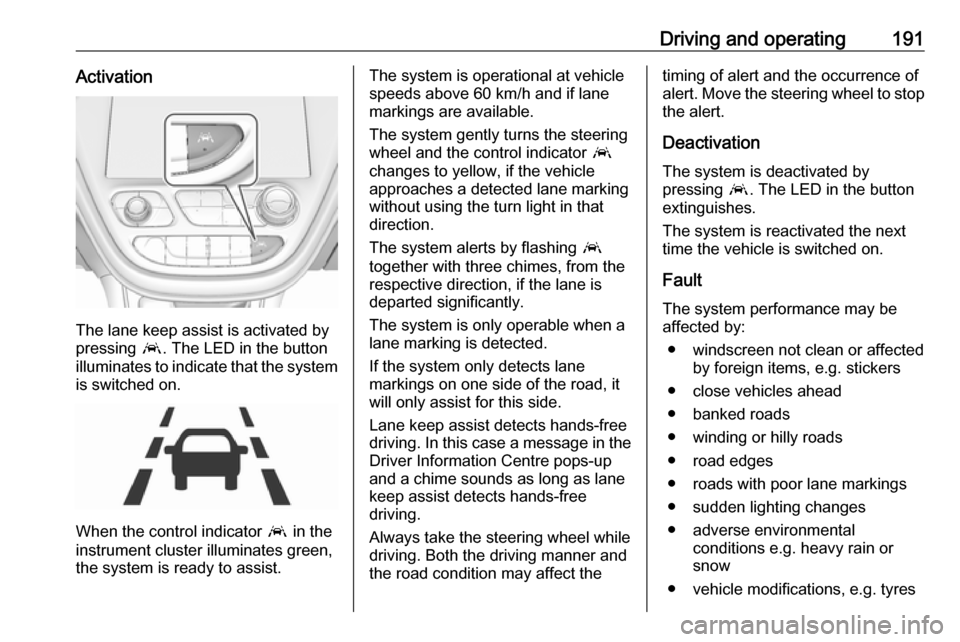
The lane keep assist is activated by
pressing a. The LED in the button
illuminates to indicate that the system
is switched on.
When the control indicator a in the
instrument cluster illuminates green,
the system is ready to assist.
The system is operational at vehicle
speeds above 60 km/h and if lane
markings are available.
The system gently turns the steering
wheel and the control indicator a
changes to yellow, if the vehicle
approaches a detected lane marking
without using the turn light in that
direction.
The system alerts by flashing a
together with three chimes, from the respective direction, if the lane is
departed significantly.
The system is only operable when a
lane marking is detected.
If the system only detects lane
markings on one side of the road, it
will only assist for this side.
Lane keep assist detects hands-free
driving. In this case a message in the
Driver Information Centre pops-up
and a chime sounds as long as lane
keep assist detects hands-free
driving.
Always take the steering wheel while
driving. Both the driving manner and
the road condition may affect thetiming of alert and the occurrence of
alert. Move the steering wheel to stop
the alert.
Deactivation The system is deactivated by
pressing a. The LED in the button
extinguishes.
The system is reactivated the next
time the vehicle is switched on.
Fault The system performance may beaffected by:
● windscreen not clean or affected by foreign items, e.g. stickers
● close vehicles ahead
● banked roads
● winding or hilly roads
● road edges
● roads with poor lane markings
● sudden lighting changes
● adverse environmental conditions e.g. heavy rain or
snow
● vehicle modifications, e.g. tyres
Page 204 of 271
202Driving and operating
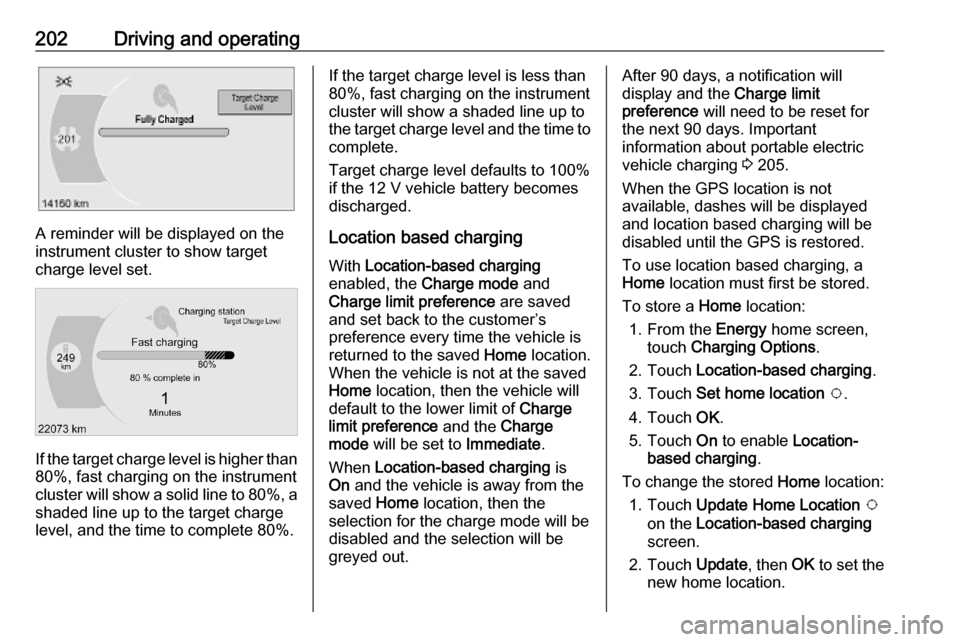
A reminder will be displayed on the
instrument cluster to show target
charge level set.
If the target charge level is higher than
80%, fast charging on the instrument
cluster will show a solid line to 80%, a
shaded line up to the target charge
level, and the time to complete 80%.
If the target charge level is less than
80%, fast charging on the instrument cluster will show a shaded line up tothe target charge level and the time to complete.
Target charge level defaults to 100%
if the 12 V vehicle battery becomes
discharged.
Location based charging
With Location-based charging
enabled, the Charge mode and
Charge limit preference are saved
and set back to the customer’s
preference every time the vehicle is
returned to the saved Home location.
When the vehicle is not at the saved
Home location, then the vehicle will
default to the lower limit of Charge
limit preference and the Charge
mode will be set to Immediate.
When Location-based charging is
On and the vehicle is away from the
saved Home location, then the
selection for the charge mode will be
disabled and the selection will be
greyed out.After 90 days, a notification will
display and the Charge limit
preference will need to be reset for
the next 90 days. Important
information about portable electric
vehicle charging 3 205.
When the GPS location is not
available, dashes will be displayed
and location based charging will be
disabled until the GPS is restored.
To use location based charging, a
Home location must first be stored.
To store a Home location:
1. From the Energy home screen,
touch Charging Options .
2. Touch Location-based charging .
3. Touch Set home location v .
4. Touch OK.
5. Touch On to enable Location-
based charging .
To change the stored Home location:
1. Touch Update Home Location v
on the Location-based charging
screen.
2. Touch Update, then OK to set the
new home location.
Page 212 of 271
210Vehicle careLifting the vehicle9Warning
Lifting the vehicle improperly can
cause serious injuries and
damage to the vehicle.
The vehicle should be lifted only by well-trained staff at an
authorised workshop.
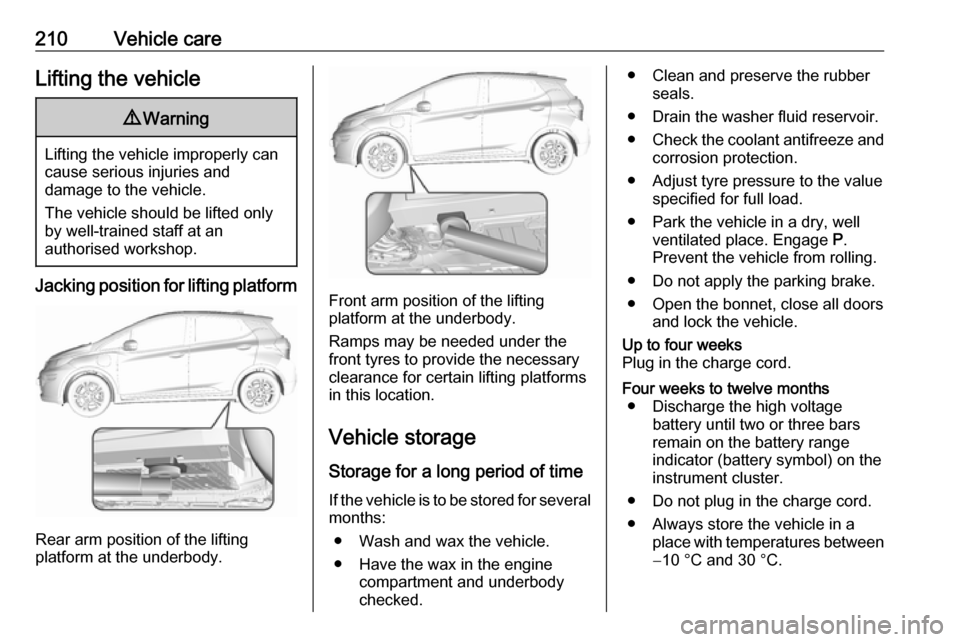
Jacking position for lifting platform
Rear arm position of the lifting
platform at the underbody.
Front arm position of the lifting
platform at the underbody.
Ramps may be needed under the
front tyres to provide the necessary
clearance for certain lifting platforms
in this location.
Vehicle storage Storage for a long period of timeIf the vehicle is to be stored for several months:
● Wash and wax the vehicle.
● Have the wax in the engine compartment and underbody
checked.
● Clean and preserve the rubber seals.
● Drain the washer fluid reservoir.
● Check the coolant antifreeze and
corrosion protection.
● Adjust tyre pressure to the value specified for full load.
● Park the vehicle in a dry, well ventilated place. Engage P.
Prevent the vehicle from rolling.
● Do not apply the parking brake.
● Open the bonnet, close all doors and lock the vehicle.Up to four weeks
Plug in the charge cord.Four weeks to twelve months ● Discharge the high voltage battery until two or three bars
remain on the battery range
indicator (battery symbol) on the
instrument cluster.
● Do not plug in the charge cord.
● Always store the vehicle in a place with temperatures between−10 °C and 30 °C.
Page 230 of 271
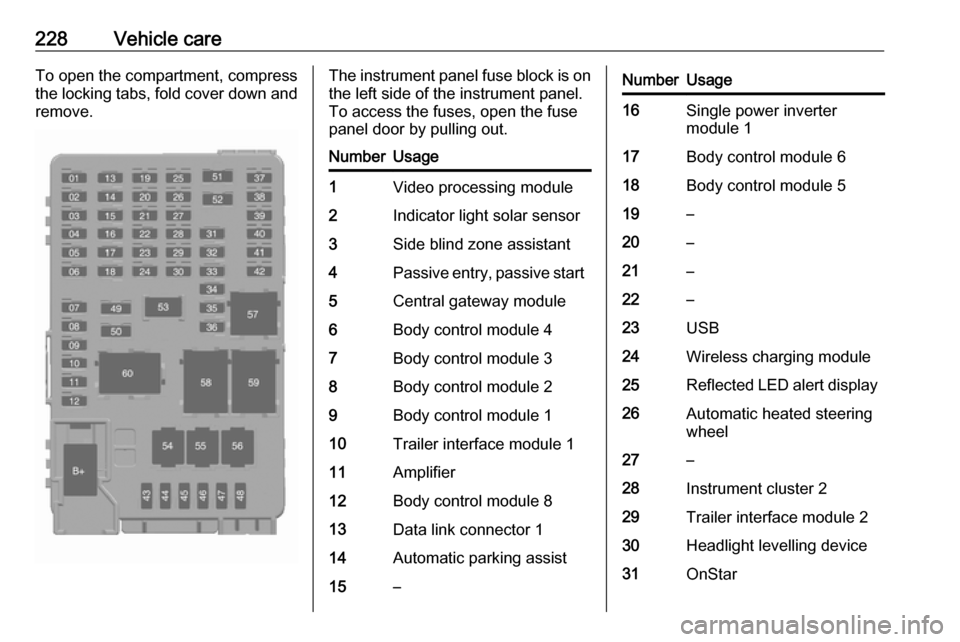
228Vehicle careTo open the compartment, compress
the locking tabs, fold cover down and remove.The instrument panel fuse block is on the left side of the instrument panel.
To access the fuses, open the fuse
panel door by pulling out.NumberUsage1Video processing module2Indicator light solar sensor3Side blind zone assistant4Passive entry, passive start5Central gateway module6Body control module 47Body control module 38Body control module 29Body control module 110Trailer interface module 111Amplifier12Body control module 813Data link connector 114Automatic parking assist15–NumberUsage16Single power inverter
module 117Body control module 618Body control module 519–20–21–22–23USB24Wireless charging module25Reflected LED alert display26Automatic heated steering
wheel27–28Instrument cluster 229Trailer interface module 230Headlight levelling device31OnStar
Page 231 of 271

Vehicle care229NumberUsage32–33Heating, ventilation, and air
conditioning module34–35Instrument panel cluster 136Radio37–38–39–40–41–42–43Body control module 744Sensing and diagnostic
module45Front camera module46Vehicle integration control
moduleNumberUsage47Single power inverter
module 248Electric steering column
lock49Auxiliary jack50Steering wheel controls51Steering wheel controls
backlighting52Smartphone remote func‐
tion module53Auxiliary power outlet54–55Logistic56–57–58–59–60–To reinstall the door, insert the bottom tab first, then push the door back into its original location.
Page 243 of 271
Vehicle care241Battery terminals in the engine
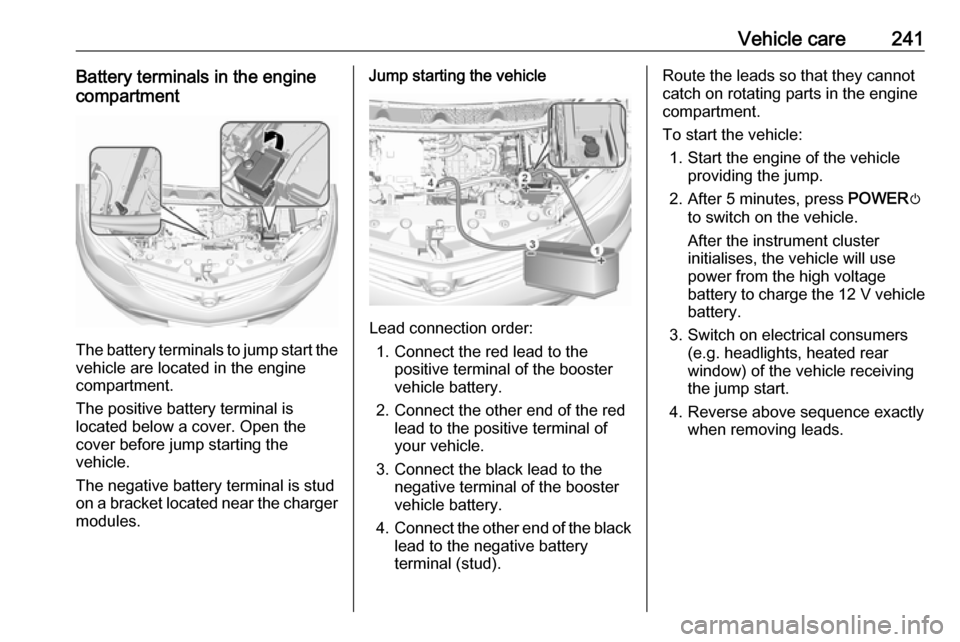
compartment
The battery terminals to jump start the
vehicle are located in the engine
compartment.
The positive battery terminal is
located below a cover. Open the
cover before jump starting the
vehicle.
The negative battery terminal is stud
on a bracket located near the charger
modules.
Jump starting the vehicle
Lead connection order:
1. Connect the red lead to the positive terminal of the booster
vehicle battery.
2. Connect the other end of the red lead to the positive terminal of
your vehicle.
3. Connect the black lead to the negative terminal of the booster
vehicle battery.
4. Connect the other end of the black
lead to the negative battery
terminal (stud).
Route the leads so that they cannot
catch on rotating parts in the engine
compartment.
To start the vehicle: 1. Start the engine of the vehicle providing the jump.
2. After 5 minutes, press POWERm
to switch on the vehicle.
After the instrument cluster
initialises, the vehicle will use
power from the high voltage
battery to charge the 12 V vehicle
battery.
3. Switch on electrical consumers (e.g. headlights, heated rear
window) of the vehicle receiving
the jump start.
4. Reverse above sequence exactly when removing leads.