wheels OPEL AMPERA E 2019 Manual user
[x] Cancel search | Manufacturer: OPEL, Model Year: 2019, Model line: AMPERA E, Model: OPEL AMPERA E 2019Pages: 271, PDF Size: 6.7 MB
Page 161 of 271

Driving and operating159The control indicator m will flash and
then stay on once the electric parking
brake is fully applied. Before leaving
the vehicle, check the control
indicator m to ensure the parking
brake is applied.
If the control indicator m flashes
continuously, then the electric parking
brake is only partially applied or there is a problem with the electric parking
brake. A message is displayed in the
Driver Information Centre. Release
the electric parking brake and try to
apply it again. If the control indicator
m does not illuminate or keeps
flashing, seek the assistance of a
workshop.
Do not drive the vehicle if the control
indicator m is flashing 3 79.
If the electric parking brake is applied while the vehicle is moving, a chime
will sound and a message will be
displayed in the Driver Information
Centre. The vehicle will decelerate as
long as the switch is pulled.
Releasing the switch m during the
deceleration process will release the
parking brake. If the switch m ispulled until the vehicle stops moving,
the electric parking brake will remain
applied.
When the electric parking brake fault
indicator j illuminates, the electric
parking brake has detected a system
problem and is operating with
reduced functionality. To apply the electric parking brake when j
illuminates, pull the switch m and
hold it until the control indicator m
remains on. If the control indicator j
illuminates, seek the assistance of a workshop.
The vehicle may automatically apply
the electric parking brake in some
situations when the vehicle is not
moving. This is normal, and is done to
periodically check the correct
operation of the electric parking brake
system.
If the electric parking brake fails to apply, the rear wheels should be
blocked to prevent vehicle
movement.Releasing
1. Switch on the vehicle.
2. Keep brake pedal depressed.
3. Push switch m.
If attempting to release the electric parking brake without the brake pedal being applied, a chime will sound and
a message will be displayed in the
Driver Information Centre. The
electric parking brake is released
when m is off.
If control indicator j is illuminated, the
electric parking brake has detected a
system problem, and is operating with
reduced functionality. To release the
electric parking brake when j is on,
push down the switch m and hold it
down until the control indicator j
goes off. If the control indicator
remains illuminated, seek the
assistance of a workshop.
Note
Driving with the parking brake on
can overheat the brake system and
cause premature wear or damage to brake system parts. Make sure that
Page 163 of 271

Driving and operating161Ride control systems
Traction Control system The Traction Control system (TC) is a
component of the Electronic Stability
Control (ESC).
TC improves driving stability when
necessary, regardless of the type of
road surface or tyre grip, by
preventing the drive wheels from
spinning.
As soon as the drive wheels starts to
spin, electric drive unit output is
reduced and the wheel spinning the
most is braked individually. This
considerably improves the driving
stability of the vehicle on slippery road
surfaces.
TC is operational as soon as the
control indicator b extinguishes.
When TC operates b flashes.
9
Warning
Do not let this special safety
feature tempt you into taking risks
when driving.
Adapt speed to the road
conditions.
Control indicator b 3 80.
Deactivation
TC can be switched off when spinning of drive wheels is required: press b
briefly.
Control indicator k illuminates.
When TC is deactivated, ESC
remains active but with a higher
control threshold.
TC is reactivated by pressing b
again.
TC is also reactivated the next time
the vehicle is switched on.
Caution
Do not repeatedly brake or accelerate heavily if TC is off. The vehicle's driveline could be
damaged.
Fault
If there is a fault in the system the
control indicator b illuminates
continuously and a message appears in the Driver Information Centre. Thesystem is not operational.
Page 164 of 271
162Driving and operatingHave the cause of the fault remedied
by a workshop.
Electronic Stability Control
Electronic Stability Control (ESC)
improves driving stability when
necessary, regardless of the type of
road surface or tyre grip.
As soon as the vehicle starts to
swerve (understeer / oversteer),
electric drive unit output is reduced and the wheels are braked
individually. This considerably
improves the driving stability of the
vehicle on slippery road surfaces.
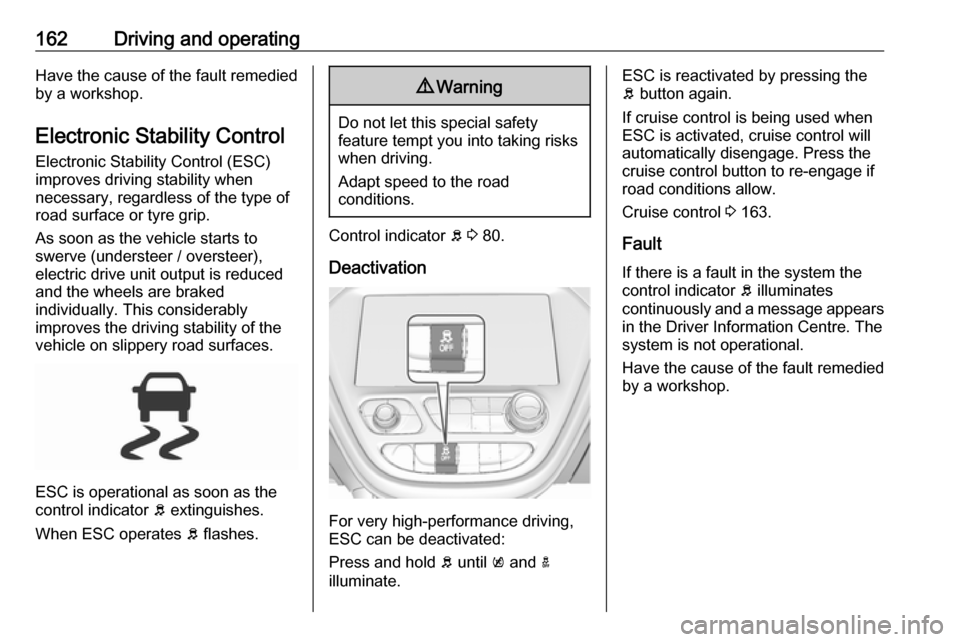
ESC is operational as soon as the
control indicator b extinguishes.
When ESC operates b flashes.
9 Warning
Do not let this special safety
feature tempt you into taking risks
when driving.
Adapt speed to the road
conditions.
Control indicator b 3 80.
Deactivation
For very high-performance driving,
ESC can be deactivated:
Press and hold b until k and a
illuminate.
ESC is reactivated by pressing the
b button again.
If cruise control is being used when
ESC is activated, cruise control will
automatically disengage. Press the
cruise control button to re-engage if road conditions allow.
Cruise control 3 163.
Fault
If there is a fault in the system the
control indicator b illuminates
continuously and a message appears
in the Driver Information Centre. The
system is not operational.
Have the cause of the fault remedied by a workshop.
Page 211 of 271

Vehicle care209Vehicle careGeneral Information...................209
Accessories and vehicle modifications .......................... 209
Lifting the vehicle .....................210
Vehicle storage ........................210
End-of-life vehicle recovery .....211
Vehicle checks ........................... 211
Performing work ......................211
Bonnet ..................................... 212
Cooling system ........................213
Washer fluid ............................ 215
Brakes ..................................... 215
Brake fluid ............................... 215
Vehicle battery ......................... 216
Wiper blade replacement ........218
Headlight aiming ......................218
Bulb replacement .......................219
Halogen bulbs ......................... 219
Xenon headlights .....................219
Front turn lights .......................219
Tail lights ................................. 220
Side turn lights ......................... 220
Number plate light ...................221Electrical system ........................222
High voltage devices and wiring ...................................... 222
Electrical system overload .......222
Fuses ....................................... 222
Engine compartment fuse box . 224
Instrument panel fuse box .......227
Vehicle tools .............................. 230
Tools ........................................ 230
Wheels and tyres .......................230
Tyres ....................................... 230
Winter tyres ............................. 231
Tyre designations ....................231
Tyre pressure .......................... 231
Tyre pressure monitoring system .................................... 232
Tread depth ............................. 234
Changing tyre and wheel size . 235
Wheel covers ........................... 235
Tyre chains .............................. 236
Tyre repair kit .......................... 236
Jump starting ............................. 240
Towing ....................................... 242
Towing the vehicle ...................242
Towing another vehicle ...........243
Appearance care .......................243
Exterior care ............................ 243
Interior care ............................. 245General Information
Accessories and vehiclemodifications
We recommend the use of genuine
parts and accessories and factory
approved parts specific for your
vehicle type. We cannot assess or
guarantee reliability of other products - even if they have a regulatory or
otherwise granted approval.
Any modification, conversion or other
changes made to standard vehicle
specifications (including, without
limitation, software modifications,
modifications of the electronic control units) may invalidate the warranty
offered by Opel. Furthermore, such
changes may affect driver assistance
systems and energy consumption.
They may also invalidate the vehicle
operating permit.Caution
When transporting the vehicle on
a train or on a recovery vehicle, the
mud flaps might be damaged.
Page 232 of 271
230Vehicle careVehicle tools
Tools
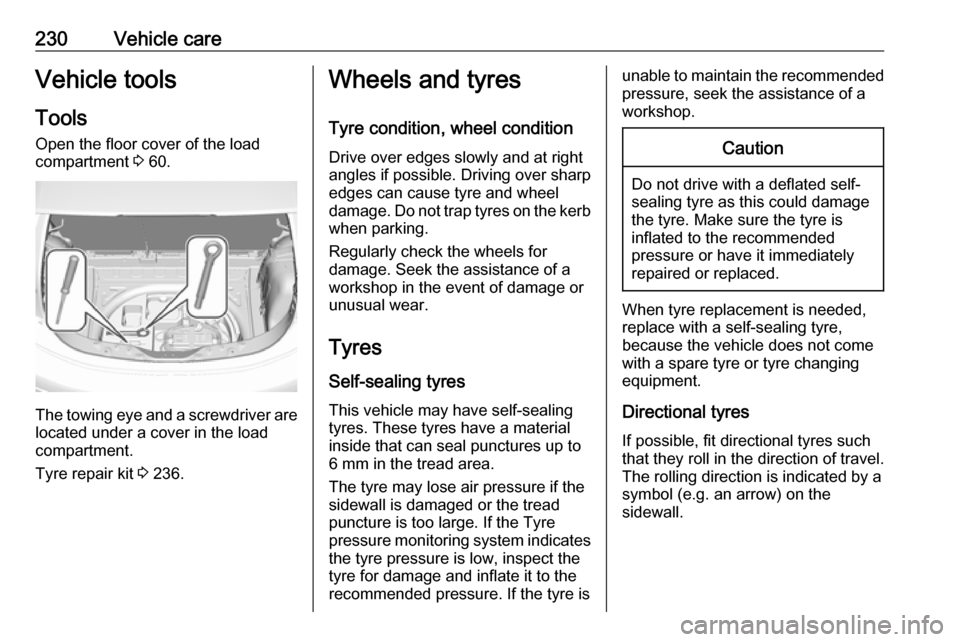
Open the floor cover of the load
compartment 3 60.
The towing eye and a screwdriver are
located under a cover in the load
compartment.
Tyre repair kit 3 236.
Wheels and tyres
Tyre condition, wheel condition Drive over edges slowly and at right
angles if possible. Driving over sharp
edges can cause tyre and wheel
damage. Do not trap tyres on the kerb when parking.
Regularly check the wheels for
damage. Seek the assistance of a
workshop in the event of damage or
unusual wear.
Tyres
Self-sealing tyres This vehicle may have self-sealing
tyres. These tyres have a material
inside that can seal punctures up to
6 mm in the tread area.
The tyre may lose air pressure if the
sidewall is damaged or the tread
puncture is too large. If the Tyre
pressure monitoring system indicates the tyre pressure is low, inspect the
tyre for damage and inflate it to the
recommended pressure. If the tyre isunable to maintain the recommended
pressure, seek the assistance of a
workshop.Caution
Do not drive with a deflated self-
sealing tyre as this could damage
the tyre. Make sure the tyre is
inflated to the recommended
pressure or have it immediately
repaired or replaced.
When tyre replacement is needed,
replace with a self-sealing tyre,
because the vehicle does not come
with a spare tyre or tyre changing
equipment.
Directional tyres
If possible, fit directional tyres such
that they roll in the direction of travel.
The rolling direction is indicated by a
symbol (e.g. an arrow) on the
sidewall.
Page 233 of 271

Vehicle care231The following applies to tyres fitted
opposing the rolling direction:
● Driveability may be affected.● Do not drive faster than 80 km/h.
● Drive particularly carefully on wet
and snow-covered road
surfaces.
Winter tyres
Winter tyres improve driving safety at temperatures below 7 °C and shouldtherefore be fitted on all wheels.
All tyre sizes are permitted as winter
tyres 3 253.
In accordance with country-specific
regulations, affix the speed sticker in
the driver's field of view.
Tyre designations E.g. 215/60 R 16 95 H215:Tyre width, mm60:Cross-section ratio (tyre height
to tyre width), %R:Belt type: RadialRF:Type: RunFlat16:Wheel diameter, inches95:Load index e.g. 95 is
equivalent to 690 kgH:Speed code letter
Speed code letter:
Q:up to 160 km/hS:up to 180 km/hT:up to 190 km/hH:up to 210 km/hV:up to 240 km/hW:up to 270 km/h
Choose a tyre appropriate for the
maximum speed of your vehicle.
The maximum speed is achievable at kerb weight with driver (75 kg) plus
125 kg payload. Optional equipment
could reduce the maximum speed of
the vehicle.
Performance 3 251.
Tyre pressure
Check the pressure of cold tyres at
least every 14 days and before any
long journey.
This also applies to vehicles with tyre pressure monitoring system.
Tyre pressure 3 253.
The tyre pressure information label on the left door frame indicates the
original equipment tyres and the
correspondent tyre pressures.
The tyre pressure data refers to cold
tyres. It applies to summer and winter
tyres.
The ECO tyre pressure serves to
achieve the smallest amount of
energy consumption possible.
Incorrect tyre pressures will impair
safety, vehicle handling, comfort and efficiency and will increase tyre wear.
Tyre pressures differ depending on
various options.
Page 234 of 271
232Vehicle careFor the tyres approved for your
vehicle, refer to the EEC Certificate of Conformity provided with your vehicle
or other national registration
documents.
The driver is responsible for correct
adjustment of tyre pressure.9 Warning
If the pressure is too low, this can
result in considerable tyre warm-
up and internal damage, leading to tread separation and even to tyre
blow-out at high speeds.
9 Warning
For specific tyres the
recommended tyre pressure as
shown in the tyre pressure table may exceed the maximum tyre
pressure as indicated on the tyre.
Never exceed the maximum tyre
pressure as indicated on the tyre.
If the tyre pressure must be reduced
or increased on a vehicle with tyre
pressure monitoring system, switch
off the vehicle.
Temperature dependency The tyre pressure depends on the
temperature of the tyre. During
driving, tyre temperature and
pressure increase. Tyre pressure
values provided on the tyre
information label and tyre pressure
chart are valid for cold tyres, which means at 20 °C.
The pressure increases by nearly
10 kPa for a 10 °C temperature
increase. This must be considered
when warm tyres are checked.
The tyre pressure value displayed in
the Driver Information Centre shows
the real tyre pressure. A cooled down
tyre will show a decreased value,
which does not indicate an air leak.Tyre pressure monitoring
system
The tyre pressure monitoring system
checks the pressure of all four tyres
once a minute when vehicle speed
exceeds a certain limit.Caution
Tyre pressure monitoring system
warns only about low tyre pressure condition and does not replace
regular tyre maintenance by the
driver.
All wheels must be equipped with pressure sensors and the tyres must
have the prescribed pressure.
Note
In countries where the tyre pressure
monitoring system is legally
required, the use of wheels without
pressure sensors will invalidate the
vehicle operating permit.
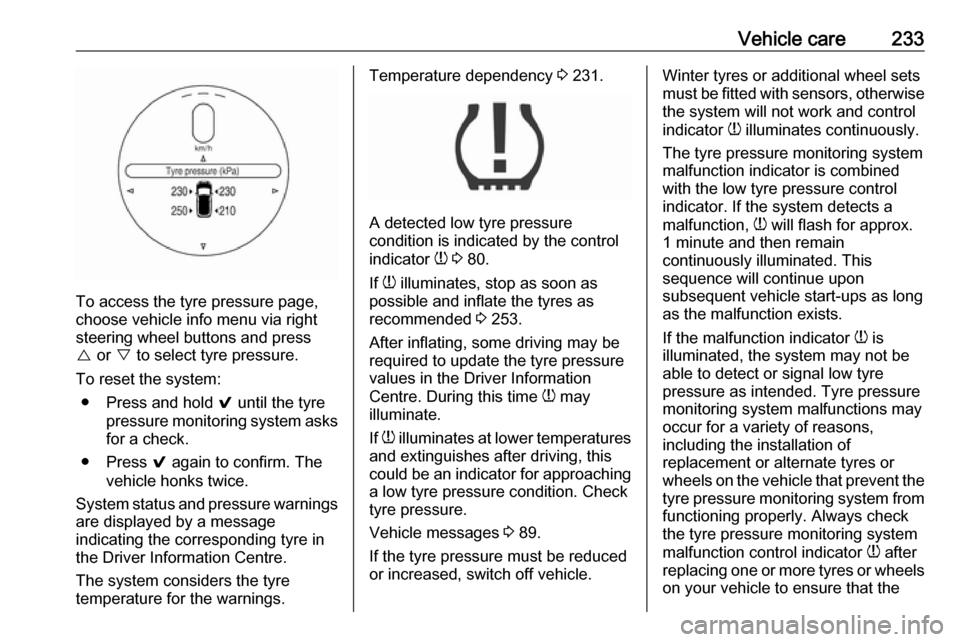
The current tyre pressures can be
shown in the Driver Information
Centre.
Page 235 of 271
Vehicle care233
To access the tyre pressure page,
choose vehicle info menu via right
steering wheel buttons and press
{ or } to select tyre pressure.
To reset the system: ● Press and hold 9 until the tyre
pressure monitoring system asks
for a check.
● Press 9 again to confirm. The
vehicle honks twice.
System status and pressure warnings
are displayed by a message
indicating the corresponding tyre in
the Driver Information Centre.
The system considers the tyre
temperature for the warnings.
Temperature dependency 3 231.
A detected low tyre pressure
condition is indicated by the control
indicator w 3 80.
If w illuminates, stop as soon as
possible and inflate the tyres as
recommended 3 253.
After inflating, some driving may be
required to update the tyre pressure
values in the Driver Information
Centre. During this time w may
illuminate.
If w illuminates at lower temperatures
and extinguishes after driving, this
could be an indicator for approaching a low tyre pressure condition. Check
tyre pressure.
Vehicle messages 3 89.
If the tyre pressure must be reduced or increased, switch off vehicle.
Winter tyres or additional wheel sets
must be fitted with sensors, otherwise the system will not work and control
indicator w illuminates continuously.
The tyre pressure monitoring system
malfunction indicator is combined
with the low tyre pressure control
indicator. If the system detects a
malfunction, w will flash for approx.
1 minute and then remain
continuously illuminated. This
sequence will continue upon
subsequent vehicle start-ups as long
as the malfunction exists.
If the malfunction indicator w is
illuminated, the system may not be
able to detect or signal low tyre
pressure as intended. Tyre pressure
monitoring system malfunctions may
occur for a variety of reasons,
including the installation of
replacement or alternate tyres or wheels on the vehicle that prevent the
tyre pressure monitoring system from functioning properly. Always check
the tyre pressure monitoring system
malfunction control indicator w after
replacing one or more tyres or wheels
on your vehicle to ensure that the
Page 236 of 271
234Vehicle carereplacement or alternative tyres andwheels allow the tyre pressure
monitoring system to continue to
function properly.
A spare wheel is not equipped with a
pressure sensor. The tyre pressure
monitoring system is not operational
for these wheels. Control indicator w
illuminates. For the further three
wheels the system remains
operational.
The use of commercially-available
liquid tyre repair kits can impair the
function of the system. Factory-
approved repair kits can be used.
Operating electronic devices or being close to facilities using similar wave
frequencies could disrupt the tyre
pressure monitoring system.
Each time the tyres are replaced, tyre
pressure monitoring system sensors
must be dismounted and serviced. For the screwed sensor, replace
valve core and sealing ring. For the
clipped sensor, replace complete
valve stem.Vehicle loading status
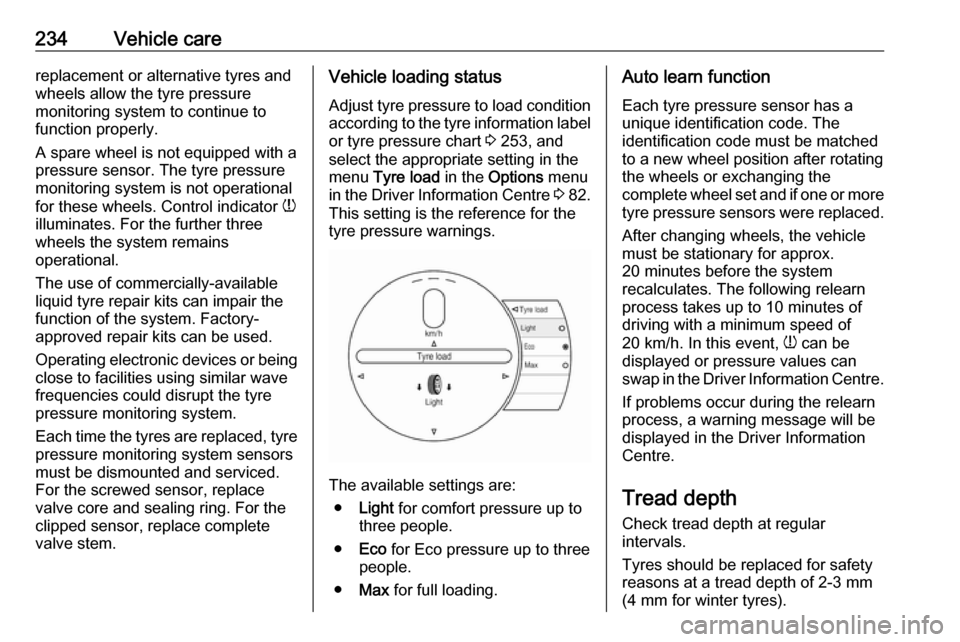
Adjust tyre pressure to load condition according to the tyre information labelor tyre pressure chart 3 253, and
select the appropriate setting in the menu Tyre load in the Options menu
in the Driver Information Centre 3 82.
This setting is the reference for the
tyre pressure warnings.
The available settings are:
● Light for comfort pressure up to
three people.
● Eco for Eco pressure up to three
people.
● Max for full loading.
Auto learn function
Each tyre pressure sensor has a
unique identification code. The
identification code must be matched
to a new wheel position after rotating
the wheels or exchanging the
complete wheel set and if one or more
tyre pressure sensors were replaced.
After changing wheels, the vehicle
must be stationary for approx.
20 minutes before the system
recalculates. The following relearn
process takes up to 10 minutes of
driving with a minimum speed of
20 km/h. In this event, w can be
displayed or pressure values can
swap in the Driver Information Centre.
If problems occur during the relearn
process, a warning message will be
displayed in the Driver Information
Centre.
Tread depthCheck tread depth at regular
intervals.
Tyres should be replaced for safety
reasons at a tread depth of 2-3 mm
(4 mm for winter tyres).
Page 237 of 271

Vehicle care235For safety reasons it is recommended
that the tread depth of the tyres on
one axle should not vary by more than
2 mm.
The legally permissible minimum
tread depth (1.6 mm) has been
reached when the tread has worn
down as far as one of the tread wear
indicators (TWI). Their position is
indicated by markings on the
sidewall.
If there is more wear at the front than
the rear, swap round front wheels and rear wheels periodically. Ensure that
the direction of rotation of the wheels
remains the same.
Tyres age, even if they are not used.
We recommend tyre replacement
every six years.
Changing tyre and wheel size
If tyres of a different size than those
fitted at the factory are used, it may be necessary to reprogramme the
nominal tyre pressure and make
other vehicle modifications.
After converting to a different tyre
size, have the label with tyre
pressures replaced and the tyre
pressure monitoring system
reinitialised 3 232.9 Warning
The use of unsuitable tyres or
wheels may lead to accidents and will invalidate the vehicle
operating permit.
Wheel covers
Wheel covers and tyres that are
factory approved for the respective
vehicle and comply with all of the
relevant wheel and tyre combination
requirements must be used.
If the wheel covers and tyres used are
not factory approved, the tyres must
not have a rim protection ridge.
Wheel covers must not impair brake
cooling.9 Warning
Use of unsuitable tyres or wheel
covers could lead to sudden
pressure loss and thereby
accidents.