light OPEL AMPERA E 2019 Manual user
[x] Cancel search | Manufacturer: OPEL, Model Year: 2019, Model line: AMPERA E, Model: OPEL AMPERA E 2019Pages: 271, PDF Size: 6.7 MB
Page 236 of 271

234Vehicle carereplacement or alternative tyres andwheels allow the tyre pressure
monitoring system to continue to
function properly.
A spare wheel is not equipped with a
pressure sensor. The tyre pressure
monitoring system is not operational
for these wheels. Control indicator w
illuminates. For the further three
wheels the system remains
operational.
The use of commercially-available
liquid tyre repair kits can impair the
function of the system. Factory-
approved repair kits can be used.
Operating electronic devices or being close to facilities using similar wave
frequencies could disrupt the tyre
pressure monitoring system.
Each time the tyres are replaced, tyre
pressure monitoring system sensors
must be dismounted and serviced. For the screwed sensor, replace
valve core and sealing ring. For the
clipped sensor, replace complete
valve stem.Vehicle loading status
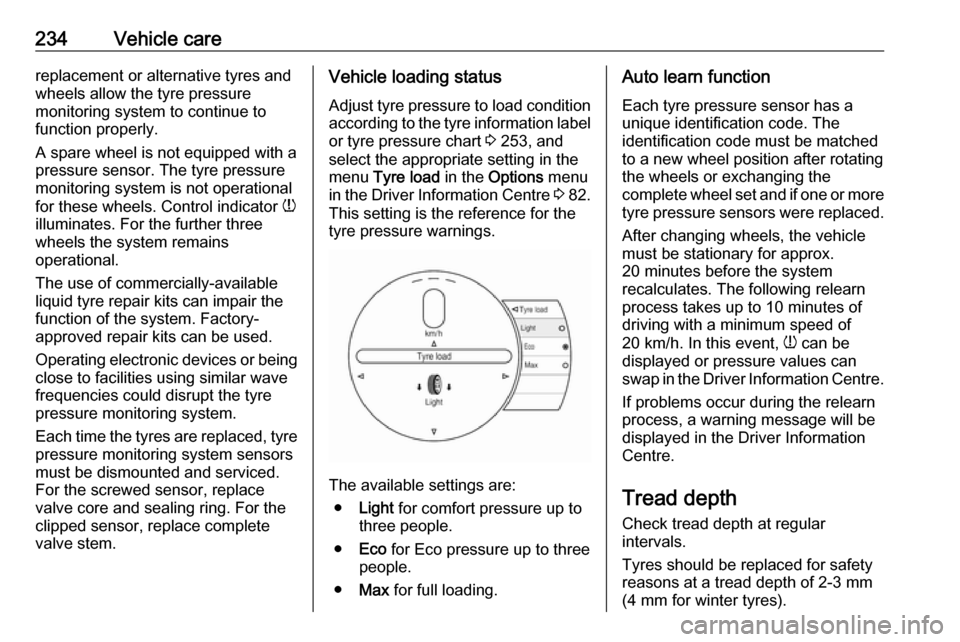
Adjust tyre pressure to load condition according to the tyre information labelor tyre pressure chart 3 253, and
select the appropriate setting in the menu Tyre load in the Options menu
in the Driver Information Centre 3 82.
This setting is the reference for the
tyre pressure warnings.
The available settings are:
● Light for comfort pressure up to
three people.
● Eco for Eco pressure up to three
people.
● Max for full loading.
Auto learn function
Each tyre pressure sensor has a
unique identification code. The
identification code must be matched
to a new wheel position after rotating
the wheels or exchanging the
complete wheel set and if one or more
tyre pressure sensors were replaced.
After changing wheels, the vehicle
must be stationary for approx.
20 minutes before the system
recalculates. The following relearn
process takes up to 10 minutes of
driving with a minimum speed of
20 km/h. In this event, w can be
displayed or pressure values can
swap in the Driver Information Centre.
If problems occur during the relearn
process, a warning message will be
displayed in the Driver Information
Centre.
Tread depthCheck tread depth at regular
intervals.
Tyres should be replaced for safety
reasons at a tread depth of 2-3 mm
(4 mm for winter tyres).
Page 239 of 271

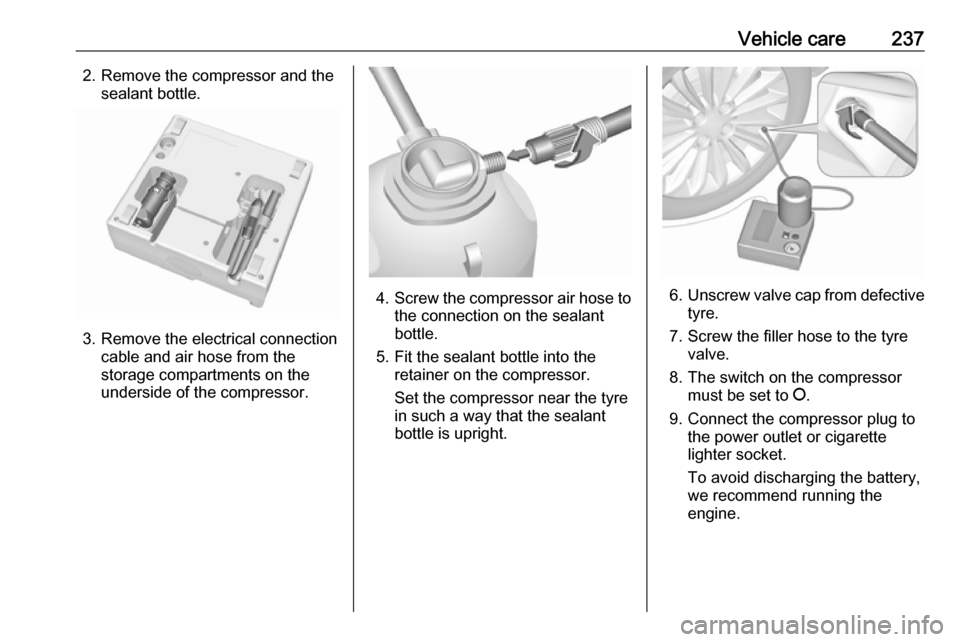
Vehicle care2372. Remove the compressor and thesealant bottle.
3. Remove the electrical connectioncable and air hose from the
storage compartments on the
underside of the compressor.
4. Screw the compressor air hose to
the connection on the sealant
bottle.
5. Fit the sealant bottle into the retainer on the compressor.
Set the compressor near the tyre
in such a way that the sealant
bottle is upright.6. Unscrew valve cap from defective
tyre.
7. Screw the filler hose to the tyre valve.
8. The switch on the compressor must be set to J.
9. Connect the compressor plug to the power outlet or cigarette
lighter socket.
To avoid discharging the battery, we recommend running the
engine.
Page 243 of 271

Vehicle care241Battery terminals in the engine
compartment
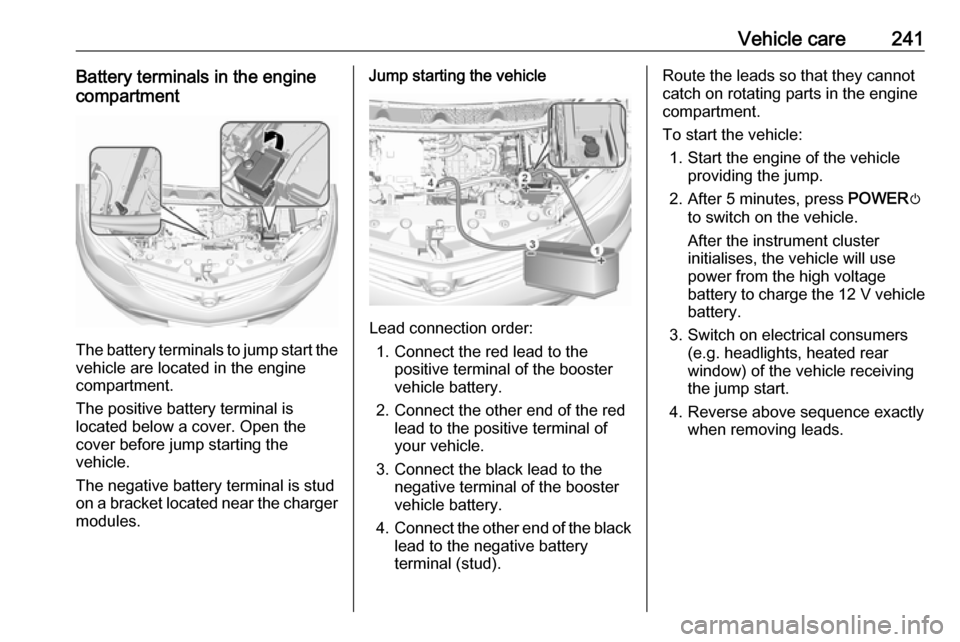
The battery terminals to jump start the
vehicle are located in the engine
compartment.
The positive battery terminal is
located below a cover. Open the
cover before jump starting the
vehicle.
The negative battery terminal is stud
on a bracket located near the charger
modules.
Jump starting the vehicle
Lead connection order:
1. Connect the red lead to the positive terminal of the booster
vehicle battery.
2. Connect the other end of the red lead to the positive terminal of
your vehicle.
3. Connect the black lead to the negative terminal of the booster
vehicle battery.
4. Connect the other end of the black
lead to the negative battery
terminal (stud).
Route the leads so that they cannot
catch on rotating parts in the engine
compartment.
To start the vehicle: 1. Start the engine of the vehicle providing the jump.
2. After 5 minutes, press POWERm
to switch on the vehicle.
After the instrument cluster
initialises, the vehicle will use
power from the high voltage
battery to charge the 12 V vehicle
battery.
3. Switch on electrical consumers (e.g. headlights, heated rear
window) of the vehicle receiving
the jump start.
4. Reverse above sequence exactly when removing leads.
Page 244 of 271

242Vehicle careTowingTowing the vehicleCaution
Incorrect towing of a disabled
vehicle may cause damage to the
vehicle. The disabled vehicle
should only be towed on a flatbed
car carrier.
Ensure the vehicle is only towed
by well trained technicians.
Wrap a cloth around the tip of a slot
screwdriver to prevent paint damage. Insert the screwdriver in the slot at the
short edge of the cap. Release the
cap by carefully moving the
screwdriver sidewards.
The towing eye is stowed with the vehicle tools 3 230.
Screw in the towing eye anticlockwise
as far as it will go until it stops in a
horizontal position.
Attach a tow rope – or better still a tow
rod – to the towing eye.
The towing eye must only be used for
towing and not for recovering the
vehicle.
Switch on the vehicle to release
steering wheel lock and to permit
operation of brake lights, horn and
windscreen wiper.Caution
Deactivate the driver assistance
systems like active emergency
braking 3 168, otherwise the
vehicle may automatically brake during towing.
Shift the selector lever of the electric
drive unit into N.
Release the electric parking brake.
Caution
Drive slowly. Do not drive jerkily.
Excessive tractive force can
damage the vehicle.
When the vehicle is not running, considerably more force is needed to
brake and steer.
Page 246 of 271

244Vehicle careDo not clean the engine compartmentwith a steam-jet or high-pressure jet
cleaner.
Thoroughly rinse and leather-off the
vehicle. Rinse leather frequently. Use
separate leathers for painted and
glass surfaces: remnants of wax on
the windows will impair vision.
Have the door hinges of all doors
greased by a workshop.
Do not use hard objects to remove
spots of tar. Use tar removal spray on painted surfaces.
Exterior lights
Headlight and other light covers are
made of plastic. Do not use any
abrasive or caustic agents, do not use an ice scraper, and do not clean them
dry.
Polishing and waxing
Wax the vehicle regularly (at the
latest when water no longer beads).
Otherwise, the paintwork will dry out.
Polishing is necessary only if the paint
has become dull or if solid deposits
have become attached to it.Paintwork polish with silicone forms a
protective film, making waxing
unnecessary.
Plastic body parts must not be treated with wax or polishing agents.
Windows and wiper blades Switch off wipers before handling in
their areas.
Use a soft lint-free cloth or chamois leather together with window cleanerand insect remover.
When cleaning the rear window from
inside, always wipe in parallel to the
heating element to prevent damage.
For mechanical removal of ice, use a
sharp-edged ice scraper. Press the
scraper firmly against the glass so
that no dirt can get under it and
scratch the glass.
Remove dirt residues from smearing
wiper blades by using a soft cloth and window cleaner. Also make sure to
remove any residues such as wax,
insect residues and similar from the
window.Ice residues, pollution and continuous
wiping on dry windows will damage or
even destroy the wiper blades.
Wheels and tyres Do not use high-pressure jet
cleaners.
Clean rims with a pH-neutral wheel
cleaner.
Rims are painted and can be treated
with the same agents as the body.
Paintwork damage
Rectify minor paintwork damage with
a touch-up pen before rust forms.
Have more extensive damage or rust areas repaired by a workshop.
Underbody
Some areas of the vehicle underbody
have a PVC undercoating while other critical areas have a durable
protective wax coating.
After the underbody is washed, check
the underbody and have it waxed if
necessary.
Page 247 of 271

Vehicle care245Bitumen / rubber materials could
damage the PVC coating. Have
underbody work carried out by a
workshop.
Before and after winter, wash the
underbody and have the protective
wax coating checked.
Interior care
Interior and upholstery
Only clean the vehicle interior,
including the instrument panel fascia
and panelling, with a dry cloth or
interior cleaner.
Clean the leather upholstery with
clear water and a soft cloth. In case of
heavy soiling, use leather care.
The instrument cluster and the
displays should only be cleaned using a soft damp cloth. If necessary use a
weak soap solution.
Do not spray cleaners directly on any
switches or controls.
Clean fabric upholstery with a
vacuum cleaner and brush. Remove
stains with an upholstery cleaner.Clothing fabrics may not be
colourfast. This could cause visible
discolourations, especially on light-
coloured upholstery. Removable
stains and discolourations should be
cleaned as soon as possible.
Clean seat belts with lukewarm water or interior cleaner.Caution
Close Velcro fasteners as open
Velcro fasteners on clothing could damage seat upholstery.
The same applies to clothing with
sharp-edged objects, like zips or
belts or studded jeans.
Plastic and rubber parts
Plastic and rubber parts can be
cleaned with the same cleaner as
used to clean the body. Use interior cleaner if necessary. Do not use any
other agent. Avoid solvents and petrol
in particular. Do not use high-
pressure jet cleaners.
Page 261 of 271

Customer information259Operating data in the vehicleControl units process data for
operation of the vehicle.
This data includes, e.g.: ● vehicle status information (e.g. speed, movement delay, lateral
acceleration, wheel rotation rate,
"seat belts fastened" display)
● ambient conditions (e.g. temperature, rain sensor,
distance sensor)
As a rule such data is transient, not
stored for longer than an operational
cycle, and only processed on board
the vehicle itself. Control units often
include data storage (including the
vehicle key). This is used to allow
information to be documented
temporarily or permanently on vehicle
condition, component stress,
maintenance requirements and
technical events and errors.Depending on technical equipment
level, the data stored is as follows:
● system component operating states (e.g. fill level, tyre
pressure, battery status)
● faults and defects in important system components (e.g. lights,brakes)
● system reactions in special driving situations (e.g. triggering
of an airbag, actuation of the
stability control systems)
● information on events damaging the vehicle
● for electric vehicles the amount of
charge in the high-voltage
battery, estimated range
In special cases (e.g. if the vehicle
has detected a malfunction), it may be
necessary to save data that would
otherwise just be volatile.
When you use services (e.g. repairs,
maintenance), the operating data
saved can be read together with the
vehicle identification number and
used when necessary. Staff working
for the service network ( e.g. garages,
manufacturers) or third parties (e.g.breakdown services) can read the
data from the vehicle. The same
applies to warranty work and quality
assurance measures.
Data is generally read via the OBD
(On-Board Diagnostics) port
prescribed by law in the vehicle. The operating data which is read out,
documents the technical condition of
the vehicle or individual components
and assists with fault diagnosis,
compliance with warranty obligations
and quality improvement. This data,
in particular information on
component stress, technical events,
operator errors and other faults, is
transmitted to the manufacturer
where appropriate, together with the
vehicle identification number. The
manufacturer is also subject to
product liability. The manufacturer
potentially also uses operating data
from vehicles for product recalls. This
data can also be used to check
customer warranty and guarantee
claims.
Fault memories in the vehicle can be
reset by a service company when
carrying out servicing or repairs or at
your request.
Page 262 of 271

260Customer informationComfort and infotainment
functions
Comfort settings and custom settings
can be stored in the vehicle and
changed or reset at any time.
Depending on the equipment level in
question, these include
● seat and steering wheel position settings
● chassis and air conditioning settings
● custom settings such as interior lighting
You can input your own data in the
infotainment functions for your
vehicle as part of the selected
features.
Depending on the equipment level in
question, these include
● multimedia data such as music, videos or photos for playback in
an integrated multimedia system
● address book data for use with an
integrated hands-free system or an integrated navigation system● input destinations
● data on the use of online services
This data for comfort and
infotainment functions can be stored
locally in the vehicle or be kept on a
device that you have connected to the
vehicle ( e.g. a smartphone, USB stick
or MP3 player). Data that you have
input yourself can be deleted at any
time.
This data can only be transmitted out
of the vehicle at your request,
particularly when using online
services in accordance with the
settings selected by you.
Smartphone integration, e.g.
Android Auto or Apple CarPlay
If your vehicle is equipped
accordingly, you can connect your
smartphone or another mobile device
to the vehicle so that you can control
it via the controls integrated in the
vehicle. The smartphone image and
sound can be output via the
multimedia system in this case. At the same time, specific information is
transmitted to your smartphone.
Depending on the type of integration,this includes data such as position
data, day / night mode and other
general vehicle information. For more
information, please see the operating
instructions for the vehicle /
infotainment system.
Integration allows selected
smartphone apps to be used, such as
navigation or music playback. No
further integration is possible
between smartphone and vehicle, in particular active access to vehicle
data. The nature of further data
processing is determined by the
provider of the app used. Whether
you can define settings, and if so
which ones, is dependent on the app
in question and your smartphone's
operating system.
Page 264 of 271

262IndexAAccessories and vehicle modifications .......................... 209
Activating Bluetooth music .........127
Activating phone .........................136
Activating radio ........................... 119
Activating USB audio ..................127
Activating USB movie .................130
Activating USB picture ................129
Active emergency braking ..........168
Adjustable air vents ...................145
Airbag and belt tensioners ...........78
Airbag deactivation ................49, 78
Airbag label................................... 45 Airbag system .............................. 45
Air conditioning regular operation ................................ 146
Air intake .................................... 146
Air vents...................................... 145
Antilock brake system ................ 157
Antilock brake system (ABS) .......79
Anti-theft alarm system ................30
Anti-theft locking system .............. 29
Appearance care ........................243
Armrest ................................... 40, 42
Armrest storage ........................... 58
Audio files ................................... 125
Automatic anti-dazzle ..................33
Automatic light control .................99
Automatic locking ........................25Auto volume................................ 115
AUX Connecting device ..................125
General information ................125
B Basic operation ........................... 112
Battery discharge protection ......104
Battery gauge ............................... 74
Battery voltage ............................. 90
Belts.............................................. 42
Bluetooth Bluetooth connection ..............133
Bluetooth music menu ............127
Connecting device ..................125
General information ................125
Pairing ..................................... 133
Phone ...................................... 136
Bluetooth connection ..................133
Bonnet ....................................... 212
Brake fluid .......................... 215, 247
Brakes ............................... 157, 215
Brake system ............................... 79
Breakdown.................................. 242
BringGo ...................................... 131
Bulb replacement ....................... 219
C Call Functions during a call ............136
Incoming call ........................... 136
Page 265 of 271

263Initiating a phone call..............136
Ring tone ................................. 136
Call history .................................. 136
Car wash mode .......................... 153
Central locking system ................20
Centre console storage ...............58
Changing tyre and wheel size ...235
Charge cord ................................ 205
Charge limit selection .................196
Charge mode selection ..............196
Charge rate selection .................196
Charging ..................................... 192
Charging override .......................196
Charging status .......................... 203
Charging system .......................... 78
Child locks ................................... 26
Child restraint installation locations ................................... 53
Child restraints.............................. 51
Child restraint systems ................51
Climate control ............................. 13
Clock............................................. 69
Control elements Infotainment system ................107
Steering wheel ........................ 107
Control elements overview .........107
Control indicators.......................... 77
Control of the vehicle .................148
Controls ........................................ 65
Convex shape .............................. 32Coolant ....................................... 213
Coolant and antifreeze ...............247
Cooling system ........................... 213
Cruise control ...................... 81, 163
Cupholders .................................. 57
Curtain airbag system .................. 49
D
DAB ............................................ 123
Danger, Warnings and Cautions ...2
Daytime running lights ...............101
Declaration of conformity ............254
Delayed locking ............................ 25
Digital audio broadcasting ..........123
Directional tyres .......................... 230
Displaying pictures .....................129
Display settings ..................129, 130
Door open .................................... 82
Doors ............................................ 29
Drive modes ............................... 153
Driver assistance systems ..........163
Driver Information Centre .............82
Driving economically................... 147
Driving efficiency gauge ...............74
Driving hints ........................ 147, 148
E Electric adjustment ......................32
Electrical requirements ...............208
Electrical system......................... 222
Electrical system overload .........222Electric drive unit ..................14, 153
Electric parking brake ...........79, 158
Electric parking brake fault ...........79
Electric rate schedule .................196
Electric vehicle operation modes 153
Electronic climate control system 141
Electronic key system ...................19
Electronic Stability Control.......... 162
Electronic Stability Control and Traction Control system ............80
Electronic Stability Control off....... 80
Emergencies............................... 148
Emergency call ........................... 135
End-of-life vehicle recovery .......211
Engine compartment fuse box ...224
Engine data ............................... 251
Entry lighting .............................. 104
Event data recorders ..................258
Exit lighting ................................ 104
Exterior care .............................. 243
Exterior light ................................. 81
Exterior lighting ......................10, 98
Exterior mirrors ............................. 32
F
File formats Audio files................................ 125
Movie files ............................... 125
Picture files.............................. 125
First aid kit ................................... 61