headlamp OPEL ANTARA 2009 User Guide
[x] Cancel search | Manufacturer: OPEL, Model Year: 2009, Model line: ANTARA, Model: OPEL ANTARA 2009Pages: 234, PDF Size: 3.01 MB
Page 95 of 234

Lighting95
Main beam, headlamp flash
To switch from dipped beam to main
beam, push lever forwards.
To switch back to dipped beam, pull lever
back towards steering wheel.
To activate the headlamp flash, pull lever
towards steering wheel. Main beam is
engaged for the duration of activation.
The blue control indicator P is illuminated
when main beam or headlamp flash is on.
Automatic dipped beam
activation 3
Light switch to AUTO; dipped beam comes
on automatically when the engine is
running, depending on outside light
conditions.
For reasons of safety, the light switch
should always remain in the AUTO
position.
To ensure automatic dipped beam
activation functions properly, do not cover
the light sensor on top of the instrument
panel.
Turn signal lamps
To activate, press lever up or down lightly.
When the steering wheel is turned back, the
lever automatically returns to its rest
position. This will not happen when making
a minor steering manoeuvre such as lane
changing.
Tap signal: briefly move lever to resistance
point. The turn signal then flashes three
times when changing lanes or the like.
Hold the lever if you want the turn signals
to flash for longer. When released, the lever
will spring back to rest position.
The volume of the turn signal lamps’
audible warning is dependent upon vehicle
speed.
Lever up = Right turn
Lever down = Left turn
Page 96 of 234

Lighting96
Front fog lamps
>
The front fog lamps can only be switched
on when both the ignition and headlamps
are on.
With automatic dipped beam activation 3,
parking lamps and dipped beam come on
simultaneously when the front fog lamps
are switched on.
Follow the regulations of the country in
which you are driving when using front fog
lamps.Fog tail lamp r
The fog tail lamp can only be switched on
when the ignition is on and the light switch
is in position 9, or the front fog lamps are
on and the light switch is in position 8.
With automatic dipped beam activation 3,
parking lamps and dipped beam come on
simultaneously when the fog tail lamp is
switched on.
Reversing lamps
Come on when reverse gear is engaged
and ignition is switched on.
Centre high-mounted stop lamp
Comes on when the brakes are applied,
acting as a third stop lamp, to supplement
the brake lamps.
On = Press button >, >
illuminates in instrument
panel.
Off = Press button > again, >
extinguishes in instrument
panel.
On = Press button r, r
illuminates in instrument
panel.
Off = Press button r again, r
extinguishes in instrument
panel.
Page 97 of 234

Lighting97
Hazard warning lamps
To switch on, press button ¨.
To switch off, press button ¨ again.
To aid location of the pushbutton, the red
surface is illuminated when the ignition is
switched on. When the button is pressed,
its control indicator flashes in unison with
the hazard warning lamps.
Headlamp range adjustment q
Manual headlamp range adjustment 3
With dipped beam switched on, adjust
headlamp range to suit vehicle load.
Correct adjustment of the headlamp range
reduces dazzle for other road users.
Automatic level control system 3 -
see page 143.
Vehicles without level control system Vehicles with level control system
Automatic headlamp range
adjustment
3
On vehicles with Xenon headlamps, the
range of the headlamps is adjusted
automatically based on vehicle load.
If control indicator q for automatic
headlamp range adjustment illuminates in
the instrument panel while driving, a fault
has occurred.
Have the cause of the fault remedied
immediately. Consult a workshop.
z Front seats occupied = 0
z All seats occupied = 1
z All seats occupied and load in
luggage compartment =2
z Driver’s seat occupied and load
in luggage compartment =3
z
Front seats occupied = 0
z All seats occupied = 1
z All seats occupied and load in
luggage compartment =1
z Driver’s seat occupied and load
in luggage compartment =2
Page 100 of 234

Lighting100
Luggage compartment lamps
Come on when a door or the tailgate is
opened. Front door lamps
Come on when a door is opened.
Once all doors are closed, the front door
lamps extinguish after approx. 10 seconds.
If the doors are left open, the lamps will
stay on for approx. 10 minutes.
Front door lamps can
also be turned off
immediately by pressing button
K in the
roof lining.
Ignition switch illumination
Comes on when you open a door.
Ignition switch illumination can also be
turned off immediately by pressing
button
K in the roof lining.
Sun visor lamps 3
Come on when vanity mirror covers are
opened. See page 34.
Ashtray illumination
The portable front ashtray, located in the
front drink holder, illuminates depending
on outside light conditions. See page 68.
Glove compartment illumination
Comes on when the glove compartment is
opened. See page 64.
Battery discharge protection
To prevent battery from becoming
discharged, the extern al lamps turn off
automatically approx. 10 minutes after the
ignition is switched off.
Battery discharge protecti on will not work if
the lamps are turned on 10 minutes after
the ignition has been switched off; the key
cannot be removed from the ignition switch
until the battery is recharged.
Headlamps when driving abroad
The asymmetrical dipped beam increases
the field of vision on the near side of the
lane.
When driving in coun tries which drive on
the opposite side of the road, this causes
glare for oncoming traffic.
For temporary periods, to avoid glare the
headlamp pattern should be adjusted
down to the horizontal position.
Have the headlamps adjusted by a
workshop.
Page 128 of 234

Driving and operation128
Switching off the engine
If the engine temperature is very high, e.g.
after driving in mountainous terrain: allow
engine to idle for approx. 2 minutes, in
order to prevent heat accumulation.
When you switch off, fans in the engine
compartment may continue running for a
time, to cool the engine.
Vehicles with turbocharger 3
In order to protect the turbocharger, after
running at high engine speeds or high
engine loads, operate the engine briefly at
a low load or run in neutral for approx.
30 seconds before switching off.
Save energy – more kilometres/miles
Please observe the running-in hints on the
previous page and the tips for energy
saving on the following pages.
Good, technically correct and economical
driving ensures maximum durability and
performance for your vehicle.
Overrun
The fuel supply is automatically shut off
during overrun, e.g. when the vehicle is
being driven down long gradients or during
braking. To enable the overrun cut-off to
come into action, do not accelerate or
declutch during overrun. Engine rpm
Under all driving conditions, drive in a
favourable engine speed range.
Warming up
Allow engine to warm up while driving. Do
not warm it up by le
tting it run at idling
speed. Do not apply full throttle until
engine reaches operating temperature.
After a cold start, automatic
transmission 3 does not shift into higher
gears until higher engine speeds have been
reached. This allows the catalytic converter
to quickly reach the temperature required
for optimum pollutant reduction.
Correct gear selection
Do not race your engine whilst in neutral or
with a low gear selected. Driving too fast in
individual gears or drive ranges as well as
stop-and-go traffic in crease engine wear
and fuel consumption.
Change down
When decreasing speed, shift down into
the next lowest gear. Do not slip the clutch
with a high-revving engine. This is
especially important when hill climbing. Clutch operation
3
Always depress the clutch pedal hard to
the floor, to prevent shifting difficulties and
transmission damage. There must be no
mats in the area of the pedals.
When driving, do not use the clutch pedal
as a foot rest; this will cause substantial
clutch wear.
Pedals
Do not place any objects in the footwell
which could slip under the pedals and
inhibit the pedal travel.
To ensure the pedal travel is uninhibited,
there must be no mats in the area of the
pedals.
When driving, do not use the brake pedal
as a foot rest; this will cause substantial
wear to brake components and cause
overheating, resultin g in longer braking
distances.
Battery care whilst driving
When driving slowly or when the vehicle
is stationary, e.g. in slow urban traffic,
stop-and-go traffic or traffic jams, turn off
all unnecessary electrical loads where
possible (e.g. heated rear window,
auxiliary headlamps).
When starting the engine, depress the
clutch pedal so that transmission
resistance is elimin ated and the starter
motor and battery are relieved.
Page 143 of 234

Driving and operation143
Control indicator for park pilotControl indicator r illuminates while
driving if there is a fault in the system.
If the acoustic signal sounds 3 times
continuously when there are no obstacles
near the front or rear bumper, there is a
fault in the system.
Have the cause of the fault remedied by a
workshop. To ensure the safety of other road users
and people in the vicinity and to avoid
damage to the vehicle, remember:
z
The park pilot should only be considered
as a supplementary function. Normal
precautions should be maintained when
reversing. Check the rear view and use
the mirrors when reversing.
z Do not push, scratch or otherwise
damage the sensors.
z Do not use high-pressure jet cleaners to
clean the sensors. Clean only with a soft
sponge and clean water.
Automatic level control 3
Automatic level control makes it possible to
keep the height of the vehicle constant
when subjected to different loads in the
rear (e.g. when passengers are occupying
the rear seats or when towing a caravan/
trailer). This significantly improves driving
conditions.
The vehicle is automatically raised at the
rear to its previous unloaded level,
increasing spring travel and ground
clearance.
Headlamp range adjustment -
see page 97.
In the event of malfunctions, do not utilise
the vehicle’s full load capacity. Have the
cause of the fault remedied by a workshop
without delay.
Page 183 of 234

Self-help, vehicle care 183
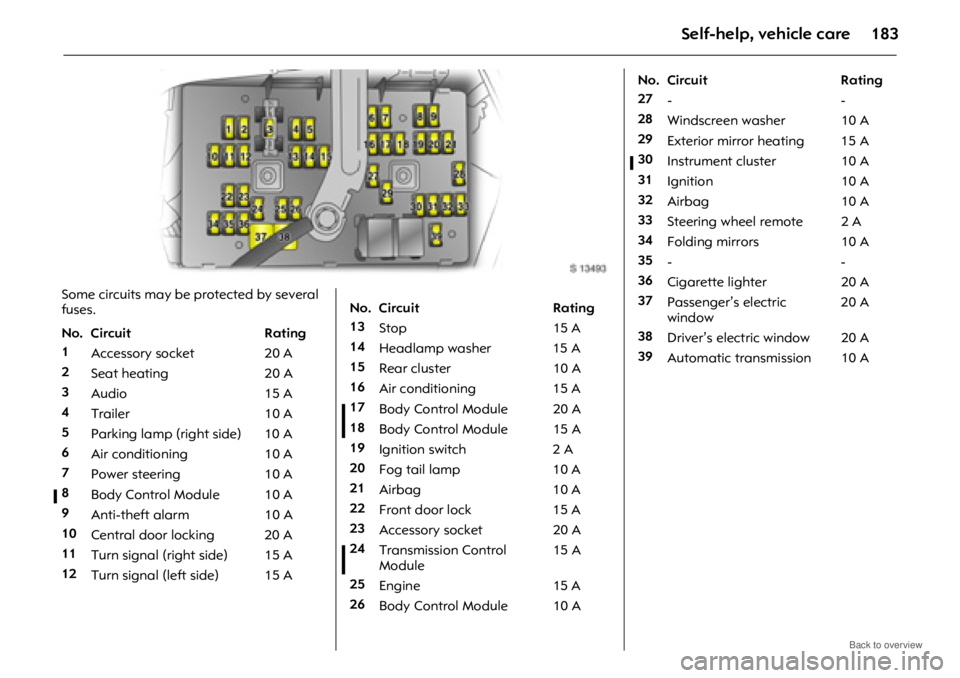
Some circuits may be protected by several
fuses.
No. Circuit Rating
1Accessory socket 20 A
2 Seat heating 20 A
3 Audio 15 A
4 Trailer 10 A
5 Parking lamp (right side) 10 A
6 Air conditioning 10 A
7 Power steering 10 A
8 Body Control Module 10 A
9 Anti-theft alarm 10 A
10 Central door locking 20 A
11 Turn signal (right side) 15 A
12 Turn signal (left side) 15 ANo. Circuit Rating
13 Stop 15 A
14 Headlamp washer 15 A
15 Rear cluster 10 A
16 Air conditioning 15 A
17 Body Control Module 20 A
18 Body Control Module 15 A
19 Ignition switch 2 A
20 Fog tail lamp 10 A
21 Airbag 10 A
22 Front door lock 15 A
23 Accessory socket 20 A
24 Transmission Control
Module 15 A
25 Engine 15 A
26 Body Control Module 10 A
No. Circuit Rating
27 --
28 Windscreen washer 10 A
29 Exterior mirror heating 15 A
30 Instrument cluster 10 A
31 Ignition 10 A
32 Airbag 10 A
33 Steering wheel remote 2 A
34 Folding mirrors 10 A
35 --
36 Cigarette lighter 20 A
37 Passenger’s electric
window 20 A
38 Driver’s electric window 20 A
39 Automatic transmission 10 A
Page 185 of 234

Self-help, vehicle care185
Bulb replacement
Before replacing a bulb , switch off ignition
and relevant switch.
Only hold new bulbs at base! Do not touch
the bulb glass with bare hands, otherwise
fingerprints on the glass evaporate and
residue builds up on the reflector
eventually resulting in a dull reflector.
Inadvertently stained bulbs may be
cleaned with a clean lint-free cloth, using
alcohol or white spirit.
Replacement bulb must be in accordance
with data on base of defective bulb. Do not
exceed wattage given on bulb base.
Headlamp aiming
We recommend that headlamp aiming be
carried out by a work shop, which will have
special equipment.
When aiming your headlamps, the manual
headlamp range adjustment 3 must be set
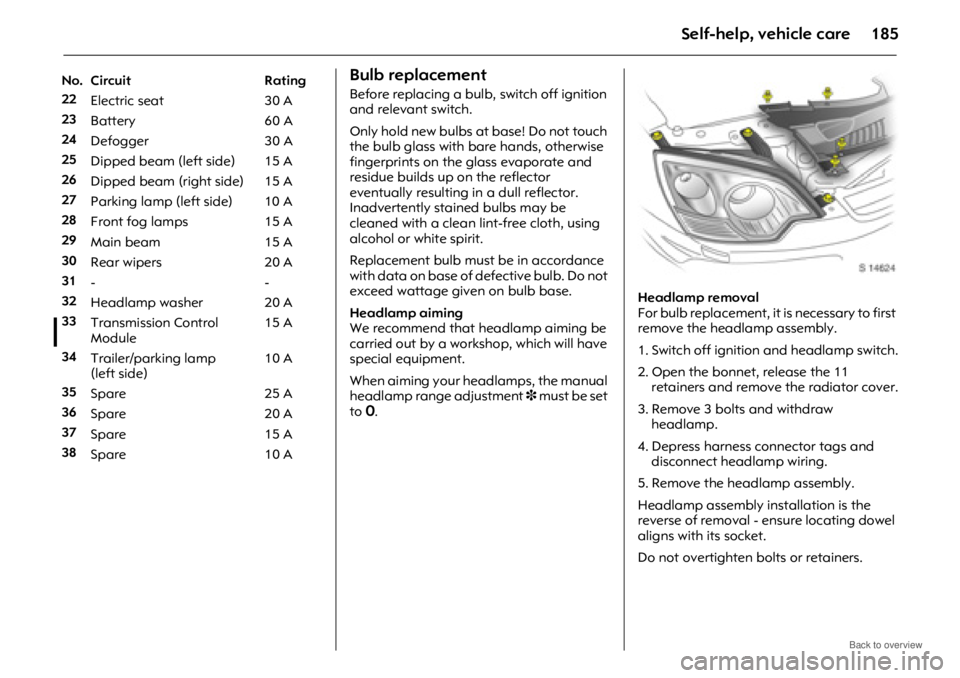
to 7. Headlamp removal
For bulb replacement, it is necessary to first
remove the headlamp assembly.
1. Switch off ignition and headlamp switch.
2. Open the bonnet, release the 11
retainers and remove the radiator cover.
3. Remove 3 bolts and withdraw headlamp.
4. Depress harness connector tags and disconnect head lamp wiring.
5. Remove the headlamp assembly.
Headlamp assembly installation is the
reverse of removal - ensure locating dowel
aligns with its socket.
Do not overtighten bolts or retainers.
No. Circuit Rating
22
Electric seat 30 A
23 Battery 60 A
24 Defogger 30 A
25 Dipped beam (left side) 15 A
26 Dipped beam (right side) 15 A
27 Parking lamp (left side) 10 A
28 Front fog lamps 15 A
29 Main beam 15 A
30 Rear wipers 20 A
31 --
32 Headlamp washer 20 A
33 Transmission Control
Module 15 A
34 Trailer/parking lamp
(left side) 10 A
35 Spare 25 A
36 Spare 20 A
37 Spare 15 A
38 Spare 10 A
Page 186 of 234

Self-help, vehicle care186
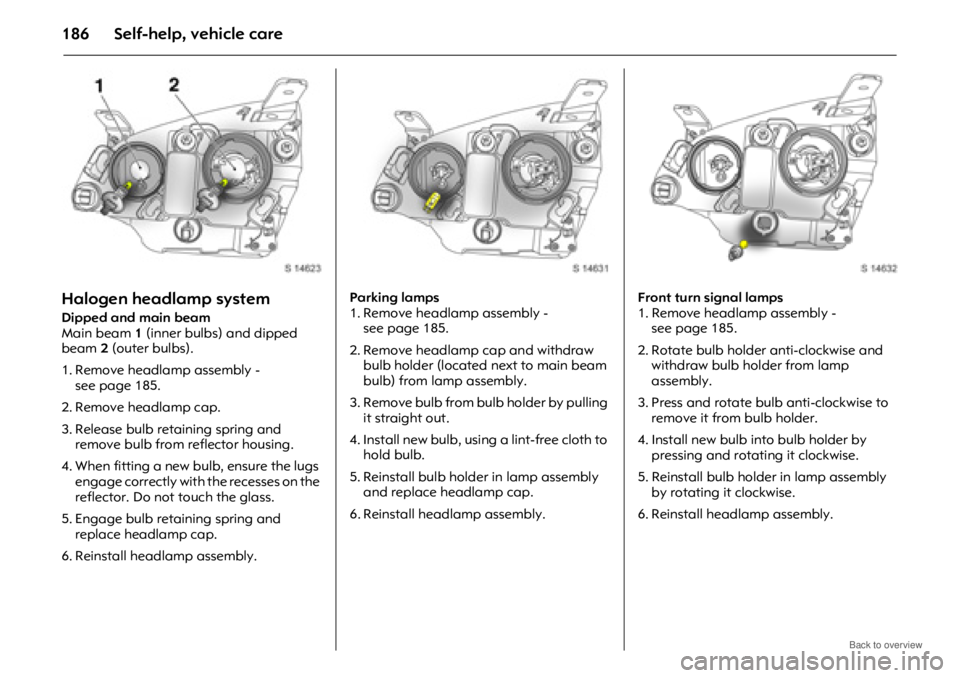
Halogen headlamp system
Dipped and main beam
Main beam 1 (inner bulbs) and dipped
beam 2 (outer bulbs).
1. Remove headlamp assembly - seepage185.
2. Remove headlamp cap.
3. Release bulb retaining spring and remove bulb from reflector housing.
4. When fitting a new bulb, ensure the lugs engage correctly with the recesses on the
reflector. Do not touch the glass.
5. Engage bulb retaining spring and replace headlamp cap.
6. Reinstall headlamp assembly. Parking lamps
1. Remove headlamp assembly -
seepage185.
2. Remove headlamp cap and withdraw bulb holder (located next to main beam
bulb) from lamp assembly.
3. Remove bulb from bulb holder by pulling it straight out.
4. Install new bulb, using a lint-free cloth to hold bulb.
5. Reinstall bulb holder in lamp assembly and replace headlamp cap.
6. Reinstall headlamp assembly. Front turn signal lamps
1. Remove headlamp assembly -
see page 185.
2. Rotate bulb holder anti-clockwise and withdraw bulb holder from lamp
assembly.
3. Press and rotate bulb anti-clockwise to remove it from bulb holder.
4. Install new bulb into bulb holder by pressing and rotating it clockwise.
5. Reinstall bulb holder in lamp assembly
by rotating it clockwise.
6. Reinstall headlamp assembly.
Page 187 of 234

Self-help, vehicle care187
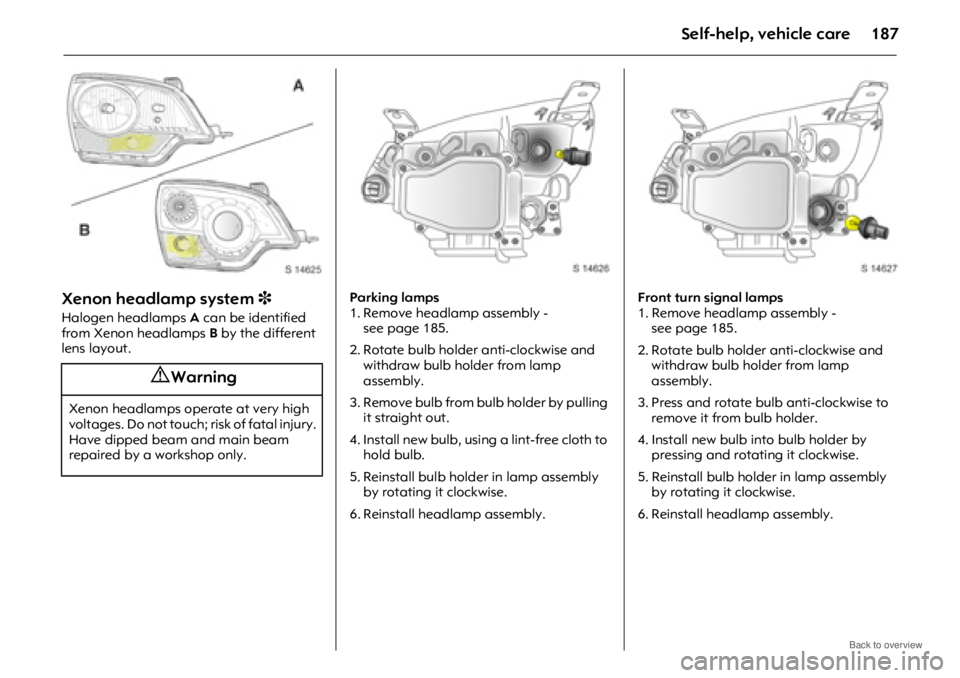
Xenon headlamp system 3
Halogen headlamps A can be identified
from Xenon headlamps B by the different
lens layout. Parking lamps
1. Remove headlamp assembly -
seepage185.
2. Rotate bulb holder anti-clockwise and withdraw bulb holder from lamp
assembly.
3. Remove bulb from bulb holder by pulling it straight out.
4. Install new bulb, using a lint-free cloth to hold bulb.
5. Reinstall bulb holder in lamp assembly by rotating it clockwise.
6. Reinstall headlamp assembly. Front turn signal lamps
1. Remove headlamp assembly -
see page 185.
2. Rotate bulb holder anti-clockwise and withdraw bulb holder from lamp
assembly.
3. Press and rotate bulb anti-clockwise to remove it from bulb holder.
4. Install new bulb into bulb holder by pressing and rotating it clockwise.
5. Reinstall bulb holder in lamp assembly
by rotating it clockwise.
6. Reinstall headlamp assembly.
9 Warning
Xenon headlamps operate at very high
voltages. Do not touch; risk of fatal injury.
Have dipped beam and main beam
repaired by a workshop only.