stop start OPEL ASTRA J 2015 Manual user
[x] Cancel search | Manufacturer: OPEL, Model Year: 2015, Model line: ASTRA J, Model: OPEL ASTRA J 2015Pages: 343, PDF Size: 10.27 MB
Page 269 of 343

Vehicle care267
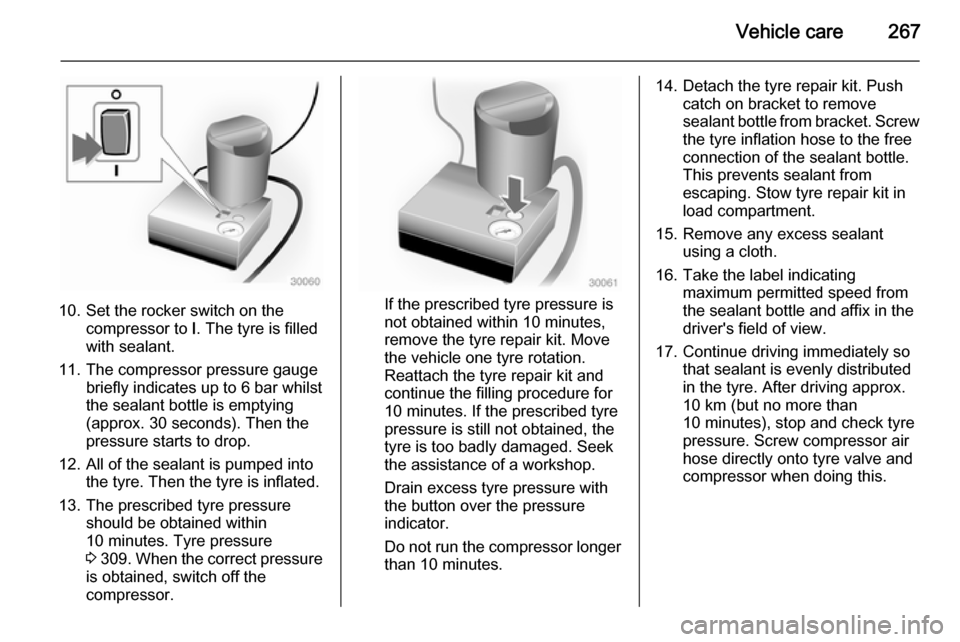
10. Set the rocker switch on thecompressor to I. The tyre is filled
with sealant.
11. The compressor pressure gauge briefly indicates up to 6 bar whilstthe sealant bottle is emptying
(approx. 30 seconds). Then the
pressure starts to drop.
12. All of the sealant is pumped into the tyre. Then the tyre is inflated.
13. The prescribed tyre pressure should be obtained within
10 minutes. Tyre pressure
3 309 . When the correct pressure
is obtained, switch off the
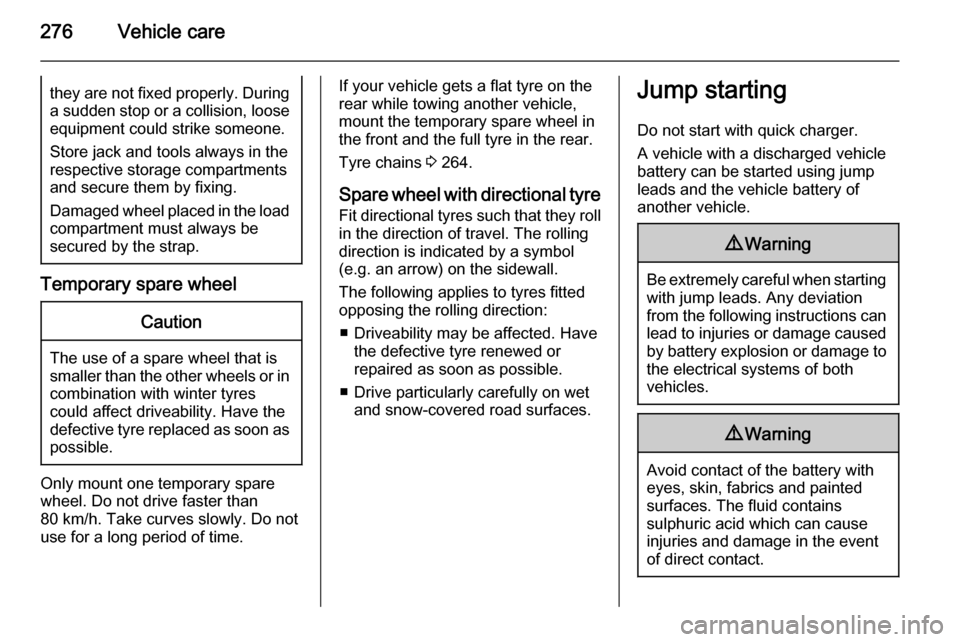
compressor.If the prescribed tyre pressure is
not obtained within 10 minutes,
remove the tyre repair kit. Move
the vehicle one tyre rotation.
Reattach the tyre repair kit and
continue the filling procedure for 10 minutes. If the prescribed tyre
pressure is still not obtained, the
tyre is too badly damaged. Seek
the assistance of a workshop.
Drain excess tyre pressure with
the button over the pressure indicator.
Do not run the compressor longer than 10 minutes.
14. Detach the tyre repair kit. Push catch on bracket to remove
sealant bottle from bracket. Screw
the tyre inflation hose to the free
connection of the sealant bottle.
This prevents sealant from
escaping. Stow tyre repair kit in
load compartment.
15. Remove any excess sealant using a cloth.
16. Take the label indicating maximum permitted speed from
the sealant bottle and affix in the
driver's field of view.
17. Continue driving immediately so that sealant is evenly distributedin the tyre. After driving approx.
10 km (but no more than
10 minutes), stop and check tyre
pressure. Screw compressor air
hose directly onto tyre valve and
compressor when doing this.
Page 278 of 343

276Vehicle carethey are not fixed properly. During
a sudden stop or a collision, loose equipment could strike someone.
Store jack and tools always in the
respective storage compartments
and secure them by fixing.
Damaged wheel placed in the load compartment must always be
secured by the strap.
Temporary spare wheel
Caution
The use of a spare wheel that is smaller than the other wheels or in combination with winter tyres
could affect driveability. Have the defective tyre replaced as soon as
possible.
Only mount one temporary spare
wheel. Do not drive faster than
80 km/h. Take curves slowly. Do not use for a long period of time.
If your vehicle gets a flat tyre on the
rear while towing another vehicle,
mount the temporary spare wheel in the front and the full tyre in the rear.
Tyre chains 3 264.
Spare wheel with directional tyre Fit directional tyres such that they rollin the direction of travel. The rolling
direction is indicated by a symbol
(e.g. an arrow) on the sidewall.
The following applies to tyres fitted
opposing the rolling direction:
■ Driveability may be affected. Have the defective tyre renewed or
repaired as soon as possible.
■ Drive particularly carefully on wet and snow-covered road surfaces.Jump starting
Do not start with quick charger.
A vehicle with a discharged vehicle
battery can be started using jump
leads and the vehicle battery of
another vehicle.9 Warning
Be extremely careful when starting
with jump leads. Any deviation
from the following instructions can
lead to injuries or damage caused
by battery explosion or damage to the electrical systems of both
vehicles.
9 Warning
Avoid contact of the battery with
eyes, skin, fabrics and painted
surfaces. The fluid contains
sulphuric acid which can cause
injuries and damage in the event
of direct contact.
Page 280 of 343

278Vehicle care
2. After 5 minutes, start the otherengine. Start attempts should be
made for no longer than
15 seconds at an interval of
1 minute.
3. Allow both engines to idle for approx. 3 minutes with the leads
connected.
4. Switch on electrical consumers (e.g. headlights, heated rear
window) of the vehicle receiving
the jump start.
5. Reverse above sequence exactly when removing leads.Towing
Towing the vehicle
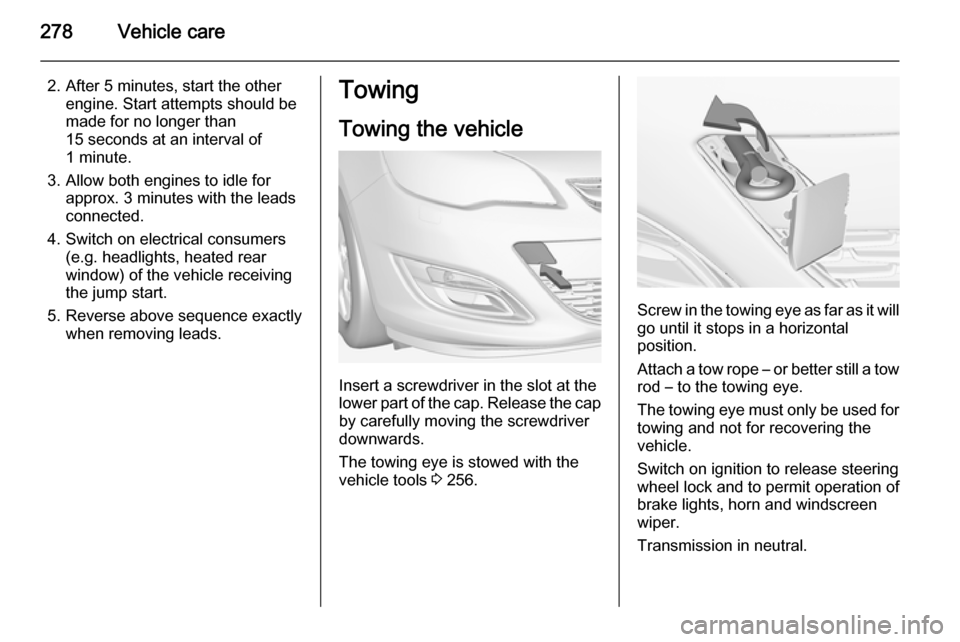
Insert a screwdriver in the slot at the
lower part of the cap. Release the cap
by carefully moving the screwdriver
downwards.
The towing eye is stowed with the
vehicle tools 3 256.
Screw in the towing eye as far as it will
go until it stops in a horizontal
position.
Attach a tow rope – or better still a tow
rod – to the towing eye.
The towing eye must only be used for
towing and not for recovering the
vehicle.
Switch on ignition to release steering wheel lock and to permit operation of
brake lights, horn and windscreen
wiper.
Transmission in neutral.
Page 341 of 343

339
PParking ................................ 19, 165
Parking assist ............................ 195
Parking brake ............................ 172
Parking lights ............................. 145
Particulate filter ........................... 166
Performance .............................. 295
Performing work ........................223
Pollen filter ................................. 159
Power outlets ............................. 106
Power seat adjustment ................44
Power steering............................ 116
Power steering fluid ....................226
Power windows ............................ 33
Preheating ................................. 117
Puncture ..................................... 268
Q
Quickheat ................................... 158
R Radio Frequency Identification (RFID) ..................................... 335
Radio remote control ...................22
Reading lights ............................ 147
Rear carrier system ......................64
Rear floor storage cover ..............88
Rear fog light ............................. 119
Rear fog lights ........................... 145
Rear seats .................................... 47Rear storage................................. 86
Rear view camera ...................... 204
Rear window wiper/washer ........ 104
Recommended fluids and lubricants ........................ 285, 289
Reduced engine power ..............118
Refuelling ................................... 213
Retained power off .....................161
Reversing lights .........................145
Ride control systems ..................174
Roof .............................................. 36
Roof load ...................................... 98
Roof rack ..................................... 97
S Safety belts ................................... 47
Safety net .................................... 93
Seat adjustment ....................... 7, 40 Seat belt ........................................ 9
Seat belt reminder .....................113
Seat belts ..................................... 47
Seat folding .................................. 43
Seat position ................................ 40
Selector lever ............................. 168
Service ............................... 159, 284
Service display .......................... 110
Service information ....................284
Service vehicle soon .................. 114
Side airbag system ......................51
Side blind spot alert ....................203Sidelights.................................... 137
Side turn signal lights ................247
Smartphone controller ................125
Spare wheel ............................... 272
Speed limiter............................... 181
Speedometer ............................. 108
Starting and operating ................161
Starting off ................................... 18
Starting the engine ....................161
Steering ...................................... 160
Steering wheel adjustment ..10, 100
Steering wheel controls .............100
Stop-start system........................ 163
Storage ......................................... 60
Storage compartments .................60
Sunroof ........................................ 36
Sunvisor lights ........................... 147
Sun visors .................................... 35
Symbols ......................................... 4
T Tachometer ............................... 108
Tail lights ................................... 240
Three-point seat belt .................... 48
Tools .......................................... 256
Top-tether fastening eyes ............59
Tow bar....................................... 217
Towing ................................ 217, 278
Towing another vehicle .............279
Towing equipment .....................218