door lock OPEL ASTRA J 2018.5 User Guide
[x] Cancel search | Manufacturer: OPEL, Model Year: 2018.5, Model line: ASTRA J, Model: OPEL ASTRA J 2018.5Pages: 295, PDF Size: 8.4 MB
Page 32 of 295

30Keys, doors and windowsActivation without monitoring of
passenger compartment and
vehicle inclination
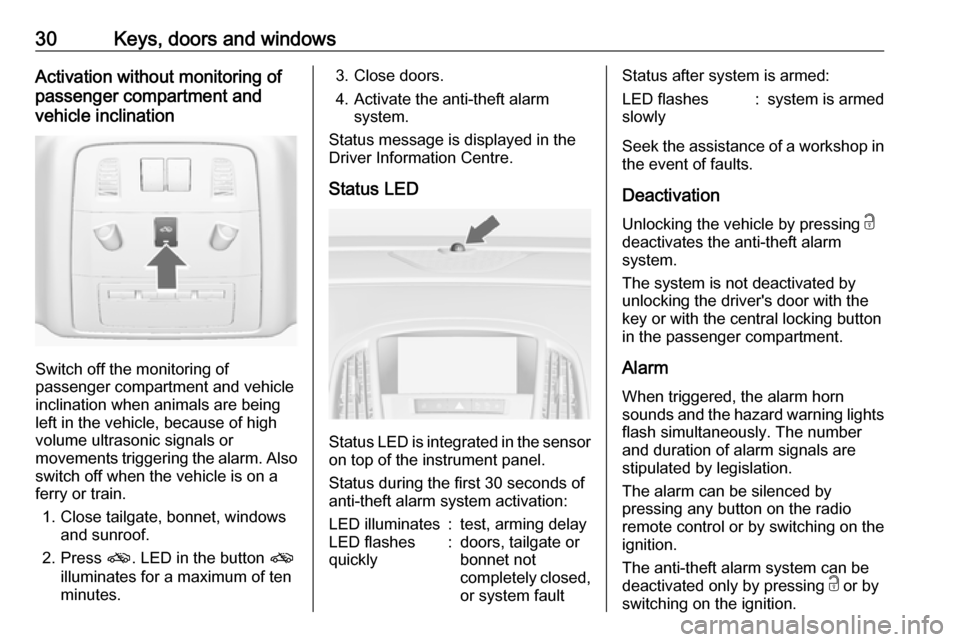
Switch off the monitoring of
passenger compartment and vehicle
inclination when animals are being
left in the vehicle, because of high
volume ultrasonic signals or
movements triggering the alarm. Also switch off when the vehicle is on a
ferry or train.
1. Close tailgate, bonnet, windows and sunroof.
2. Press o. LED in the button o
illuminates for a maximum of ten minutes.
3. Close doors.
4. Activate the anti-theft alarm system.
Status message is displayed in the
Driver Information Centre.
Status LED
Status LED is integrated in the sensor
on top of the instrument panel.
Status during the first 30 seconds of
anti-theft alarm system activation:
LED illuminates:test, arming delayLED flashes
quickly:doors, tailgate or
bonnet not
completely closed,
or system faultStatus after system is armed:LED flashes
slowly:system is armed
Seek the assistance of a workshop in
the event of faults.
Deactivation
Unlocking the vehicle by pressing c
deactivates the anti-theft alarm
system.
The system is not deactivated by
unlocking the driver's door with the
key or with the central locking button
in the passenger compartment.
Alarm
When triggered, the alarm horn
sounds and the hazard warning lights flash simultaneously. The numberand duration of alarm signals are
stipulated by legislation.
The alarm can be silenced by
pressing any button on the radio
remote control or by switching on the
ignition.
The anti-theft alarm system can be
deactivated only by pressing c or by
switching on the ignition.
Page 33 of 295

Keys, doors and windows31A triggered alarm, which has not been
interrupted by the driver, will be
indicated by the hazard warning
lights. They will flash quickly three
times the next time the vehicle is
unlocked with the radio remote
control. Additionally, a warning
message or a warning code is
displayed in the Driver Information Centre after switching on the ignition.
Vehicle messages 3 100.
If the vehicle's battery is to be
disconnected (e.g. for maintenance
work), the alarm siren must be
deactivated as follows: Switch the
ignition on then off, then disconnect
the vehicle's battery within
15 seconds.
Immobiliser The system is part of the ignition
switch and checks whether the
vehicle is allowed to be started with the key being used.
The immobiliser is activated
automatically after the key has been removed from the ignition switch.If the control indicator d flashes when
the ignition is on, there is a fault in the
system; the engine cannot be started. Switch off the ignition and repeat the
start attempt.
If the control indicator continues
flashing, attempt to start the engine
using the spare key and seek the
assistance of a workshop.
Note
The immobiliser does not lock the
doors. You should always lock the
vehicle after leaving it and switch on the anti-theft alarm system 3 24,
3 29.
Control indicator d 3 93.Exterior mirrors
Convex shape The shape of the mirror makes
objects appear smaller, which will
affect the ability to estimate
distances.
Side blind spot alert 3 183.
Electric adjustment
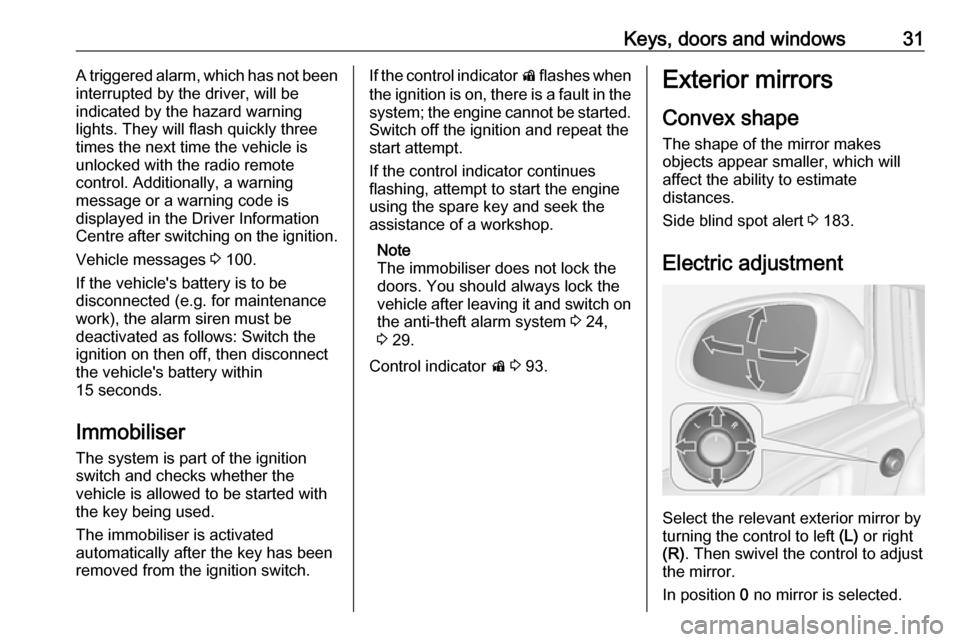
Select the relevant exterior mirror by
turning the control to left (L) or right
(R) . Then swivel the control to adjust
the mirror.
In position 0 no mirror is selected.
Page 67 of 295

Storage65Load compartment
The rear seat backrest is divided into
two parts. Both parts can be folded
down.
Load compartment extension ● Only 3-door hatchback: remove the load compartment cover ifnecessary.
● Press and hold the catch to push
the head restraints down 3 39.
● Fold up the rear armrest.● Guide the seat belts through side
supports to protect them against
damage. When folding the
backrests, pull the seat belts along with them.
● Pull the release lever on one or both sides and fold down the
backrests onto the seat cushion.
● Take the seat belt out of the seat
backrest guide and put it behind
the retainer as shown in the
illustration.
To fold up, raise the backrests and
guide them into an upright position until they engage audibly.
Ensure that the seat belts of the
outboard seats are placed in the corresponding belt guides.
The backrests are properly engaged
when the red marks on both sides near the release lever are no longer
visible.
9 Warning
When folding up, ensure that
backrests are securely locked in
position before driving. Failure to
do so may result in personal injury
Page 75 of 295

Instruments and controls73Instruments and
controlsControls ....................................... 74
Steering wheel adjustment ........74
Steering wheel controls .............74
Heated steering wheel ...............74
Horn ........................................... 75
Windscreen wiper and washer ..75
Rear window wiper and washer ...................................... 77
Outside temperature ..................77
Clock ......................................... 78
Power outlets ............................. 79
Cigarette lighter ......................... 80
Ashtrays .................................... 80
Warning lights, gauges and indi‐ cators ........................................... 81
Instrument cluster ......................81
Speedometer ............................. 81
Odometer .................................. 81
Trip odometer ............................ 81
Tachometer ............................... 81
Fuel gauge ................................ 82
Fuel selector .............................. 82
Engine coolant temperature gauge ....................................... 84Service display.......................... 84
Control indicators ......................85
Turn lights .................................. 88
Seat belt reminder .....................88
Airbag and belt tensioners .........88
Airbag deactivation ....................88
Charging system .......................89
Malfunction indicator light ..........89
Service vehicle soon .................89
Brake and clutch system ...........89
Operate pedal ............................ 89
Electric parking brake ................89
Electric parking brake fault ........90
Antilock brake system (ABS) .....90
Upshift ....................................... 90
Power steering .......................... 90
Lane departure warning ............90
Ultrasonic parking assist ...........91
Electronic Stability Control off ...91
Electronic Stability Control and Traction Control system ...........91
Traction Control system off .......91
Preheating ................................. 91
Exhaust filter .............................. 91
Tyre pressure monitoring system ...................................... 92
Engine oil pressure ....................92
Low fuel ..................................... 92
Immobiliser ................................ 93
Reduced engine power .............93Exterior light .............................. 93
High beam ................................. 93
High beam assist .......................93
Adaptive forward lighting ...........93
Fog light ..................................... 93
Rear fog light ............................. 93
Low washer fluid ........................93
Cruise control ............................ 93
Adaptive cruise control ..............93
Vehicle detected ahead .............94
Door open .................................. 94
Displays ....................................... 94
Driver Information Centre ..........94
Info Display ................................ 98
Smartphone controller .............100
Vehicle messages ......................100
Warning chimes .......................103
Battery voltage ........................ 103
Trip computer ............................. 104
Vehicle personalisation ..............106
Telematics service .....................111
OnStar ..................................... 111
ERA GLONASS .......................114
Page 89 of 295

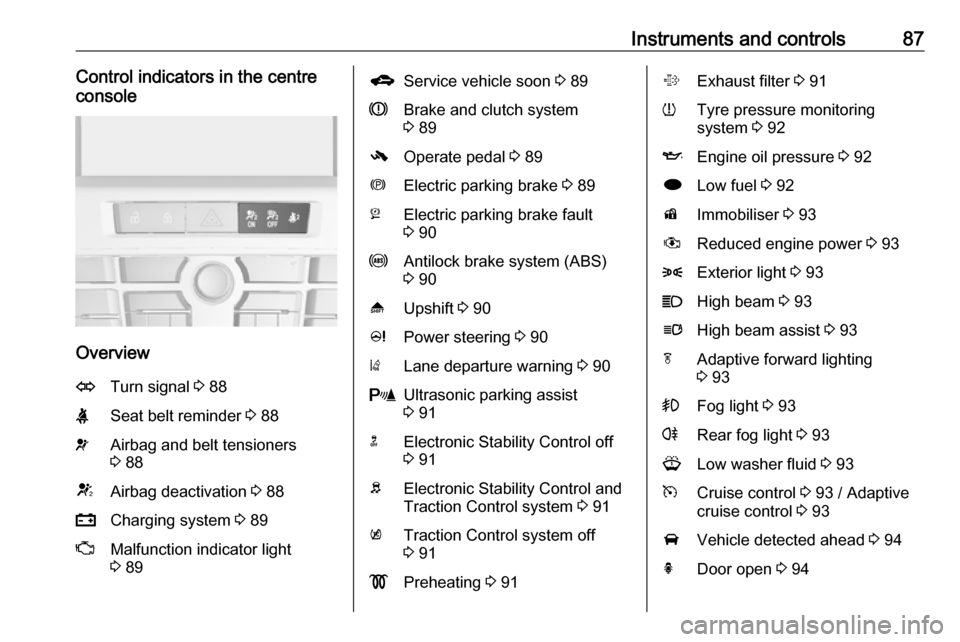
Instruments and controls87Control indicators in the centre
console
Overview
OTurn signal 3 88XSeat belt reminder 3 88vAirbag and belt tensioners
3 88VAirbag deactivation 3 88pCharging system 3 89ZMalfunction indicator light
3 89gService vehicle soon 3 89RBrake and clutch system
3 89-Operate pedal 3 89mElectric parking brake 3 89jElectric parking brake fault
3 90uAntilock brake system (ABS)
3 90[Upshift 3 90cPower steering 3 90)Lane departure warning 3 90rUltrasonic parking assist
3 91nElectronic Stability Control off
3 91bElectronic Stability Control and
Traction Control system 3 91kTraction Control system off
3 91!Preheating 3 91%Exhaust filter 3 91wTyre pressure monitoring
system 3 92IEngine oil pressure 3 92iLow fuel 3 92dImmobiliser 3 93#Reduced engine power 3 938Exterior light 3 93CHigh beam 3 93lHigh beam assist 3 93fAdaptive forward lighting
3 93>Fog light 3 93rRear fog light 3 93GLow washer fluid 3 93mCruise control 3 93 / Adaptive
cruise control 3 93AVehicle detected ahead 3 94hDoor open 3 94
Page 110 of 295

108Instruments and controls●Comfort settings
Chime volume : Changes the
volume of warning chimes.
Personalization by driver :
Activates or deactivates the
personalisation function.
Rear auto wipe in reverse :
Activates or deactivates
automatic switching on of the
rear window wiper when reverse gear is engaged.
● Park assist / Collision detection
Park assist : Activates or
deactivates the ultrasonic
parking assist. Activation is
selectable with or without
attached trailer coupling.
Auto collision preparation :
Activates or deactivates the
automatic brake functionality of
the vehicle in the event of
imminent collision danger. The
following is selectable: the
system will take over brake
control, warn by chimes only or is
deactivated.Side blind zone alert : Changes
the settings for the side blind spot
alert system.
● Exterior ambient lighting
Duration upon exit of vehicle :
Activates or deactivates and
changes the duration of exit
lighting.
Exterior lighting by unlocking :
Activates or deactivates the
welcome lighting.
● Power door locks
Auto door lock : Activates or
deactivates the automatic door
unlocking function after switching off ignition. Activates or
deactivates the automatic door
locking function after driving-off.
Stop door lock if door open :
Activates or deactivates the
automatic door locking function
while a door is open.
Delayed door lock : Activates or
deactivates the delayed door
locking function.
● Remote locking, unlocking,
startingRemote unlock feedback :
Activates or deactivates the
hazard warning flasher feedback
whilst unlocking.
Remote door unlock : Changes
the configuration to unlock only
the driver's door or the whole
vehicle whilst unlocking.
Auto relock doors : Activates or
deactivates the automatic relock
function after unlocking without
opening the vehicle.
● Restore factory settings
Restore factory settings : Resets
all settings to the default settings.
Settings in the Colour-Info-
Display
Navi 950/Navi 650/CD 600Press CONFIG on the Infotainment
system faceplate to enter the
Configuration menu.
Turn the multifunction knob to scroll
upwards or downwards in the list.
Press the multifunction knob
(Navi 950 / Navi 650: press the outer
ring) to select a menu item.
Page 112 of 295

110Instruments and controlsAuto Rear Demist: Activates the
heated rear window
automatically.
● Comfort and Convenience
Chime Volume : Changes the
volume of warning chimes.
Personalisation by Driver :
Activates or deactivates the
personalisation function.
Auto Reverse Gear Wiper :
Activates or deactivates
automatic switching on of the
rear window wiper when reverse gear is engaged.
● Collision Detection Systems
Park Assist : Activates or
deactivates the ultrasonic
sensors. Activation is selectable
with or without attached trailer
coupling.
Automatic Collision Preparation :
Activates or deactivates the
automatic brake functionality of
the vehicle in the event of
imminent collision danger. The
following is selectable: the
system will take over brakecontrol, warn by chimes only or is
deactivated completely.
Side Blind Zone Alert : Activates
or deactivates the side blind spot
alert system.
● Lighting
Vehicle Locator Lights : Activates
or deactivates the entry lighting.
Exit Lighting : Activates or
deactivates and changes the
duration of exit lighting.
● Power Door Locks
Open Door Anti Lock Out :
Activates or deactivates the
automatic door locking function
while a door is open.
Auto Door Lock : Activates or
deactivates the automatic door unlocking function after switching off ignition. Activates or
deactivates the automatic door
locking function after driving-off.
Delay Door Lock : Activates or
deactivates the delayed door
locking function.● Remote Lock/Unlock/Start
Remote Lock Feedback :
Activates or deactivates the
hazard warning flasher feedback whilst locking.
Remote Unlock Feedback :
Activates or deactivates the
hazard warning flasher feedback
whilst unlocking.
Remote Door Unlock : Changes
the configuration to unlock only
the driver's door or the whole
vehicle whilst unlocking.
Relock Remotely Unlocked
Doors : Activates or deactivates
the automatic relock function
after unlocking without opening
the vehicle.
● Return to Factory Settings? :
Resets all settings to the default
settings.
Page 130 of 295

128LightingLighting featuresCentre console lighting Spotlight incorporated in the interior
lighting comes on when headlights
are switched on.
Entry lighting
Welcome lighting The following lights are switched on
for a short time by unlocking the
vehicle with the radio remote control:
● headlights
● tail lights
● number plate lights
● instrument panel light
● interior lights
● door and console lights
● puddle lights
Some functions work only in the dark and facilitates locating the vehicle.
The lighting switches off immediately
when the ignition key is turned to
position 1 3 142.Activation or deactivation of this
function can be changed in the
Settings menu in the Info-Display.
Vehicle personalisation 3 106.
The settings can be saved for the key
being used 3 24.
The following lights will additionally
switch on when the driver's door is
opened:
● illumination of some switches
● Driver Information Centre
● door pocket lights
● console lights
Exit lighting The following lights switch on if the
key is removed from the ignition
switch:
● interior lights
● instrument panel light (only when
it is dark)
● door lights
● puddle lights
They will switch off automatically after
a delay and will be activated again if
the driver's door is opened.Path lighting
Headlights, tail lights and number
plate lights illuminate the surrounding
area for an adjustable time after
leaving the vehicle.
Activating
1. Switch off ignition.
2. Remove ignition key.
3. Open driver's door.
4. Pull turn signal lever.
5. Close driver's door.
If the driver's door is not closed the
lights switch off after two minutes.
Page 144 of 295

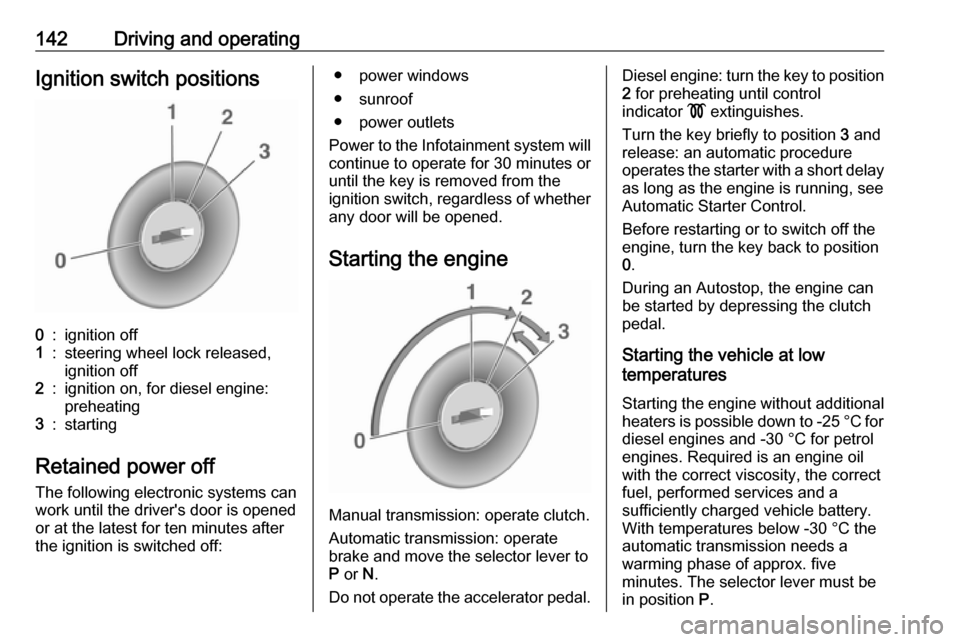
142Driving and operatingIgnition switch positions0:ignition off1:steering wheel lock released,
ignition off2:ignition on, for diesel engine:
preheating3:starting
Retained power off
The following electronic systems can
work until the driver's door is opened
or at the latest for ten minutes after the ignition is switched off:
● power windows
● sunroof
● power outlets
Power to the Infotainment system will continue to operate for 30 minutes or
until the key is removed from the ignition switch, regardless of whether
any door will be opened.
Starting the engine
Manual transmission: operate clutch.
Automatic transmission: operate
brake and move the selector lever to
P or N.
Do not operate the accelerator pedal.
Diesel engine: turn the key to position 2 for preheating until control
indicator ! extinguishes.
Turn the key briefly to position 3 and
release: an automatic procedure
operates the starter with a short delay
as long as the engine is running, see
Automatic Starter Control.
Before restarting or to switch off the
engine, turn the key back to position
0 .
During an Autostop, the engine can
be started by depressing the clutch
pedal.
Starting the vehicle at low
temperatures
Starting the engine without additional
heaters is possible down to -25 °С for diesel engines and -30 °C for petrol
engines. Required is an engine oil
with the correct viscosity, the correct
fuel, performed services and a
sufficiently charged vehicle battery.
With temperatures below -30 °C the
automatic transmission needs a
warming phase of approx. five
minutes. The selector lever must be
in position P.
Page 199 of 295

Driving and operating197Fitting the coupling ball bar
All versions except 3-door hatchback:
Press fastenings inward and fold the
cover downward at the front. Remove
cover.
Disengage and fold down the socket. Remove the sealing plug from the
opening for the coupling ball bar and
stow it.
Checking the tensioning of the
coupling ball bar
● Red marking on rotary knob must
point towards green marking on
coupling ball bar.
● The gap between the rotary knob
and the coupling ball bar must be approx. 6 mm.
● The key must be in position c.
Otherwise, the coupling ball bar must be tensioned before being inserted:
● Unlock coupling ball bar by turning key to position c.