clock OPEL ASTRA J 2018 Manual user
[x] Cancel search | Manufacturer: OPEL, Model Year: 2018, Model line: ASTRA J, Model: OPEL ASTRA J 2018Pages: 295, PDF Size: 8.41 MB
Page 214 of 295
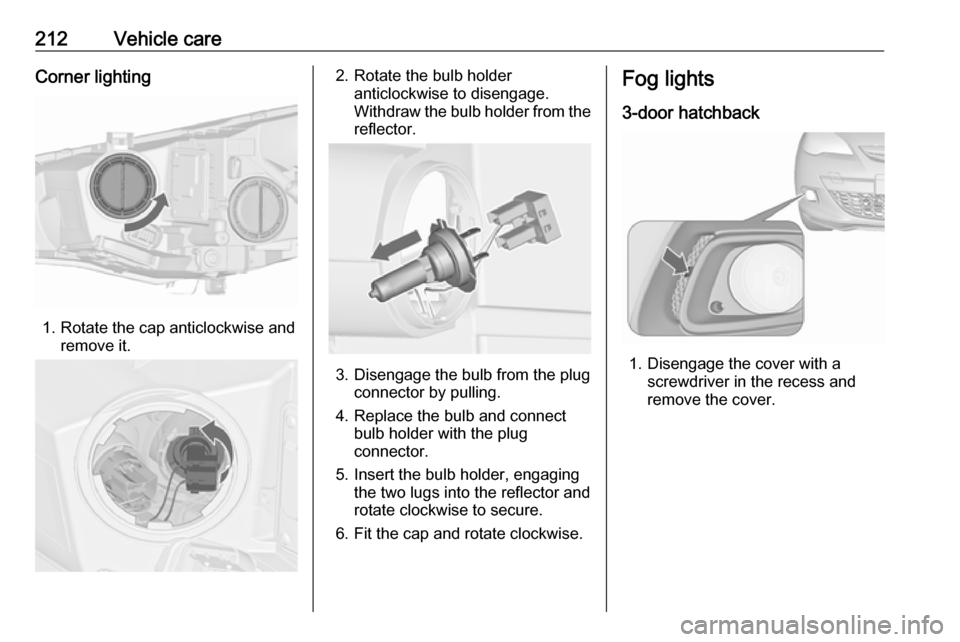
212Vehicle careCorner lighting
1. Rotate the cap anticlockwise andremove it.
2. Rotate the bulb holderanticlockwise to disengage.
Withdraw the bulb holder from the
reflector.
3. Disengage the bulb from the plug connector by pulling.
4. Replace the bulb and connect bulb holder with the plug
connector.
5. Insert the bulb holder, engaging the two lugs into the reflector and
rotate clockwise to secure.
6. Fit the cap and rotate clockwise.
Fog lights
3-door hatchback
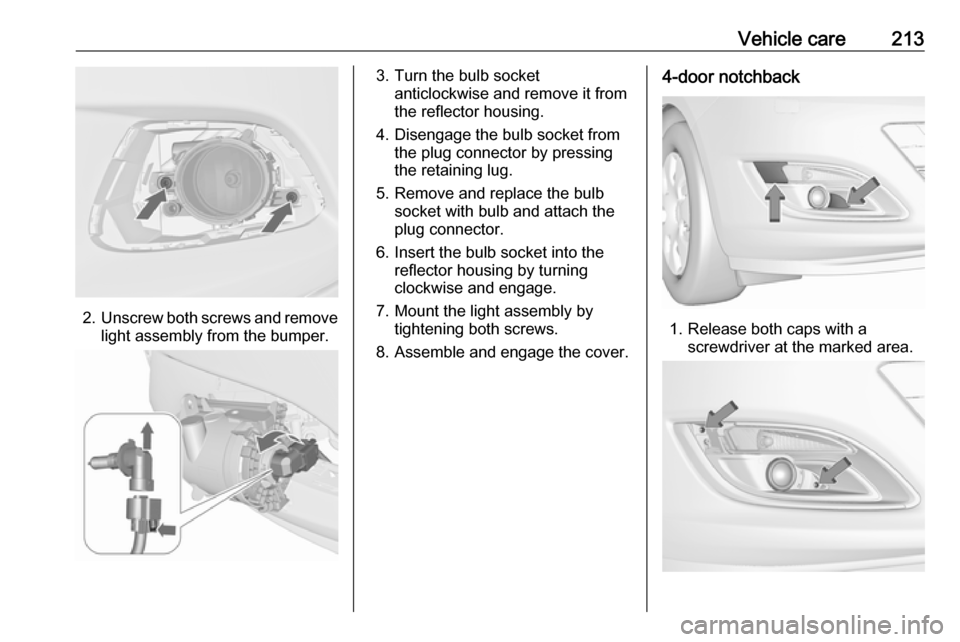
1. Disengage the cover with a screwdriver in the recess and
remove the cover.
Page 215 of 295
Vehicle care213
2.Unscrew both screws and remove
light assembly from the bumper.
3. Turn the bulb socket anticlockwise and remove it from
the reflector housing.
4. Disengage the bulb socket from the plug connector by pressing
the retaining lug.
5. Remove and replace the bulb socket with bulb and attach the
plug connector.
6. Insert the bulb socket into the reflector housing by turning
clockwise and engage.
7. Mount the light assembly by tightening both screws.
8. Assemble and engage the cover.4-door notchback
1. Release both caps with a screwdriver at the marked area.
Page 216 of 295
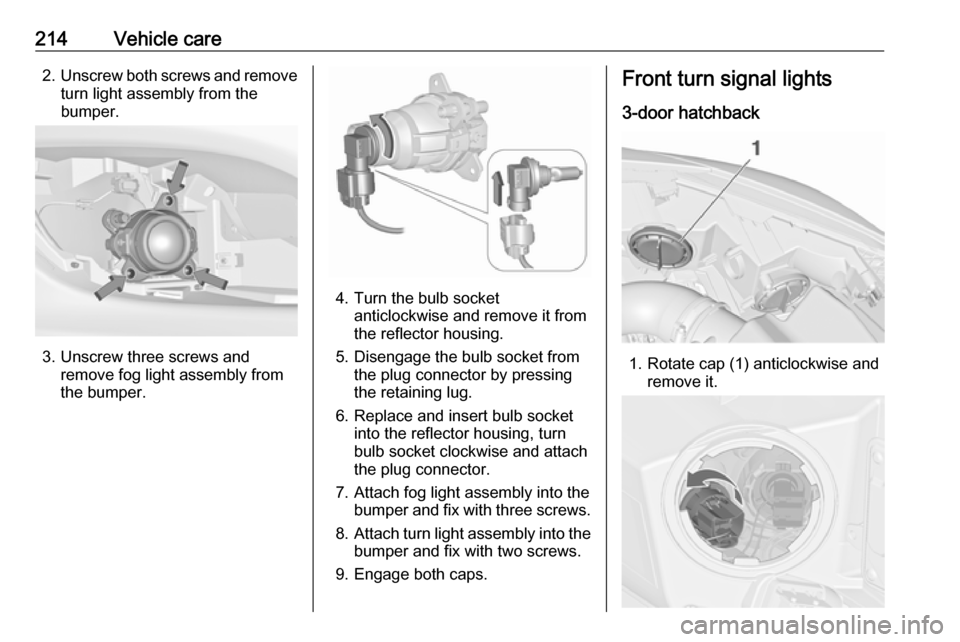
214Vehicle care2.Unscrew both screws and remove
turn light assembly from the
bumper.
3. Unscrew three screws and remove fog light assembly from
the bumper.
4. Turn the bulb socket anticlockwise and remove it from
the reflector housing.
5. Disengage the bulb socket from the plug connector by pressing
the retaining lug.
6. Replace and insert bulb socket into the reflector housing, turn
bulb socket clockwise and attach
the plug connector.
7. Attach fog light assembly into the bumper and fix with three screws.
8. Attach turn light assembly into the
bumper and fix with two screws.
9. Engage both caps.
Front turn signal lights
3-door hatchback
1. Rotate cap (1) anticlockwise and remove it.
Page 217 of 295

Vehicle care2152. Rotate bulb socket anticlockwiseto disengage and withdraw from
the reflector housing.
3. Remove the bulb from the socket by turning anticlockwise.
4. Replace and insert new bulb into socket by turning clockwise.
5. Insert the bulb socket into the reflector housing and turn
clockwise.
6. Fit the cap and rotate clockwise.
4-door notchback
1. Release both caps with a screwdriver at the marked area.
2. Unscrew both screws and remove
light assembly from the bumper.
3. Disengage the bulb socket from the reflector housing by pressing
both retaining lugs.
Page 219 of 295

Vehicle care2172. Unscrew both plastic securingnuts from the inside by hand.
3. Carefully withdraw the light assembly from the recesses and
remove.
4. Detach wiring plug from bulb carrier.
5. Remove the bulb holder by turning and replace the bulb by
withdrawing or pushing the bulb
slightly into the socket and
rotating anticlockwise:
Tail light/Brake light ( 1)
Turn signal light ( 2)
Version with Light Emitting Diode (LED)
Only turn signal light ( 2) can be
changed.
6. Insert and turn bulb holder clockwise into the tail light
assembly. Connect the wiring
plug with the light assembly. Fit
light assembly with the retaining
pins into the recesses of the
vehicle body and tighten the
plastic securing nuts from the
inside of the load compartment.
Close cover and engage.
Light assembly in the tailgate
1. Open the tailgate and remove the
covers on the respective side.
2. Unscrew three screws.
3. Remove the tail light assembly from tailgate.
4. Remove the bulb holder by turning and replace the bulb by
withdrawing or pushing the bulb
slightly into the socket and rotating anticlockwise:
Page 220 of 295
218Vehicle care
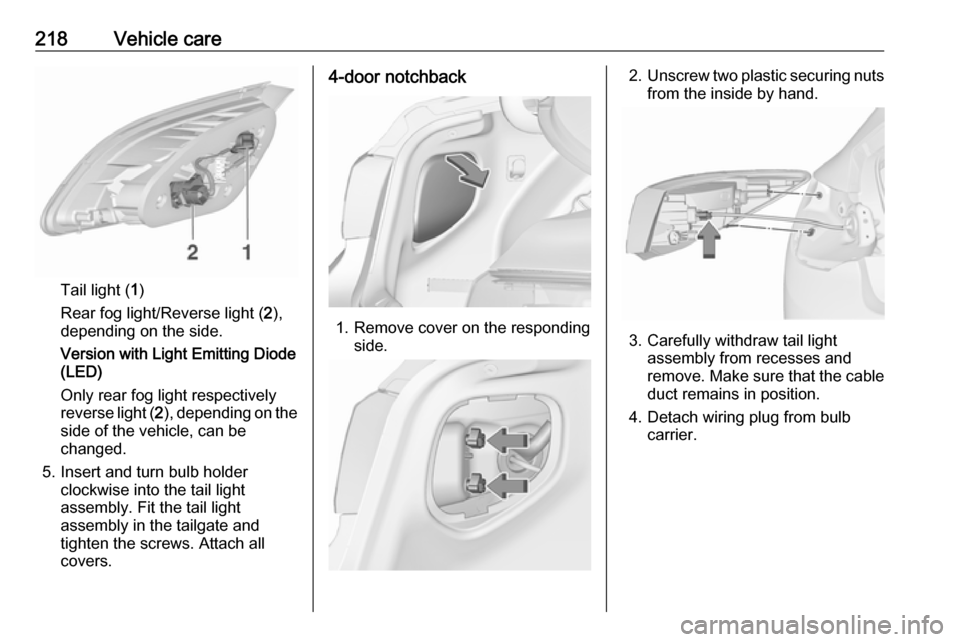
Tail light (1)
Rear fog light/Reverse light ( 2),
depending on the side.
Version with Light Emitting Diode
(LED)
Only rear fog light respectively
reverse light ( 2), depending on the
side of the vehicle, can be
changed.
5. Insert and turn bulb holder clockwise into the tail light
assembly. Fit the tail light
assembly in the tailgate and
tighten the screws. Attach all
covers.
4-door notchback
1. Remove cover on the responding side.
2.Unscrew two plastic securing nuts
from the inside by hand.
3. Carefully withdraw tail light assembly from recesses and
remove. Make sure that the cable duct remains in position.
4. Detach wiring plug from bulb carrier.
Page 221 of 295
Vehicle care219
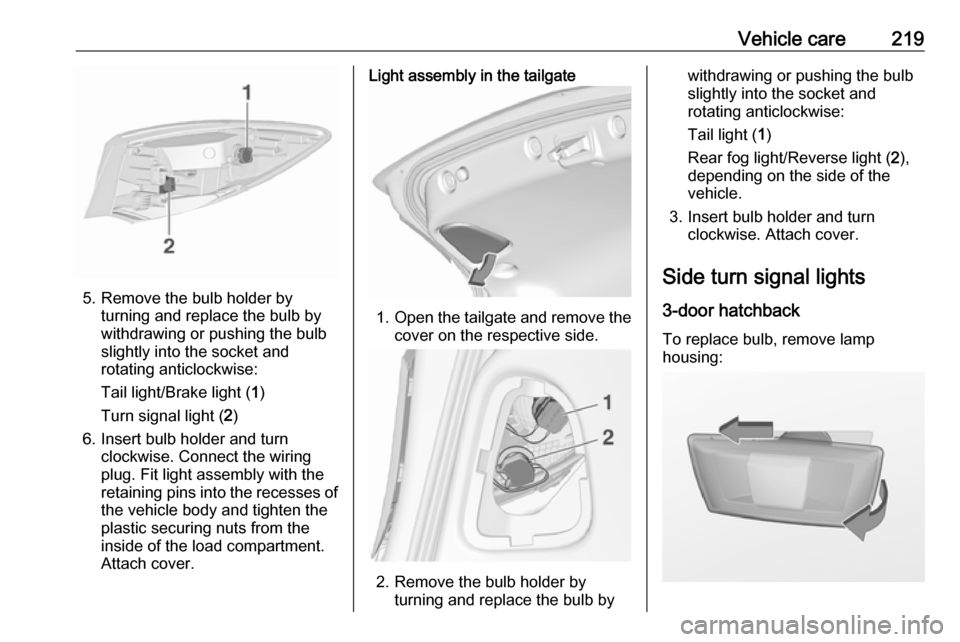
5. Remove the bulb holder byturning and replace the bulb by
withdrawing or pushing the bulb
slightly into the socket and rotating anticlockwise:
Tail light/Brake light ( 1)
Turn signal light ( 2)
6. Insert bulb holder and turn clockwise. Connect the wiring
plug. Fit light assembly with the
retaining pins into the recesses of
the vehicle body and tighten the
plastic securing nuts from the
inside of the load compartment.
Attach cover.
Light assembly in the tailgate
1. Open the tailgate and remove the
cover on the respective side.
2. Remove the bulb holder by turning and replace the bulb by
withdrawing or pushing the bulb
slightly into the socket and rotating anticlockwise:
Tail light ( 1)
Rear fog light/Reverse light ( 2),
depending on the side of the
vehicle.
3. Insert bulb holder and turn clockwise. Attach cover.
Side turn signal lights
3-door hatchback To replace bulb, remove lamp
housing:
Page 222 of 295

220Vehicle care1. Slide lamp to its left side andremove at its right end.
2. Turn bulb holder anticlockwise and remove from housing.
3. Pull bulb from bulb holder andreplace it.
4. Insert bulb holder and turn clockwise.
5. Insert left end of the lamp, slide to
the left and insert right end.
4-door notchback To replace bulb, remove lamp
housing:
1. Slide lamp to its left side and remove at its right end.
2. Turn bulb holder anticlockwiseand remove from housing.
3. Pull bulb from bulb holder and replace it.
Page 223 of 295
Vehicle care2214. Insert bulb holder and turnclockwise.
5. Insert left end of the lamp, slide to
the left and insert right end.
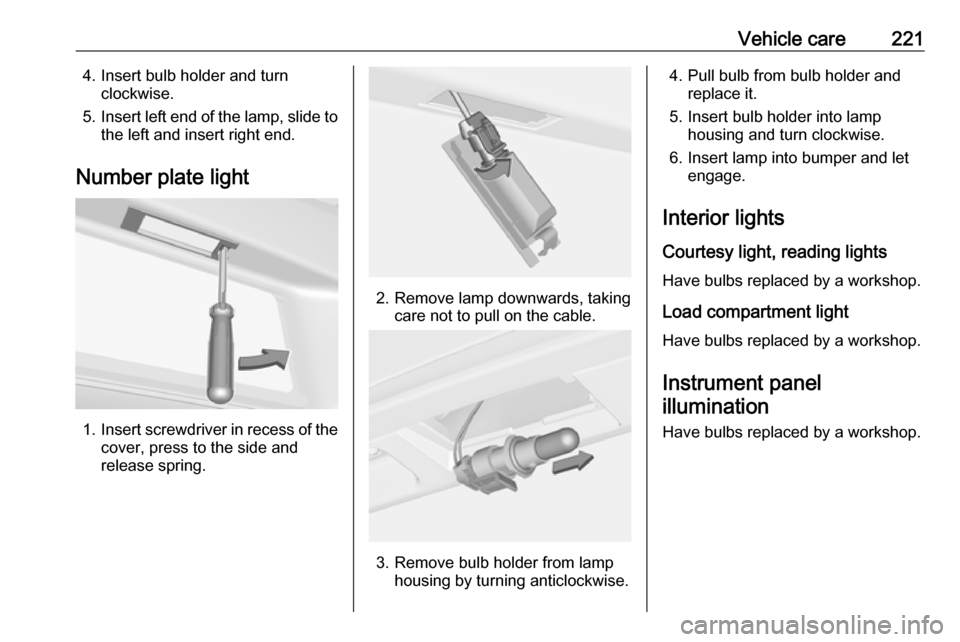
Number plate light
1. Insert screwdriver in recess of the
cover, press to the side and
release spring.
2. Remove lamp downwards, taking care not to pull on the cable.
3. Remove bulb holder from lamp housing by turning anticlockwise.
4. Pull bulb from bulb holder andreplace it.
5. Insert bulb holder into lamp housing and turn clockwise.
6. Insert lamp into bumper and let engage.
Interior lights
Courtesy light, reading lights Have bulbs replaced by a workshop.
Load compartment light
Have bulbs replaced by a workshop.
Instrument panel illumination
Have bulbs replaced by a workshop.
Page 246 of 295

244Vehicle careThe floor cover can be placed on the
projecting wheel.Vehicles equipped with a temporary
spare wheel:
Secure a damaged full size wheel
facing upwards with the wing nut in
the spare wheel well after exchanging the thread bolt by an extension bolt,
placed in the tool bag 3 227. To
replace the bolt:
1. Install the hexagon key of the wheel wrench ensuring that it
locates securely on the bolt.
2. Turn the wheel wrench anticlockwise to loosen the bolt.
Remove the bolt.
3. Take the extension bolt from the tool bag 3 227 and screw it in
hand-tight using the hexagon key
of the wheel wrench.
4. Store the tool box and the damaged wheel with the side
facing upwards, in the spare
wheel well and secure it by turning
the wing nut clockwise on the bolt.
The floor cover can be placed on the
projecting wheel.
Replace the extension bolt with the short bolt before placing the
temporary spare wheel in the well
after renewing or repairing the
defective wheel.
Stowing the spare wheel back in
the well after replacing the
damaged wheel
1. Open the floor cover, loosen and remove wing nut.
Only 3-door hatchback: open floor
cover, remove rear storage,
loosen and remove wing nut and
conus.
2. Only 4-door notchback with temporary spare wheel: replace
the extension bolt with the short
bolt by using the hexagon key of
the wheel wrench.
3. Place the tools in the tool box or the tool bag 3 227.
4. Place spare wheel facing upwards, in the wheel well and
secure by tightening the wing nut.