start stop button OPEL ASTRA K 2017 Manual user
[x] Cancel search | Manufacturer: OPEL, Model Year: 2017, Model line: ASTRA K, Model: OPEL ASTRA K 2017Pages: 305, PDF Size: 9.11 MB
Page 159 of 305

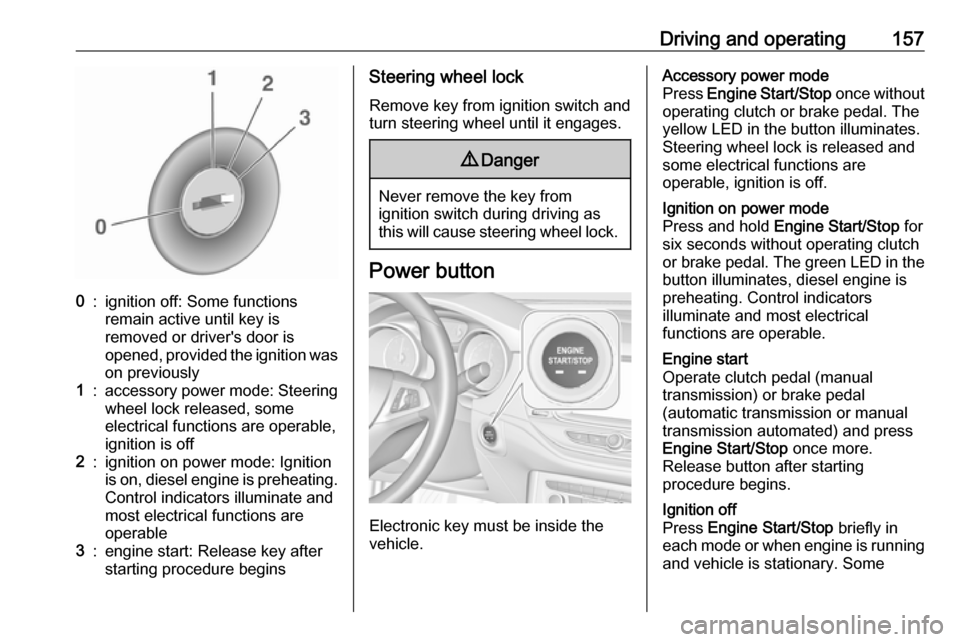
Driving and operating1570:ignition off: Some functions
remain active until key is
removed or driver's door is
opened, provided the ignition was
on previously1:accessory power mode: Steering wheel lock released, some
electrical functions are operable,
ignition is off2:ignition on power mode: Ignition
is on, diesel engine is preheating.
Control indicators illuminate and
most electrical functions are
operable3:engine start: Release key after
starting procedure beginsSteering wheel lock
Remove key from ignition switch and
turn steering wheel until it engages.9 Danger
Never remove the key from
ignition switch during driving as
this will cause steering wheel lock.
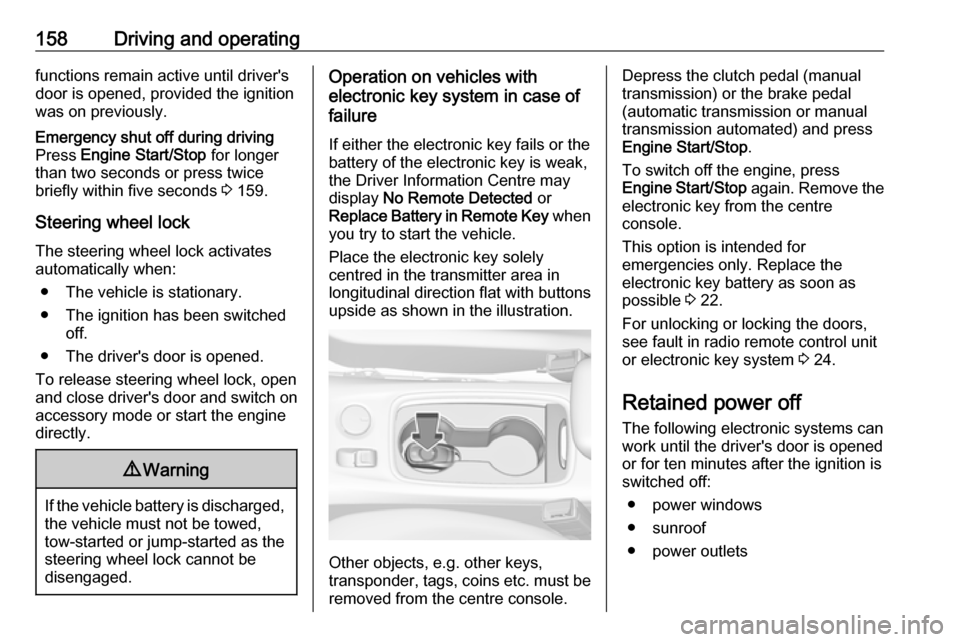
Power button
Electronic key must be inside the
vehicle.
Accessory power mode
Press Engine Start/Stop once without
operating clutch or brake pedal. The yellow LED in the button illuminates.
Steering wheel lock is released and
some electrical functions are
operable, ignition is off.Ignition on power mode
Press and hold Engine Start/Stop for
six seconds without operating clutch
or brake pedal. The green LED in the button illuminates, diesel engine is
preheating. Control indicators
illuminate and most electrical
functions are operable.Engine start
Operate clutch pedal (manual
transmission) or brake pedal
(automatic transmission or manual
transmission automated) and press
Engine Start/Stop once more.
Release button after starting
procedure begins.Ignition off
Press Engine Start/Stop briefly in
each mode or when engine is running and vehicle is stationary. Some
Page 160 of 305

158Driving and operatingfunctions remain active until driver's
door is opened, provided the ignition
was on previously.Emergency shut off during driving
Press Engine Start/Stop for longer
than two seconds or press twice
briefly within five seconds 3 159.
Steering wheel lock
The steering wheel lock activates
automatically when:
● The vehicle is stationary.
● The ignition has been switched off.
● The driver's door is opened.
To release steering wheel lock, open
and close driver's door and switch on accessory mode or start the engine
directly.
9 Warning
If the vehicle battery is discharged,
the vehicle must not be towed,
tow-started or jump-started as the
steering wheel lock cannot be
disengaged.
Operation on vehicles with
electronic key system in case of
failure
If either the electronic key fails or the
battery of the electronic key is weak,
the Driver Information Centre may
display No Remote Detected or
Replace Battery in Remote Key when
you try to start the vehicle.
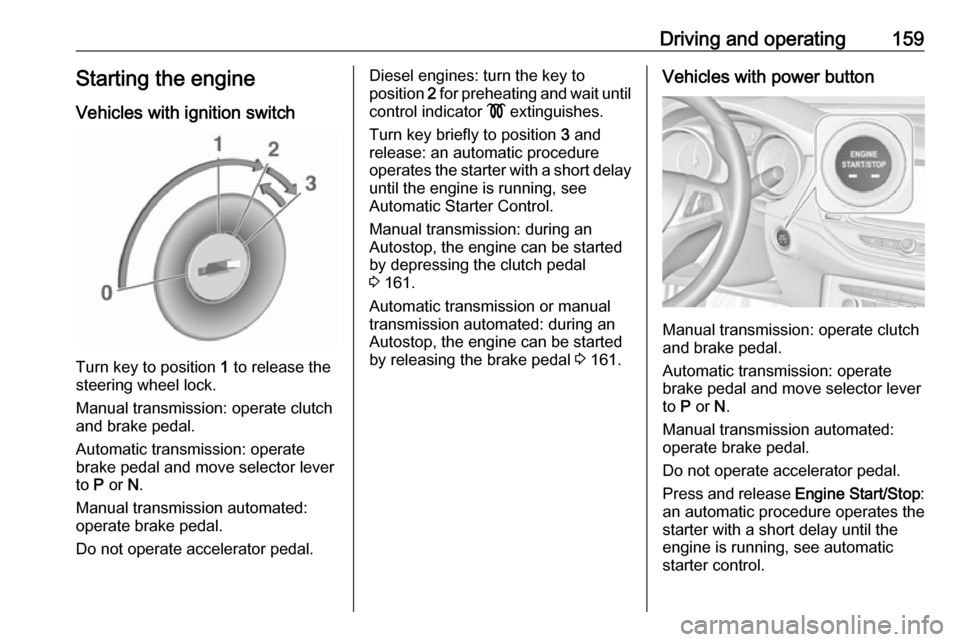
Place the electronic key solely
centred in the transmitter area in
longitudinal direction flat with buttons
upside as shown in the illustration.
Other objects, e.g. other keys,
transponder, tags, coins etc. must be removed from the centre console.
Depress the clutch pedal (manual
transmission) or the brake pedal
(automatic transmission or manual
transmission automated) and press
Engine Start/Stop .
To switch off the engine, press
Engine Start/Stop again. Remove the
electronic key from the centre
console.
This option is intended for
emergencies only. Replace the
electronic key battery as soon as
possible 3 22.
For unlocking or locking the doors,
see fault in radio remote control unit
or electronic key system 3 24.
Retained power off
The following electronic systems can
work until the driver's door is opened
or for ten minutes after the ignition is
switched off:
● power windows
● sunroof
● power outlets
Page 161 of 305

Driving and operating159Starting the engine
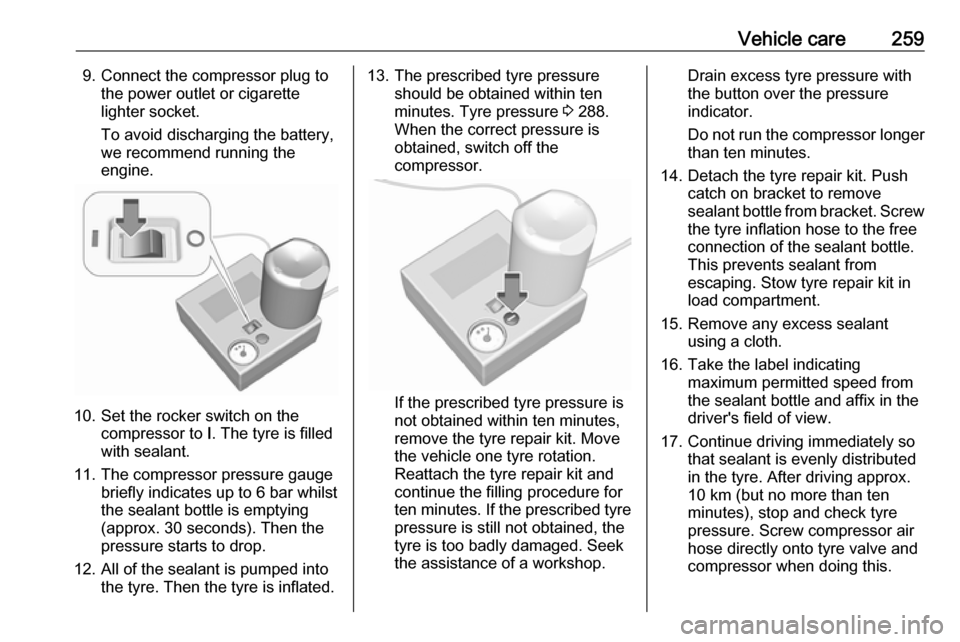
Vehicles with ignition switch
Turn key to position 1 to release the
steering wheel lock.
Manual transmission: operate clutch
and brake pedal.
Automatic transmission: operate
brake pedal and move selector lever
to P or N.
Manual transmission automated:
operate brake pedal.
Do not operate accelerator pedal.
Diesel engines: turn the key to
position 2 for preheating and wait until
control indicator ! extinguishes.
Turn key briefly to position 3 and
release: an automatic procedure operates the starter with a short delay
until the engine is running, see
Automatic Starter Control.
Manual transmission: during an
Autostop, the engine can be started
by depressing the clutch pedal
3 161.
Automatic transmission or manual
transmission automated: during an
Autostop, the engine can be started
by releasing the brake pedal 3 161.Vehicles with power button
Manual transmission: operate clutch
and brake pedal.
Automatic transmission: operate
brake pedal and move selector lever
to P or N.
Manual transmission automated:
operate brake pedal.
Do not operate accelerator pedal.
Press and release Engine Start/Stop:
an automatic procedure operates the
starter with a short delay until the
engine is running, see automatic
starter control.
Page 163 of 305

Driving and operating161Overrun cut-off
The fuel supply is automatically cut off
during overrun, i.e. when the vehicle
is driven with a gear engaged but accelerator pedal is released.
Depending on driving conditions, the
overrun cut-off may be deactivated.
Stop-start system The stop-start system helps to save
fuel and to reduce the exhaust
emissions. When conditions allow, it
switches off the engine as soon as the
vehicle is at a low speed or at a
standstill, e.g. at a traffic light or in a
traffic jam.
Activation
The stop-start system is available as
soon as the engine is started, the
vehicle starts-off and the conditions
as stated below in this section are
fulfilled.Deactivation
Deactivate the stop-start system
manually by pressing Ï OFF . The
deactivation is indicated when the
LED in the button illuminates.
Autostop
Vehicles with manual transmission
Depending on the engine, two
versions of an Autostop are available. See engine data to identify the engine
identifier code for your vehicle
3 280.
Conventional AutostopAll petrol engines and diesel engines
except B16DTU have only the
conventional Autostop.
An Autostop can be activated at a
standstill or at a low speed up to
5 km/h.
Activate a conventional Autostop as
follows:
● Depress the clutch pedal.
● Set the lever in neutral.
● Release the clutch pedal.
The engine will be switched off while the ignition stays on.
Early Autostop
Engine B16DTU has early Autostop
in addition to conventional Autostop.
An Autostop, both conventional and
early, can be activated at a standstill
or at a low speed up to 14 km/h.
Activate an early Autostop as follows: ● Depress the brake pedal.
● Depress the clutch pedal.
The engine will be switched off while
the ignition stays on.
Page 167 of 305

Driving and operating165Emergency operation under
extreme cold temperatures9 Warning
This emergency operation may
only be carried out in case of
extremely cold temperatures and if the vehicle is parked on a levelsurface.
In countries with extreme cold
temperatures it may be necessary to
park the vehicle without applied
parking brake.
This is an emergency operation to
avoid freezing of the parking brake.
Vehicles equipped with manual
transmission automated, electric
parking brake and power button
On vehicles with manual transmission
automated the ignition can only be
switched off if the parking brake is
applied. Therefore the following items must be carried out to release the
electric parking brake:
1. Apply electric parking brake and switch off ignition.
2. Switch on ignition by pressing and
holding Engine Start/Stop for six
seconds without operating brake
pedal.
3. Press brake pedal and release electric parking brake.
4. Switch off ignition.
Vehicles equipped with manual
transmission automated, electric
parking brake and ignition switch
On vehicles with manual transmission
automated the ignition can only be
switched off if the parking brake is
applied. Therefore the following items
must be carried out to release the
electric parking brake:
1. Apply electric parking brake and switch off ignition.
2. Press brake pedal and release electric parking brake.
3. Remove key from ignition switch.Engine exhaust9 Danger
Engine exhaust gases contain
poisonous carbon monoxide,
which is colourless and odourless and could be fatal if inhaled.
If exhaust gases enter the interior
of the vehicle, open the windows.
Have the cause of the fault
rectified by a workshop.
Avoid driving with an open load
compartment, otherwise exhaust
gases could enter the vehicle.
Page 257 of 305

Vehicle care255positions. If it takes longer, the
matching process stops and must be restarted.
The tyre pressure sensor matching
process is:
1. Apply the parking brake.
2. Turn the ignition on.
3. On vehicles with automatic transmission: set the selector
lever to P.
On vehicles with manual
transmission: select neutral.
4. Midlevel display: Use MENU on the turn signal
lever to select the Vehicle
Information Menu ? in the
Driver Information Centre.
Uplevel display:
Press p on the steering wheel to
open main menu page.
Select the Info page with Q or P.
Confirm with 9.
5. Select the tyre pressure menu. Midlevel display:
Uplevel display:
6. Midlevel display: Press SET/CLR to begin the
sensor matching process. A
message requesting acceptance
of the process should be
displayed.
Press SET/CLR again to confirm
the selection. The horn sounds
twice to indicate that the receiver
is in relearn mode.
Uplevel display:
Press 9 to begin the sensor
matching process. The horn
sounds twice to indicate that the receiver is in relearn mode.
7. Start with the left side front wheel.
8. Place the relearn tool against the tyre sidewall, near the valve stem.Then press the button to activate
the tyre pressure sensor. A horn
chirp confirms that the sensor
identification code has been
matched to this wheel position.
9. Proceed to the right side front wheel, and repeat the procedure
in Step 8.
10. Proceed to the right side rear wheel, and repeat the procedure
in Step 8.
11. Proceed to the left side rear wheel, and repeat the procedure
in Step 8. The horn sounds twice
Page 261 of 305

Vehicle care2599. Connect the compressor plug tothe power outlet or cigarette
lighter socket.
To avoid discharging the battery,
we recommend running the
engine.
10. Set the rocker switch on the compressor to I. The tyre is filled
with sealant.
11. The compressor pressure gauge briefly indicates up to 6 bar whilstthe sealant bottle is emptying
(approx. 30 seconds). Then the
pressure starts to drop.
12. All of the sealant is pumped into the tyre. Then the tyre is inflated.
13. The prescribed tyre pressure should be obtained within ten
minutes. Tyre pressure 3 288.
When the correct pressure is
obtained, switch off the
compressor.
If the prescribed tyre pressure is
not obtained within ten minutes,
remove the tyre repair kit. Move
the vehicle one tyre rotation.
Reattach the tyre repair kit and
continue the filling procedure for
ten minutes. If the prescribed tyre
pressure is still not obtained, the
tyre is too badly damaged. Seek
the assistance of a workshop.
Drain excess tyre pressure with
the button over the pressure indicator.
Do not run the compressor longer
than ten minutes.
14. Detach the tyre repair kit. Push catch on bracket to remove
sealant bottle from bracket. Screw the tyre inflation hose to the free
connection of the sealant bottle.
This prevents sealant from
escaping. Stow tyre repair kit in
load compartment.
15. Remove any excess sealant using a cloth.
16. Take the label indicating maximum permitted speed from
the sealant bottle and affix in the
driver's field of view.
17. Continue driving immediately so that sealant is evenly distributed
in the tyre. After driving approx.
10 km (but no more than ten
minutes), stop and check tyre
pressure. Screw compressor air
hose directly onto tyre valve and
compressor when doing this.