Time OPEL ASTRA K 2018.5 Manual user
[x] Cancel search | Manufacturer: OPEL, Model Year: 2018.5, Model line: ASTRA K, Model: OPEL ASTRA K 2018.5Pages: 317, PDF Size: 9.58 MB
Page 234 of 317

232Vehicle careCaution
When transporting the vehicle on
a train or on a recovery vehicle, the
mud flaps might be damaged.
Vehicle storage
Storage for a long period of time
If the vehicle is to be stored for several months:
● Wash and wax the vehicle.
● Have the wax in the engine compartment and underbody
checked.
● Clean and preserve the rubber seals.
● Fill up fuel tank completely.
● Change the engine oil.
● Drain the washer fluid reservoir.
● Check the coolant antifreeze and
corrosion protection.
● Adjust tyre pressure to the value specified for full load.
● Park the vehicle in a dry, wellventilated place. Engage first or
reverse gear or set selector lever
to P. Prevent the vehicle from
rolling.
● Do not apply the parking brake.
● Open the bonnet, close all doors and lock the vehicle.
● Disconnect the clamp from the negative terminal of the vehicle
battery. Beware that all systems
are not functional, e.g. anti-theft
alarm system.
Putting back into operation
When the vehicle is to be put back into
operation:
● Connect the clamp to the negative terminal of the vehicle
battery. Activate the electronics
of the power windows.
● Check tyre pressure.
● Fill up the washer fluid reservoir.
● Check the engine oil level.
● Check the coolant level.
● Fit the number plate if necessary.End-of-life vehicle recovery
Information on end-of-life vehicle
recovery centres and the recycling of
end-of-life vehicles is available on our website, where legally required. Only
entrust this work to an authorised
recycling centre.
Page 240 of 317

238Vehicle careCharging the vehicle battery9Warning
On vehicles with stop-start
system, ensure that the charging potential does not exceed
14.6 volts when using a battery
charger. Otherwise the vehicle
battery might be damaged.
Jump starting 3 273.
Warning label
Meaning of symbols: ● No sparks, naked flames or smoking.
● Always shield eyes. Explosive gases can cause blindness or
injury.
● Keep the vehicle battery out of reach of children.
● The vehicle battery contains sulphuric acid which could cause
blindness or serious burn
injuries.
● See the Owner's Manual for further information.
● Explosive gas may be present in the vicinity of the vehicle battery.
Diesel fuel system bleeding If the tank has been run dry, the diesel
fuel system must be bled. Switch on
the ignition three times for
15 seconds at a time. Then crank the
engine for a maximum of 40 seconds. Repeat this process after
no less than five seconds. If the
engine fails to start, seek the
assistance of a workshop.Wiper blade replacement
Windscreen
Lift the wiper arm until it stays in the
raised position, press button to
disengage the wiper blade and
remove.
Attach the wiper blade slightly angled
to the wiper arm and push until it
engages.
Lower wiper arm carefully.
Page 243 of 317

Vehicle care2412. Disengage spring clip fromretainer by moving it forward and
to the side. Swivel spring clip
downwards.
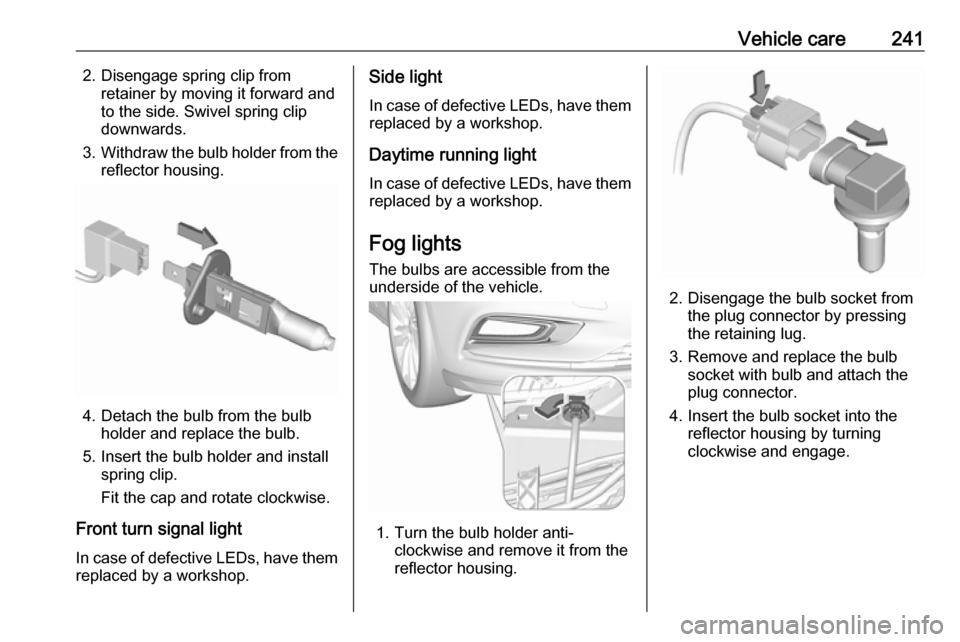
3. Withdraw the bulb holder from the
reflector housing.
4. Detach the bulb from the bulb holder and replace the bulb.
5. Insert the bulb holder and install spring clip.
Fit the cap and rotate clockwise.
Front turn signal light
In case of defective LEDs, have them replaced by a workshop.
Side light
In case of defective LEDs, have them
replaced by a workshop.
Daytime running light In case of defective LEDs, have them
replaced by a workshop.
Fog lights
The bulbs are accessible from the
underside of the vehicle.
1. Turn the bulb holder anti- clockwise and remove it from the
reflector housing.
2. Disengage the bulb socket from the plug connector by pressing
the retaining lug.
3. Remove and replace the bulb socket with bulb and attach the
plug connector.
4. Insert the bulb socket into the reflector housing by turning
clockwise and engage.
Page 262 of 317

260Vehicle careAll wheels must be equipped with
pressure sensors and the tyres must
have the prescribed pressure.
Note
In countries where the tyre pressure monitoring system is legally
required, the use of wheels without
pressure sensors will invalidate the
vehicle operating permit.
The current tyre pressures can be
shown in the Driver Information
Centre.
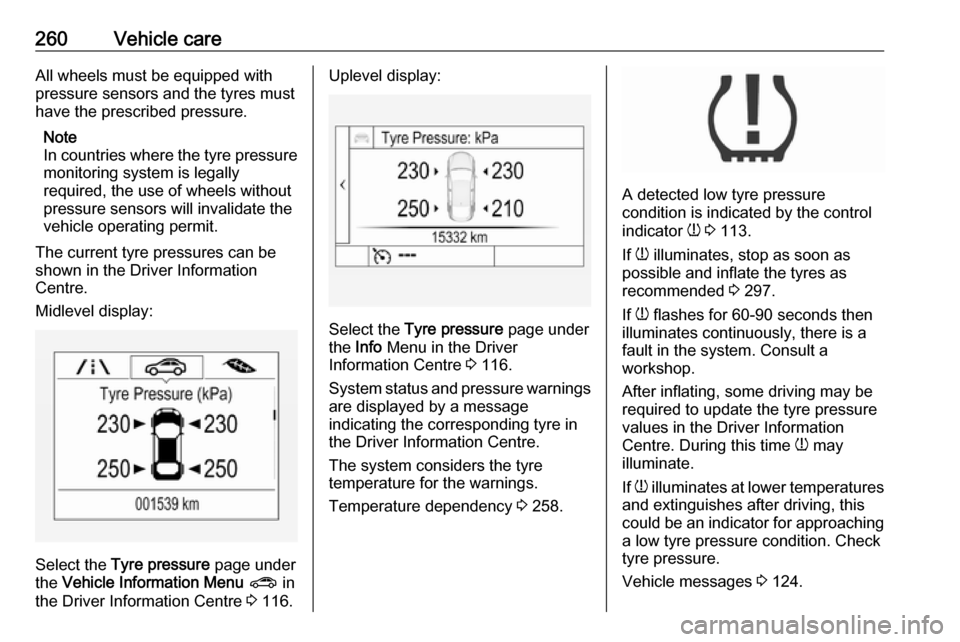
Midlevel display:
Select the Tyre pressure page under
the Vehicle Information Menu ? in
the Driver Information Centre 3 116.
Uplevel display:
Select the Tyre pressure page under
the Info Menu in the Driver
Information Centre 3 116.
System status and pressure warnings
are displayed by a message
indicating the corresponding tyre in
the Driver Information Centre.
The system considers the tyre
temperature for the warnings.
Temperature dependency 3 258.
A detected low tyre pressure
condition is indicated by the control
indicator w 3 113.
If w illuminates, stop as soon as
possible and inflate the tyres as
recommended 3 297.
If w flashes for 60-90 seconds then
illuminates continuously, there is a
fault in the system. Consult a
workshop.
After inflating, some driving may be
required to update the tyre pressure
values in the Driver Information
Centre. During this time w may
illuminate.
If w illuminates at lower temperatures
and extinguishes after driving, this
could be an indicator for approaching
a low tyre pressure condition. Check
tyre pressure.
Vehicle messages 3 124.
Page 263 of 317

Vehicle care261If the tyre pressure must be reduced
or increased, switch off ignition.
Only mount wheels with pressure
sensors, otherwise the tyre pressure
will not be displayed and w
illuminates continuously.
A spare wheel or temporary spare
wheel is not equipped with pressure
sensors. The tyre pressure
monitoring system is not operational
for these tyres. Control indicator w
illuminates. For the further three
tyres, the system remains
operational.
The use of commercially-available liquid tyre repair kits can impair the
function of the system. Factory-
approved repair kits can be used.
Operating electronic devices or being
close to facilities using similar wave
frequencies could disrupt the tyre
pressure monitoring system.
Each time the tyres are replaced, tyre pressure monitoring system sensors
must be dismounted and serviced.
For the screwed sensor, replace
valve core and sealing ring. For the
clipped sensor, replace complete
valve stem.Vehicle loading status
Adjust tyre pressure to load condition
according to the tyre information label or tyre pressure chart 3 297, and
select the appropriate setting in the menu Tyre Load in the Driver
Information Centre, Vehicle
Information Menu 3 116. This setting
is the reference for the tyre pressure
warnings.
The Tyre load menu only appears
when the vehicle is at a standstill and the parking brake is applied. On
vehicles with automatic transmission
the selector lever must be in P.
Midlevel display:Select the Tyre load page under the
Vehicle Information Menu ? in the
Driver Information Centre 3 116.
Select ● Light for comfort pressure up to
three people.
● Eco for Eco pressure up to three
people.
● Max for full loading.
Uplevel display:
Select the Tyre load page under the
Options Menu in the Driver
Information Centre 3 116.
Page 274 of 317

272Vehicle care
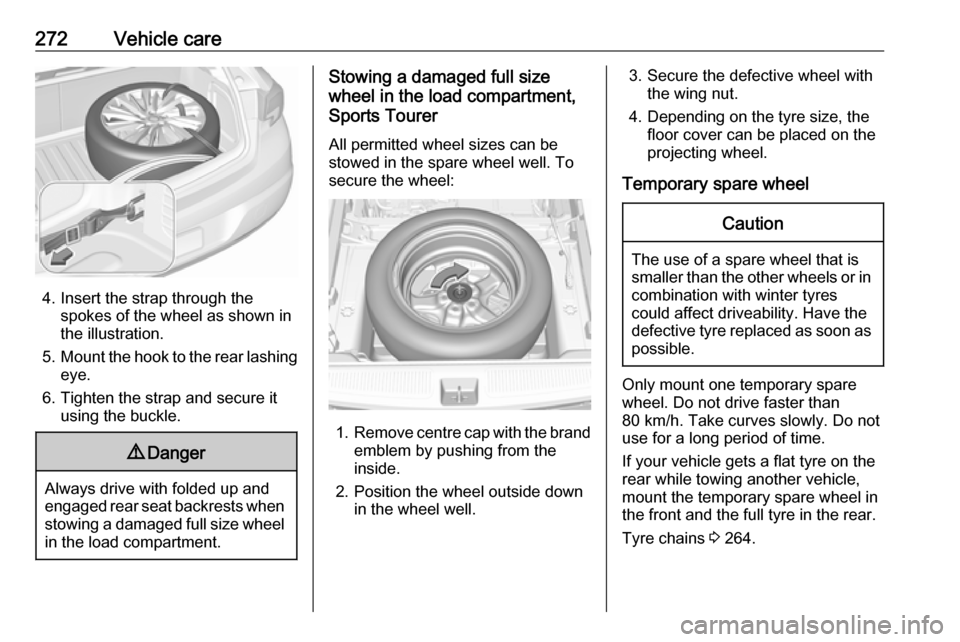
4. Insert the strap through thespokes of the wheel as shown in
the illustration.
5. Mount the hook to the rear lashing
eye.
6. Tighten the strap and secure it using the buckle.
9 Danger
Always drive with folded up and
engaged rear seat backrests when stowing a damaged full size wheel
in the load compartment.
Stowing a damaged full size
wheel in the load compartment,
Sports Tourer
All permitted wheel sizes can be
stowed in the spare wheel well. To
secure the wheel:
1. Remove centre cap with the brand
emblem by pushing from the
inside.
2. Position the wheel outside down in the wheel well.
3. Secure the defective wheel withthe wing nut.
4. Depending on the tyre size, the floor cover can be placed on the
projecting wheel.
Temporary spare wheelCaution
The use of a spare wheel that is smaller than the other wheels or in combination with winter tyres
could affect driveability. Have the defective tyre replaced as soon as
possible.
Only mount one temporary spare
wheel. Do not drive faster than
80 km/h. Take curves slowly. Do not use for a long period of time.
If your vehicle gets a flat tyre on the
rear while towing another vehicle,
mount the temporary spare wheel in the front and the full tyre in the rear.
Tyre chains 3 264.
Page 285 of 317

Service and maintenance283Washer fluidUse only washer fluid approved for
the vehicle to prevent damage of
wiper blades, paintwork, plastic and
rubber parts. Consult a workshop.
Brake and clutch fluid Over time, brake fluid absorbs
moisture which will reduce braking
effectiveness. The brake fluid should
therefore be replaced at the specified
interval.
Page 293 of 317
![OPEL ASTRA K 2018.5 Manual user Technical data291Performance
5-door HatchbackEngineB10XFLB14XEB14XFLB14XFT
B14XNT
CNG
B16SHT
Maximum speed [km/h]Manual transmission1951852052154)235Manual transmission automated200–––––Auto OPEL ASTRA K 2018.5 Manual user Technical data291Performance
5-door HatchbackEngineB10XFLB14XEB14XFLB14XFT
B14XNT
CNG
B16SHT
Maximum speed [km/h]Manual transmission1951852052154)235Manual transmission automated200–––––Auto](/img/37/18785/w960_18785-292.png)
Technical data291Performance
5-door HatchbackEngineB10XFLB14XEB14XFLB14XFT
B14XNT
CNG
B16SHT
Maximum speed [km/h]Manual transmission1951852052154)235Manual transmission automated200–––––Automatic transmission–––210–2354) Value was not available at time of printing.EngineB16DTCB16DTEB16DTUB16DTHB16DTRMaximum speed [km/h]Manual transmission185195200205220Manual transmission automated–––––Automatic transmission–––200–
Page 294 of 317
![OPEL ASTRA K 2018.5 Manual user 292Technical dataSports Tourer
EngineB10XFLB14XEB14XFLB14XFT
B14XNT
CNG
B16SHT
Maximum speed [km/h]Manual transmission1951852052154)235Manual transmission automated200–––––Automatic transmis OPEL ASTRA K 2018.5 Manual user 292Technical dataSports Tourer
EngineB10XFLB14XEB14XFLB14XFT
B14XNT
CNG
B16SHT
Maximum speed [km/h]Manual transmission1951852052154)235Manual transmission automated200–––––Automatic transmis](/img/37/18785/w960_18785-293.png)
292Technical dataSports Tourer
EngineB10XFLB14XEB14XFLB14XFT
B14XNT
CNG
B16SHT
Maximum speed [km/h]Manual transmission1951852052154)235Manual transmission automated200–––––Automatic transmission–––210–2354) Value was not available at time of printing.EngineB16DTCB16DTEB16DTUB16DTHB16DTRMaximum speed [km/h]Manual transmission185195195205220Manual transmission automated–––––Automatic transmission–––200–
Page 295 of 317

Technical data293Vehicle weightKerb weight, basic model without any optional equipment5-door HatchbackEngineManual
transmissionManual transmission
automatedAutomatic
transmissionwithout/with
air conditioning
[kg]B10XFL1263/12731263/1273–B14XE1234/1244––B14XFL1268/1278––B14XFT1268/1278––/1308B14XNT
CNG5)––B16SHT–/1350––/1378B16DTC1335/1345––B16DTE1350/1360––B16DTU1335/1345––B16DTH1350/1360–1354/1364B16DTR1396/1406––5) Value was not available at time of printing.
Optional equipment and accessories increase the kerb weight.
Loading information 3 88.