ECU OPEL ASTRA K 2019.5 Manual user
[x] Cancel search | Manufacturer: OPEL, Model Year: 2019.5, Model line: ASTRA K, Model: OPEL ASTRA K 2019.5Pages: 311, PDF Size: 9.52 MB
Page 231 of 311
Vehicle care229Vehicle checks
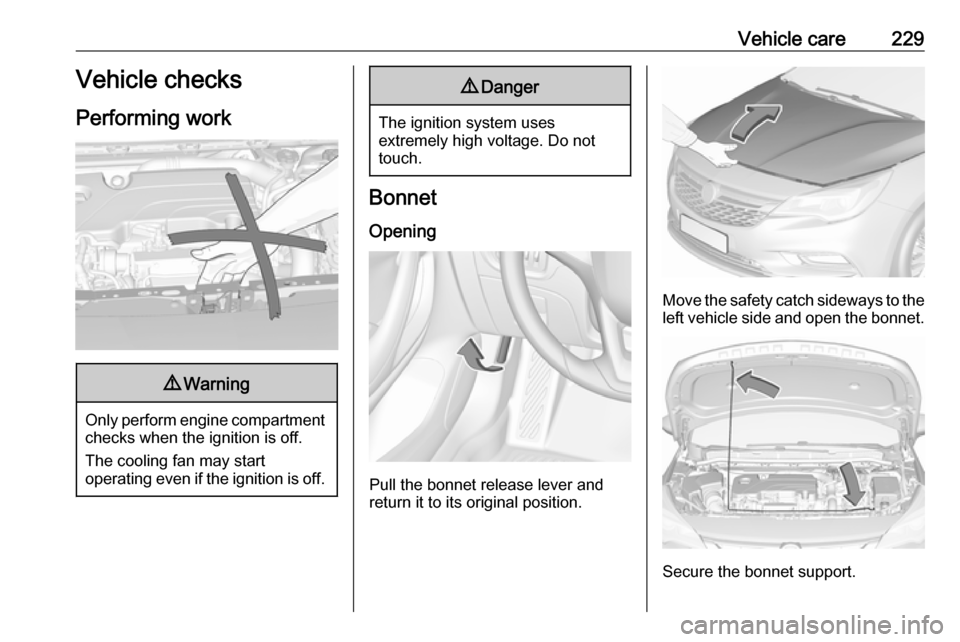
Performing work9 Warning
Only perform engine compartment
checks when the ignition is off.
The cooling fan may start
operating even if the ignition is off.
9 Danger
The ignition system uses
extremely high voltage. Do not
touch.
Bonnet
Opening
Pull the bonnet release lever and
return it to its original position.
Move the safety catch sideways to the left vehicle side and open the bonnet.
Secure the bonnet support.
Page 238 of 311
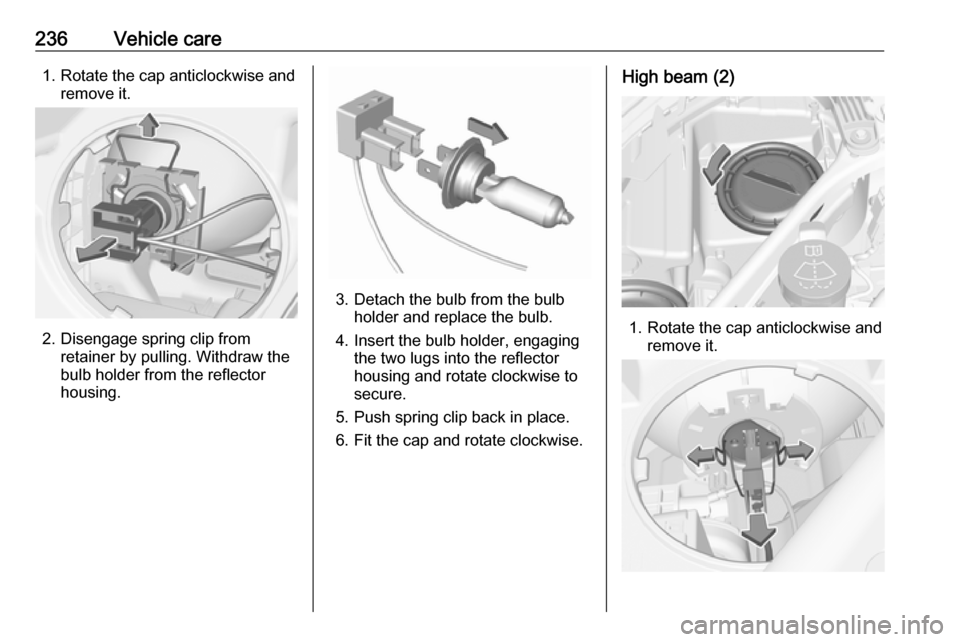
236Vehicle care1. Rotate the cap anticlockwise andremove it.
2. Disengage spring clip fromretainer by pulling. Withdraw the
bulb holder from the reflector
housing.
3. Detach the bulb from the bulb holder and replace the bulb.
4. Insert the bulb holder, engaging the two lugs into the reflector
housing and rotate clockwise to
secure.
5. Push spring clip back in place. 6. Fit the cap and rotate clockwise.
High beam (2)
1. Rotate the cap anticlockwise and remove it.
Page 240 of 311
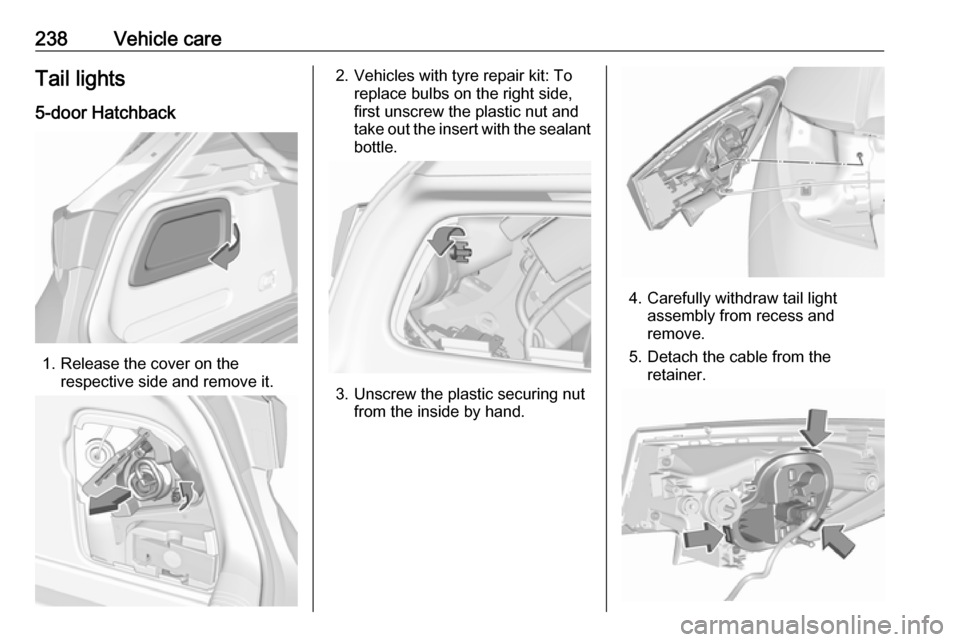
238Vehicle careTail lights5-door Hatchback
1. Release the cover on the respective side and remove it.
2. Vehicles with tyre repair kit: To replace bulbs on the right side,
first unscrew the plastic nut and
take out the insert with the sealant
bottle.
3. Unscrew the plastic securing nut from the inside by hand.
4. Carefully withdraw tail lightassembly from recess and
remove.
5. Detach the cable from the retainer.
Page 241 of 311
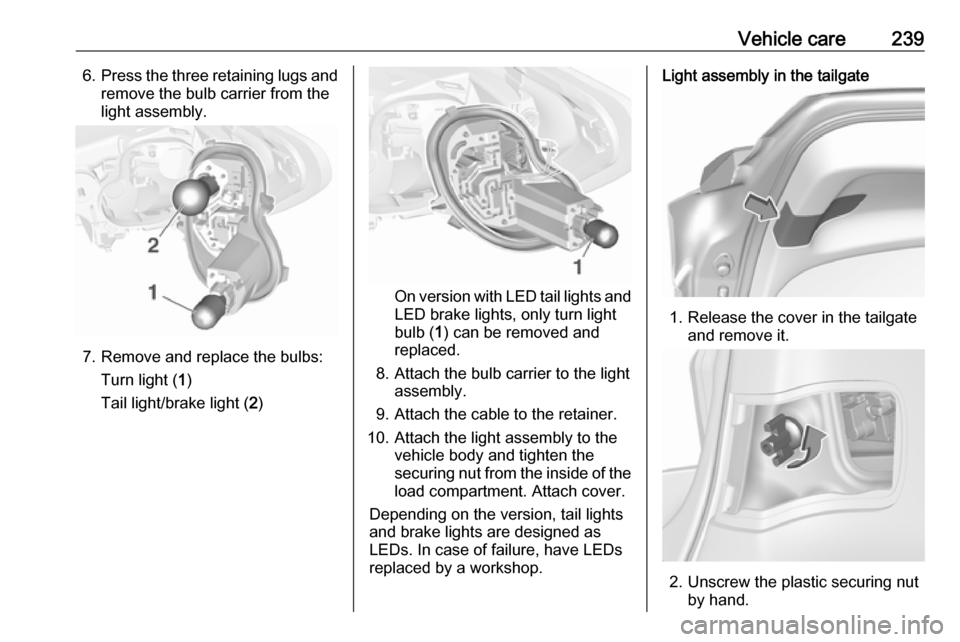
Vehicle care2396.Press the three retaining lugs and
remove the bulb carrier from the
light assembly.
7. Remove and replace the bulbs:
Turn light ( 1)
Tail light/brake light ( 2)
On version with LED tail lights and
LED brake lights, only turn light
bulb ( 1) can be removed and
replaced.
8. Attach the bulb carrier to the light assembly.
9. Attach the cable to the retainer.
10. Attach the light assembly to the vehicle body and tighten the
securing nut from the inside of the load compartment. Attach cover.
Depending on the version, tail lights
and brake lights are designed as
LEDs. In case of failure, have LEDs
replaced by a workshop.
Light assembly in the tailgate
1. Release the cover in the tailgate and remove it.
2. Unscrew the plastic securing nutby hand.
Page 243 of 311
Vehicle care241
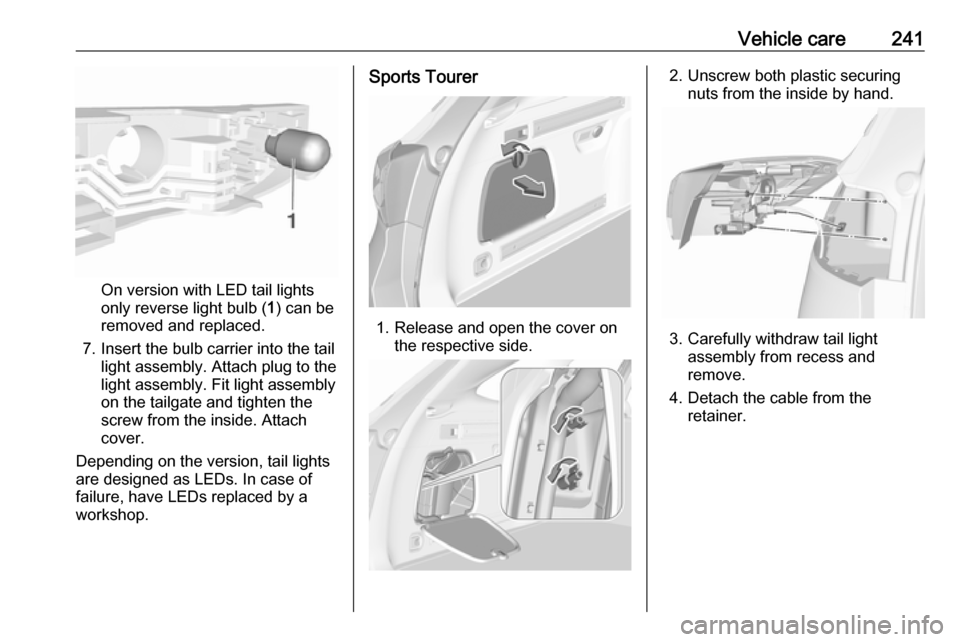
On version with LED tail lights
only reverse light bulb ( 1) can be
removed and replaced.
7. Insert the bulb carrier into the tail light assembly. Attach plug to the
light assembly. Fit light assembly
on the tailgate and tighten the
screw from the inside. Attach
cover.
Depending on the version, tail lights are designed as LEDs. In case of failure, have LEDs replaced by aworkshop.
Sports Tourer
1. Release and open the cover on the respective side.
2. Unscrew both plastic securingnuts from the inside by hand.
3. Carefully withdraw tail light assembly from recess and
remove.
4. Detach the cable from the retainer.
Page 244 of 311
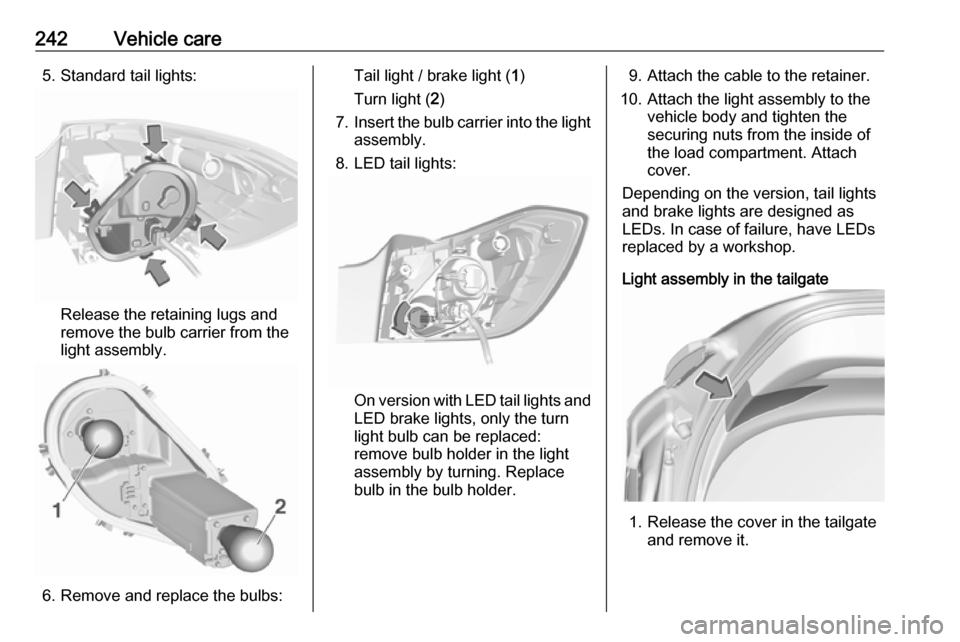
242Vehicle care5. Standard tail lights:
Release the retaining lugs and
remove the bulb carrier from the
light assembly.
6. Remove and replace the bulbs:
Tail light / brake light ( 1)
Turn light ( 2)
7. Insert the bulb carrier into the light
assembly.
8. LED tail lights:
On version with LED tail lights and
LED brake lights, only the turn
light bulb can be replaced:
remove bulb holder in the light
assembly by turning. Replace
bulb in the bulb holder.
9. Attach the cable to the retainer.
10. Attach the light assembly to the vehicle body and tighten the
securing nuts from the inside of
the load compartment. Attach
cover.
Depending on the version, tail lights
and brake lights are designed as
LEDs. In case of failure, have LEDs
replaced by a workshop.
Light assembly in the tailgate
1. Release the cover in the tailgate and remove it.
Page 245 of 311
Vehicle care243
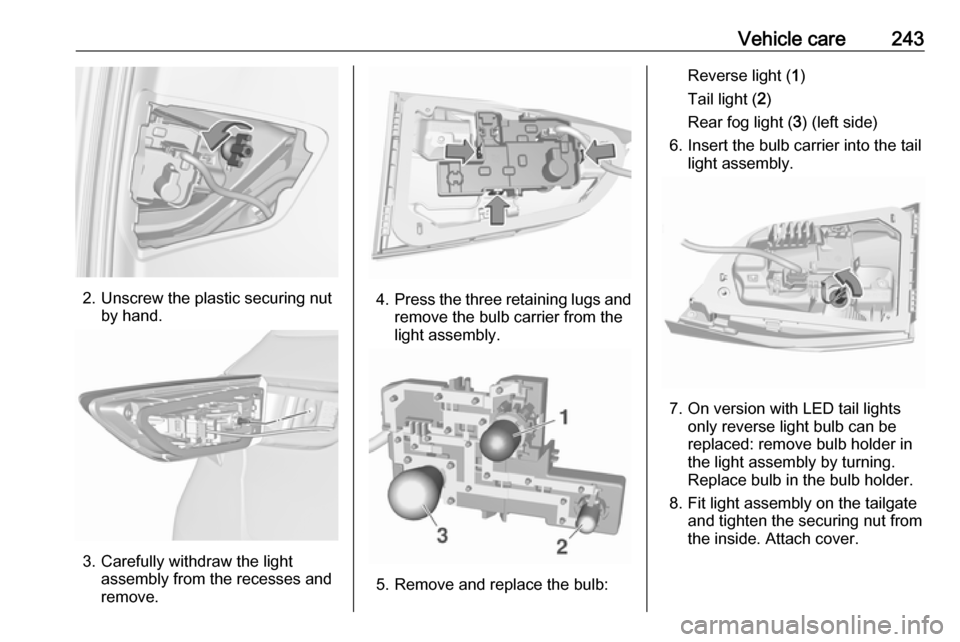
2. Unscrew the plastic securing nutby hand.
3. Carefully withdraw the lightassembly from the recesses and
remove.
4. Press the three retaining lugs and
remove the bulb carrier from the
light assembly.
5. Remove and replace the bulb:
Reverse light ( 1)
Tail light ( 2)
Rear fog light ( 3) (left side)
6. Insert the bulb carrier into the tail light assembly.
7. On version with LED tail lightsonly reverse light bulb can be
replaced: remove bulb holder in
the light assembly by turning.
Replace bulb in the bulb holder.
8. Fit light assembly on the tailgate and tighten the securing nut from
the inside. Attach cover.
Page 252 of 311
250Vehicle careNo.Circuit33Anti-theft alarm system / Power
sounder34Parking assist / Side blind spot
alert / Infotainment system /
USB socket35OnStar36Info Display / Instrument
cluster / CD player37Infotainment system / radio
After having changed defective fuses,
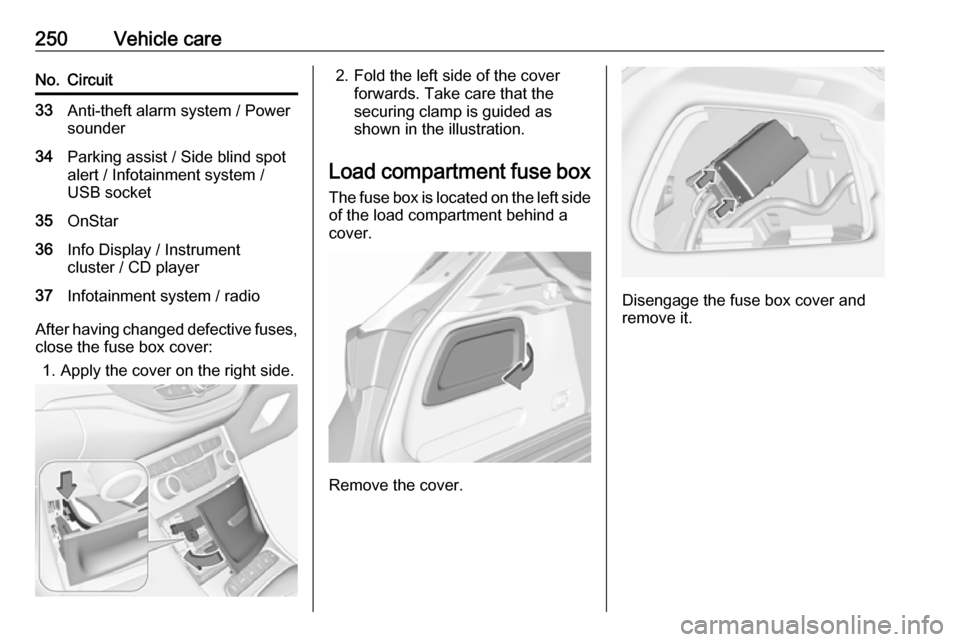
close the fuse box cover:
1. Apply the cover on the right side.
2. Fold the left side of the cover forwards. Take care that thesecuring clamp is guided as
shown in the illustration.
Load compartment fuse box The fuse box is located on the left side
of the load compartment behind a
cover.
Remove the cover.
Disengage the fuse box cover and
remove it.
Page 264 of 311
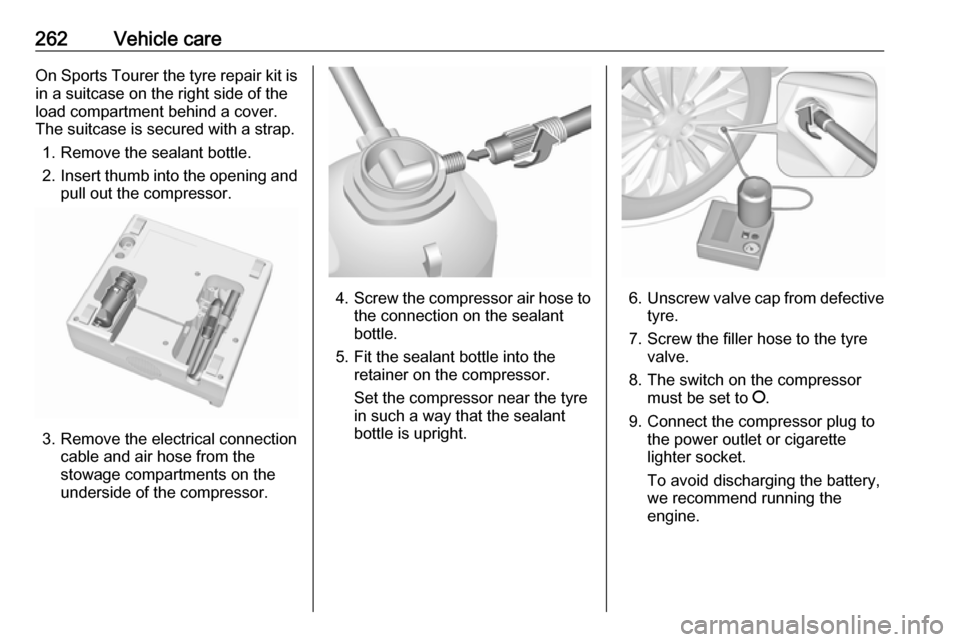
262Vehicle careOn Sports Tourer the tyre repair kit isin a suitcase on the right side of the
load compartment behind a cover.
The suitcase is secured with a strap.
1. Remove the sealant bottle.
2. Insert thumb into the opening and
pull out the compressor.
3. Remove the electrical connection cable and air hose from the
stowage compartments on the
underside of the compressor.
4. Screw the compressor air hose to
the connection on the sealant
bottle.
5. Fit the sealant bottle into the retainer on the compressor.
Set the compressor near the tyre
in such a way that the sealant
bottle is upright.6. Unscrew valve cap from defective
tyre.
7. Screw the filler hose to the tyre valve.
8. The switch on the compressor must be set to J.
9. Connect the compressor plug to the power outlet or cigarette
lighter socket.
To avoid discharging the battery, we recommend running the
engine.
Page 268 of 311
266Vehicle care
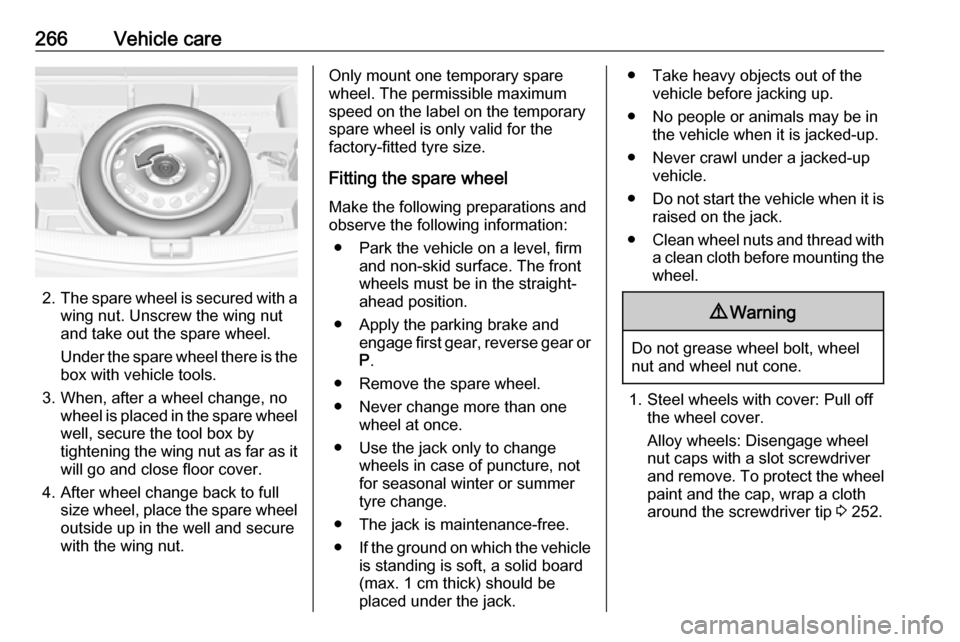
2.The spare wheel is secured with a
wing nut. Unscrew the wing nut
and take out the spare wheel.
Under the spare wheel there is the box with vehicle tools.
3. When, after a wheel change, no wheel is placed in the spare wheel
well, secure the tool box by
tightening the wing nut as far as it will go and close floor cover.
4. After wheel change back to full size wheel, place the spare wheel
outside up in the well and secure
with the wing nut.
Only mount one temporary spare
wheel. The permissible maximum
speed on the label on the temporary
spare wheel is only valid for the
factory-fitted tyre size.
Fitting the spare wheel Make the following preparations and
observe the following information:
● Park the vehicle on a level, firm and non-skid surface. The front
wheels must be in the straight-
ahead position.
● Apply the parking brake and engage first gear, reverse gear or
P .
● Remove the spare wheel.
● Never change more than one wheel at once.
● Use the jack only to change wheels in case of puncture, not
for seasonal winter or summer
tyre change.
● The jack is maintenance-free. ● If the ground on which the vehicle
is standing is soft, a solid board
(max. 1 cm thick) should be
placed under the jack.● Take heavy objects out of the vehicle before jacking up.
● No people or animals may be in the vehicle when it is jacked-up.
● Never crawl under a jacked-up vehicle.
● Do not start the vehicle when it is
raised on the jack.
● Clean wheel nuts and thread with
a clean cloth before mounting the wheel.9 Warning
Do not grease wheel bolt, wheel
nut and wheel nut cone.
1. Steel wheels with cover: Pull off the wheel cover.
Alloy wheels: Disengage wheel
nut caps with a slot screwdriver
and remove. To protect the wheel paint and the cap, wrap a cloth
around the screwdriver tip 3 252.